


工厂+策略模式解决if-else/switch过多问题
一、前提
在平时的开发过程中,你是否遇到过以下问题:
1.sonar扫描代码圈复杂度过高,需要减少if-else分支及switch分支。
2.某个类中/某个方法的代码太多,难以维护。
代码中业务分支过多时,代码可读性会变得很差,大量的代码堆积在一个类中,也会变得难以维护。
遇到这些问题,说明你:该拆分啦!!
使用Spring的工厂管理+策略模式可以很好的解决这个问题。

总体来说设计模式分为三大类:
创建型模式,共五种:工厂方法模式、抽象工厂模式、单例模式、建造者模式、原型模式。
结构型模式,共七种:适配器模式、装饰器模式、代理模式、外观模式、桥接模式、组合模式、享元模式。
行为型模式,共十一种:策略模式、模板方法模式、观察者模式、迭代子模式、责任链模式、命令模式、备忘录模式、状态模式、访问者模式、中介者模式、解释器模式。
二、策略模式的介绍
策略模式作为一种软件设计模式,指对象有某个行为,但是在不同的场景中,该行为有不同的实现算法。比如每个人都要“交个人所得税”,但是“在美国交个人所得税”和“在中国交个人所得税”就有不同的算税方法。
在策略模式(Strategy Pattern)中,一个类的行为或其算法可以在运行时更改。这种类型的设计模式属于行为型模式。
下面使用三个案例进行演示,策略模式和工厂模式的使用。
三、实战应用1(Java–使用工厂+策略模式解决if-else/switch分支过多的问题.)
1.应用场景:通过spring工厂+策略模式减少分支代码
假设我们这有一个非常复杂的类,里面有很多个分支。改造前的代码如下:
package com.ampthon.api.impl;

import org.springframework.stereotype.Service;

@Service
public class FuncApiImpl {

    /**
     * 假设有数十个分支,每个分支的处理方法都有100行,那么这个类就可能有1000行
     * 所有的功能模块都写在一起,这样会造成程序的高耦合,低内聚,可维护性差,代码复杂度高
     *
     * @param type 业务类型
     * @return
     */
    public String funcDeal(String type) {
        String result = "";
        switch (type) {
            case "aaaa":
                result = funcA();
                break;
            case "bbbb":
                result = funcB();
                break;
            case "cccc":
                result = funcC();
                break;
            case "...."://假设有数十个分支,每个分支的处理方法都超过100行
                result = "....";
                break;
            default:
                break;

        }
        return result;
    }

    public String funcA() {
        return "aaaa";
    }

    public String funcB() {
        return "bbbb";
    }

    public String funcC() {
        return "cccc";
    }

}
2.代码改造
主函数代码:
import org.springframework.boot.SpringApplication;
import org.springframework.boot.autoconfigure.SpringBootApplication;
import org.springframework.context.annotation.ComponentScan;

@SpringBootApplication
@ComponentScan("com.ampthon")
public class Application {

    public static void main(String[] args) {
        System.out.println("项目开始启动");
        SpringApplication.run(Application.class);
        System.out.println("项目启动完成");
    }
}
controller代码:
package com.ampthon.controller;

import com.ampthon.api.FuncApi;
import com.ampthon.factory.StrategyFactory;
import org.springframework.beans.factory.annotation.Autowired;
import org.springframework.web.bind.annotation.PostMapping;
import org.springframework.web.bind.annotation.RestController;

@RestController
public class FuncController {

    @Autowired
    private StrategyFactory factory;

    @PostMapping("/getData")
    public String getData(String funcName){
        String result = "";
        try {
            FuncApi api =  factory.getApiByFuncName(funcName);
            result = api.funcDeal();
        } catch (Exception e) {
           e.printStackTrace();
        }
        return result;
    }
}
定义一个抽象接口,计算价格的方法,具体实现由策略子类实现将原有impl类拆分为一个api,多个实现类。
api类代码:
package com.ampthon.api;

public interface FuncApi {

    public String funcDeal();

    public String getFuncName();

}
api实现类代码:
FuncOneApiImpl 实现类1:
package com.ampthon.api.impl;

import com.ampthon.api.FuncApi;
import org.springframework.stereotype.Service;

@Service
public class FuncOneApiImpl implements FuncApi {

    @Override
    public String funcDeal() {
        return "this is funcOne result";
    }

    @Override
    public String getFuncName(){
        return "funcOneApiImpl";
    }

}
FuncTwoApiImpl 实现类2:
package com.ampthon.api.impl;

import com.ampthon.api.FuncApi;
import org.springframework.stereotype.Service;

@Service
public class FuncTwoApiImpl implements FuncApi {

    @Override
    public String funcDeal() {
        return "this is funcTwo result";
    }

    @Override
    public String getFuncName(){
        return "funcTwoApiImpl";
    }

}
FuncThreeApiImpl 实现类3:
package com.ampthon.api.impl;

import com.ampthon.api.FuncApi;
import org.springframework.stereotype.Service;

@Service
public class FuncThreeApiImpl implements FuncApi {

    @Override
    public String funcDeal() {
        return "this is funcThree result";
    }

    @Override
    public String getFuncName(){
        return "funcThreeApiImpl";
    }

}
StrategyFactory 工厂类,此策略工厂用于保存策略。实现InitializingBean接口。
在Spring初始化bean的时候,如果bean实现了InitializingBean接口,会自动调用afterPropertiesSet方法。
package com.ampthon.factory;

import com.ampthon.api.FuncApi;
import org.springframework.beans.factory.InitializingBean;
import org.springframework.beans.factory.annotation.Autowired;
import org.springframework.context.ApplicationContext;
import org.springframework.stereotype.Component;
import java.util.HashMap;
import java.util.Map;

@Component
public class StrategyFactory implements InitializingBean{

    @Autowired
    private ApplicationContext applicationContext;

    //策略map
    public static Map<String,FuncApi> strategyMaps = new HashMap<>();

    //根据功能名称获取对应的实现类进行处理
    public FuncApi getApiByFuncName(String funcName) throws Exception{
        FuncApi api = strategyMaps.get(funcName);
        if(null==api){
            throw new Exception("not matched api");
        }
        return api;
    }

    //启动时将所有处理类加载好由spring进行管理
    @Override
    public void afterPropertiesSet() throws Exception {
        Map<String, FuncApi> beansOfFuncType = applicationContext.getBeansOfType(FuncApi.class);
        for(Map.Entry<String,FuncApi> entry:beansOfFuncType.entrySet()){
            strategyMaps.put(entry.getKey(),entry.getValue());
        }
    }
}
3.启动程序,进行演示:
我们输入funcThreeApiImpl,调用一下第三个处理类进行处理,结果如下:正常。

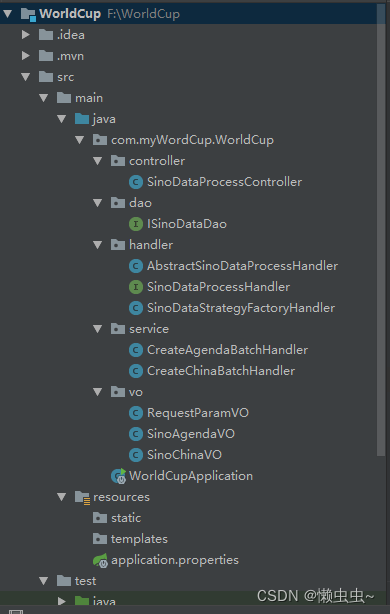
四、实战应用2
采用泛型增强接口参数扩展性,根据不同的type参数,执行不同的业务逻辑。
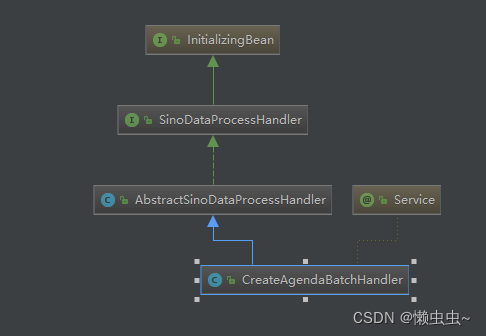
1.三个handler,分别为接口类,抽象模板类和工厂类
public class AbstractSinoDataProcessHandler<T> implements SinoDataProcessHandler<T> {

    @Override
    public void updateSinoData(T t) {

    }

    @Override
    public void afterPropertiesSet() throws Exception {

    }
}
public interface SinoDataProcessHandler<T>  extends InitializingBean {
    void updateSinoData(T t);
}
public class SinoDataStrategyFactoryHandler {
    private static Map<String,SinoDataProcessHandler> map = new HashMap<>();

    public static void register(String key,SinoDataProcessHandler sinoDataProcessHandler){
        if(StringUtils.isEmpty(key) && null == sinoDataProcessHandler){
            return;
        }
        map.put(key,sinoDataProcessHandler);
    }

    public static SinoDataProcessHandler getInvokeHandler(String key){
        return map.get(key);
    }
}
2.业务方法1
@Service
public class CreateAgendaBatchHandler extends AbstractSinoDataProcessHandler<List<SinoAgendaVO>> {
    @Autowired
    private ISinoDataDao iSinoDataDao;

    @Override
    public void updateSinoData(List<SinoAgendaVO> list) {
        iSinoDataDao.createAgendaBatch(list);
    }

    @Override
    public void afterPropertiesSet() throws Exception {
        SinoDataStrategyFactoryHandler.register("agenda",this);
    }
}
3.业务方法2
@Service
public class CreateChinaBatchHandler  extends AbstractSinoDataProcessHandler<List<SinoChinaVO>> {
    @Autowired
    private ISinoDataDao iSinoDataDao;

    @Override
    public void updateSinoData(List<SinoChinaVO> list) {
        iSinoDataDao.createChinaBatch(list);
    }

    @Override
    public void afterPropertiesSet() throws Exception {
        SinoDataStrategyFactoryHandler.register("china",this);
    }
}
4.实体类
@Data
@NoArgsConstructor //生成无参构造函数
@AllArgsConstructor //生成全参数构造函数
public class RequestParamVO {
    List data;
    String type;
}
@Data
public class SinoAgendaVO {
    private Integer id;
    private String name;
}
@Data
public class SinoChinaVO {
    private Integer id;
    private String name;
    private String title;
}
5.控制层和dao层
@Controller
@RequestMapping("/sinoDataProcessController")
public class SinoDataProcessController {

    @RequestMapping("/getUserInfo}")
    public void updateSinoData(RequestParamVO requestParamVO){
        String type = requestParamVO.getType();
        List data = requestParamVO.getData();
        SinoDataProcessHandler sinoDataProcessHandler = SinoDataStrategyFactoryHandler.getInvokeHandler(type);
        sinoDataProcessHandler.updateSinoData(data);
    }
}
public interface ISinoDataDao {
    void createAgendaBatch(List<SinoAgendaVO> list);
    void createChinaBatch(List<SinoChinaVO> list);
}
整体代码结构
引用关系
五、实战应用3
将业务接口抽象,例如根据不同第三方供应商来进行不同的O2O订单服务。比如达达、蜂鸟、饿了么等O2O订单服务。
1.订单服务策略接口
public interface O2oOrderStrategyService {

    /**
     * 创建O2O订单
     *
     * @param o2oOrderReq
     * @return
     */
    O2oOrderResp createOrder(O2oOrderReq o2oOrderReq);

    /**
     * 预发布模式创建O2O订单
     *
     * @param o2oOrderReq
     * @return
     */
    O2oPreOrderResp preCreateOrder(O2oOrderReq o2oOrderReq);
}
2.订单服务策略工厂
public class O2oOrderStrategyFactory {
    private static final Map<Byte, O2oOrderStrategyService> strategies = new HashMap<>();

    public static O2oOrderStrategyService getO2oOrderStrategy(Byte o2oSpType) {
        return strategies.get(o2oSpType);
    }

    public static void register(Byte o2oSpType, O2oOrderStrategyService o2oOrderStrategyService) {
        strategies.put(o2oSpType, o2oOrderStrategyService);
    }
}
3.蜂鸟O2O服务实现类
public class EleO2oOrderStrategyServiceImpl implements O2oOrderStrategyService, InitializingBean {

    /**
     * 创建O2O订单
     *
     * @param o2oOrderReq
     * @return
     */
    @Override
    public O2oOrderResp createOrder(O2oOrderReq o2oOrderReq) {
        O2oOrderResp o2oOrderResp = new O2oOrderResp();
        OrderService orderService = getConfigAndToken();

        CreateOrderReq createOrderReq = new CreateOrderReq();
        PreCreateOrderReq preCreateOrderReq = getReq(o2oOrderReq);
        BeanUtils.copyProperties(preCreateOrderReq,createOrderReq);
        createOrderReq.setOrderType(O2oOrderTypeEnum.CREATE.getValue());
        createOrderReq.setReceiverName(o2oOrderReq.getReceiverName());
        createOrderReq.setReceiverPrimaryPhone(o2oOrderReq.getReceiverPhone());
        log.info("createOrder Req:{}", JSON.toJSONString(createOrderReq));

        try {
            CreateOrderRes order = orderService.createOrder(createOrderReq);
            if (order != null) {
                o2oOrderResp.setOutOrderId(order.getOrderId());
            }
            log.info("createOrder resp:{}", JSON.toJSONString(order));
        } catch (ServiceException e) {
            log.error("createOrder error", e);
        }

        return o2oOrderResp;
    }
  /**
     * 预发布模式创建O2O订单
     *
     * @param o2oOrderReq
     * @return
     */
    @Override
    public O2oPreOrderResp preCreateOrder(O2oOrderReq o2oOrderReq) {
        O2oOrderResp o2oOrderResp = new O2oOrderResp();
        OrderService orderService = getConfigAndToken();

        PreCreateOrderReq preCreateOrderReq = getReq(o2oOrderReq);
        preCreateOrderReq.setOrderType(O2oOrderTypeEnum.PRECREATE.getValue());
        log.info("preCreateOrderReq:{}", JSON.toJSONString(preCreateOrderReq));

        try {
            PreCreateOrderRes preCreateOrderRes = orderService.preCreateOrder(preCreateOrderReq);
            log.info("preCreateOrderRes:{}", JSON.toJSONString(preCreateOrderRes));
            if (preCreateOrderRes != null) {
                o2oOrderResp.setDistance(Double.valueOf(preCreateOrderRes.getDistance()));
                List<GoodsInfo> goodsInfoList = preCreateOrderRes.getList();
                if(CollectionUtils.isNotEmpty(goodsInfoList)){
                    Long totalDeliveryAmountCent = goodsInfoList.stream().mapToLong(GoodsInfo::getTotalDeliveryAmountCent).sum();
                    Long actualDeliveryAmountCent = goodsInfoList.stream().mapToLong(GoodsInfo::getActualDeliveryAmountCent).sum();
                    String totalDeliveryAmountYuan = AmountConversionUtil.fenToYuan(String.valueOf(totalDeliveryAmountCent));
                    String actualDeliveryAmountYuan = AmountConversionUtil.fenToYuan(String.valueOf(actualDeliveryAmountCent));
                    o2oOrderResp.setDeliverFee(Double.valueOf(totalDeliveryAmountYuan));
                    o2oOrderResp.setFee(Double.valueOf(actualDeliveryAmountYuan));
                }
            }
        } catch (ServiceException e) {
            log.info("ServiceException,e:{}", e);
        }

        O2oPreOrderResp o2oPreOrderResp = new O2oPreOrderResp();
        BeanUtils.copyProperties(o2oOrderResp,o2oPreOrderResp);
        return o2oPreOrderResp;
    }

    @Override
    public void afterPropertiesSet() {
        O2oOrderStrategyFactory.register(O2oSpTypeEnum.ELE_ME.getValue(), this);
    }
}
4.达达O2O订单服务实现类
public class DadaO2oOrderStrategyServiceImpl implements O2oOrderStrategyService, InitializingBean {
    /**
     * 创建O2O订单
     *
     * @param o2oOrderReq
     * @return
     */
    @Override
    public O2oOrderResp createOrder(O2oOrderReq o2oOrderReq) {
        O2oOrderResp o2oOrderResp;
        String cityName = o2oOrderReq.getCityName();
        CityInfoVo cityInfo = cityCodeService.getCityCode(cityName);
        String cityCode = cityInfo.getCityCode();
        DadaAddOrderReq addOrderReq = DadaAddOrderReq.builder().callback(o2oOrderReq.getCallback())
                .shopNo(o2oOrderReq.getStoreId())
                .originId(o2oOrderReq.getOrderNo())
                .cargoPrice(Double.valueOf(o2oOrderReq.getOrderAmount()))
                .cargoWeight(o2oOrderReq.getCargoWeight())
                .cityCode(cityCode)
                .isPrepay(o2oOrderReq.getIsPrepay())
                .receiverAddress(o2oOrderReq.getReceiverAddress())
                .receiverPhone(o2oOrderReq.getReceiverPhone())
                .receiverLat(o2oOrderReq.getReceiverLat())
                .receiverLng(o2oOrderReq.getReceiverLng())
                .receiverName(o2oOrderReq.getReceiverName())
                .tips(o2oOrderReq.getTips())
                .build();

        if(CollectionUtils.isNotEmpty(o2oOrderReq.getGoods())){
            List<DadaProductListDTO> productLists = o2oOrderReq.getGoods().stream().map(i -> {
                DadaProductListDTO productList = new DadaProductListDTO();
                DadaProductListDTO.builder().count(Double.valueOf(i.getItemQuantity()))
                        .skuName(i.getItemName())
                        .srcProductNo(i.getItemId())
                        .unit(i.getUnit());
                return productList;
            }).collect(Collectors.toList());
            DadaAddOrderReq.builder().productList(productLists).build();
        }

        Integer o2oOrderType = o2oOrderReq.getO2oOrderType();
        if(O2oOrderTypeEnum.CREATE.getValue() == o2oOrderType){
            o2oOrderResp = getO2oOrderResp(DadaApiConstant.ORDER_ADD_URL, addOrderReq);
        }else{
            o2oOrderResp = getO2oOrderResp(DadaApiConstant.QUERY_DELIVER_FEE, addOrderReq);
        }
        return o2oOrderResp;
    }

    /**
     * 预发布模式创建O2O订单
     *
     * @param o2oOrderReq
     * @return
     */
    @Override
    public O2oPreOrderResp preCreateOrder(O2oOrderReq o2oOrderReq) {
        PreCreateOrderReq preCreateOrderReq = new PreCreateOrderReq();
        preCreateOrderReq.setDeliveryNo(o2oOrderReq.getOutOrderId());
        O2oOrderResp o2oOrderResp = getO2oOrderResp(DadaApiConstant.ADD_AFTER_QUERY, preCreateOrderReq);
        O2oPreOrderResp o2oPreOrderResp = new O2oPreOrderResp();
        BeanUtils.copyProperties(o2oOrderResp,o2oPreOrderResp);
        return o2oPreOrderResp;
    }

    @Override
    public void afterPropertiesSet() {
        O2oOrderStrategyFactory.register(O2oSpTypeEnum.DADA.getValue(), this);
    }
}
5.控制层
public class O2oOrderController implements IO2oOrderController {

    final O2oOrderService o2oOrderService;

    /**
     * 创建O2O订单
     *
     * @param o2oOrderReq
     * @return
     */
    @Override
    public SHResponse<O2oOrderResp> createOrder(O2oOrderReq o2oOrderReq) {
        return ResponseUtils.success(o2oOrderService.createOrder(o2oOrderReq));
    }

    /**
     * 预发布模式创建O2O订单
     *
     * @param o2oOrderReq
     * @return
     */
    @Override
    public SHResponse<O2oPreOrderResp> preCreateOrder(O2oOrderReq o2oOrderReq) {
        return ResponseUtils.success(o2oOrderService.preCreateOrder(o2oOrderReq));
    }
}
6.对外统一暴露的接口层
/**
 * 对外提供统一的O2O订单接口
 */
public interface IO2oOrderController {

    /**
     * 创建O2O订单
     *
     * @param o2oOrderReq
     * @return
     */
    @PostMapping("/o2o/createOrder")
    SHResponse<O2oOrderResp> createOrder(@RequestBody O2oOrderReq o2oOrderReq);

    /**
     * 预发布模式创建O2O订单
     *
     * @param o2oOrderReq
     * @return
     */
    @PostMapping("/o2o/preCreateOrder")
    SHResponse<O2oPreOrderResp> preCreateOrder(@RequestBody O2oOrderReq o2oOrderReq);
}
六、总结
通过工厂模式,将一个功能的多个实现类预装载到Spring服务中,通过某个字段去判断调用那个实现类来进行处理,从而将大量的if-else或switch分支替换掉,可以有效的提高代码的可复用性以及降低复杂度。同时使代码更加简洁。


 954
954


 被折叠的 条评论
为什么被折叠?
被折叠的 条评论
为什么被折叠?
 到【灌水乐园】发言


