


传统的开发模式是将所有的东西都丢到APP模块里面,项目越做越大,适合组件化开发。
组件化分三层:
1. 业务逻辑层
2. 公共层(第三方库,框架)
3. 系统层
组件化开发的优势:
1.编译速度
每一个模块都是Application,只需要单独编译我的这个模块,别的模块不需要编译,节省时间
2.超级解耦
每个模块都是没有关联的,拆分成各个模块.模块之间是彼此之间是不关联的,彼此之间是没有任何耦合的
3.功能重用
不需要再copy过来,直接单独依赖这一模块就行
4.便于团队开发
节省沟通成本
组件化开发需要注意的点:
1.要注意包名和资源文件命名冲突问题
2.Gradle中的版本号的统一管理
3.组件在Application和Library之间可以随意的切换
4.AndroidManifest.xml的区分,Application和Library的AndroidManifest的内容是不一样的
app里面分为application类型插件和library类型插件。application插件生成apk包,library插件生成arr包
apply plugin: 'com.android.application'
apply plugin: 'com.android.library'
1.统一管理Gradle中的版本号,定义在gradle.properties文件里面,这个里面都是字符串类中
MIN_SDK_VERSION=18
TAR_SDK_VERSION=30
COMPILER_SDK_VERSION=30
BUILD_TOOL_VERSION=30.0.3
VERSION_CODE=1
VERSION_NAME=1.0
IS_APPLICATION=false
build.gradle中去使用,注意字符串类型转成Int类型
android {
    compileSdkVersion COMPILER_SDK_VERSION.toInteger()
    buildToolsVersion BUILD_TOOL_VERSION

    defaultConfig {
        applicationId "com.example.arouterdemo"
        minSdkVersion MIN_SDK_VERSION.toInteger()
        targetSdkVersion TAR_SDK_VERSION.toInteger()
        versionCode VERSION_CODE.toInteger()
        versionName VERSION_NAME

        testInstrumentationRunner "androidx.test.runner.AndroidJUnitRunner"
    }

    buildTypes {
        release {
            minifyEnabled false
            proguardFiles getDefaultProguardFile('proguard-android-optimize.txt'), 'proguard-rules.pro'
        }
    }
}
2.组件在Application和Library之间可以随意的切换
if (IS_APPLICATION.toBoolean()) {
    apply plugin: 'com.android.application'
} else {
    apply plugin: 'com.android.library'
}
直接通过一个全局变量IS_APPLICATION来进行随意的切换
3.AndroidManifest.xml的区分
Application和Library的AndroidManifest的内容是不一样的,需要生成一个manifest的文件夹再生成一个AndroidManifest.xml
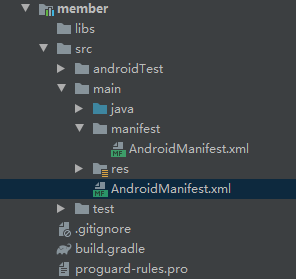
Application的AndroidManifest.xml
<?xml version="1.0" encoding="utf-8"?>
<manifest xmlns:android="http://schemas.android.com/apk/res/android"
    package="com.example.member">

    <application
        android:allowBackup="true"
        android:icon="@mipmap/ic_launcher"
        android:label="@string/app_name"
        android:roundIcon="@mipmap/ic_launcher_round"
        android:supportsRtl="true"
        android:theme="@style/AppTheme">
        <activity android:name=".MemberActivity">
            <intent-filter>
                <action android:name="android.intent.action.MAIN" />

                <category android:name="android.intent.category.LAUNCHER" />
            </intent-filter>
        </activity>
    </application>

</manifest>
Library的AndroidManifest.xml
<?xml version="1.0" encoding="utf-8"?>
<manifest xmlns:android="http://schemas.android.com/apk/res/android"
    package="com.example.member">

    <application>
        <activity android:name=".MemberActivity">

        </activity>
    </application>

</manifest>
根据Application和Library来加载不同目录下的AndroidManifest.xml文件
   sourceSets {
        main {
            if (IS_APPLICATION.toBoolean()) {
                manifest.srcFile'src/main/AndroidManifest.xml'
            }else{
                manifest.srcFile'src/main/manifest/AndroidManifest.xml'
            }
        }
    }
只有Application才有applicationId ,Library是没有的
    defaultConfig {
        if (IS_APPLICATION.toBoolean()) {
            applicationId "com.example.member"
        }
        minSdkVersion MIN_SDK_VERSION.toInteger()
        targetSdkVersion TAR_SDK_VERSION.toInteger()
        versionCode VERSION_CODE.toInteger()
        versionName VERSION_NAME

        testInstrumentationRunner "androidx.test.runner.AndroidJUnitRunner"
    }
APP模块依赖其他的Library不能依赖Application
dependencies {
    implementation fileTree(dir: "libs", include: ["*.jar"])
    implementation 'androidx.appcompat:appcompat:1.2.0'
    implementation 'androidx.constraintlayout:constraintlayout:2.0.4'
    testImplementation 'junit:junit:4.12'
    androidTestImplementation 'androidx.test.ext:junit:1.1.2'
    androidTestImplementation 'androidx.test.espresso:espresso-core:3.3.0'
    if (!IS_APPLICATION.toBoolean()) {
        implementation project(path: ':login')
        implementation project(path: ':member')
    }
}
login模块和member模块之间是没有任何的关联,组件化的优势是各个业务模块是完全解耦,没有关联,各个模块页面之间的跳转会比较困难.
组件化需要解决的问题-页面跳转
组件之间禁止相互依赖,如何在不同的组件之间进行页面跳转?
使用路由框架去解决页面跳转的问题
路由框架的原理:一系列特定url和特定Activity之间的的隐射集合
路由表里面的数据结构就是key和value的Map集合
应用启动的时候往路由表里面进行注册key和value。路由表是在内存里面,堆内存是共享的,都可以获取堆内存里面的数据。
首先创建一个中间人模块arouter
所有的业务模块(app、 login、 member)都依赖这个模块arouter
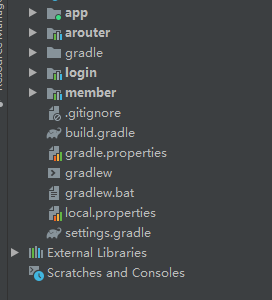
implementation project(path: ':arouter')思路:在arouter里面把整个应用的类对象都缓存在这个容器里面
产生一个单例Router,保证路由表的唯一
public class ARouter {
    private static final ARouter aRouter = new ARouter();

    //装载了所有Activity的类对象
    private Map<String, Class<? extends Activity>> maps;

    private Context context;

    public static ARouter getInstance() {
        return aRouter;
    }

    private ARouter() {
        maps = new HashMap<>();
    }

    public void init(Context context) {
        this.context = context;
    }

    public void jumpActiviy(String key, Bundle bundle) {
        Class<? extends Activity> aClass = maps.get(key);
        if (aClass != null) {
            Intent intent = new Intent();
            intent.setClass(context, aClass);
            if (bundle != null) {
                intent.putExtras(bundle);
            }
            context.startActivity(intent);
        }

    }


}
在login模块跳转member模块
public class LoginActivity extends AppCompatActivity {
    @Override
    protected void onCreate(Bundle savedInstanceState) {
        super.onCreate(savedInstanceState);
        setContentView(R.layout.activity_main);
        jumpActivity();
    }

    public void jumpActivity() {
        ARouter.getInstance().jumpActiviy("member",null);
    }
}
那么怎么样将每个模块的Activity对象加入到map里面去?
来个接口,每个模块实现这个接口
public interface IRouter {
    void putActivity();
}
实现这个接口:
class ActivityUtils implements IRouter {
    @Override
    public void putActivity() {
        ARouter.getInstance().addActivity("login/login",LoginActivity.class);
    }
}
增加addActivity()方法往map里面增加Activity
public class ARouter {
    private static final ARouter aRouter = new ARouter();

    //装载了所有Activity的类对象
    private Map<String, Class<? extends Activity>> maps;

    private Context context;

    public static ARouter getInstance() {
        return aRouter;
    }

    private ARouter() {
        maps = new HashMap<>();
    }

    public void init(Context context) {
        this.context = context;
    }

   public void addActivity(String key, Class<? extends Activity> clazz) {
        if (key != null && clazz != null && !maps.containsKey(key)) {
            maps.put(key, clazz);
        }

    }

    public void jumpActiviy(String key, Bundle bundle) {
        Class<? extends Activity> aClass = maps.get(key);
        if (aClass != null) {
            Intent intent = new Intent();
            intent.setClass(context, aClass);
            if (bundle != null) {
                intent.putExtras(bundle);
            }
            context.startActivity(intent);
        }

    }


}
这样实现了,但是这样是比较麻烦的,假设有很多模块,每个模块都要写这个代码
class ActivityUtils implements IRouter {
    @Override
    public void putActivity() {
        ARouter.getInstance().addActivity("login/login",LoginActivity.class);
    }
}
使用编译时技术可以帮我们生成这个代码:使用注解和注解处理器来帮我们完成
注解和注解处理器都属于Java Library
![]()
所有的模块依赖注解和注解处理器
依赖方式
 implementation project(path: ':annotation')
 annotationProcessor project(path: ':annotation_compile')
定一个注解
@Target(ElementType.TYPE)//声明注解的作用域,就是放在什么上面
@Retention(RetentionPolicy.CLASS)//声明注解的生命周期,编译器
public @interface BindPath {
    String value();
}
使用
@BindPath("login/login")
public class LoginActivity extends AppCompatActivity {
    @Override
    protected void onCreate(Bundle savedInstanceState) {
        super.onCreate(savedInstanceState);
        setContentView(R.layout.activity_main);
        jumpActivity();
    }

    public void jumpActivity() {
        ARouter.getInstance().jumpActiviy("member",null);
    }
}
注解处理器依赖的库
    compileOnly 'com.google.auto.service:auto-service:1.0-rc4'
    annotationProcessor 'com.google.auto.service:auto-service:1.0-rc4'
    implementation project(path: ':annotation')
不想去写工具类,让系统自动生成工具类,那么生成注解处理器帮我们去自动生成
anntation包实现下面的方法
@Target(ElementType.TYPE)//声明注解的作用域,就是放在什么上面
@Retention(RetentionPolicy.CLASS)//声明注解的生命周期,编译器
public @interface BindPath {
    String value();
}
anntation_compile包实现下面的方法
@AutoService(Process.class) //注册注解处理器
class AnnotationCompiler extends AbstractProcessor {
    //生成文件的对象
    Filer filer;

    @Override
    public synchronized void init(ProcessingEnvironment processingEnvironment) {
        super.init(processingEnvironment);
        filer = processingEnvironment.getFiler();
    }

    /**
     * 声明支持的Java版本
     * @return
     */
    @Override
    public SourceVersion getSupportedSourceVersion() {
        return processingEnv.getSourceVersion();
    }

    /**
     * 声明注解处理器处理的注解
     * @return
     */
    @Override
    public Set<String> getSupportedAnnotationTypes() {
        Set<String> types = new HashSet<>();
        types.add(BindPath.class.getCanonicalName());
        return types;
    }

    @Override
    public boolean process(Set<? extends TypeElement> set, RoundEnvironment roundEnvironment) {
        //获取到当前模块用到的BindPath的节点
        //TypeElement类节点
        //ExecutableElement 方法节点
        //VariableElement 成员变量节点
        Set<? extends Element> elementsAnnotatedWith = roundEnvironment.getElementsAnnotatedWith(BindPath.class);
        Map<String,String> map =new HashMap<>();
        for (Element element:elementsAnnotatedWith){
            TypeElement typeElement = (TypeElement) element;
            //获取Activity上面的BindPath注解
            BindPath annotation = typeElement.getAnnotation(BindPath.class);
            String key = annotation.value();
            //获取包名加类名
            Name qualifiedName = typeElement.getQualifiedName();
            map.put(key,qualifiedName+".class");
        }

        if(map.size()>0){
            Writer writer = null;
            //生成文件的类名
            String activityName = "ActivityUtils"+System.currentTimeMillis();
            //生成一个文件
            try {
                JavaFileObject sourceFile = filer.createSourceFile("com.example.utils." + activityName);
                writer = sourceFile.openWriter();
                StringBuilder stringBuilder = new StringBuilder();
                stringBuilder.append("package com.example.utils;\n");
                stringBuilder.append("import com.example.arouter.ARouter;\n" +
                        "import com.example.arouter.IRouter;\n" +
                        "\n" +
                        "class ActivityUtils implements IRouter {\n" +
                        "    @Override\n" +
                        "    public void putActivity() {\n");

                Iterator<String> iterator = map.keySet().iterator();
                while (iterator.hasNext()){
                    String key = iterator.next();
                    String className = map.get(key);
                    //需要自己改下
                    stringBuilder.append("ARouter.getInstance().addActivity(\"login/login\",LoginActivity.class);\n");
                    stringBuilder.append("    }\n" +
                            "}");
                }
            } catch (Exception e) {
                e.printStackTrace();
            }finally {
                if(writer!=null){
                    try {
                        writer.close();
                    } catch (IOException e) {
                        e.printStackTrace();
                    }
                }
            }
        }
        return false;
    }
}


 1009
1009


 被折叠的 条评论
为什么被折叠?
被折叠的 条评论
为什么被折叠?
 到【灌水乐园】发言


