


一.IOC与DI
1. 传统的开发方式区别
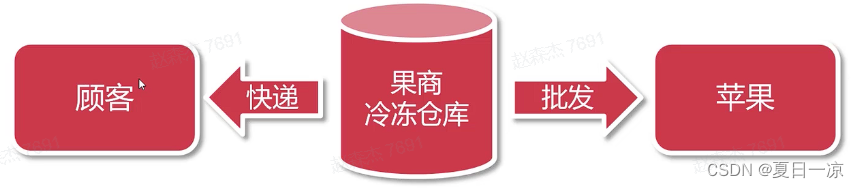
对象直接引用导致对象硬性关联,程序难以扩展维护

loC容器是Spring生态的地基,用于统─创建与管理对象依赖
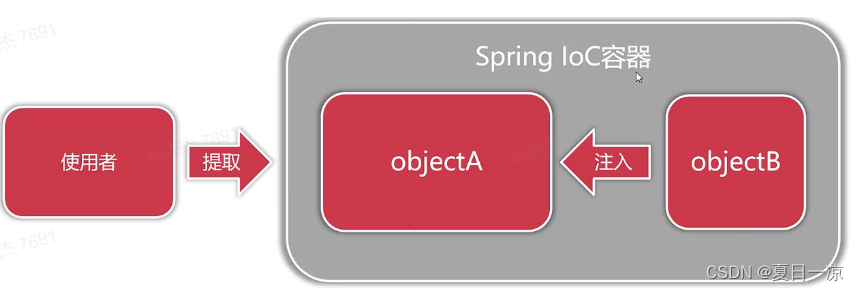
2. Spring IOC 控制反转
loC控制反转,全称Inverse of Control,是一种设计理念
由代理人来创建与管理对象,消费者通过代理人来获取对象
loC的目的是降低对象之间直接耦合
加入loC容器将对象统一管理,让对象关联变为弱耦合
Spring loC容器职责
对象的控制权交由第三方统一管理(loC控制反转)
利用Java反射技术实现运行时对象创建与关联(DI依赖注入)
基于配置提高应用程序的可维护性与扩展性
IOC初步体验
加载spring
<repositories>
    <repository>
        <id>aliyun</id>
        <name>aliyun</name>
        <url>https: //maven.aliyun.com/ repository/public</url>
    </repository>
</repositories>
<dependencies>
    <dependency>
        <groupId>org.springframework</groupId>
        <artifactId>spring-context</artifactId>
        <version>5.2.6.RELEASE</version>
    </dependency>
</dependencies>
引入spring
<?xml version="1.0" encoding="UTF-8"?>
<beans xmlns="http://www.springframework.org/schema/beans"
        xmlns:xsi="http://www.w3.org/2001/XMLSchema-instance"
        xsi:schemaLocation="http://www.springframework.org/schema/beans
        https://www.springframework.org/schema/beans/spring-beans.xsd">
    <bean id="sweetApple" class="com.imooc.spring.ioc.entity.Apple">
        <property name="title" value="红富士" ></property>
        <property name="origin" value="欧洲" ></property>
        <property name="color" value="红色" ></property>
    </bean>
<beans>
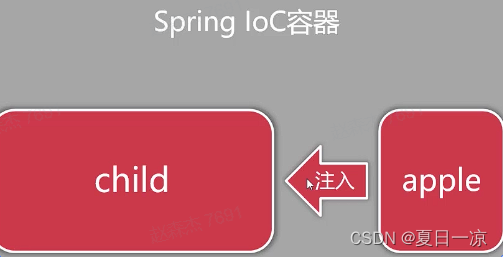
实例:
public class Apple {
    private String title;
    private String color;
    private String origin;
    ...
    }

public class Child {
    private String name;
    private Apple apple;
    ...
    public void eat(){
    System.out.println(name + "吃到了" + apple.getOrigin() + "种植物" + apple.getTitle());
}
传统方式:
Apple apple1 = new Apple("红富士","红色","欧洲");
Apple apple2 = new Apple("青苹果","绿色","中亚");
Apple apple3 = new Apple("金帅","黄色","中国");
Child lily = new Child("莉莉",apple1);
Child andy = new Child("安迪",apple2);
Child luna = new Child("露娜",apple3);
lily.eat();
andy.eat();
luna.eat();
引入spring后:
<?xml version="1.0" encoding="UTF-8"?>
<beans xmlns="http://www.springframework.org/schema/beans"xmlns:xsi="http://www.w3.org/2001/XMLSchema-instance"xsi:schemaLocation="http://www.springframework.org/schema/beans
        https://www.springframework.org/schema/beans/spring-beans.xsd">
<bean id="sweetApple" class="com.imooc.spring.ioc.entity.Apple">
        <!--在Ioc容器启动时,自动由Spring实例化Apple对象,取名sweetApple放入到容器中-->
    <property name="title" value="红富士" ></property>
    <property name="origin" value="欧洲" ></property>
    <property name="color" value="红色" ></property>
</bean>
<bean id="sourApple" class="com.imooc.spring.ioc.entity.Apple">
    <property name="title" value="青苹果" ></property>
    <property name="origin" value="绿色" ></property>
    <property name="color" value="中亚" ></property>
</bean>
<bean id="softApple" class="com.imooc.spring.ioc.entity.Apple">
    <property name="title" value="金帅" ></property>
    <property name="origin" value="中国" ></property>
    <property name="color" value="黄色" ></property>
</bean>

<bean id="lily" class="com.imooc.spring.ioc.entity.Child">
    <property name="name" value="莉莉"/>
    <property name="apple" ref="softApple"/>
</bean>
<bean id="andy" class="com.imooc.spring.ioc.entity.Child">
    <property name="name" value="安迪"/>
    <property name="apple" ref="sourApple"/>
</bean>
<bean id="luna" class="com.imooc.spring.ioc.entity.Child">
    <property name="name" value="露娜"/>
    <property name="apple" ref="sweetApple"/>
</bean>

<beans>
public static void main(String[] args) {
//创建spring Ioc容器,并根据配置文件在容器中实例化对象
    ApplicationContext context = new ClassPathXmlApplicationContext("classpath:applicationContext.xml");
    Apple sweetApple = context.getBean("sweetApple",Apple.class);
    System.out.println(sweetApple.getTitle());
    //从IoC容器中提取beanId-lily的对象
    Child lily = context.getBean("lily",Child.class);
    lily.eat();
    Child andy = context.getBean("andy",Child.class);
    andy.eat();
    Child luna = context.getBean("luna",Child.class);
    luna.eat();
}
3. DI依赖注入
loC是设计理念,是现代程序设计遵循的标准,是宏观目标
DI(Dependency Injection)是具体技术实现,是微观实现
DI在Java中利用反射技术实现对象注入(lnjection)
二.XML管理对象(Bean)
1.什么是java Bean
事实上就是有默认构造函数,属性私有并通过get与set方法属性设置组成的对象
2.三种配置方式
- 基于XML配置Bean
- 基于注解配置Bean
- 基于Java代码(javaconfig)配置Bean
3.基于XML配置Bean
applicationContext.xml
<bean id="sweetApple" class="com.imooc.spring.ioc.entity.Apple">
    <property name="title" value="红富士" ></property>
    <property name="origin" value="欧洲" ></property>
    <property name="color" value="红色" ></property>
</bean>
XML方式创建IoC容器
//创建IoC容器并根据配置文件创建对象
ApplicationContext context = new ClassPathXmlApplicationContext(" classpath:applicationContext.xml");
实例化Bean的三种方式
- 基于构造方法对象实例化
- 默认构造方法实例化
<bean id="apple1" class="com.imooc.spring.ioc.entity.Apple">
</bean>
- 带参构造方法实例化
1.利用构造方法参数名实例化
<bean id="sweetApple" class= "com.imooc.spring.ioc.entity.Apple">
<!--没有constructor-arg则代表调用默认构造方法实例化-->
<constructor-arg name="title" value="红富士"/>
<constructor-arg name="origin" value="欧洲"/>
<constructor-arg name="color" value="红色"/>
</bean>

2.利用构造方法参数位置实例化
<bean id="sweetApple" class="com.imooc..spring.ioc.entity.Apple">
<!--利用构造方法参数位置实现对象实例化-->
<constructor-arg index="O" value="红富士"/>
<constructor-arg index="1" value="红色"/>
<constructor-arg index="2" value="欧洲"/>
</bean>
这里如果有数值类型的属性,那么在value写入的值是字符串类型,但是在构造方法中识别到这里是数值类型时会将这里的字符串自动转换为数值类型
如果在xml中只实例化两个属性,但在构造方法中却检测不到含有两个属性的构造方法,会报错
尽量按名称设置,因为按位置设置由于我的属性位置和构造方法中需要传入的值会有无意间的误差,导致运行结果的错误
- 基于静态工厂实例化
静态工厂通过静态方法创建对象,隐藏创建对象的细节
public class AppleStaticFactory {
    public static Apple createSweetApple(){
        Apple apple = new Apple();
        apple.setTitle("红富士");
        apple.setOrigin("欧洲");
        apple.setColor("红色");
        return apple;
    }
}

<bean id="apple3" class="com.imooc.spring.ioc.factory.AppleStaticFactory" factory-method="createSweetApple"/>
- 基于工厂实例方法实例化
利用工厂实例方法获取对象
public class AppleFactoryInstance {
    public Apple createSweetApple(){
        Apple apple = new Apple();
        apple.setTitle("红富士");
        apple.setOrigin("欧洲");
        apple.setColor("红色");
        return apple;
    }
}
<bean id="factoryInstance" class="com.imooc.spring.ioc.factory.AppleFactoryInstance"/>
<bean id="apple4" factory-bean="factoryInstance" factory-method="createSweetApple"/>
从IoC容器获取Bean
Apple sweetApple = context.getBean("sweetApple",Apple.class);
或者
Apple sweetApple = (Apple)context.getBean("sweetApple");
System.out.println(sweetApple.getTitle());
id与name属性的相同点与不同点
id与name属性相同点
- bean id与name都是设置对象在loC容器中唯一标识
- 两者在同一个配置文件中都不允许出现重复
- 两者允许在多个配置文件中出现重复,新对象覆盖旧对象
id与name属性不同点 - id要求更为严格,一次只能定义一个对象标识(推荐)
- name更为宽松,一次允许定义多个对象标识
- tips: id与name的命名要求有意义,按驼峰命名书写
没有id 与name的bean默认使用类名全称作为bean标识
<bean class="com.imooc..spring.ioc.entity.Apple">
<constructor-arg index="O" value="红富士三号"/>
<constructor-arg index="1" value="红色"/>
<constructor-arg index="2" value="欧洲"/>
</bean>
Apple apple = context.getBean ( s: "com.imooc.spring.ioc.entity.Apple",Apple.class) ;
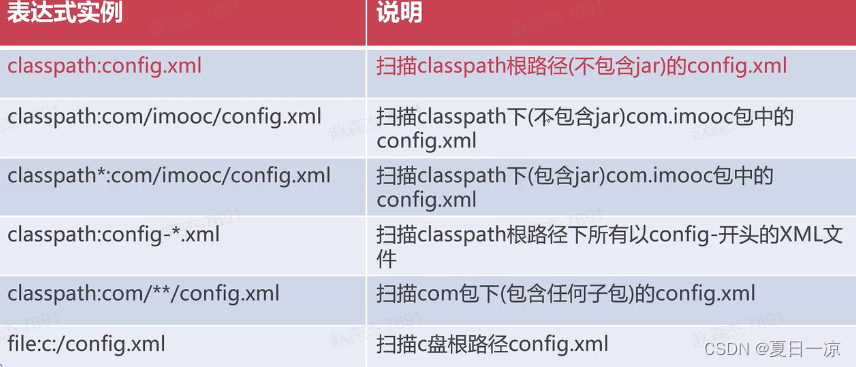
路径匹配表达式
加载单个配置文件
//创建loC容器并根据配置文件创建对象
ApplicationContext context = new ClassPathXmlApplicationContext(" classpath:applicationContext.xml");
加载多个配置文件
String[] configLocations = new
    String[]{"classpath:applicationContext.xml"
    ," classpath:applicationContext-1.xml"};
ApplicationContext context = new
ClassPathXmlApplicationContext(configLocations);
对象注入依赖
- 依赖注入是指运行时将容器内对象利用反射赋给其他对象的操作
- 基于setter方法注入对象
- 利用setter实现静态数值注入
<bean id="sweetApple" class= "com.imooc.spring.ioc.entity.Apple">
<!--IoC容器自动利用反射机制运行时调用setXXX方法为属性赋值-->
<property name="title" value="红富士"/>
<property name="color" value="红色"/>
<property name="origin" value="欧洲"/>
</bean>
- 利用setter实现对象注入
<bean id= "lily" class="com.imooc.spring.ioc.entity.Child">
<property name="name" value="莉莉"/>
<!--利用ref注入依赖对象-->
<property name="apple" ref= "sweetApple"/>  ref:关联
</bean>
- 基于构造方法注入对象
public Child(String name, Apple apple) {
    System.out.println("构造方法参数apple::"+ apple);
    this.name = name;
    this.apple = apple;
}
<bean id="sourApple" class="com.imooc.spring.ioc.entity.Apple">
    <property name="title" value="青苹果"/>
    <property name="origin" value="中亚"/>
    <property name="color" value="绿色"/>
</bean>

<bean id="andy" class="com.imooc.spring.ioc.entity.Child">
    <constructor-arg name="name" value="安迪"/>
    <constructor-arg name="apple" ref="sourApple"/>
</bean>
- 注入依赖的优势
注入集合对象
注入List
<bean id="..." class="...">
    <property name= "someList">
    <list>
        <value>具体值</alue>
        <ref bean="beanld" ></ref>
    </list>
    </property>
</bean>
注入Set
<bean id="..." class="...">
    <property name= "someSet">
    <set>
        <value>具体值</value>
        <ref bean="beanld"></ref>
    </set>
    </property>
</bean>
注入Map
<bean id="..." class="..." >
    <property name="someMap">
        <map>
            <entry key="k1" value="v1"></entry>
            <entry key="k2" value-ref= "beanld" ></entry>
        </map>
    </property>
</bean>
注入Properties
<bean id="..." class="..." >
    <property name="someProperties">
    <props>
        <prop key="k1">v1</prop>
        <prop key="k2">v2</prop>
    </props>
    </property>
</bean>
查看容器内对象
//获取容器内所有beanId数组
string[ ] beanNames = context.getBeanDefinitionNames ();
    for (string beanName : beanNames ) {
        system. out.println (beanName) ;
    }
运行结果:
c1
company
写在外部的bean会被IoC检测Bean Id,写在内部的不会被检测
匿名对象使用办法
<bean class="com.imooc.spring.ioc.entity.Computer">
    <constructor-arg name="brand" value="微星"/>
    <constructor-arg name="type" value="台式机"/>
    <constructor-arg name="sn" value="8389280012"/>
    <constructor-arg name="price" value="3000"/>
</bean>

<bean class="com.imooc.spring.ioc.entity.Computer">
    <constructor-arg name="brand" value="华硕"/>
    <constructor-arg name="type" value="笔记本"/>
    <constructor-arg name="sn" value="9089380012"/>
    <constructor-arg name="price" value="6000"/>
</bean>
运行结果:
com.imooc.spring.ioc.entity.Computer#0
com.imooc.spring.ioc.entity.Computer#1
如果不加#X则默认调用第一个computer
Computer computer = context.getBean("com.imooc.spring.ioc.entity.Computer",Computer.class);
System.out.println(computer.getBrand());
运行结果:
微星
获取内容的方式:
String[] beanNames = context.getBeanDefinitionNames();
for (String beanName : beanNames) {
    System.out.println(beanName);
    System.out.println("类型:"+ context.getBean(beanName).getClass().getName());
    System.out.println("内容:"+ context.getBean(beanName).getClass().toString());
}
这里的toString可写可不写,因为这里默认调用toString方法
Bean Scope
定义:
bean scope属性用于决定对象何时被创建与作用范围
bean scope配置将影响容器内对象的数量
bean scope默认值singleton(单例),指全局共享同个对象实例
默认情况下bean会在loC容器创建后自动实例化,全局唯一
scope用法:
<bean id="bookDao"
class="com.imooc.spring.ioc.bookshop.dao.BookDaoOraclelmpl"
scope="prototype" />
bean scope属性清单
![[图片]](https://img-blog.csdnimg.cn/direct/383a934ef13e4a65aca40cf24815915c.png)
singleton单例示意图
![[图片]](https://img-blog.csdnimg.cn/direct/0aa89cd966644c79992eea403c9c438d.png)
解决问题:
IoC使用单例模式可以解决创建对象占用资源的问题,全局创建一次就行。
带来的问题是:
singleton在容器是单例多线程执行,存在线程安全风险
singleton的线程安全问题:
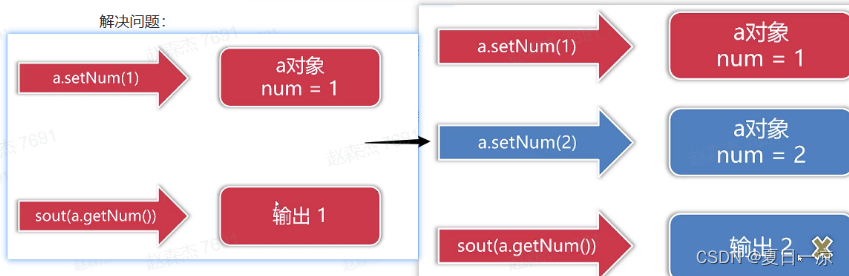
解决办法:
设置与读取的过程是独占状态,用户2的操作只有用户1操作完才行,多线程并行改成串行
prototype多例示意图
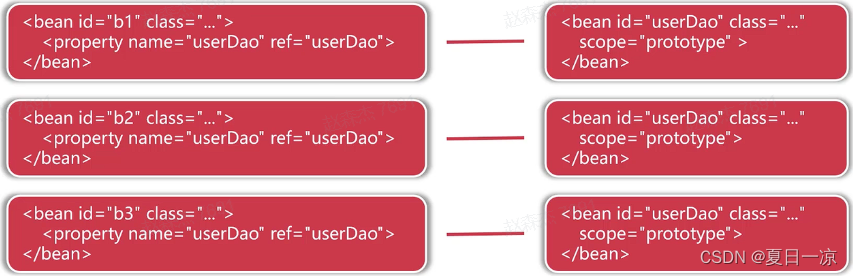
prototype在容器中多实例,占用更多资源,不存在线程安全问题
singleton和prototype的区别
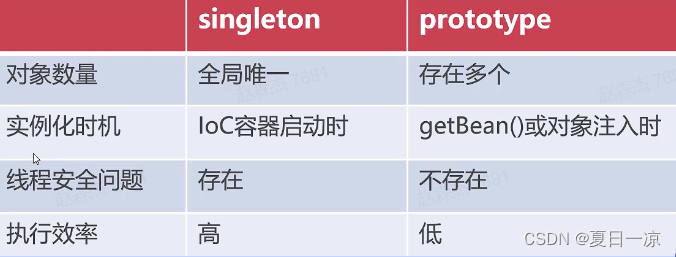
IoC容器已初始化用到prototype,大多数用到的是singleton的单例
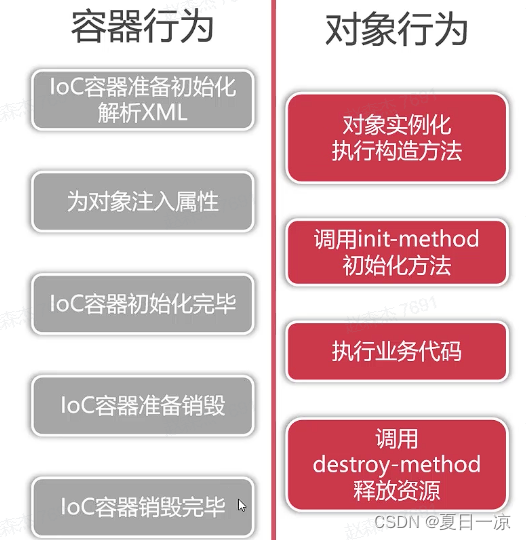
bean生命周期
实例:
public class Order {
    private Float price;
    private Integer quantity;
    private Float total;

    public Order(){
        System.out.println("创建Order对象:"+this);
    }

    public void init(){
        System.out.println("执行init方法");
        total = price * quantity;
    }

    public void pay() {
        System.out.println("订单金额为:"+ total);
    }

    public Float getPrice() {
        return price;
    }

    public void setPrice(Float price) {
        System.out.println("设置price:"+price);
        this.price = price;
    }

    public Integer getQuantity() {
        return quantity;
    }

    public void setQuantity(Integer quantity) {
        System.out.println("设置quantity:"+quantity);
        this.quantity = quantity;
    }

    public Float getTotal() {
        return total;
    }

    public void setTotal(Float total) {
        this.total = total;
    }

    public void destroy(){
        System.out.println("释放预订单相关的资源");
    }
}
<bean id="order1" class="com.imooc.spring.ioc.entity.Order" init-method="init" destroy-method="destroy">
    <property name="price" value="19.8"/>
    <property name="quantity" value="1000"/>
</bean>
 ApplicationContext context = new ClassPathXmlApplicationContext("classpath:applicationContext.xml");
        System.out.println("=====IoC容器已初始化=======");
        Order order1 = context.getBean("order1",Order.class);
        order1.pay();

        ((ClassPathXmlApplicationContext) context).registerShutdownHook();
运行结果:
创建Order对象:com.imooc.spring.ioc.entity.Order@234bef66
设置price:19.8
设置quantity:1000
执行init方法
=====IoC容器已初始化=======
订单金额为:19800.0
释放预订单相关的资源
实现极简IoC容器
public class Apple {
    private String title;
    private String color;
    private String origin;
<?xml version="1.0" encoding="UTF-8"?>
<beans>
    <bean id="sweetApple" class="com.imooc.spring.ioc.entity.Apple">
        <property name="title" value="富士红"/>
        <property name="color" value="红色"/>
        <property name="origin" value="欧洲"/>
    </bean>
</beans>
public interface ApplicationContext {
    public Object getBean(String beanId);
}
public class ClassPathXmlApplicationContext implements ApplicationContext{
    private Map iocContainer = new HashMap();
    public ClassPathXmlApplicationContext(){
        try {
            String filePath = this.getClass().getResource("/applicationContext.xml").getPath();
            filePath= new URLDecoder().decode(filePath, "UTF-8");
            SAXReader reader = new SAXReader();
            Document document = reader.read(new File(filePath));
            List<Node> beans = document.getRootElement().selectNodes("bean");
            for (Node node: beans) {
                Element ele = (Element) node;
                String id = ele.attributeValue("id");
                String className = ele.attributeValue("class");
                Class c = Class.forName(className);
                Object obj = c.newInstance();
                List<Node> properties = ele.selectNodes("property");
                for (Node p:properties) {
                    Element property = (Element) p;
                    String propName = property.attributeValue("name");
                    String propValue = property.attributeValue("value");

                    String setMethodName = "set"+propName.substring(0,1).toUpperCase()+propName.substring(1);
                    System.out.println("准备执行"+setMethodName+"方法注入数据");
                    Method setMethod = c.getMethod(setMethodName, String.class);
                    setMethod.invoke(obj,propValue);
                }

                iocContainer.put(id,obj);
            }
            System.out.println("IoC容器初始化完毕");
        }catch (Exception e){
            e.printStackTrace();
        }
    }
    @Override
    public Object getBean(String beanId) {
        return iocContainer.get(beanId);
    }
}
运行结果
准备执行setTitle方法注入数据
准备执行setColor方法注入数据
准备执行setOrigin方法注入数据
IoC容器初始化完毕
com.imooc.spring.ioc.entity.Apple@7006c658
注解与Java Config
1.基于注解配置loC容器
1.基于注解的优势
摆脱繁琐的XML形式的bean与依赖注入配置
基于"声明式"的原则,更适合轻量级的现代企业应用
让代码可读性变得更好,研发人员拥有更好的开发体验
2.三类注解
组件类型注解-声明当前类的功能与职责
自动装配注解-根据属性特征自动注入对象
元数据注解-更细化的辅助loC容器管理对象的注解
3.四种组件类型注解
![[图片]](https://img-blog.csdnimg.cn/direct/53d44a5bdd524581a222d707d76fe673.png)
例子:
<?xml version="1.0" encoding="UTF-8"?>
<beans xmlns="http://www.springframework.org/schema/beans"
       xmlns:xsi="http://www.w3.org/2001/XMLSchema-instance"
       xmlns:context="http://www.springframework.org/schema/context"
       xsi:schemaLocation="http://www.springframework.org/schema/beans
        https://www.springframework.org/schema/beans/spring-beans.xsd
        http://www.springframework.org/schema/context
        https://www.springframework.org/schema/context/spring-context.xsd">
    <!--在Ioc容器初始化时自动扫描四种组件类型注解并完成实例化
        @Repository
        @Service
        @Controller
        @component
    -->
    <context:component-scan base-package="com.imooc"/>
</beans>
//组件类型注解默认beanId为类名首字母小写
@Repository("udao")
public class UserDao {
}
@Service
public class UserService {
}
@Controller
public class UserController {
}
@Component
public class StringUtils {

}
public static void main(String[] args) {
    ApplicationContext context = new ClassPathXmlApplicationContext("classpath:applicationContext.xml");
    String[] ids = context.getBeanDefinitionNames();
    for (String id:ids) {
        System.out.println(id+":"+context.getBean(id));
    }
}
运行结果:
userController:com.imooc.spring.ioc.controller.UserController@5427c60c
udao:com.imooc.spring.ioc.dao.UserDao@15bfd87
userService:com.imooc.spring.ioc.service.UserService@543e710e
stringUtils:com.imooc.spring.ioc.utils.StringUtils@57f23557
4.开启组件扫描
<!--XML配置开启组件扫描,才能使用注解-->
<context:component-scan base-package= "com.imooc">
<!--正则表达式,不会被IoC扫描实例化-->
<context.exclude-filter type="regex" expression= "com.imooc.exl.*"/>
</context:component-scan>
5.两类自动装配注解
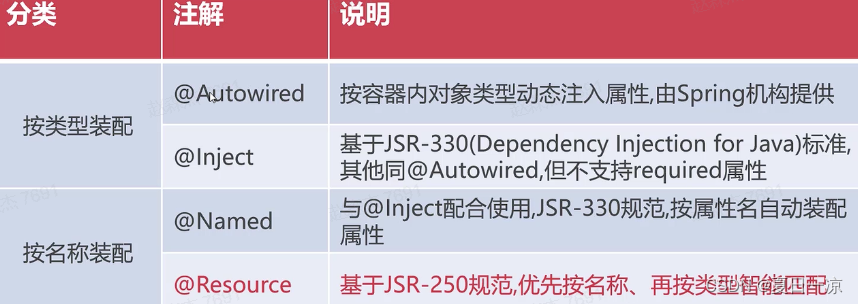
按类型注入的问题
@Autowired
@Service
public class UserService {

    public UserService() {
        System.out.println("正在创建UserService:"+this);
    }

    @Autowired
    //Spring Ioc容器会自动通过反射技术将属性private修饰符自动改为public,直接进行赋值,不再执行set方法
    //private->public->private
    private UserDao udao;

    public UserDao getUdao() {
        return udao;
    }
    //@Autowired
    //如果装配注解放在set方法上,则自动按类型/名称对set方法参数进行注入
    public void setUdao(UserDao udao) {
        System.out.println("setUdao"+udao);
        this.udao = udao;
    }
}
ApplicationContext context = new ClassPathXmlApplicationContext("classpath:applicationContext.xml");
UserService userService = context.getBean("userService",UserService.class);
System.out.println(userService.getUdao());
运行结果:
正在创建userDao:com.imooc.spring.ioc.dao.UserDao@306279ee
正在创建UserService:com.imooc.spring.ioc.service.UserService@545997b1
com.imooc.spring.ioc.dao.UserDao@306279ee
说明:如果运行结果没有setUdao,说明注入到属性中,没有在set方法上进行。
@Autowired装配注解本身问题
@Autowired
private IUserDao udao;

public IUserDao getUdao() {
    return udao;
}
public interface IUserDao {
}
@Repository
public class UserDao implements IUserDao{
    public UserDao() {
        System.out.println("正在创建userDao:"+this);
    }
}

@Repository
public class UserOracleDao implements IUserDao{
    public UserOracleDao() {
        System.out.println("正在创建UserOracleDao:"+this);
    }
}
会报错,不知道接口中那个Dao
解决办法:
方法一:去掉@Repository注解,不被Ioc容器去管理
public class UserDao implements IUserDao{
    public UserDao() {
        System.out.println("正在创建userDao:"+this);
    }
}
方法二:加上@Primary
@Repository
@Primary
public class UserOracleDao implements IUserDao{
    public UserOracleDao() {
        System.out.println("正在创建UserOracleDao:"+this);
    }
}
不推荐按类型装配
如果用注解进行对象依赖注入的话,通常不会创建set方法,多数情况下在属性上用到装配注解
按名称装配:
@Resource
@Service
public class DepartmentService {
    /**
        * 1. @Resource设置name属性,则按name在IoC容器中将bean注
        * 2.@Resource未设置name属性
        * 2.1 以属性名作为bean name在Ioc容器中匹配bean ,如有匹配则注入
        * 2.2按属性名未匹配,则按类型进行匹配,同@Autowired ,需加入@Primary解决类型冲突
        *使用建议:在使用@Resource对象时推荐设置name或保证属性名与bean名称一致
        */
    @Resource
    private IUserDao userOracleDao;

    public void joinDepartment(){
        System.out.println(userOracleDao);
    }
}
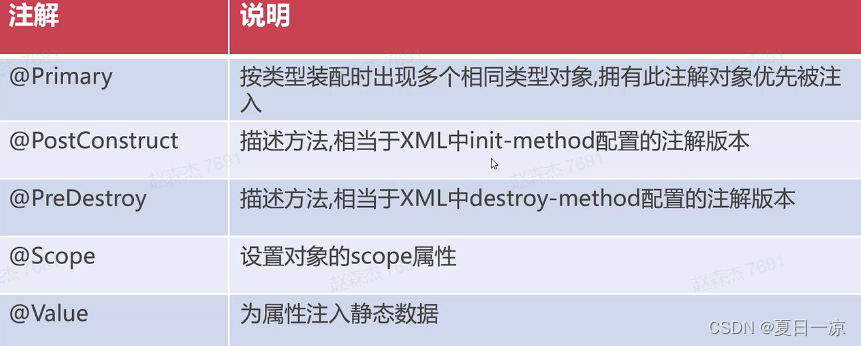
6.元数据注解
config.properties文件
metaData=imooc.com
connection.driver=xxxxx
connection.url=xxxxx
connection.username=xxxxx
connection.password=xxxxx
xml配置文件
<context:property-placeholder location="classpath:config.properties"/>
@Service
@Scope("prototype")//设置单例/多例,XML中 bean scope完全相同
public class UserService {

    @Value("${metaData}")//读取config.properties的metaData属性值
    private String metaData;
    @Value("${connection.password}")
    private String password;

    public UserService() {
        System.out.println("正在创建UserService:"+this);
    }
    @PostConstruct//XML中bean init-method完全相同
    public void init(){
        System.out.println("初始化UserService对象,metaData="+metaData);
    }
Java Config配置loC容器
1.优势
完全摆脱XML的束缚,使用独立Java类管理对象与依赖
注解配置相对分散,利用Java Config可对配置集中管理
可以在编译时讲行依赖检查不容易出错
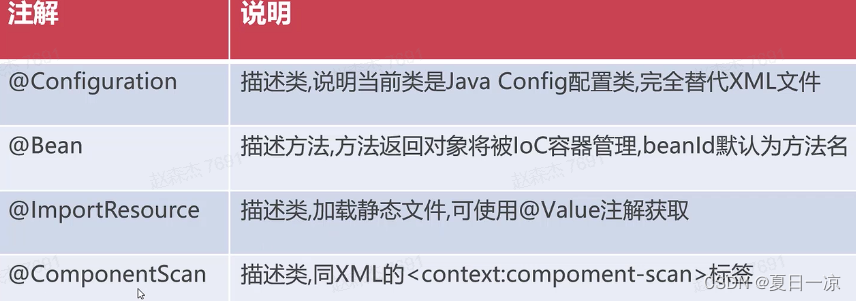
2.java Config核心注解
对象的实例化
public class UserDao {
}

public class UserService {
    private UserDao userDao ;
    ...
}

public class UserController {
   private UserService userService;
   ...
}
@Configuration//当前类是一个配置类,用于替代applicationContext.xml
public class Config {
    @Bean//Java Config利用方法创建对象,将方法返回对象放入容器,beanId=方法名
    public UserDao userDao(){
        UserDao userDao = new UserDao();
        return userDao;
    }

    @Bean
    public UserService userService(){
        UserService userService = new UserService();
        return userService;
    }

    @Bean
    public UserController userController(){
        UserController userController = new UserController();
        return userController;
    }
}
public class SpringApplication {
    public static void main(String[] args) {
        //基于Java Config配置工oC容器的初始化
        ApplicationContext context = new AnnotationConfigApplicationContext(Config.class);
        String[] ids = context.getBeanDefinitionNames();
        for (String id:ids) {
            System.out.println(id + ":" + context.getBean(id));

        }
    }
}
运行结果
org.springframework.context.annotation.internalConfigurationAnnotationProcessor:org.springframework.context.annotation.ConfigurationClassPostProcessor@4d49af10
org.springframework.context.annotation.internalAutowiredAnnotationProcessor:org.springframework.beans.factory.annotation.AutowiredAnnotationBeanPostProcessor@279ad2e3
org.springframework.context.annotation.internalCommonAnnotationProcessor:org.springframework.context.annotation.CommonAnnotationBeanPostProcessor@58134517
org.springframework.context.event.internalEventListenerProcessor:org.springframework.context.event.EventListenerMethodProcessor@4450d156
org.springframework.context.event.internalEventListenerFactory:org.springframework.context.event.DefaultEventListenerFactory@4461c7e3
config:com.imooc.spring.ioc.Config$$EnhancerBySpringCGLIB$$c42995d4@351d0846
userDao:com.imooc.spring.ioc.dao.UserDao@77e4c80f
userService:com.imooc.spring.ioc.service.UserService@35fc6dc4
userController:com.imooc.spring.ioc.controller.UserController@7fe8ea47
对象依赖注入
这里java Config的依赖注入中,用到注解形式和在xml中一样
@Configuration//当前类是一个配置类,用于替代applicationContext.xml
@ComponentScan(basePackages = "com.imooc")
public class Config {
    @Bean//Java Config利用方法创建对象,将方法返回对象放入容器,beanId=方法名
    public UserDao userDao(){
        UserDao userDao = new UserDao();
        System.out.println("已创建"+userDao);
        return userDao;
    }

    @Bean
    @Primary
    public UserDao userDao1(){
        UserDao userDao = new UserDao();
        System.out.println("已创建"+userDao);
        return userDao;
    }

    @Bean
    //先按name尝试注入,name不存在则按类型注入
    public UserService userService(UserDao userDao , EmployeeDao employeeDao){
        UserService userService = new UserService();
        System.out.println("已创建"+userDao);
        userService.setUserDao(userDao);
        System.out.println("调用setUserDao"+userDao);
        userService.setEmployeeDao(employeeDao);
        return userService;
    }

    @Bean//<bean id="xxx" class="xxx">
    @Scope("prototype")
    public UserController userController(UserService userService){
        UserController userController = new UserController();
        System.out.println("已创建"+userService);
        userController.setUserService(userService);
        System.out.println("调用setUserService"+userService);
        return userController;
    }
}
Java Config与xml的利弊
Java Config好处在于能在编写代码初期就能识别代码对错,而xml无法快速定位错误
Java Config的开发体验好,对象被集中管理和创建,但是是java的源代码,在产品发布后要调整,必须重新编译才行,这种方式用于开发工作中敏捷开发中快速迭代,快速上线的工程
xml用于大型项目,通过配置文件来划分不同团队各司其职
Java Config有好的开发体验,xml有更好的程序可维护性
Spring Test测试模块
Spring Test是Spring中用于测试的模块
Spring Test对JUnit单元测试框架有良好的整合
通过Spring Test可在JUnit在单元测试时自动初始化loC容器
Spring与JUnit4整合过程
- Maven工程依赖spring-test
- 利用@RunWith与@ContextConfiguration描述测试用例类
- @RunWith:将junit4的运行过程交给spring完成,通过这个注解让spring来接管junit4的控制权,完成IoC的初始化工作
- @ContextConfiguration:用于说明我们在初始化Ioc容器过程中要加载那些配置文件
- 测试用例类从容器获取对象完成测试用例的执行
加载junit4和test测试
 <dependency>
    <groupId>org.springframework</groupId>
    <artifactId>spring-test</artifactId>
    <version>5.2.6.RELEASE</version>
</dependency>
<dependency>
    <groupId>junit</groupId>
    <artifactId>junit</artifactId>
    <version>4.12</version>
    <scope>test</scope>
</dependency>
public class UserDao {
    public void insert(){
        System.out.println("新增用户数据");
    }
}

public class UserService {
    private UserDao userDao;

    public void createUser(){
        System.out.println("调用创建用户业务代码");
        userDao.insert();
    }
    ...
}
<bean id="userDao" class="com.imooc.spring.ioc.dao.UserDao">

</bean>

<bean id="userService" class="com.imooc.spring.ioc.service.UserService">
    <property name="userDao" ref="userDao"/>
</bean>
//将Junit4的执行权交由Spring Test,在测试用例执行前自动初始化IoC容器
@RunWith(SpringJUnit4ClassRunner.class)
@ContextConfiguration(locations = {"classpath:applicationContext.xml"})
public class SpringTestor {
    @Resource
    private UserService userService;

    @Test
    public void testUserService(){
        userService.createUser();
    }
}


 383
383

 被折叠的 条评论
为什么被折叠?
被折叠的 条评论
为什么被折叠?
 到【灌水乐园】发言


