


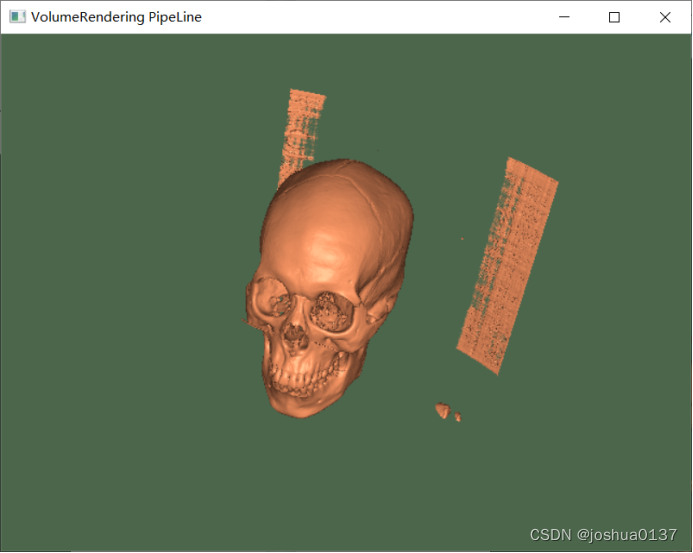
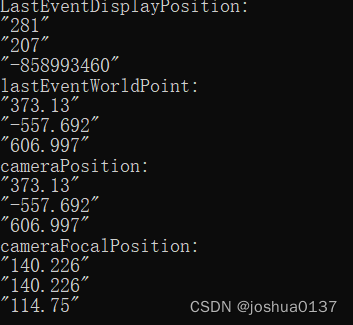
主要的测试目的是获得几个世界坐标
1. 测试源代码
class myInteractorStyle :public vtkInteractorStyleTrackballCamera
{
public:
	static myInteractorStyle* New()
	{
		return new myInteractorStyle;
	}
	void OnLeftButtonDown()
	{
		vtkInteractorStyleTrackballCamera::OnLeftButtonDown();
		this->ShowStation();
	}

public:
	void  ShowStation()
	{
		vtkRenderWindowInteractor* interactor = this->GetInteractor();
		vtkRenderer* render = this->GetCurrentRenderer();

		//获得 event 的 world 坐标
		int eventDisplayPosition[3];
		interactor->GetEventPosition(eventDisplayPosition);

		qDebug() << "eventDisplayPosition: ";
		for (int i = 0; i < 3; ++i)
		{
			qDebug() << QString::number(eventDisplayPosition[i]);
		}

		render->SetDisplayPoint((double)eventDisplayPosition[0], (double)eventDisplayPosition[1], (double)eventDisplayPosition[2]);
		render->DisplayToWorld();

		double  eventWorldPoint[4];
		render->GetWorldPoint(eventWorldPoint);

		qDebug() << "eventWorldPoint: ";
		for (int i = 0; i < 4; ++i)
		{
			qDebug() << QString::number(eventWorldPoint[i]);
		}


		//获得 last event的 world 坐标
		int     LastEventDisplayPosition[3];
		interactor->GetLastEventPosition(LastEventDisplayPosition);

		qDebug() << "LastEventDisplayPosition: ";
		for (int i = 0; i < 3; ++i)
		{
			qDebug() << QString::number(LastEventDisplayPosition[i]);
		}


		render->SetDisplayPoint((double)LastEventDisplayPosition[0], (double)LastEventDisplayPosition[1], (double)LastEventDisplayPosition[2]);
		render->DisplayToWorld();

		double  lastEventWorldPoint[4];
		render->GetWorldPoint(lastEventWorldPoint);

		qDebug() << "lastEventWorldPoint: ";
		for (int i = 0; i < 3; ++i)
		{
			qDebug() << QString::number(lastEventWorldPoint[i]);
		}

		vtkCamera* camera = this->GetCurrentRenderer()->GetActiveCamera();
		double* cameraPosition = camera->GetPosition();

		qDebug() << "cameraPosition: ";
		for (int i = 0; i < 3; ++i)
		{
			qDebug() << QString::number(cameraPosition[i]);
		}


		double* focalPosition = camera->GetFocalPoint();

		qDebug() << "cameraFocalPosition: ";
		for (int i = 0; i < 3; ++i)
		{
			qDebug() << QString::number(focalPosition[i]);
		}
	}
};

	static void Test()
	{
		vtkNew<vtkRenderer> ren;
		vtkNew<vtkDICOMImageReader> reader;
		reader->SetDirectoryName("D:\\VTK-DATA\\Dicom-Samples\\xuebaolin");
		reader->Update();
		vtkImageData* pImageData = reader->GetOutput();
		dm = pImageData->GetDimensions();
		spacing = reader->GetDataSpacing();
		origin = reader->GetDataOrigin();

		vtkNew<vtkGPUVolumeRayCastMapper> gpuMapper;
		vtkNew<vtkVolumeProperty> volumeProperty;
		volumeProperty->SetInterpolationTypeToLinear();
		volumeProperty->SetAmbient(0.4);
		volumeProperty->SetDiffuse(1.6);  //漫反射
		volumeProperty->SetSpecular(0.2); //镜面反射
		volumeProperty->ShadeOn();  //打开或者关闭阴影测试

									//设置不透明度
		vtkNew<vtkPiecewiseFunction> compositeOpacity;
		compositeOpacity->AddPoint(220, 0.00);
		compositeOpacity->AddPoint(255, 1.0);
		volumeProperty->SetScalarOpacity(compositeOpacity); //设置不透明度传输函数

		vtkNew<vtkColorTransferFunction> color;
		color->AddRGBPoint(0.000, 0.00, 0.00, 0.00);
		color->AddRGBPoint(60, 1.00, 0.52, 0.30);
		color->AddRGBPoint(150, 1.00, 1.00, 1.00);
		color->AddRGBPoint(200, .5, .3, .2);
		volumeProperty->SetColor(color);

		vtkNew<vtkVolume> volume;
		volume->SetMapper(gpuMapper);
		volume->SetProperty(volumeProperty);

		ren->SetBackground(0.3, 0.4, 0.3);
		ren->AddVolume(volume);
		ren->GetActiveCamera()->SetViewUp(0, 0, 1);
		ren->GetActiveCamera()->SetFocalPoint(0, 0, 0);
		ren->GetActiveCamera()->SetPosition(0, -1, 0);
		ren->ResetCamera();


		gpuMapper->SetInputData(pImageData);
		//gpuMapper->SetMaskTypeToBinary();
		//gpuMapper->SetMaskInput(stencilToImage->GetOutput());

		ren->ResetCamera();
		vtkNew<vtkRenderWindow> rw;
		rw->AddRenderer(ren);
		rw->SetSize(640, 480);
		//rw->SetFullScreen(1);
		rw->Render();
		rw->SetWindowName("VolumeRendering PipeLine");

		vtkNew<vtkRenderWindowInteractor> rwi;
		vtkSmartPointer<myInteractorStyle>  style = 				vtkSmartPointer<myInteractorStyle>::New();

		rwi->SetInteractorStyle(style);
		rwi->SetRenderWindow(rw);

		rw->Render();

		rwi->Start();
	}
2. Display Position
如下,左下角(0,0), 右上角为Windows窗口宽度和高度。

3. 相机位置与相机焦点位置
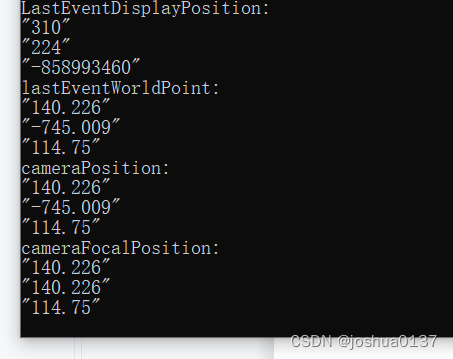
Y向为从我们的视线纸外垂直与直面射向焦点的方向。这两个坐标都是世界坐标

正在上传…重新上传取消
4. 点击中央的点,获得的几个坐标

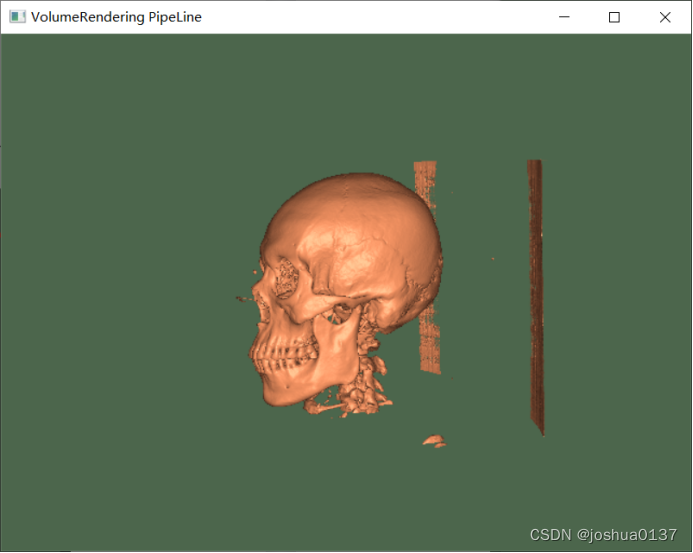
5. 旋转图形后

6. 图形放大
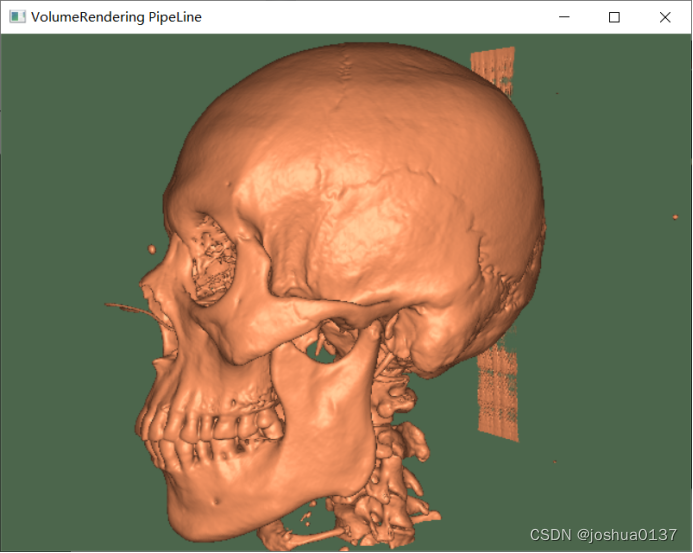
相机位置逼近纸面,焦点位置没变。
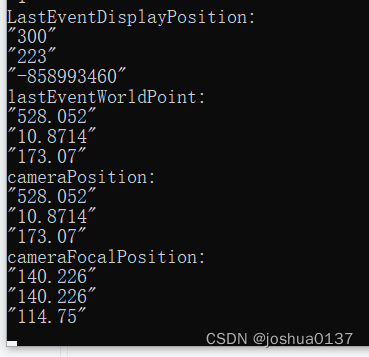
7、 图形做了较大变化


 1277
1277


 被折叠的 条评论
为什么被折叠?
被折叠的 条评论
为什么被折叠?
 到【灌水乐园】发言


