


=============================================================
标题:创建阴影线画刷
摘要:
备注:Windows CE
日期:2010.5.1
姓名:朱铭雷
=============================================================
填充棒图,图表的时候,使用阴影线画刷能够使之更加醒目。其他版本的Windows系统可以通过CreateHatchBrush函数来创建,但Windows CE下不支持这个函数,只能通过其他方法来实现。
下面这个函数,摘自《Programming Windows Embedded CE 6.0 Developer Reference》,可以完成这个功能。
#define HS_HORIZONTAL 0 /* ----- */
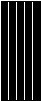
#define HS_VERTICAL 1 /* ||||| */
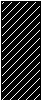
#define HS_FDIAGONAL 2 /* / */
#define HS_BDIAGONAL 3 /* / */
#define HS_CROSS 4 /* +++++ */
#define HS_DIAGCROSS 5 /* xxxxx */
//----------------------------------------------------------------
// MyCreateHatchBrush - Creates hatched brushes
//
HBRUSH MyCreateHatchBrush (INT fnStyle, COLORREF clrref) {
BRUSHBMP brbmp;
BYTE *pBytes;
int i;
DWORD dwBits[6][2] = {
{0x000000ff,0x00000000}, {0x10101010,0x10101010},
{0x01020408,0x10204080}, {0x80402010,0x08040201},
{0x101010ff,0x10101010}, {0x81422418,0x18244281},
};
if ((fnStyle < 0) || (fnStyle > dim(dwBits)))
return 0;
memset (&brbmp, 0, sizeof (brbmp));
brbmp.bmi.biSize = sizeof (BITMAPINFOHEADER);
brbmp.bmi.biWidth = 8;
brbmp.bmi.biHeight = 8;
brbmp.bmi.biPlanes = 1;
brbmp.bmi.biBitCount = 1;
brbmp.bmi.biClrUsed = 2;
brbmp.bmi.biClrImportant = 2;
// Initialize the palette of the bitmap.
brbmp.dwPal[0] = PALETTERGB(0xff,0xff,0xff);
brbmp.dwPal[1] = PALETTERGB((BYTE)((clrref >> 16) & 0xff),
(BYTE)((clrref >> 8) & 0xff),
(BYTE)(clrref & 0xff));
// Write the hatch data to the bitmap.
pBytes = (BYTE *)&dwBits[fnStyle];
for (i = 0; i < 8; i++)
brbmp.bBits[i*4] = *pBytes++;
// Return the handle of the brush created.
return CreateDIBPatternBrushPt (&brbmp, DIB_RGB_COLORS);
}
使用的时候,直接调用这个函数来创建阴影线画刷就可以了。如下:
HBRUSH hBr, hOldBr;
hBr = (HBRUSH) MyCreateHatchBrush (HS_DIAGCROSS, RGB (0, 0, 0));
hOldBr = (HBRUSH) SelectObject (hdc, hBr);
Rectangle (hdc, 100, 100, 140, 200);
SelectObject (hdc, hOldBr);
DeleteObject (hBr);
效果如下:


 988
988

 被折叠的 条评论
为什么被折叠?
被折叠的 条评论
为什么被折叠?
 到【灌水乐园】发言


