


每台计算机都有一个cpu作为中央处理器,cpu可以胜任多种不同任务。显卡中包含的GPU也就是图形处理器(graphics processing unit)与CPU不同的是GPU作为图像处理单元,可以高效并行地做矩阵运算。
1)通过nvidia指令便可以直观查看硬件设备的GPU型号、显存大小、程序占用情况等,如下:
#  nvidia-smi
Thu Jan  7 19:04:55 2021
+-----------------------------------------------------------------------------+
| NVIDIA-SMI 418.87.01    Driver Version: 418.87.01    CUDA Version: 10.1     |
|-------------------------------+----------------------+----------------------+
| GPU  Name        Persistence-M| Bus-Id        Disp.A | Volatile Uncorr. ECC |
| Fan  Temp  Perf  Pwr:Usage/Cap|         Memory-Usage | GPU-Util  Compute M. |
|===============================+======================+======================|
|   0  Tesla P100-PCIE...  On   | 00000000:00:08.0 Off |                    0 |
| N/A   29C    P0    24W / 250W |      0MiB / 16280MiB |      0%      Default |
+-------------------------------+----------------------+----------------------+
|   1  Tesla P100-PCIE...  On   | 00000000:00:09.0 Off |                    0 |
| N/A   31C    P0    26W / 250W |      0MiB / 16280MiB |      0%      Default |
+-------------------------------+----------------------+----------------------+

+-----------------------------------------------------------------------------+
| Processes:                                                       GPU Memory |
|  GPU       PID   Type   Process name                             Usage      |
|=============================================================================|
|  No running processes found                                                 |
+-----------------------------------------------------------------------------+
2)下面我们来编写math.py实现用一个矩阵创建cuda张量,在GPU上进行矩阵乘法:
import torch
device = torch.device("cuda")
a = torch.randn(3, 3)
b = torch.randn(3, 3)
a = a.to(device)
b = b.to(device)
c = torch.matmul(a,b)
print(c)
3)编写入口文件run.sh
#bin/bash
#打印GPU信息
nvidia-smi
#执行math.py
python3 math.py
4)编写Dockerfile构建镜像提交
# Base Images
## 从天池基础镜像构建(from的base img 根据自己的需要更换,建议使用天池open list镜像链接:https://tianchi.aliyun.com/forum/postDetail?postId=67720)
FROM registry.cn-shanghai.aliyuncs.com/tcc-public/pytorch:1.4-cuda10.1-py3

##安装依赖包,pip包请在requirements.txt添加
#RUN pip install --no-cache-dir -r requirements.txt -i https://pypi.tuna.tsinghua.edu.cn/simple

## 把当前文件夹里的文件构建到镜像的//workspace目录下,并设置为默认工作目录
ADD math.py /workspace
ADD run.sh /workspace
WORKDIR /workspace

## 镜像启动后统一执行 sh run.sh
CMD ["sh", "run.sh"]
5)构建镜像并上传
docker build -t registry.cn-shenzhen.aliyuncs.com/test_for_tianchi/test_for_tianchi_submit:1.0 .
注意:registry.~~~是你在阿里云容器仓库开通的镜像仓库的公网地址,用自己仓库地址替换。地址后面的:1.0为自己指定的版本号,用于区分每次build的镜像。最后的.是构建镜像的路径,不可以省掉。不知道如何开通镜像仓库的选手可以查看这篇教程:https://tianchi.aliyun.com/forum/postDetail?postId=76615
6)到大赛页面提交
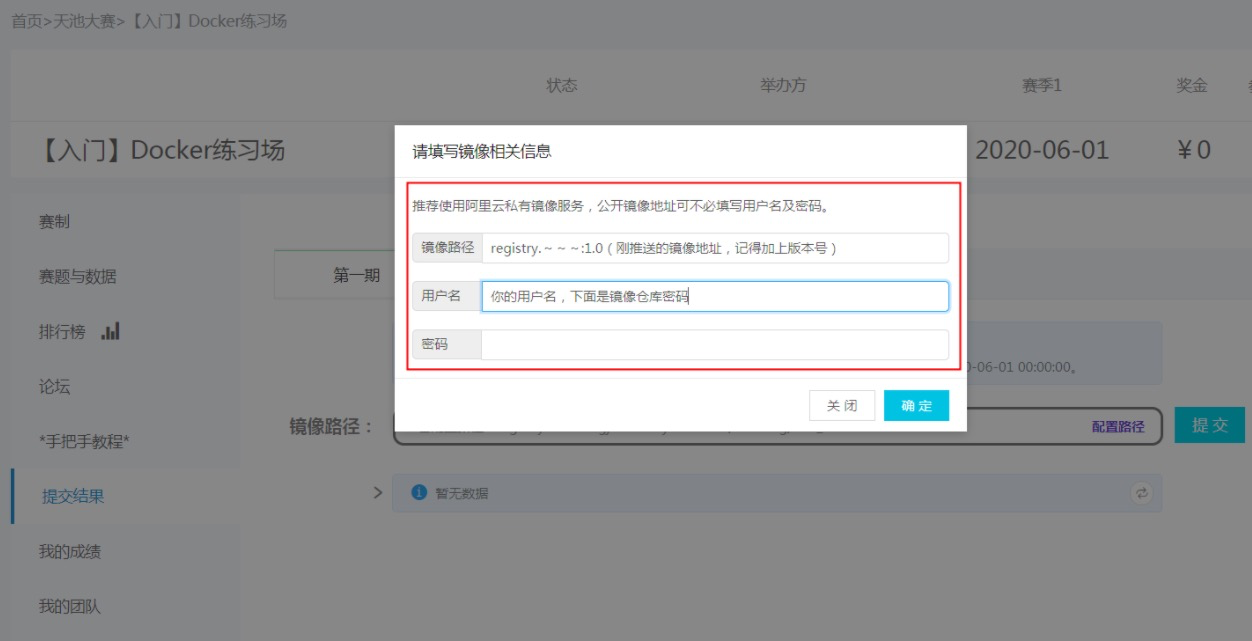
练习一:使用(numpy.load())读取容器/tcdata下的文件a.npy和b.npy,(500500的矩阵)使用GPU计算ab,然后存储为result.npy,存放在容器默认工作路径下即可。然后平台会自动执行计算并打分。
- 赛道二:进阶-大赛经典模型练习,在GPU上加载MMDetection预训练权重做物体检测
MMDetection是香港中文大学多媒体实验室开发的基于PyTorch的开源对象检测工具集,在大赛中被广泛使用,项目地址为https://github.com/open-mmlab/mmdetection。下面我们基于MMDetection做简单的物体检测。
1)下载包含mmdet项目+pytorch+cuda的基础镜像
docker pull registry.cn-shanghai.aliyuncs.com/tcc-public/mmdetection:pytorch1.4-cuda10.1-py3
2)编写detector.py加载mmdet预训练模型检测图片demo.jpg,权重文件下载:http://download.openmmlab.com/mmdetection/v2.0/faster_rcnn/faster_rcnn_r50_fpn_1x_coco/faster_rcnn_r50_fpn_1x_coco_20200130-047c8118.pth
from mmdet.apis import inference_detector, init_detector, show_result_pyplot

# Choose to use a config and initialize the detector
config_file = 'configs/fast_rcnn_r50_fpn_1x.py'
# download the checkpoint from model zoo and put it in `checkpoints/`
# url: http://download.openmmlab.com/mmdetection/v2.0/faster_rcnn/faster_rcnn_r50_fpn_1x_coco/faster_rcnn_r50_fpn_1x_coco_20200130-047c8118.pth
checkpoint_file = 'faster_rcnn_r50_fpn_1x_coco_20200130-047c8118.pth'
# initialize the detector
model = init_detector(config, checkpoint, device='cuda:0')

# Use the detector to do inference
img = 'demo/demo.jpg'
result = inference_detector(model, img)
print(result)
3)编写入口文件run.sh
#bin/bash
python3 detector.py
4)编写Dockerfile构建提交镜像
 # Base Images
## 从天池基础镜像构建(from的base img 根据自己的需要更换,建议使用天池open list镜像链接:https://tianchi.aliyun.com/forum/postDetail?postId=67720)
FROM registry.cn-shanghai.aliyuncs.com/tcc-public/mmdetection:pytorch1.4-cuda10.1-py3

##安装依赖包,pip包请在requirements.txt添加
#RUN pip install --no-cache-dir -r requirements.txt -i https://pypi.tuna.tsinghua.edu.cn/simple

## 把当前文件夹里的文件构建到镜像的/mmdetection目录下,并设置为默认工作目录
ADD demo.jpg /mmdetection
ADD faster_rcnn_r50_fpn_1x_coco_20200130-047c8118.pth /mmdetection
ADD detector.py /mmdetection
ADD run.sh /mmdetection
WORKDIR /mmdetection

## 镜像启动后统一执行 sh run.sh
CMD ["sh", "run.sh"]
5)构建镜像并上传
docker build -t registry.cn-shenzhen.aliyuncs.com/test_for_tianchi/test_for_tianchi_submit:1.0 .
注意:registry.~~~是你在阿里云容器仓库开通的镜像仓库的公网地址,用自己仓库地址替换。地址后面的:1.0为自己指定的版本号,用于区分每次build的镜像。最后的.是构建镜像的路径,不可以省掉。不知道如何开通镜像仓库的跳转:https://tianchi.aliyun.com/forum/postDetail?postId=76615
6)到大赛页面提交


 1万+
1万+


 被折叠的 条评论
为什么被折叠?
被折叠的 条评论
为什么被折叠?
 到【灌水乐园】发言


