刚开始学习Service的时候以为它是一个线程的封装,也可以执行耗时操作。其实不然,Service是运行在主线程的。直接执行耗时操作是会阻塞主线程的。长时间就直接ANR了。
我们知道Service可以执行一些后台任务,是后台任务不是耗时的任务,后台和耗时是有区别的喔。
这样就很容易想到音乐播放器,天气预报这些应用是要用到Service的。当然如果要在Service中执行耗时操作的话,开个线程就可以了。
关于Service的运行状态有两种,启动状态和绑定状态,两种状态可以一起。
启动一个Service只需调用Context的startService方法,传进一个Intent即可。看起来好像很简单的说,那是因为Android为了方便开发者,做了很大程度的封装。那么你真的有去学习过Service是怎么启动的吗?Service的onCreate方法回调前都做了哪些准备工作?
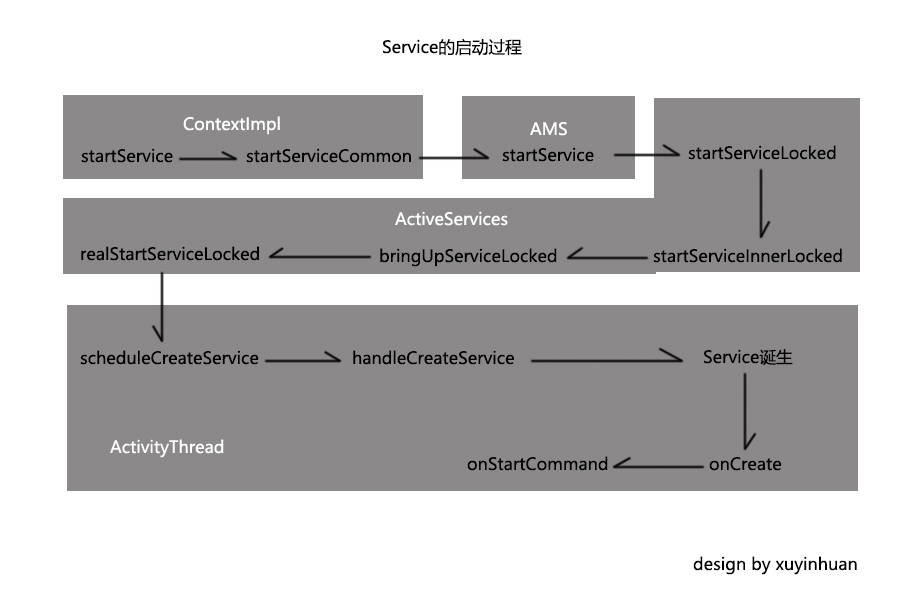
先上一张图大致了解下,灰色背景框起来的是同一个类中的方法,如下图:
那接下来就从源码的角度来分析Service的启动过程。
当然是从Context的startService方法开始,Context的实现类是ContextImpl,那么我们就看到ContextImpl的startService方法即可,如下:
@Override
public ComponentName startService(Intent service) {
    warnIfCallingFromSystemProcess();
    return startServiceCommon(service, mUser);
}
会转到startServiceCommon方法,那跟进startServiceCommon方法方法瞧瞧。
private ComponentName startServiceCommon(Intent service, UserHandle user) {
try {
validateServiceIntent(service);
service.prepareToLeaveProcess();
ComponentName cn = ActivityManagerNative.getDefault().startService(
mMainThread.getApplicationThread(), service, service.resolveTypeIfNeeded(
getContentResolver()), getOpPackageName(), user.getIdentifier());
return cn;
} catch (RemoteException e) {
throw new RuntimeException("Failure from system", e);
}
}
可以看到调用了ActivityManagerNative.getDefault()的startService方法来启动Service,ActivityManagerNative.getDefault()是ActivityManagerService,简称AMS。
那么现在启动Service的过程就转移到了ActivityManagerService,我们关注ActivityManagerService的startService方法即可,如下:
@Override
public ComponentName startService(IApplicationThread caller, Intent service,
String resolvedType, String callingPackage, int userId)
throws TransactionTooLargeException {
synchronized(this) {
final int callingPid = Binder.getCallingPid();
final int callingUid = Binder.getCallingUid();
final long origId = Binder.clearCallingIdentity();
ComponentName res = mServices.startServiceLocked(caller, service,
resolvedType, callingPid, callingUid, callingPackage, userId);
Binder.restoreCallingIdentity(origId);
return res;
}
}
- 1
- 2
- 3
- 4
- 5
- 6
- 7
- 8
- 9
- 10
- 11
- 12
- 13
- 14
- 15
- 16
- 17
- 18
- 1
- 2
- 3
- 4
- 5
- 6
- 7
- 8
- 9
- 10
- 11
- 12
- 13
- 14
- 15
- 16
- 17
- 18
在上述的代码中,调用了ActiveServices的startServiceLocked方法,那么现在Service的启动过程从AMS转移到了ActiveServices了。
继续跟进ActiveServices的startServiceLocked方法,如下:
ComponentName startServiceLocked(IApplicationThread caller, Intent service, String resolvedType,
int callingPid, int callingUid, String callingPackage, int userId)
throws TransactionTooLargeException {
ServiceLookupResult res =
retrieveServiceLocked(service, resolvedType, callingPackage,
callingPid, callingUid, userId, true, callerFg);
ServiceRecord r = res.record;
return startServiceInnerLocked(smap, service, r, callerFg, addToStarting);
}
- 1
- 2
- 3
- 4
- 5
- 6
- 7
- 8
- 9
- 10
- 11
- 12
- 13
- 14
- 15
- 16
- 17
- 18
- 19
- 20
- 1
- 2
- 3
- 4
- 5
- 6
- 7
- 8
- 9
- 10
- 11
- 12
- 13
- 14
- 15
- 16
- 17
- 18
- 19
- 20
在startServiceLocked方法中又会调用startServiceInnerLocked方法,
我们瞧瞧startServiceInnerLocked方法,
ComponentName startServiceInnerLocked(ServiceMap smap, Intent service, ServiceRecord r,
boolean callerFg, boolean addToStarting) throws TransactionTooLargeException {
ProcessStats.ServiceState stracker = r.getTracker()
if (stracker != null) {
stracker.setStarted(true, mAm.mProcessStats.getMemFactorLocked(), r.lastActivity)
}
r.callStart = false
synchronized (r.stats.getBatteryStats()) {
r.stats.startRunningLocked()
}
String error = bringUpServiceLocked(r, service.getFlags(), callerFg, false)
//代码省略
return r.name
}
- 1
- 2
- 3
- 4
- 5
- 6
- 7
- 8
- 9
- 10
- 11
- 12
- 13
- 14
- 15
- 16
- 17
- 1
- 2
- 3
- 4
- 5
- 6
- 7
- 8
- 9
- 10
- 11
- 12
- 13
- 14
- 15
- 16
- 17
startServiceInnerLocked方法内部调用了bringUpServiceLocked方法,此时启动过程已经快要离开ActiveServices了。继续看到bringUpServiceLocked方法。如下:
private final String bringUpServiceLocked(ServiceRecord r, int intentFlags, boolean execInFg,
boolean whileRestarting) throws TransactionTooLargeException {
if (app != null && app.thread != null) {
try {
app.addPackage(r.appInfo.packageName, r.appInfo.versionCode, mAm.mProcessStats);
realStartServiceLocked(r, app, execInFg);
return null;
}
return null;
}
- 1
- 2
- 3
- 4
- 5
- 6
- 7
- 8
- 9
- 10
- 11
- 12
- 13
- 14
- 15
- 16
- 17
- 1
- 2
- 3
- 4
- 5
- 6
- 7
- 8
- 9
- 10
- 11
- 12
- 13
- 14
- 15
- 16
- 17
省略了大部分if判断,相信眼尖的你一定发现了核心的方法,那就是
realStartServiceLocked,没错,看名字就像是真正启动Service。那么事不宜迟跟进去探探吧。如下:
private final void realStartServiceLocked(ServiceRecord r,
ProcessRecord app, boolean execInFg) throws RemoteException {
boolean created = false;
try {
app.forceProcessStateUpTo(ActivityManager.PROCESS_STATE_SERVICE);
app.thread.scheduleCreateService(r, r.serviceInfo,
mAm.compatibilityInfoForPackageLocked(r.serviceInfo.applicationInfo),
app.repProcState);
r.postNotification();
created = true;
} catch (DeadObjectException e) {
Slog.w(TAG, "Application dead when creating service " + r);
mAm.appDiedLocked(app);
throw e;
}
sendServiceArgsLocked(r, execInFg, true);
}
- 1
- 2
- 3
- 4
- 5
- 6
- 7
- 8
- 9
- 10
- 11
- 12
- 13
- 14
- 15
- 16
- 17
- 18
- 19
- 20
- 21
- 22
- 23
- 24
- 25
- 26
- 27
- 28
- 29
- 1
- 2
- 3
- 4
- 5
- 6
- 7
- 8
- 9
- 10
- 11
- 12
- 13
- 14
- 15
- 16
- 17
- 18
- 19
- 20
- 21
- 22
- 23
- 24
- 25
- 26
- 27
- 28
- 29
找到了。app.thread调用了scheduleCreateService来启动Service,而app.thread是一个ApplicationThread,也是ActivityThread的内部类。此时已经到了主线程。
那么我们探探ApplicationThread的scheduleCreateService方法。如下:
public final void scheduleCreateService(IBinder token,
        ServiceInfo info, CompatibilityInfo compatInfo, int processState) {
    updateProcessState(processState, false);
    CreateServiceData s = new CreateServiceData();
    s.token = token;
    s.info = info;
    s.compatInfo = compatInfo;

    sendMessage(H.CREATE_SERVICE, s);
}
对待启动的Service组件信息进行包装,然后发送了一个消息。我们关注这个CREATE_SERVICE消息即可。
public void handleMessage(Message msg) {
case CREATE_SERVICE:
Trace.traceBegin(Trace.TRACE_TAG_ACTIVITY_MANAGER, "serviceCreate");
handleCreateService((CreateServiceData)msg.obj);
Trace.traceEnd(Trace.TRACE_TAG_ACTIVITY_MANAGER);
break;
}
在handleMessage方法中接收到这个消息,然后调用了handleCreateService方法,跟进handleCreateService探探究竟:
private void handleCreateService(CreateServiceData data) {
// If we are getting ready to gc after going to the background, well
// we are back active so skip it.
unscheduleGcIdler()
LoadedApk packageInfo = getPackageInfoNoCheck(
data.info.applicationInfo, data.compatInfo)
Service service = null
try {
java.lang.ClassLoader cl = packageInfo.getClassLoader()
service = (Service) cl.loadClass(data.info.name).newInstance()
} catch (Exception e) {
if (!mInstrumentation.onException(service, e)) {
throw new RuntimeException(
"Unable to instantiate service " + data.info.name
+ ": " + e.toString(), e)
}
}
try {
if (localLOGV) Slog.v(TAG, "Creating service " + data.info.name)
ContextImpl context = ContextImpl.createAppContext(this, packageInfo)
context.setOuterContext(service)
Application app = packageInfo.makeApplication(false, mInstrumentation)
service.attach(context, this, data.info.name, data.token, app,
ActivityManagerNative.getDefault())
service.onCreate()
mServices.put(data.token, service)
try {
ActivityManagerNative.getDefault().serviceDoneExecuting(
data.token, SERVICE_DONE_EXECUTING_ANON, 0, 0)
} catch (RemoteException e) {
// nothing to do.
}
} catch (Exception e) {
if (!mInstrumentation.onException(service, e)) {
throw new RuntimeException(
"Unable to create service " + data.info.name
+ ": " + e.toString(), e)
}
}
}
- 1
- 2
- 3
- 4
- 5
- 6
- 7
- 8
- 9
- 10
- 11
- 12
- 13
- 14
- 15
- 16
- 17
- 18
- 19
- 20
- 21
- 22
- 23
- 24
- 25
- 26
- 27
- 28
- 29
- 30
- 31
- 32
- 33
- 34
- 35
- 36
- 37
- 38
- 39
- 40
- 41
- 42
- 43
- 44
- 45
- 1
- 2
- 3
- 4
- 5
- 6
- 7
- 8
- 9
- 10
- 11
- 12
- 13
- 14
- 15
- 16
- 17
- 18
- 19
- 20
- 21
- 22
- 23
- 24
- 25
- 26
- 27
- 28
- 29
- 30
- 31
- 32
- 33
- 34
- 35
- 36
- 37
- 38
- 39
- 40
- 41
- 42
- 43
- 44
- 45
终于击破,这个方法很核心的。一点点分析
首先获取到一个LoadedApk对象,在通过这个LoadedApk对象获取到一个类加载器,通过这个类加载器来创建Service。如下:
java.lang.ClassLoader cl = packageInfo.getClassLoader()
service = (Service) cl.loadClass(data.info.name).newInstance()
接着调用ContextImpl的createAppContext方法创建了一个ContextImpl对象。
之后再调用LoadedApk的makeApplication方法来创建Application,这个创建过程如下:
public Application makeApplication(boolean forceDefaultAppClass,
Instrumentation instrumentation) {
if (mApplication != null) {
return mApplication;
}
Application app = null;
String appClass = mApplicationInfo.className;
if (forceDefaultAppClass || (appClass == null)) {
appClass = "android.app.Application";
}
try {
java.lang.ClassLoader cl = getClassLoader();
if (!mPackageName.equals("android")) {
initializeJavaContextClassLoader();
}
ContextImpl appContext = ContextImpl.createAppContext(mActivityThread, this);
app = mActivityThread.mInstrumentation.newApplication(
cl, appClass, appContext);
appContext.setOuterContext(app);
} catch (Exception e) {
if (!mActivityThread.mInstrumentation.onException(app, e)) {
throw new RuntimeException(
"Unable to instantiate application " + appClass
+ ": " + e.toString(), e);
}
}
mActivityThread.mAllApplications.add(app);
mApplication = app;
if (instrumentation != null) {
try {
instrumentation.callApplicationOnCreate(app);
} catch (Exception e) {
if (!instrumentation.onException(app, e)) {
throw new RuntimeException(
"Unable to create application " + app.getClass().getName()
+ ": " + e.toString(), e);
}
}
}
SparseArray<String> packageIdentifiers = getAssets(mActivityThread)
.getAssignedPackageIdentifiers();
final int N = packageIdentifiers.size();
for (int i = 0; i < N; i++) {
final int id = packageIdentifiers.keyAt(i);
if (id == 0x01 || id == 0x7f) {
continue;
}
rewriteRValues(getClassLoader(), packageIdentifiers.valueAt(i), id);
}
return app;
}
- 1
- 2
- 3
- 4
- 5
- 6
- 7
- 8
- 9
- 10
- 11
- 12
- 13
- 14
- 15
- 16
- 17
- 18
- 19
- 20
- 21
- 22
- 23
- 24
- 25
- 26
- 27
- 28
- 29
- 30
- 31
- 32
- 33
- 34
- 35
- 36
- 37
- 38
- 39
- 40
- 41
- 42
- 43
- 44
- 45
- 46
- 47
- 48
- 49
- 50
- 51
- 52
- 53
- 54
- 55
- 56
- 57
- 58
- 59
- 60
- 1
- 2
- 3
- 4
- 5
- 6
- 7
- 8
- 9
- 10
- 11
- 12
- 13
- 14
- 15
- 16
- 17
- 18
- 19
- 20
- 21
- 22
- 23
- 24
- 25
- 26
- 27
- 28
- 29
- 30
- 31
- 32
- 33
- 34
- 35
- 36
- 37
- 38
- 39
- 40
- 41
- 42
- 43
- 44
- 45
- 46
- 47
- 48
- 49
- 50
- 51
- 52
- 53
- 54
- 55
- 56
- 57
- 58
- 59
- 60
当然Application是只有一个的,从上述代码中也可以看出。
在回来继续看handleCreateService方法,之后service调用了attach方法关联了ContextImpl和Application等
最后service回调了onCreate方法,
service.onCreate()
mServices.put(data.token, service)
并将这个service添加进了一个了列表进行管理。
至此service启动了起来,以上就是service的启动过程。
你可能还想要知道onStartCommand方法是怎么被回调的?可能细心的你发现了在ActiveServices的realStartServiceLocked方法中,那里还有一个sendServiceArgsLocked方法。是的,那个就是入口。
那么我们跟进sendServiceArgsLocked方法看看onStartCommand方法是怎么回调的。
private final void sendServiceArgsLocked(ServiceRecord r, boolean execInFg,
boolean oomAdjusted) throws TransactionTooLargeException {
final int N = r.pendingStarts.size();
try {
r.app.thread.scheduleServiceArgs(r, si.taskRemoved, si.id, flags, si.intent);
} catch (TransactionTooLargeException e) {
if (DEBUG_SERVICE) Slog.v(TAG_SERVICE, "Transaction too large: intent="
+ si.intent);
caughtException = e;
} catch (RemoteException e) {
if (DEBUG_SERVICE) Slog.v(TAG_SERVICE, "Crashed while sending args: " + r);
caughtException = e;
}
}
- 1
- 2
- 3
- 4
- 5
- 6
- 7
- 8
- 9
- 10
- 11
- 12
- 13
- 14
- 15
- 16
- 17
- 18
- 19
- 20
- 21
- 22
- 23
- 24
- 1
- 2
- 3
- 4
- 5
- 6
- 7
- 8
- 9
- 10
- 11
- 12
- 13
- 14
- 15
- 16
- 17
- 18
- 19
- 20
- 21
- 22
- 23
- 24
可以看到onStartCommand方法回调过程和onCreate方法的是很相似的,都会转到app.thread。那么现在就跟进ApplicationThread的scheduleServiceArgs。
你也可能猜到了应该又是封装一些Service的信息,然后发送一个消息, handleMessage接收。是的,源码如下:
public final void scheduleServiceArgs(IBinder token, boolean taskRemoved, int startId,
    int flags ,Intent args) {
    ServiceArgsData s = new ServiceArgsData();
    s.token = token;
    s.taskRemoved = taskRemoved;
    s.startId = startId;
    s.flags = flags;
    s.args = args;

    sendMessage(H.SERVICE_ARGS, s);
}
public void handleMessage(Message msg) {
case SERVICE_ARGS:
Trace.traceBegin(Trace.TRACE_TAG_ACTIVITY_MANAGER, "serviceStart");
handleServiceArgs((ServiceArgsData)msg.obj);
Trace.traceEnd(Trace.TRACE_TAG_ACTIVITY_MANAGER);
break;
}
咦,真的是这样。谜底应该就在handleServiceArgs方法了,那么赶紧瞧瞧,源码如下:
private void handleServiceArgs(ServiceArgsData data) {
Service s = mServices.get(data.token)
if (s != null) {
try {
if (data.args != null) {
data.args.setExtrasClassLoader(s.getClassLoader())
data.args.prepareToEnterProcess()
}
int res
if (!data.taskRemoved) {
res = s.onStartCommand(data.args, data.flags, data.startId)
} else {
s.onTaskRemoved(data.args)
res = Service.START_TASK_REMOVED_COMPLETE
}
QueuedWork.waitToFinish()
try {
ActivityManagerNative.getDefault().serviceDoneExecuting(
data.token, SERVICE_DONE_EXECUTING_START, data.startId, res)
} catch (RemoteException e) {
// nothing to do.
}
ensureJitEnabled()
} catch (Exception e) {
if (!mInstrumentation.onException(s, e)) {
throw new RuntimeException(
"Unable to start service " + s
+ " with " + data.args + ": " + e.toString(), e)
}
}
}
}
- 1
- 2
- 3
- 4
- 5
- 6
- 7
- 8
- 9
- 10
- 11
- 12
- 13
- 14
- 15
- 16
- 17
- 18
- 19
- 20
- 21
- 22
- 23
- 24
- 25
- 26
- 27
- 28
- 29
- 30
- 31
- 32
- 33
- 34
- 35
- 1
- 2
- 3
- 4
- 5
- 6
- 7
- 8
- 9
- 10
- 11
- 12
- 13
- 14
- 15
- 16
- 17
- 18
- 19
- 20
- 21
- 22
- 23
- 24
- 25
- 26
- 27
- 28
- 29
- 30
- 31
- 32
- 33
- 34
- 35
可以看到回调了onStartCommand方法。
以上就是Service的启动过程的源码分析。
从中,我理解了Service的启动过程的同时,阅读源码的能力也提高了,分析源码的时候我没能力把每一个变量,每一个方法都搞懂,我关注的都是一些关键的字眼,比如这篇文章就是start呀,service呀。会有那种感觉,就是这里没错了。当然如果陷入胡同了也要兜出来。
这样的分析也能够摸清整体的过程,对于细节,等我有扎实的功底了在去研究吧。


 3719
3719


 被折叠的 条评论
为什么被折叠?
被折叠的 条评论
为什么被折叠?
 到【灌水乐园】发言


