


springboot使用的是2.6版本,首先添加knife4j maven,springfox的包删掉
<dependency>
    <groupId>com.github.xiaoymin</groupId>
    <artifactId>knife4j-spring-boot-starter</artifactId>
    <version>3.0.3</version>
</dependency>
<!--        <dependency>-->
<!--            <groupId>io.springfox</groupId>-->
<!--            <artifactId>springfox-boot-starter</artifactId>-->
<!--            <version>3.0.0</version>-->
<!--        </dependency>-->
添加application.yaml
mvc:
    pathmatch:
        matching-strategy: ant_path_matcher
添加swagger配置类,swagger.enable如果配置的话可以打开
@Slf4j
@Configuration
@EnableSwagger2WebMvc
//@ConditionalOnProperty(name = "swagger.enable", havingValue = "true")
public class SwaggerConfig implements WebMvcConfigurer {

    @Bean
    public Docket createRestApi() {
        return new Docket(DocumentationType.SWAGGER_2)
                .apiInfo(new ApiInfoBuilder()
                        .title("API 接口文档")
                        .contact(new Contact("cnbai", "https://blog.csdn.net/baihaibo1024", ""))
                        .version("1.0")
                        .build())
                .select()
                .apis(RequestHandlerSelectors.withMethodAnnotation(ApiOperation.class))
                .apis(RequestHandlerSelectors.basePackage("com.coscoshipping.api.demo"))
                .paths(PathSelectors.any())
                .build();
    }

    @Override
    public void addResourceHandlers(ResourceHandlerRegistry registry) {
        registry.addResourceHandler("/**").addResourceLocations("classpath:/static/");
        registry.addResourceHandler("swagger-ui.html").addResourceLocations("classpath:/META-INF/resources/");
        registry.addResourceHandler("doc.html").addResourceLocations("classpath:/META-INF/resources/");
        registry.addResourceHandler("/swagger-resources/**").addResourceLocations("classpath:/META-INF/resources/");
        registry.addResourceHandler("/webjars/**").addResourceLocations("classpath:/META-INF/resources/webjars/");


    }


}
重写BeanProcessorConfig类防止Failed to start bean 'documentationPluginsBootstrapper'; nested exception is java.lang.NullPointerException 异常
@Configuration
public class BeanProcessorConfig {
    @Bean
    public static BeanPostProcessor springfoxHandlerProviderBeanPostProcessor() {
        return new BeanPostProcessor() {

            @Override
            public Object postProcessAfterInitialization(Object bean, String beanName) throws BeansException {
                if (bean instanceof WebMvcRequestHandlerProvider || bean instanceof WebFluxRequestHandlerProvider) {
                    customizeSpringfoxHandlerMappings(getHandlerMappings(bean));
                }
                return bean;
            }

            private <T extends RequestMappingInfoHandlerMapping> void customizeSpringfoxHandlerMappings(List<T> mappings) {
                List<T> copy = mappings.stream()
                        .filter(mapping -> mapping.getPatternParser() == null)
                        .collect(Collectors.toList());
                mappings.clear();
                mappings.addAll(copy);
            }

            @SuppressWarnings("unchecked")
            private List<RequestMappingInfoHandlerMapping> getHandlerMappings(Object bean) {
                try {
                    Field field = ReflectionUtils.findField(bean.getClass(), "handlerMappings");
                    field.setAccessible(true);
                    return (List<RequestMappingInfoHandlerMapping>) field.get(bean);
                } catch (IllegalArgumentException | IllegalAccessException e) {
                    throw new IllegalStateException(e);
                }
            }
        };
    }

}
新建测试用DTO
@Data
@NoArgsConstructor
@AllArgsConstructor
@ApiModel(value = "用户",description = "用户对象模型")
@ToString
public class DemoUser implements Serializable {

    private static final long serialVersionUID = 7497034210240490279L;

    @ApiModelProperty(name="id",value = "用户Id",dataType = "Long")
    private Long id;

    @ApiModelProperty(name="name",value = "用户名",dataType = "String")
    private String name;

    @ApiModelProperty(name="age",value = "年龄",dataType = "Integer")
    private Integer age;

    @ApiModelProperty(name="deleted",value = "是否删除",dataType = "Boolean")
    private Boolean deleted;

    @ApiModelProperty(name="birthday",value = "生日",dataType = "Date")
    private Date birthday;


}
@ApiModel 用来描述实体
@ApiModelProperty 用来描述成员对象
常用注解具体的可以参考下面这个文章:
Swagger常用注解 - 三分恶 - 博客园 (cnblogs.com)
接着为全局通用返回类添加注解:
@Data
@NoArgsConstructor
@AllArgsConstructor
public class IntfResponseModel<T> {
    @ApiModelProperty(name="code",value = "状态 200:成功 其余异常",dataType = "int")
    private int code;
    @ApiModelProperty(name="message",value = "错误信息",dataType = "String")

    private String message;
    @ApiModelProperty(name="data",value = "返回数据主体")
    private T data;

    public static IntfResponseModel newInstance(InterfaceResponseCodeEnum interfaceResponseCodeEnum){
        IntfResponseModel intfResponseModel = new IntfResponseModel();
        intfResponseModel.setCode(interfaceResponseCodeEnum.getCode());
        intfResponseModel.setMessage(interfaceResponseCodeEnum.getMessage());
        return intfResponseModel;
    }

    public static IntfResponseModel success(String data){
        IntfResponseModel intfResponseModel = new IntfResponseModel();
        intfResponseModel.setCode(InterfaceResponseCodeEnum.INF_200.getCode());
        intfResponseModel.setMessage(InterfaceResponseCodeEnum.INF_200.getMessage());
        intfResponseModel.setData(data);
        return intfResponseModel;
    }

    public static <T> IntfResponseModel<T> success(T data) {
        IntfResponseModel intfResponseModel = new IntfResponseModel();
        intfResponseModel.setCode(InterfaceResponseCodeEnum.INF_200.getCode());
        intfResponseModel.setMessage(InterfaceResponseCodeEnum.INF_200.getMessage());
        intfResponseModel.setData(data);
        return intfResponseModel;
    }

    public static IntfResponseModel error(Integer code, String message){
        IntfResponseModel intfResponseModel = new IntfResponseModel();
        intfResponseModel.setCode(code);
        intfResponseModel.setMessage(message);
        return intfResponseModel;
    }

    public int getCode() {
        return code;
    }

    public void setCode(int code) {
        this.code = code;
    }

    public String getMessage() {
        return message;
    }

    public void setMessage(String message) {
        this.message = message;
    }

    public T getData() {
        return data;
    }

    public void setData(T data) {
        this.data = data;
    }
}
这里要注意不要为全局返回类添加@ApiModel,因为内部的data才是文档需要描述的对象,另外getData最好不要用lombok自动生成的,因为这里需要getData返回T,lombok自动生成的getset返回的是Object。
写个测试接口
@RestController
@RequestMapping("/demo")
@Api(tags = {"测试接口"}, description = "测试接口")
@Slf4j
public class DemoController {
    @ApiOperationSupport(author = "xxx")
    @GetMapping("/user/info")
    @ApiOperation(value = "获取用户信息")
    @ApiImplicitParam(name = "userId",value = "用户id",required = true,paramType = "query",dataType = "string")
    public IntfResponseModel<DemoUser> userInfo(@ApiParam("userId") @RequestParam(value = "userId", required = true) String userId){
        DemoUser result = new DemoUser();
        return IntfResponseModel.success(result);
    }


    @ApiOperationSupport(author = "xxx")
    @PostMapping("/user/add")
    @ApiOperation(value = "用户添加接口")
    public IntfResponseModel<Boolean> addUser(@RequestBody  DemoUser user){
        log.info(user.toString());
        return IntfResponseModel.success(Boolean.TRUE);
    }

}
启动后访问127.0.0.1:8080/doc.html
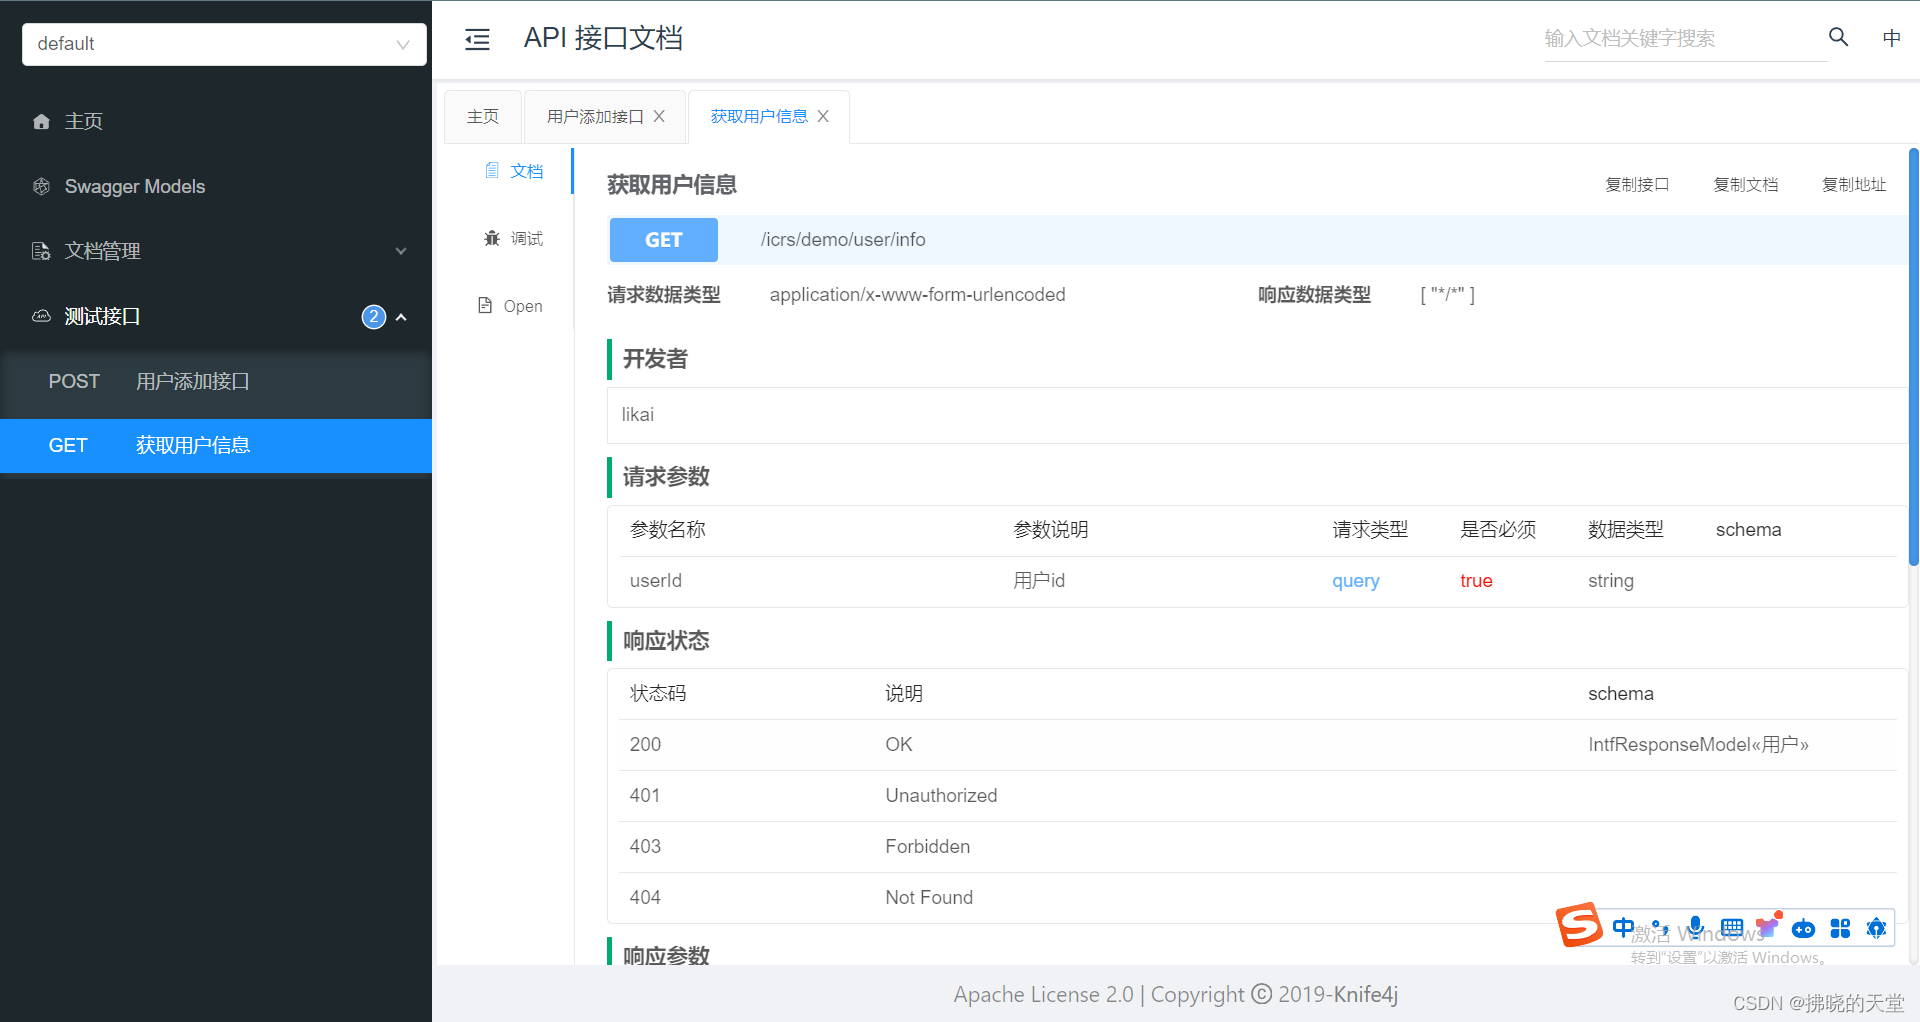
接口文档,调试,接口导出功能三块,其中接口导出可以导出通用的openApi协议,支持导入到YAPI或者postman中,方便测试同学测试。
另外接口安全部分可以自行实现APO拦截进行鉴权验签校验,防止非认证请求和接口重放攻击,流程参考下图:
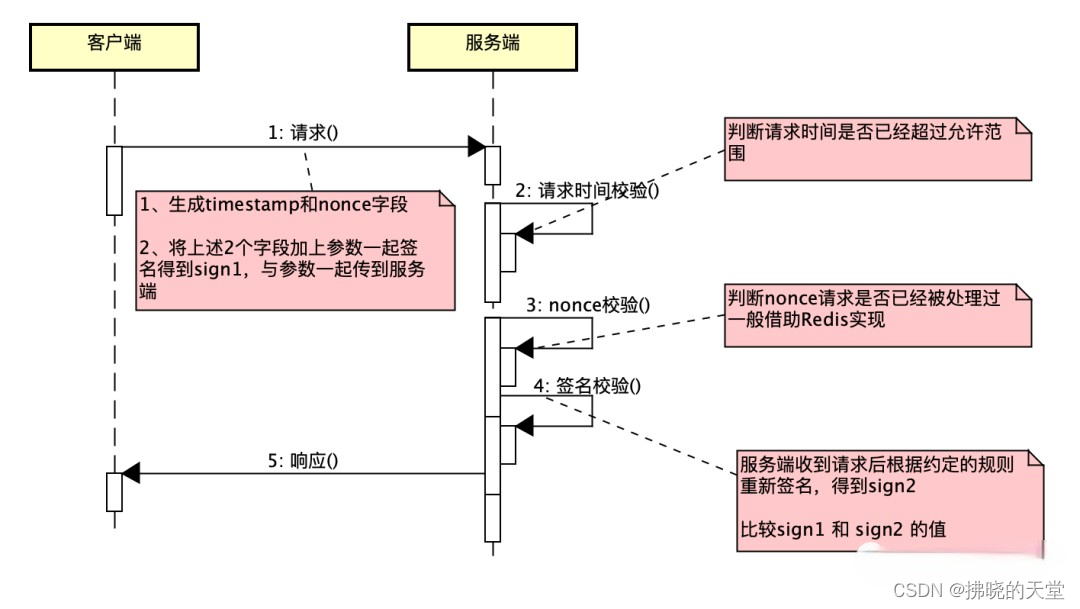
如果接口暴露在外网,接入内网网关的话也建议在后端做校验,可以通过referer判断是外网请求或是内部请求,在AOP中选择不同的校验方式,如外网请求用验签,内网请求用透传token判断,按需求灵活设置。


 609
609


 被折叠的 条评论
为什么被折叠?
被折叠的 条评论
为什么被折叠?
 到【灌水乐园】发言


