Canvas
canvas概述
-
canvas的像素化
我们使用canvas绘制了一个图形,一旦绘制成功了,canvas就像素化了它们。
canvas没有能力,从画布上再次得到这个图形,也就是说我们没有能力去修改已经在画布上的内容,这个就是canvas比较轻量的原因
如果我们想要让这个canvas图形移动,必须按照 清屏-更新-渲染的逻辑进行编程
-
canvas的动画思想
动画思想就是 清屏-更新-渲染
实际上动画的生成就是相关静态画面连续播放,这个就是动画的过程,我们把每一次绘制的静态画面叫做 “一帧”
时间的间隔就表示的是帧的间隔
-
面向对象思维实现canvas动画
因为canvas不能得到已经上屏的对象,所以我们要维持对象的状态。在canvas动画中,我们都使用面向对象来进行编程,因为我们可以使用面向对象的方式来维持canvas需要的属性和状态
canvas的绘制功能
const canvas = document.getElementById("myCanvas");
const ctx = canvas.getContext("2d");
绘制矩形
-
填充矩形
ctx.fillStyle = "green"; ctx.fillRect(x,y,width,height); -
绘制矩形边框
ctx.strokeStyle = "green"; ctx.strokeRect(x,y,width,height); -
清除画布
ctx.clearRect(x,y,width,height)
绘制路径
绘制路径作用是为了设置一个不规则的多边形状态
路径都是闭合的,使用路径进行绘制的时候需要既定的步骤
-
设置路径起点
-
使用绘制命令画出路径
-
封闭路径
-
填充或者绘制已经封闭路径的形状
// 创建一个路径
ctx.beginPath();
// 移动绘制点
ctx.moveTo(100, 100);
// 描述行进路径
ctx.lineTo(200, 200);
ctx.lineTo(400, 180);
ctx.lineTo(380, 50);
// 封闭路径
ctx.closePath();
// 绘制图形
ctx.strokeStyle = "pink";
ctx.stroke();
ctx.fillStyle = "orange";
ctx.fill();
stroke()通过线条来绘制图形轮廓
fill()通过填充路径的内容区域生成实心的图形
我们在绘制路径的时候可以选择不关闭路径,这个时候会实现自封闭现象(只针对fill)
圆弧
arc(x,y,radius,starAngle,endAngle,anticlockwise)
画一个以(x,y)为圆心的radius为半径的圆弧(圆),从starAngle到endAngle结束,按照anticlockwise给定的方向(默认为顺时针 false)来生成
圆弧也是绘制路径的一种也需要 beginPath() 和 stroke()
透明度
透明度的值是 0~1之间
ctx.globalAlpha = 0.2
线型
我们可以利用 lineWidth 设置线的粗细,属性值必须是数字,默认是1,没有单位。
ctx.lineWidth = 20;
lineCap决定了线段末端的属性
// 默认,线段末端以方形结束
ctx.lineCap = "butt"
// 线段末端以圆形结束
ctx.lineCap = "round"
// 方形 线段末端以方形结束,增加了一个宽度和线段相同,高度是线段厚度一半的矩形区域
ctx.lineCap = "square"
lineJoin用来设置图形两端连接处所显示的样子(线段,圆弧,曲线)
ctx.lineJoin = "round";	// 圆弧
ctx.lineJoin = "bevel";	// 平的
ctx.lineJoin = "miter"; // 默认
setLineDash()方法来定义虚线的样式,内部接收一个数组(数组内部是虚线的交替状态)
// 10表示每段虚线的长度 20标识虚线和虚线之间的距离
// 数组内部可以是一组状态 最少接收两个参数,也可以传多个
ctx.setLineDash([10,20]);
lineDashOffset设置虚线的起始偏移量
ctx.setLineDash([15, 12]);
ctx.lineDashOffset = 20;
ctx.moveTo(0, 100);
ctx.lineTo(400, 100);
ctx.stroke();
文本
我们可以在画布上绘制文字内容
ctx.font = "30px 宋体";
ctx.fillText("你好,我是宋体的文字",100,100);
textAlign设置文字对齐方式 start(默认), end, left, right, center
// 对齐基于 fillText方法的x值
ctx.font = "30px 宋体";
ctx.textAlign = "center";
ctx.fillText("你好,我是宋体的文字", 50, 50);
渐变
createLinearGradient(x0,y0,x1,y1) 线型渐变
x0 起点的x轴坐标 y0 起点的y轴坐标 x1 终点的x轴坐标 y1 终点的y轴坐标
const linear = ctx.createLinearGradient(0, 0, 200, 200);
linear.addColorStop(0, "red");
linear.addColorStop(0.3, "blue");
linear.addColorStop(0.5, "yellow");
linear.addColorStop(1, "purple");
ctx.fillStyle = linear;
ctx.fillRect(10,10,200,100);
createRadialGradient(x0,y0,r0,x1,y1,r1) 径向渐变
x0 开始圆的x轴坐标 y0 开始圆的y轴坐标 r0 开始圆的半径
x1 结束圆的x轴坐标 y1 结束圆的y轴坐标 r1 结束圆的半径
用的少
阴影
我们可以在画布中设置阴影的状态
ctx.shadowOffsetX = 20;	 // 左右偏移量
ctx.shadowOffsetY = 8;	 // 上下偏移量
ctx.shadowBlur = 4; 	 // 模糊状态
ctx.shadowColor = "red"; // 阴影颜色
ctx.font = "30px 宋体";
ctx.fillText("李银河", 50, 50);
使用图片
canvas中使用**drawImage()**来绘制图片,主要是外部的图片导入进来绘制到画布上
如果我们设置的是参数一共是两个(不包含第一个image),表示的是图片的加载位置
如果有四个参数,分别表示位置和宽高
// 创建一个image元素
const image = new Image();
// 用src设置图片的地址
image.src = "./image/green.jpg";
// 必须要在onload之后再进行绘制图片,否则不会渲染
image.onload = () => {
  // ctx.drawImage(image, 0, 0);
  ctx.drawImage(image, 250, 150,100,100);
};
注意:如果有8个参数,代表的是切片在图片上切下一块内容之后再画布中进行渲染。
前四个参数是图片中设置切片的宽度和高度,以及切片位置
后四个参数指的是切片在画布上的位置和切片宽度高度
资源管理器
我们在开发游戏的时候,有一些静态资源是需要请求回来的,否则如果直接开始,有些静态资源没有,会报错或者空白,比如我们的游戏背景图,如果没有请求回来就直接开始,页面会有空白现象
资源管理器就是当游戏需要资源全部加装完毕的时候,再开始游戏
获取对象中属性的长度
this.srcList = {
  beibei: "./image/beibei.jpg",
  green: "./image/green.jpg",
};
// 获取资源图片的总数  Object.keys 获取对象中属性的长度
const allAmount = Object.keys(this.srcList);
console.log(allAmount);  // ["beibei","green"]
      // 游戏类
      function Game() {
        this.canvas = document.querySelector("#myCanvas");
        this.ctx = this.canvas.getContext("2d");
        // 添加属性,保存需要的图片地址
        this.srcList = {
          beibei: "./image/beibei.jpg",
          green: "./image/green.jpg",
        };
        // 获取资源图片的总数  Object.keys 获取对象中属性的长度
        const allAmount = Object.keys(this.srcList).length;
        // 计数器 记录的是加载完毕的数量
        let count = 0;
        // 遍历 获取每一个路径地址
        for (k in this.srcList) {
          // 备份每一张图片的地址
          const src = this.srcList[k];
          // 创建图片
          this.srcList[k] = new Image();
          // 赋值src图片地址
          this.srcList[k].src = src;
          // 判断图片是否加载完成,如果完成了,计数,如果加载完毕的数量和总数量相同了,则说明资源加载完毕,开始游戏
          this.srcList[k].onload = () => {
            // 这里使用箭头函数捕获上一层 this
            // 增加计数器
            count++;
            this.ctx.clearRect(0, 0, 600, 400);
            this.ctx.font = "16px Arial";
            this.ctx.fillText(`图片已经加载${count}/${allAmount}`, 10, 50);
            // 判断图片是否加载完毕,如果加载完毕了,开始游戏
            if (count == allAmount)this.star();
          };
        }
      }
      Game.prototype = {
        constructor: Game,
        star: function () {
          this.ctx.drawImage(this.srcList["beibei"], 100, 150, 100, 100);
        },
      };
变形
canvas是可以进行变形的,但是变形的不是元素,而是ctx,ctx就是画布的渲染区域,整个画布再变形,我们需要在画布变形前,进行保存和恢复。
save()保存画布的所有状态 无参数
restore()恢复画布的所有状态 无参数
如果使用到变形,变形之前先备份,将世界和平的状态进行备份,然后再变形,变形完毕后再恢复到世界和平的样子。
移动
translate
ctx.translate(x, y);
旋转
rotate
ctx.rotate(deg);
缩放
scale
ctx.scale(0.5,0.5);
合成
合成就是我们常见的蒙版状态,本质就是如何进行压盖,如何进行显示。
我们可以通过 globalCompositeOperation来设置压盖顺序
比如我们先绘制了一个矩形再绘制了一个圆形,这时会出现圆压盖矩形的现象
ctx.fillStyle = "skyblue";
ctx.fillRect(100, 100, 100, 100);

// ctx.globalCompositeOperation = "destination-over"

ctx.fillStyle = "deeppink";
ctx.beginPath();
ctx.arc(200, 200, 60, 0, Math.PI * 2, false);
ctx.fill();
如果我们想要粉色在下面
ctx.globalCompositeOperation = "destination-over";
更多案例访问MDN
https://developer.mozilla.org/zh-CN/docs/Web/API/Canvas_API/Tutorial/Compositing
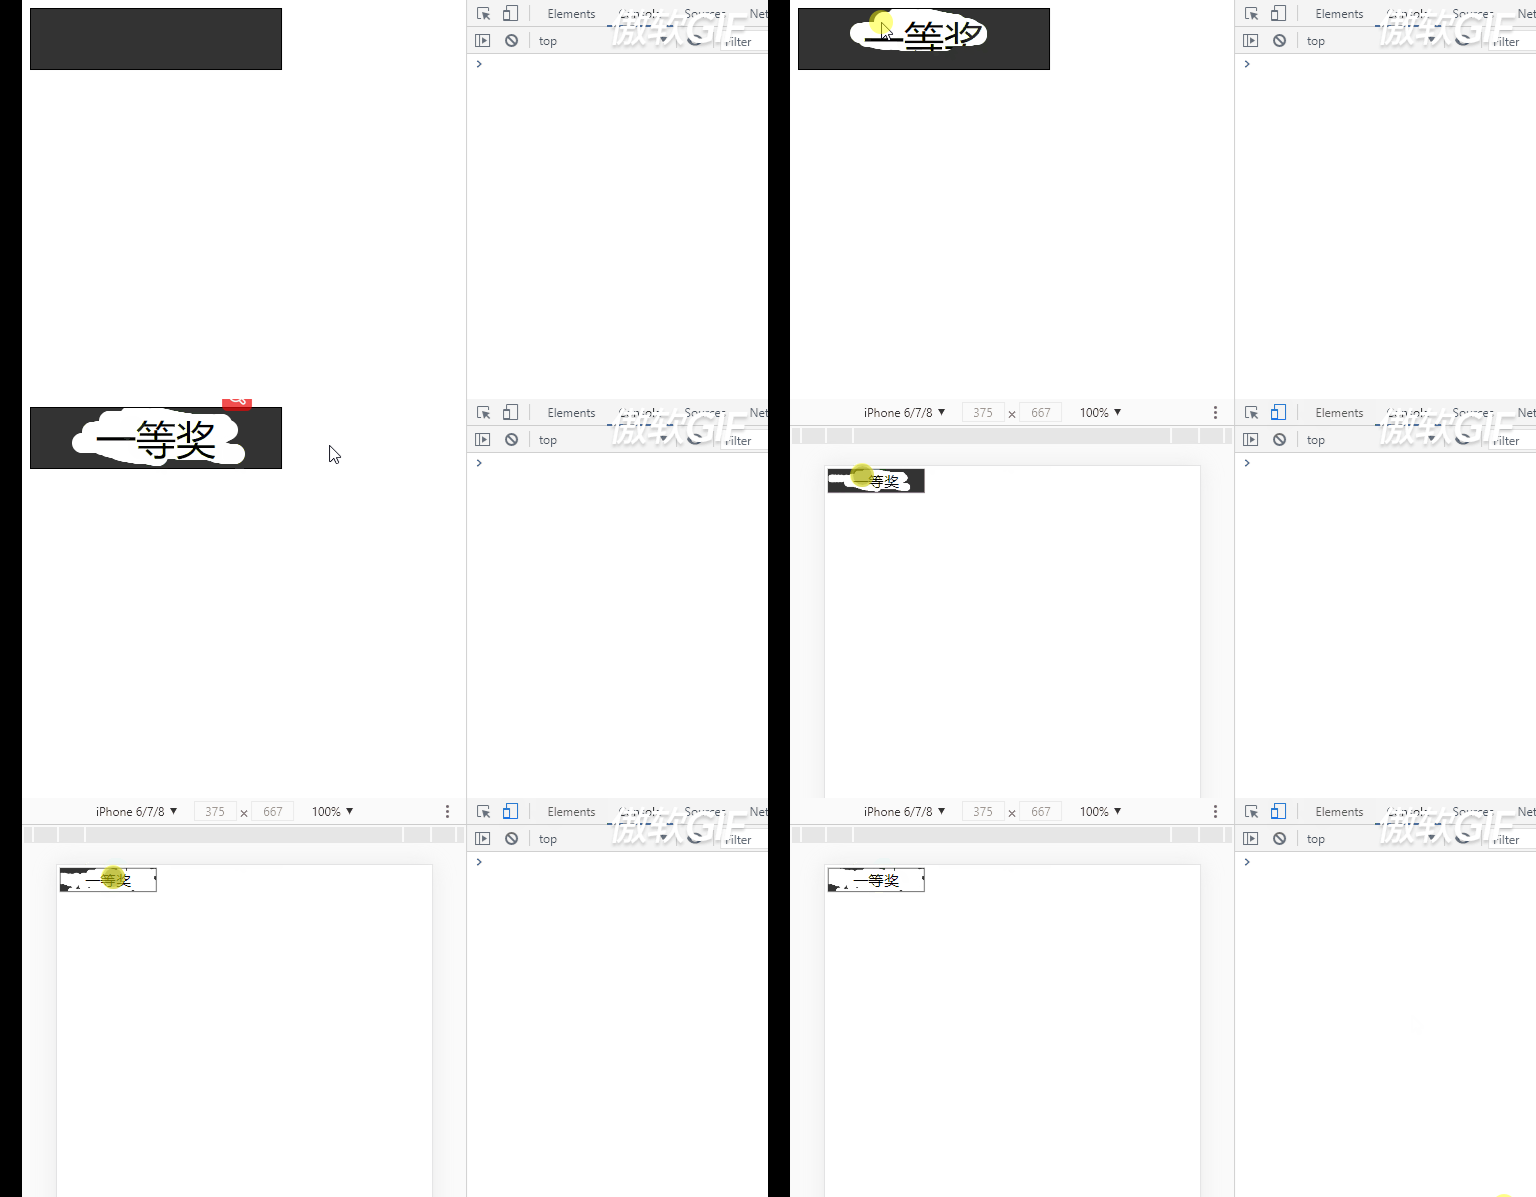
刮刮乐
效果图:

代码如下
<!DOCTYPE html>
<html lang="zh">
  <head>
    <meta charset="UTF-8" />
    <title>刮刮乐</title>
    <style>
      div {
        position: relative;
        width: 250px;
        height: 60px;
        line-height: 60px;
        text-align: center;
        font-size: 40px;
        border: 1px solid #000;
        user-select: none;
      }
      #myCanvas {
        position: absolute;
        top: 0;
        left: 0;
      }
    </style>
  </head>
  <body>
    <div>
      一等奖
      <canvas id="myCanvas" width="250" height="60"></canvas>
    </div>
    <script>
      const canvas = document.querySelector("#myCanvas");
      const ctx = canvas.getContext("2d");
      ctx.fillStyle = "#333";
      ctx.fillRect(0, 0, 250, 60);
      // 设置新画上的元素,实际上就是擦除之前的元素
      ctx.globalCompositeOperation = "destination-out";
      let flag = true;
      /* ==== PC端 ==== */
      // 鼠标按下
      canvas.addEventListener("mousedown", () => {
        flag = true;
        // 鼠标拖动
        canvas.addEventListener("mousemove", (e) => flag && erasure(e));
      });
      // 鼠标离开
      canvas.addEventListener("mouseup", () => (flag = false));

      /* ==== 移动端 ==== */
      // 手指触摸
      canvas.addEventListener("touchstart", () => {
        flag = true;
        // 手指滑动
        canvas.addEventListener("touchmove", (e) => flag && erasure(e));
      });
      // 手指离开
      canvas.addEventListener("touchend", () => (flag = false));

      // 擦除函数
      function erasure(e) {
        let x = e.offsetX || e.targetTouches[0].clientX;
        let y = e.offsetY || e.targetTouches[0].clientY;
        ctx.beginPath();
        ctx.arc(x, y, 5, 0, Math.PI * 2, false);
        ctx.fill();
      }
    </script>
  </body>
</html>
全景移动
效果图:

代码如下:
<!DOCTYPE html>
<html lang="zh">
<head>
  <meta charset="UTF-8">
  <title>Title</title>
  <style>
    canvas {
      border: 1px solid #000000;
    }
  </style>
</head>
<body>
<canvas id="myCanvas"></canvas>
<canvas id="beiBei"></canvas>
<script src="./PanoramaMove.js"></script>
<script>
  let panoramaMove_1 = new PanoramaMove("#myCanvas","./image/bg.jpg");
  panoramaMove_1.render();
</script>
</body>
</html>
PanoramaMove.js文件
/** ==== 全景滚动构造函数 ==== **/
/**
 * @param {String} element DOM元素
 * @param {String} src     图片路径
 */
function PanoramaMove(element,src) {
  this.element = element;
  this.c = null;
  this.ctx = null;
  this.src = src;
  this.translateX = 0;
}

PanoramaMove.prototype = {
  constructor: PanoramaMove,
  /** ==== 初始化canvas函数 ==== **/
  /**
   * @param {Number} width  图片的宽度
   * @param {Number} height 图片的高度
   */
  canvasInit: function (width,height) {
    this.c = document.querySelector(this.element);
    this.c.width = width;
    this.c.height = height;
    this.ctx = this.c.getContext("2d");
  },
  /** ==== 渲染图片函数 ==== **/
  render: function () {
    const img = new Image();
    img.src = this.src;
    img.onload = () => {
      this.canvasInit(img.width,img.height);
      this.drawImg(img)();
    };
  },
  /** ==== 绘制图片函数 ==== **/
  /**
   * @param {HTMLElement} img DOM元素
   * @returns {function(): void} void
   */
  drawImg: function (img) {
    return () => {
      this.ctx.save();
      this.ctx.clearRect(0,0,this.c.width,this.c.height);
      this.ctx.translate(-this.translateX,0);
      this.ctx.drawImage(img,0,0);
      this.ctx.drawImage(img,this.c.width,0);
      this.translateX++;
      if(this.translateX >= this.c.width) this.translateX = 0;
      window.requestAnimationFrame(this.drawImg(img));
      this.ctx.restore();
    }
  }
}
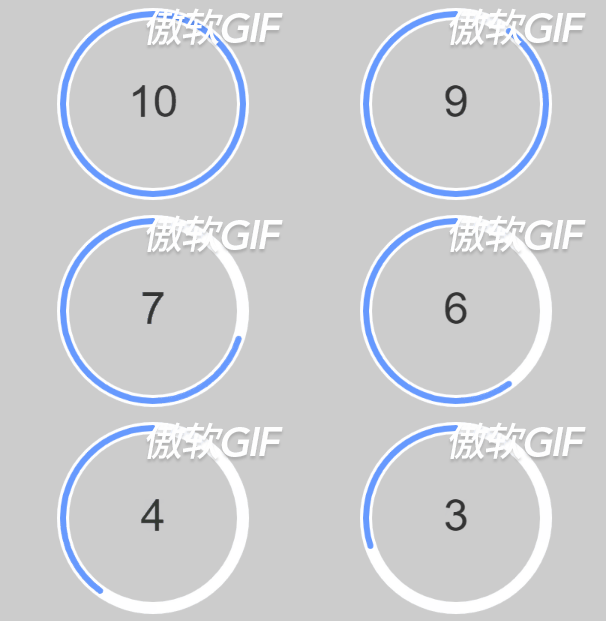
圆环倒计时
效果图:
代码如下:
<!DOCTYPE html>
<html lang="zh">
<head>
  <meta charset="UTF-8">
  <title>圆环倒计时</title>
  <style>
    body {
      background-color: #cccccc;
    }
  </style>
</head>
<body>
<canvas id="myCanvas"></canvas>
<script src="./ClockCountDown.js"></script>
<script>
  const clock = new ClockCountDown("#myCanvas", 400, 400, 10);
  clock.render();
</script>
</body>
</html>
ClockCountDown.js文件
/**
 *  圆环倒计时 构造函数
 * @param {String} element DOM类名或ID
 * @param {Number} canvasWidth canvas宽度
 * @param {Number} canvasHeight canvas高度
 * @param {Number} allSeconds 一共要倒计时多少秒
 * @constructor
 */
function ClockCountDown(element, canvasWidth, canvasHeight, allSeconds) {
  /**
   * this.element -- DOM类名或ID
   * this.c -- canvas
   * this.ctx -- canvas.ctx
   * this.width -- canvas.width
   * this.height -- canvas.height
   * this.startAngle -- 开始的弧度
   * this.endAngle -- 结束的弧度
   * this.step -- 动画的次数
   * this.num -- 倒计时已经过去了的秒数
   * this.allSeconds -- 总秒数
   * this.timer -- 定时器容器
   */
  this.element = element;
  this.c = null;
  this.ctx = null;
  this.width = canvasWidth;
  this.height = canvasHeight;
  this.startAngle = 1.5 * Math.PI;
  this.endAngle = -0.5 * Math.PI;
  this.step = 1;
  this.num = 0;
  this.allSeconds = allSeconds;
  this.timer = null;
  /** ==== 外圆环数据 ==== */
  this.outAnnulusData = {
    lineWidth: 16,
    strokeStyle: "#ffffff",
    r: 120,
  }
  /** ==== 内圆环数据 ==== */
  this.innerAnnulusData = {
    lineWidth: 8,
    lineCap: "round",
    strokeStyle: "#6699ff",
    r: 120,
  }
  /** ==== 倒计时文字数据 ==== */
  this.countDownTextData = {
    font: "60px Arial",
    fillStyle: "#333333",
    textAlign: "center",
    textBaseline: "middle",
  }
}
/** ==== 往原型上添加方法 ==== */
ClockCountDown.prototype = {
  constructor: ClockCountDown,
  /** ==== canvas初始化 ==== */
  canvasInit() {
    this.c = document.querySelector(this.element);
    this.ctx = this.c.getContext("2d");
    this.c.width = this.width;
    this.c.height = this.height;
  },
  /** ==== 绘制外圆环 ==== */
  outerAnnulus() {
    const {lineWidth, strokeStyle, r} = this.outAnnulusData;
    this.ctx.lineWidth = lineWidth;
    this.ctx.strokeStyle = strokeStyle;
    this.ctx.arc(this.width / 2, this.height / 2, r, 0, 2 * Math.PI);
    this.ctx.stroke();
  },
  /** ==== 绘制内圆环 ==== */
  innerAnnulus() {
    const {lineWidth, lineCap, strokeStyle, r} = this.innerAnnulusData;
    this.ctx.beginPath();
    this.ctx.lineWidth = lineWidth;
    this.ctx.lineCap = lineCap;
    this.ctx.strokeStyle = strokeStyle;
    this.ctx.arc(this.width / 2, this.height / 2, r, this.startAngle, this.endAngle, true);
    this.ctx.stroke();
  },
  /** ==== 绘制倒计时文字 ==== */
  countDownText() {
    const {font, fillStyle, textAlign, textBaseline} = this.countDownTextData;
    this.ctx.beginPath();
    this.ctx.font = font;
    this.ctx.fillStyle = fillStyle;
    this.ctx.textAlign = textAlign;
    this.ctx.textBaseline = textBaseline;
    this.ctx.fillText(`${this.allSeconds - this.num}`, this.width / 2, this.height / 2);
    this.ctx.closePath();
    this.num++;
  },
  /** ==== 动画函数 ==== */
  animation() {
    /** ==== 返回箭头函数 纠正this指向 */
    return () => {
      if (this.step <= this.allSeconds) {
        this.endAngle = this.endAngle + 2 * Math.PI / this.allSeconds;
        this.ctx.clearRect(0, 0, this.c.width, this.c.height);
        this.outerAnnulus();
        this.innerAnnulus();
        this.countDownText();
        this.step++;
      } else {
        this.innerAnnulus()
        clearInterval(this.timer);
      }
    }
  },
  /** ==== 渲染函数 ==== */
  render() {
    this.canvasInit();
    this.outerAnnulus();
    this.innerAnnulus();
    this.countDownText();
    this.timer = setInterval(this.animation(), 1000);
  }
}


 1275
1275


 被折叠的 条评论
为什么被折叠?


