


源码
https://github.com/kelvinylon/eureka.server
1.Eureka服务器(根项目)
作为系统各微服务的管理者,eureka服务器在spring boot下只需要少量配置即可开启
build.gradle文件如下:
plugins {
	id 'org.springframework.boot' version '2.1.7.RELEASE'
	id 'io.spring.dependency-management' version '1.0.8.RELEASE'
	id 'java'
	id 'war'
}

group = 'kelvin'
version = '0.0.1-SNAPSHOT'
sourceCompatibility = '1.8'

repositories {
	mavenCentral()
}

ext {
	set('springCloudVersion', "Greenwich.SR2")
}

dependencies {
	implementation 'org.springframework.boot:spring-boot-starter-web'
	implementation 'org.springframework.cloud:spring-cloud-starter-netflix-eureka-server'
	implementation 'org.springframework.cloud:spring-cloud-starter-netflix-eureka-client'
	testImplementation 'org.springframework.boot:spring-boot-starter-test'
}

dependencyManagement {
	imports {
		mavenBom "org.springframework.cloud:spring-cloud-dependencies:${springCloudVersion}"
	}
}

allprojects {

}
settings.gradle文件:
rootProject.name = 'eureka.server'
include 'service1'
include 'FrontClient'
include 'service2'
此处包含了3个子模块,其中FrontClient作为前置服务器,把请求分发到service1和service2,另外为了模拟微服务的依赖,service2也会依赖service1
Eureka Server的应用启动类:
package kelvin.eureka.server;

import org.springframework.boot.SpringApplication;
import org.springframework.boot.autoconfigure.SpringBootApplication;
import org.springframework.cloud.netflix.eureka.server.EnableEurekaServer;

@SpringBootApplication
@EnableEurekaServer
public class Application {
	public static void main(String[] args) {
		SpringApplication.run(Application.class, args);
	}
}
注意需要显式加上@EnableEurekaServer
application.yml (localhost:8761)
server:
  port: 8761

eureka:
  # 设置dashboard的路径
  dashboard:
    path: /eurekadashboard
  instance:
    hostname: localhost
    # eureka服务器好像不需要设定是否用IP,由客户端设定
#    preferIpAddress: true
  server:
    # 需要关闭eureka自我保护机制才能剔除服务,但不建议关闭
    # enableSelfPreservation: false
  client:
    # eureka 设置服务器不注册自己
#    registerWithEureka: false
    registerWithEureka: true
    # 不拉取注册表
#    fetchRegistry: false
    fetchRegistry: true
    # stand alone mode
    serviceUrl:
#      defaultZone: http://${eureka.instance.hostname}:${server.port}/eureka/
      defaultZone: http://localhost2:8762/eureka/
      # 好像不需要这个
#    healthcheck:
#      enabled: true

spring:
  # 需要设置这个,才能正常访问dashboard
  freemarker:
    prefer-file-system-access: false
  # 名称
  application:
    name: eureka-service
另外,生产环境下需要设置一个平行的eureka服务器,以实现eureka的高可用。这里利用spring boot的profile设置另一台eureka服务器(localhost2:8762)
application-dev.yml
server:
  port: 8762

eureka:
  instance:
    hostname: localhost2
  client:
    serviceUrl:
#      defaultZone: http://${eureka.instance.hostname}:8761/eureka/
      defaultZone: http://localhost:8761/eureka/
启动时增加参数–spring.profiles.active=dev 即可启动spring profile dev (双横杠,java程序参数传入即可)
另外记得修改系统的host文件,增加记录
127.0.0.1 localhost localhost2
使用gradle插件进行bootJar指令,得到可运行的jar(在build/libs中)
然后分别使用默认的profile和dev profile启动jar包(不建议直接用bootRun指令,好像不能带启动参数)
启动过程可能会报这个错:
com.netflix.discovery.shared.transport.TransportException: Cannot execute request on any known server
这是eureka在注册服务时报的错,两个服务器总不能同时开启吧!不用理会,进入dashboard查看状态:
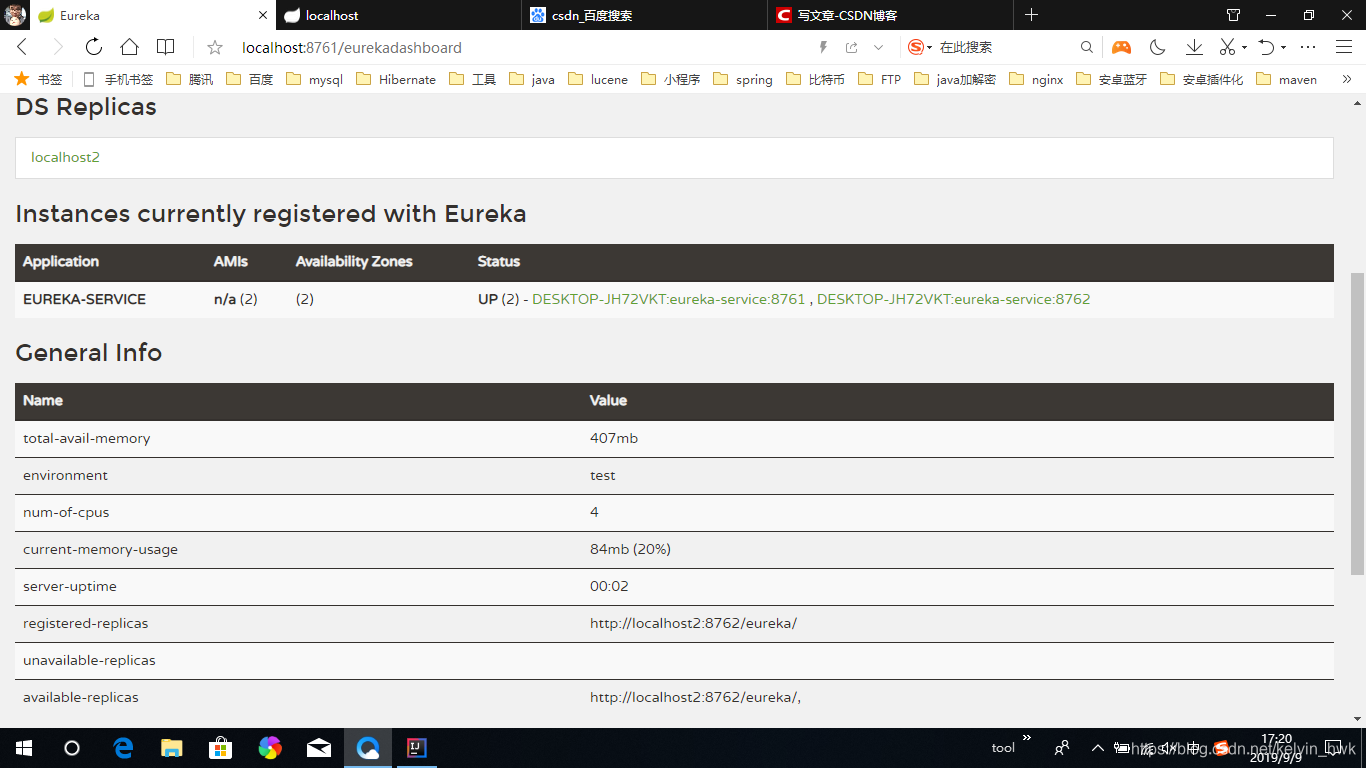
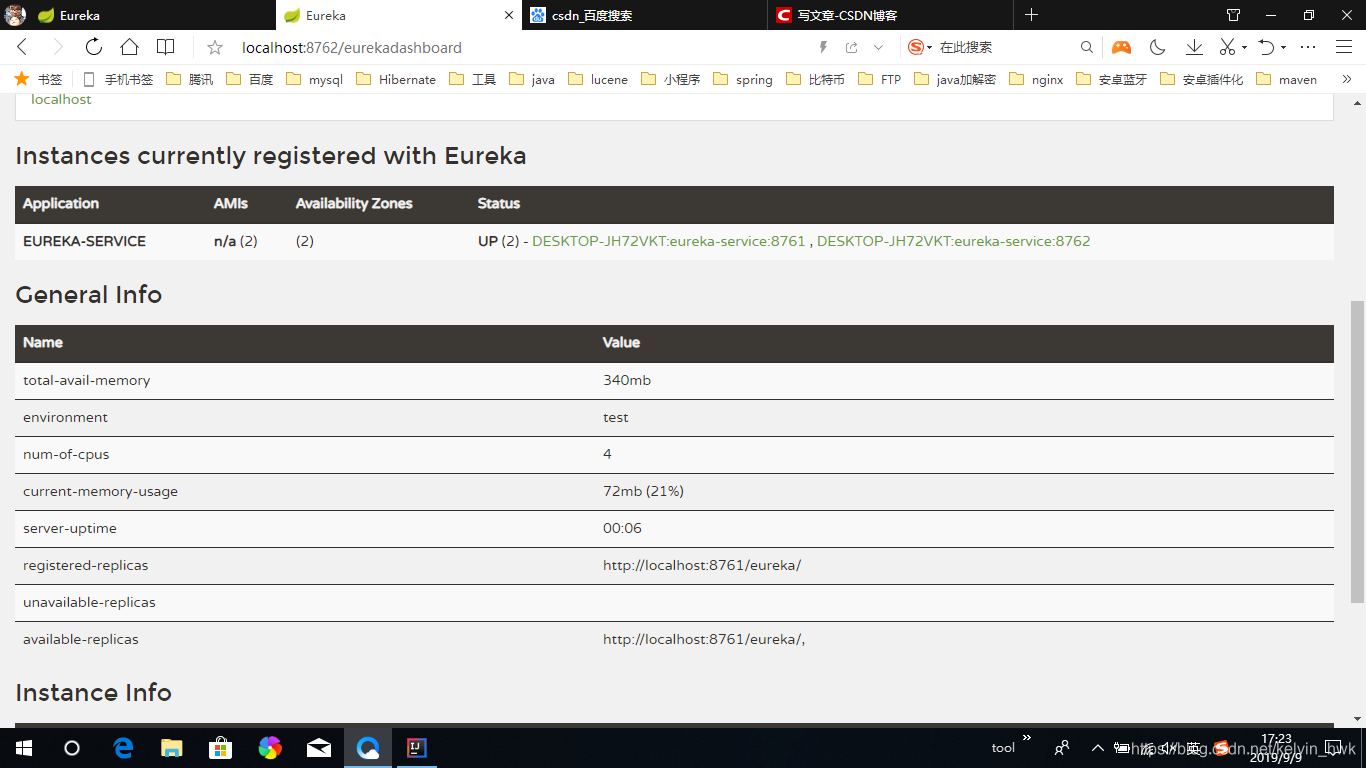
看到两个服务器的eureka面板,registered-replicas和available-replicas有对等服务器的url,就证明eureka服务器搭建成功了
2.前置FrontClient(作为子模块)
顾名思义,此服务器作为前置服务器接收用户请求,然后再调用eureka服务器中注册的微服务对请求进行处理
FrontClient的build.gradle
plugins {
    id 'org.springframework.boot'
    id 'io.spring.dependency-management'
    id 'java'
    id 'war'
}

group 'kelvin'
version '0.0.1-SNAPSHOT'

sourceCompatibility = 1.8

repositories {
    mavenCentral()
}

ext {
    set('springCloudVersion', "Greenwich.SR2")
}

dependencies {
    // spring boot web
    implementation 'org.springframework.boot:spring-boot-starter-web'

    // 此处不需要依赖eureka服务器,因为FrontClient只作为eureka客户端
//  implementation 'org.springframework.cloud:spring-cloud-starter-netflix-eureka-server'

    // eureka客户端
    implementation 'org.springframework.cloud:spring-cloud-starter-netflix-eureka-client'

    testCompile group: 'junit', name: 'junit', version: '4.12'

    // 依赖service1
    compile project(':service1')
}

dependencyManagement {
    imports {
        mavenBom "org.springframework.cloud:spring-cloud-dependencies:${springCloudVersion}"
    }
}
注意,作为子项目,插件声明部分不用带版本(即plugins{}),另外也不需要作为eureka服务器,所以不用依赖eureka server dependency。另外试了下gradle的子项目依赖,依赖了service1子项目,与根项目基本上差不多。
看看应用类:
FrontApplication.java
package kelvin.front;

import com.kelvin.Response;
import org.springframework.beans.factory.annotation.Autowired;
import org.springframework.boot.SpringApplication;
import org.springframework.boot.autoconfigure.SpringBootApplication;
import org.springframework.cloud.client.loadbalancer.LoadBalanced;
import org.springframework.context.annotation.Bean;
import org.springframework.web.bind.annotation.RequestMapping;
import org.springframework.web.bind.annotation.RestController;
import org.springframework.web.client.RestTemplate;

@SpringBootApplication
@RestController
public class FrontApplication {

    @Bean
    @LoadBalanced
    RestTemplate restTemplate() {
        return new RestTemplate();
    }

    @RequestMapping("/front")
    public String front() {
        return "front";
    }

    @Autowired
    RestTemplate restTemplate;

    @RequestMapping("/service1")
    public Response service1() {
        return restTemplate.getForObject("http://Service-1/service", Response.class);
    }

    @RequestMapping("/service2")
    public String service2() {
        return restTemplate.getForObject("http://Service-2/service", String.class);
    }

    public static void main(String[] args) {
        SpringApplication.run(FrontApplication.class, args);
    }
}
上面的代码,把容器配置和控制器写在一起,实际上分开写会更清晰。现在的spring boot版本,有@SpringBootApplication标注,基本上就自动帮你做很多事情了,不需要显式使用其他标注。
注意需要定义一个RestTemplate bean,现在的版本好像不会自动生成这个bean,用来调用微服务的,这个bean还要加上@LoadBalanced注解以实现负载均衡。
然后,我们在控制器代码里,使用RestTemplate调用其他微服务,注意,getForObject的url参数格式:
http://service名称/xxx
service名称是配置spring.application.name指定的,后面不用带端口(也不可能带端口),如果该名称的服务在eureka注册了多个,由spring自己选择其中一个微服务来进行处理。
接下来,看看FrontClient的spring boot配置文件:
application.yml
server:
  port: 80

spring:
  application:
    name: front-service

eureka:
  instance:
    host: localhost
  client:
    serviceUrl:
      defaultZone: http://localhost:8761/eureka/,http://localhost2:8762/eureka/
注意eureka的配置,写上两个eureka服务器的实际地址
3.Service1(作为子模块,给FrontClient调用)
不多说,其实和FrontClient项目差不多,直接贴代码:
build.gradle
plugins {
    id 'org.springframework.boot'
    id 'io.spring.dependency-management'
    id 'java'
    id 'war'
}

group 'kelvin'
version '0.0.1-SNAPSHOT'

sourceCompatibility = 1.8

repositories {
    mavenCentral()
}

// 设置常量springCloudVersion
ext {
    set('springCloudVersion', "Greenwich.SR2")
}

dependencies {
    implementation 'org.springframework.boot:spring-boot-starter-web'
    implementation 'org.springframework.cloud:spring-cloud-starter-netflix-eureka-client'
    testCompile group: 'junit', name: 'junit', version: '4.12'
}

// spring boot的依赖管理插件需要此配置
dependencyManagement {
    imports {
        mavenBom "org.springframework.cloud:spring-cloud-dependencies:${springCloudVersion}"
    }
}

// 模块service1需要被FrontClient依赖,则需要配置jar.enabled=true
jar.enabled=true
这里注意,FrontClient依赖了service1的某个类(自定义的一个Response类,很简单的),所以这里要设置成能打包jar
jar.enabled=true
其他和FrontClient差不多
看看应用类
Service1App.java
package com.kelvin;

import org.springframework.boot.SpringApplication;
import org.springframework.boot.autoconfigure.SpringBootApplication;

@SpringBootApplication
public class Service1App {

    public static void main(String[] args) {
        SpringApplication.run(Service1App.class, args);
    }
}
这里控制器就分开写了
Service1Controller.java
package com.kelvin;

import org.springframework.web.bind.annotation.RequestMapping;
import org.springframework.web.bind.annotation.RestController;

import javax.servlet.http.HttpServletRequest;

@RestController
public class Service1Controller {

    @RequestMapping("/service")
    public Response service(HttpServletRequest req) {
        return new Response(0, "this is service1, port="
                + req.getServerPort());
    }
}
控制器很简单的输出了一个端口,返回了Response类,看看Response类的代码:
package com.kelvin;

public class Response {

    private int rspCode;
    private String rspMsg;

    public Response() {

    }

    public Response(int rspCode, String rspMsg) {
        this.rspCode = rspCode;
        this.rspMsg = rspMsg;
    }

    public int getRspCode() {
        return rspCode;
    }

    public void setRspCode(int rspCode) {
        this.rspCode = rspCode;
    }

    public String getRspMsg() {
        return rspMsg;
    }

    public void setRspMsg(String rspMsg) {
        this.rspMsg = rspMsg;
    }
}
简单的结构体,注意要带无参的构造器!不然在FrontClient中会报错说你没有默认构造器
再看看配置
application.yml
server:
  port: 8080

spring:
  application:
    name: Service-1

eureka:
  client:
    serviceUrl:
      defaultZone: http://localhost:8761/eureka/,http://localhost2:8762/eureka/
4.Service2(作为子模块,也调用了Service1微服务)
直接上代码啦!
build.gradle
plugins {
    id 'org.springframework.boot'
    id 'io.spring.dependency-management'
    id 'java'
    id 'war'
}

group 'kelvin'
version '0.0.1-SNAPSHOT'

sourceCompatibility = 1.8

repositories {
    mavenCentral()
}

dependencies {
    implementation 'org.springframework.boot:spring-boot-starter-web'
    implementation 'org.springframework.cloud:spring-cloud-starter-netflix-eureka-client'
    testCompile group: 'junit', name: 'junit', version: '4.12'
}

// 设置常量springCloudVersion
ext {
    set('springCloudVersion', "Greenwich.SR2")
}

// spring boot的依赖管理插件需要此配置
dependencyManagement {
    imports {
        mavenBom "org.springframework.cloud:spring-cloud-dependencies:${springCloudVersion}"
    }
}
这个build.gradle够干净,没有依赖其他子模块,也没被其他模块依赖
应用类:
Service2App.java
package com.kelvin.service2;

import org.springframework.boot.SpringApplication;
import org.springframework.boot.autoconfigure.SpringBootApplication;
import org.springframework.cloud.client.loadbalancer.LoadBalanced;
import org.springframework.context.annotation.Bean;
import org.springframework.web.client.RestTemplate;

@SpringBootApplication
public class Service2App {

    @Bean
    @LoadBalanced
    public RestTemplate restTemplate() {
        return new RestTemplate();
    }

    public static void main(String[] args) {
        SpringApplication.run(Service2App.class, args);
    }

}
因为调用了Service1,所以要建立一个RestTemplate bean
控制器
Service2Controller.java
package com.kelvin.service2;
import org.springframework.beans.factory.annotation.Autowired;
import org.springframework.web.bind.annotation.RequestMapping;
import org.springframework.web.bind.annotation.RestController;
import org.springframework.web.client.RestTemplate;
@RestController
public class Service2Controller {
@Autowired
RestTemplate restTemplate;
@RequestMapping("/service")
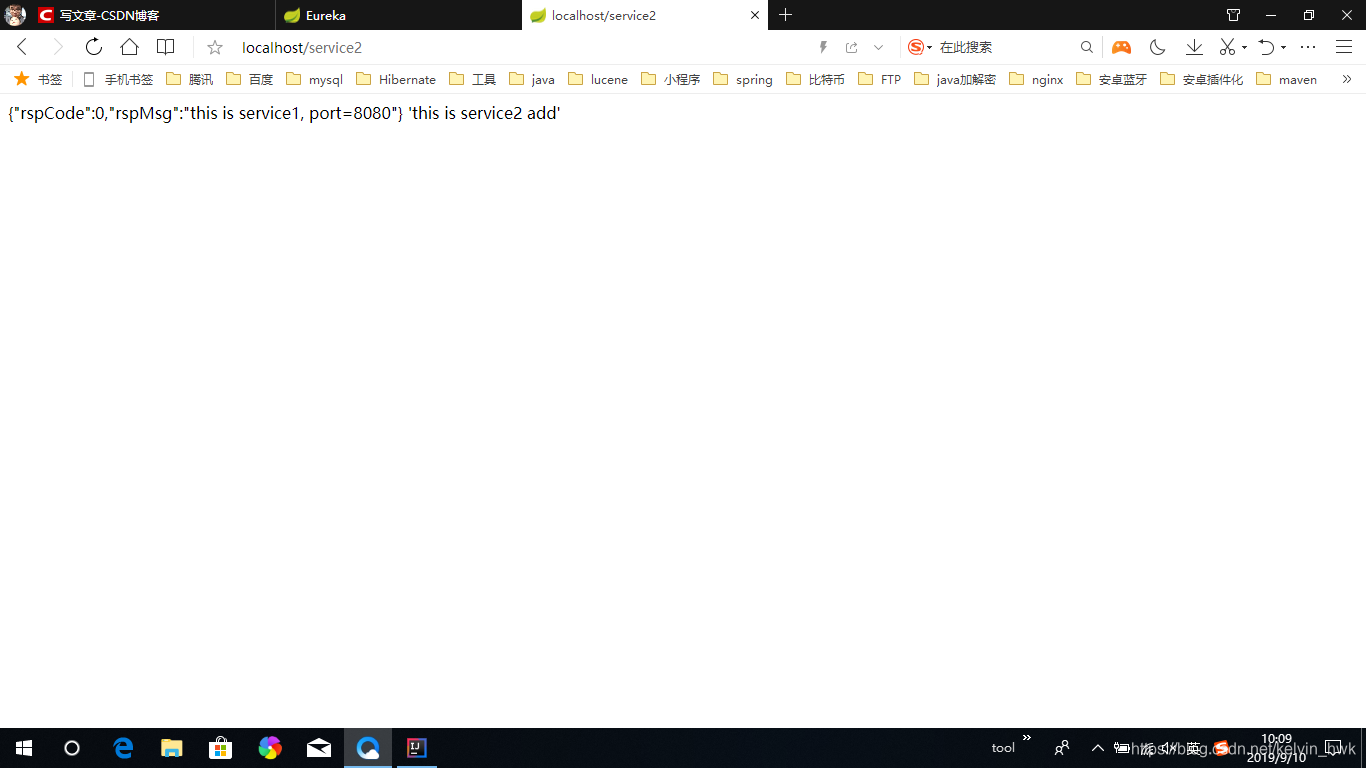
public String service() {
String result = restTemplate.getForObject("http://Service-1/service", String.class);
return result += " 'this is service2 add'";
}
}
最后贴上spring boot配置
server:
  port: 8081

spring:
  application:
    name: Service-2

eureka:
  instance:
    host: localhost
  client:
    serviceUrl:
      defaultZone: http://localhost:8761/eureka/,http://localhost2:8762/eureka/
测试
各个微服务的开启是独立的,不需要特定的顺序,报错了就看看是不是因为eureka服务器没有开启,可以后面再启动eureka服务器。可以尝试用不同端口多开几个Service1,看看负载均衡的效果。
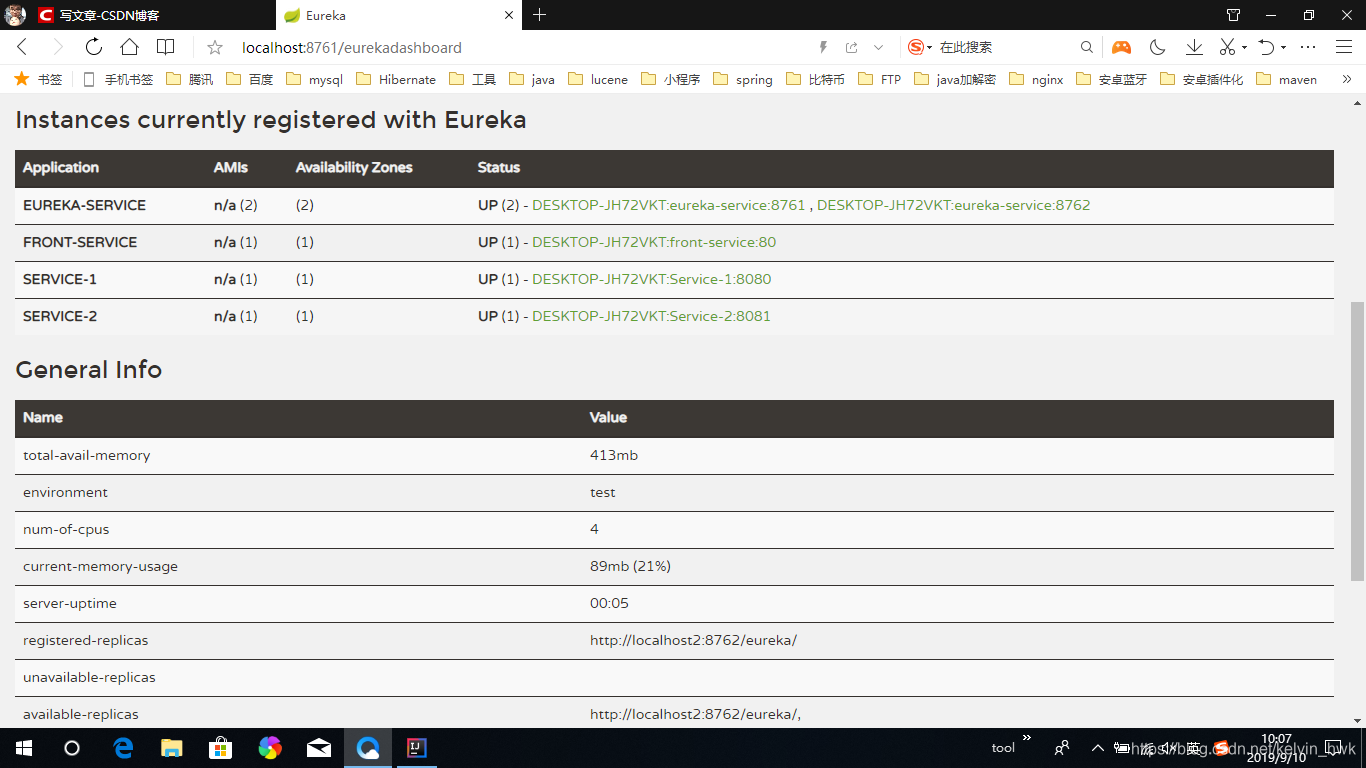
这里贴上几个测试图
eureka dashboard:
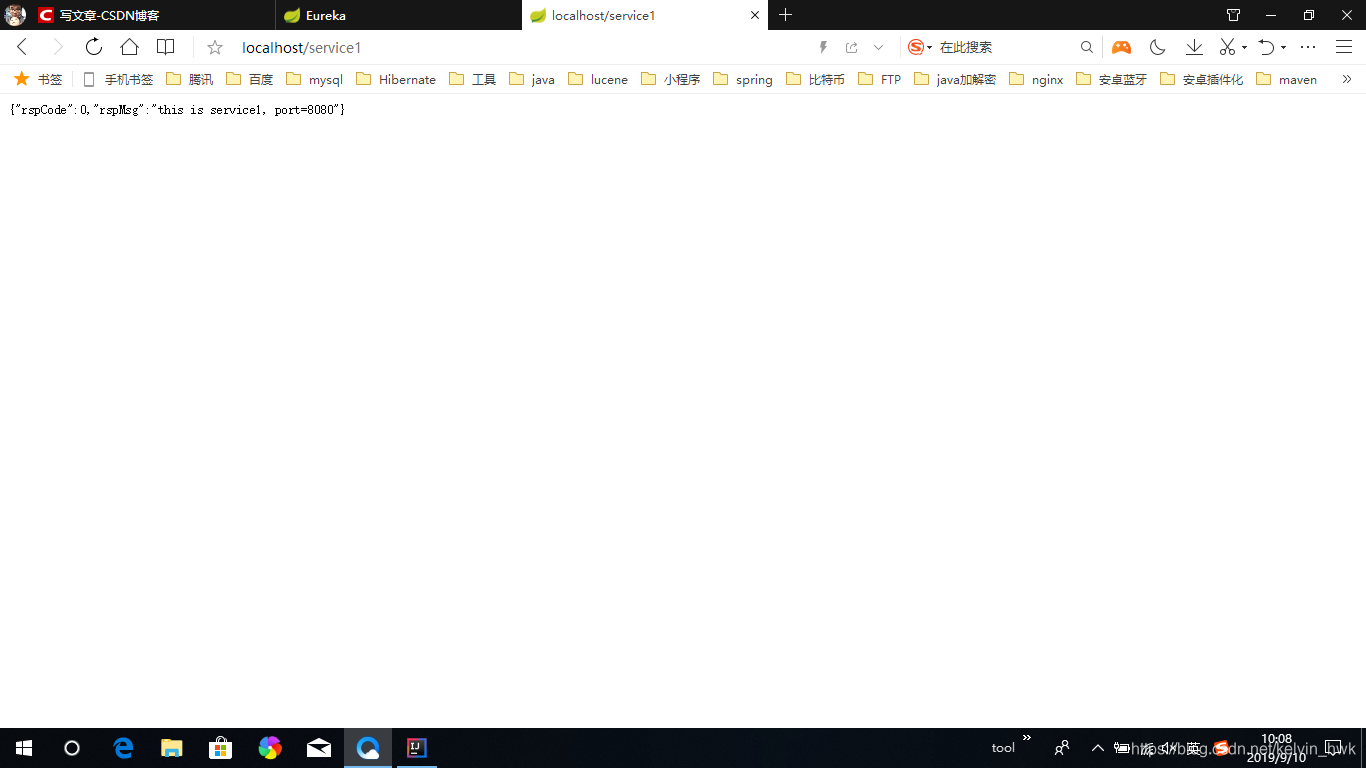
访问前置服务器的service1控制器
访问前置服务器的service2控制器


 1万+
1万+


 被折叠的 条评论
为什么被折叠?
被折叠的 条评论
为什么被折叠?
 到【灌水乐园】发言


