


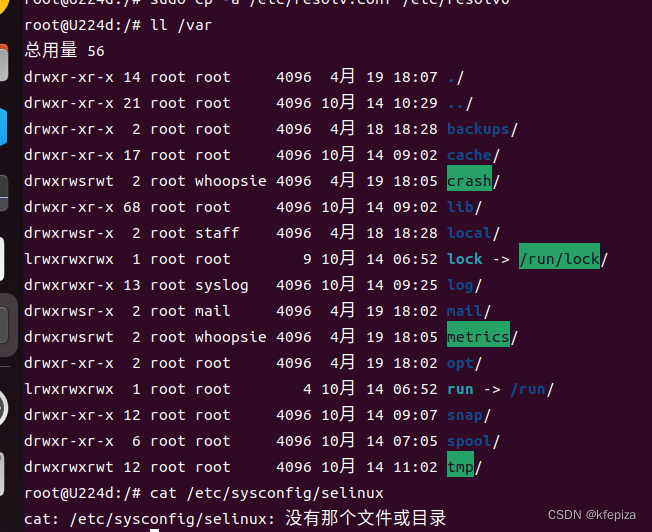
今天安装Ubuntu22.04时, 发现 /tmp , /var/tmp 等文件夹的属性是 drwxrwxrwt
又发现 CentOS7 的 /tmp 是 drwxrwxrwt.

经查
drwxrwxrwt含义是:
- 任何人都可以在此目录拥有写权限,但是不能删除别人拥有的文件
t是Sticky bit (粘贴位) 是Unix文件系统权限的一个旗标
可以用 chmod 1777 设为 drwxrwxrwt
chmod 1777 file
试验
z@U224d:~/temp$ mkdir test
z@U224d:~/temp$ cd test
z@U224d:~/temp/test$ touch file
z@U224d:~/temp/test$ mkdir dire
z@U224d:~/temp/test$ ls -l
总用量 4
drwxrwxr-x 2 z z 4096 10月 14 11:55 dire
-rw-rw-r-- 1 z z    0 10月 14 11:55 file
z@U224d:~/temp/test$ chmod +t dire
z@U224d:~/temp/test$ chmod +t file
z@U224d:~/temp/test$ ls -l
总用量 4
drwxrwxr-t 2 z z 4096 10月 14 11:55 dire
-rw-rw-r-T 1 z z    0 10月 14 11:55 file
z@U224d:~/temp/test$ chmod 1777 dire
z@U224d:~/temp/test$ chmod 1777 file
z@U224d:~/temp/test$ ls -l
总用量 4
drwxrwxrwt 2 z z 4096 10月 14 11:55 dire
-rwxrwxrwt 1 z z    0 10月 14 11:55 file
z@U224d:~/temp/test$ chmod 0 dire file
z@U224d:~/temp/test$ ls -l
总用量 4
d--------- 2 z z 4096 10月 14 11:55 dire
---------- 1 z z    0 10月 14 11:55 file
z@U224d:~/temp/test$ chmod u+t dire file
z@U224d:~/temp/test$ ls -l
总用量 4
d--------- 2 z z 4096 10月 14 11:55 dire
---------- 1 z z    0 10月 14 11:55 file
z@U224d:~/temp/test$ chmod g+t dire file
z@U224d:~/temp/test$ ls -l
总用量 4
d--------- 2 z z 4096 10月 14 11:55 dire
---------- 1 z z    0 10月 14 11:55 file
z@U224d:~/temp/test$ chmod o+t dire file
z@U224d:~/temp/test$ ls -l
总用量 4
d--------T 2 z z 4096 10月 14 11:55 dire
---------T 1 z z    0 10月 14 11:55 file
z@U224d:~/temp/test$ chmod 0 dire file
z@U224d:~/temp/test$ ls -l
总用量 4
d--------- 2 z z 4096 10月 14 11:55 dire
---------- 1 z z    0 10月 14 11:55 file
z@U224d:~/temp/test$ chmod +t dire file
z@U224d:~/temp/test$ ls -l
总用量 4
d--------T 2 z z 4096 10月 14 11:55 dire
---------T 1 z z    0 10月 14 11:55 file
z@U224d:~/temp/test$ chmod 0 dire file
z@U224d:~/temp/test$ ls -l
总用量 4
d--------- 2 z z 4096 10月 14 11:55 dire
---------- 1 z z    0 10月 14 11:55 file
z@U224d:~/temp/test$ chmod +t dire
z@U224d:~/temp/test$ chmod +t file
z@U224d:~/temp/test$ ls -l
总用量 4
d--------T 2 z z 4096 10月 14 11:55 dire
---------T 1 z z    0 10月 14 11:55 file
z@U224d:~/temp/test$ chmod 0 dire file
z@U224d:~/temp/test$ ls -l
总用量 4
d--------- 2 z z 4096 10月 14 11:55 dire
---------- 1 z z    0 10月 14 11:55 file
z@U224d:~/temp/test$ chmod =t dire file
z@U224d:~/temp/test$ ls -l
总用量 4
d--------T 2 z z 4096 10月 14 11:55 dire
---------T 1 z z    0 10月 14 11:55 file
z@U224d:~/temp/test$ chmod 770 dire file
z@U224d:~/temp/test$ ls -l
总用量 4
drwxrwx--- 2 z z 4096 10月 14 11:55 dire
-rwxrwx--- 1 z z    0 10月 14 11:55 file
z@U224d:~/temp/test$ chmod +t dire file
z@U224d:~/temp/test$ ls -l
总用量 4
drwxrwx--T 2 z z 4096 10月 14 11:55 dire
-rwxrwx--T 1 z z    0 10月 14 11:55 file
z@U224d:~/temp/test$ chmod 776 dire file
z@U224d:~/temp/test$ ls -l
总用量 4
drwxrwxrw- 2 z z 4096 10月 14 11:55 dire
-rwxrwxrw- 1 z z    0 10月 14 11:55 file
z@U224d:~/temp/test$ chmod +t dire file
z@U224d:~/temp/test$ ls -l
总用量 4
drwxrwxrwT 2 z z 4096 10月 14 11:55 dire
-rwxrwxrwT 1 z z    0 10月 14 11:55 file
z@U224d:~/temp/test$ chmod 777 dire file
z@U224d:~/temp/test$ ls -l
总用量 4
drwxrwxrwx 2 z z 4096 10月 14 11:55 dire
-rwxrwxrwx 1 z z    0 10月 14 11:55 file
z@U224d:~/temp/test$ chmod +t dire file
z@U224d:~/temp/test$ ls -l
总用量 4
drwxrwxrwt 2 z z 4096 10月 14 11:55 dire
-rwxrwxrwt 1 z z    0 10月 14 11:55 file
z@U224d:~/temp/test$
经试验, 除了能用chmod 1777设置外, 也能用 chmod +t设置, 但必须已经是rwxrwxrwx
否则会设为T,而不是t
T表示没有x , t表示有x
查看一些其它系统的 /tmp
-
Debian11 的
/tmp是drwxrwxrwt -
Ubuntu22.04 的
/tmp是drwxrwxrwt -
Ubuntu20.04的
/tmp是drwxrwxrwt -
CentOS6 的
/tmp是drwxrwxrwt. -
CentOS7 的
/tmp是drwxrwxrwt. -
CentOS9 的
/tmp是drwxrwxrwt. -
AlmaLinux9 的
/tmp是drwxrwxrwt. -
Rocky9 的
/tmp是drwxrwxrwt. -
Fedora36 的
/tmp是drwxrwxrwt. -
OracleLinux9 的
/tmp是drwxrwxrwt.
发现 红帽系的后面还有个.点
这个点是 SELinux 的安全标签
参考 linux系统中,文件权限最后一个点的含义
Sticky Bit
Sticky Bit是Linux或Unix系统下的一种特殊的权限标识位,它可以赋予文件或者目录。而被赋予此权限位的文件或者目录可以实现只有Owner或者root才可以进行移动、删除或者重命名操作。
Sticky Bit的起源
Sticky Bit并不是一个新的概念,而事实上早在1974年它就被引入了Unix操作系统中了,而当时引入的目的则是不同的,是用于降低每次应用程序执行时的时间延迟,程序在执行时,首先要加载至内存之中,在用户使用之前会需要一些时间,Sticky Bit为了对此进行改善而引入,操作系统会检测是否设定了Sticky Bit,如果设定了,会将可执行程序的text段数据保存在交换空间(swap)中,通过swap的使用降低了反复使用情况下的时间延迟。而当下Sticky Bit主要应用在是否允许其他用户来删除Owner创建的文件或者目录。
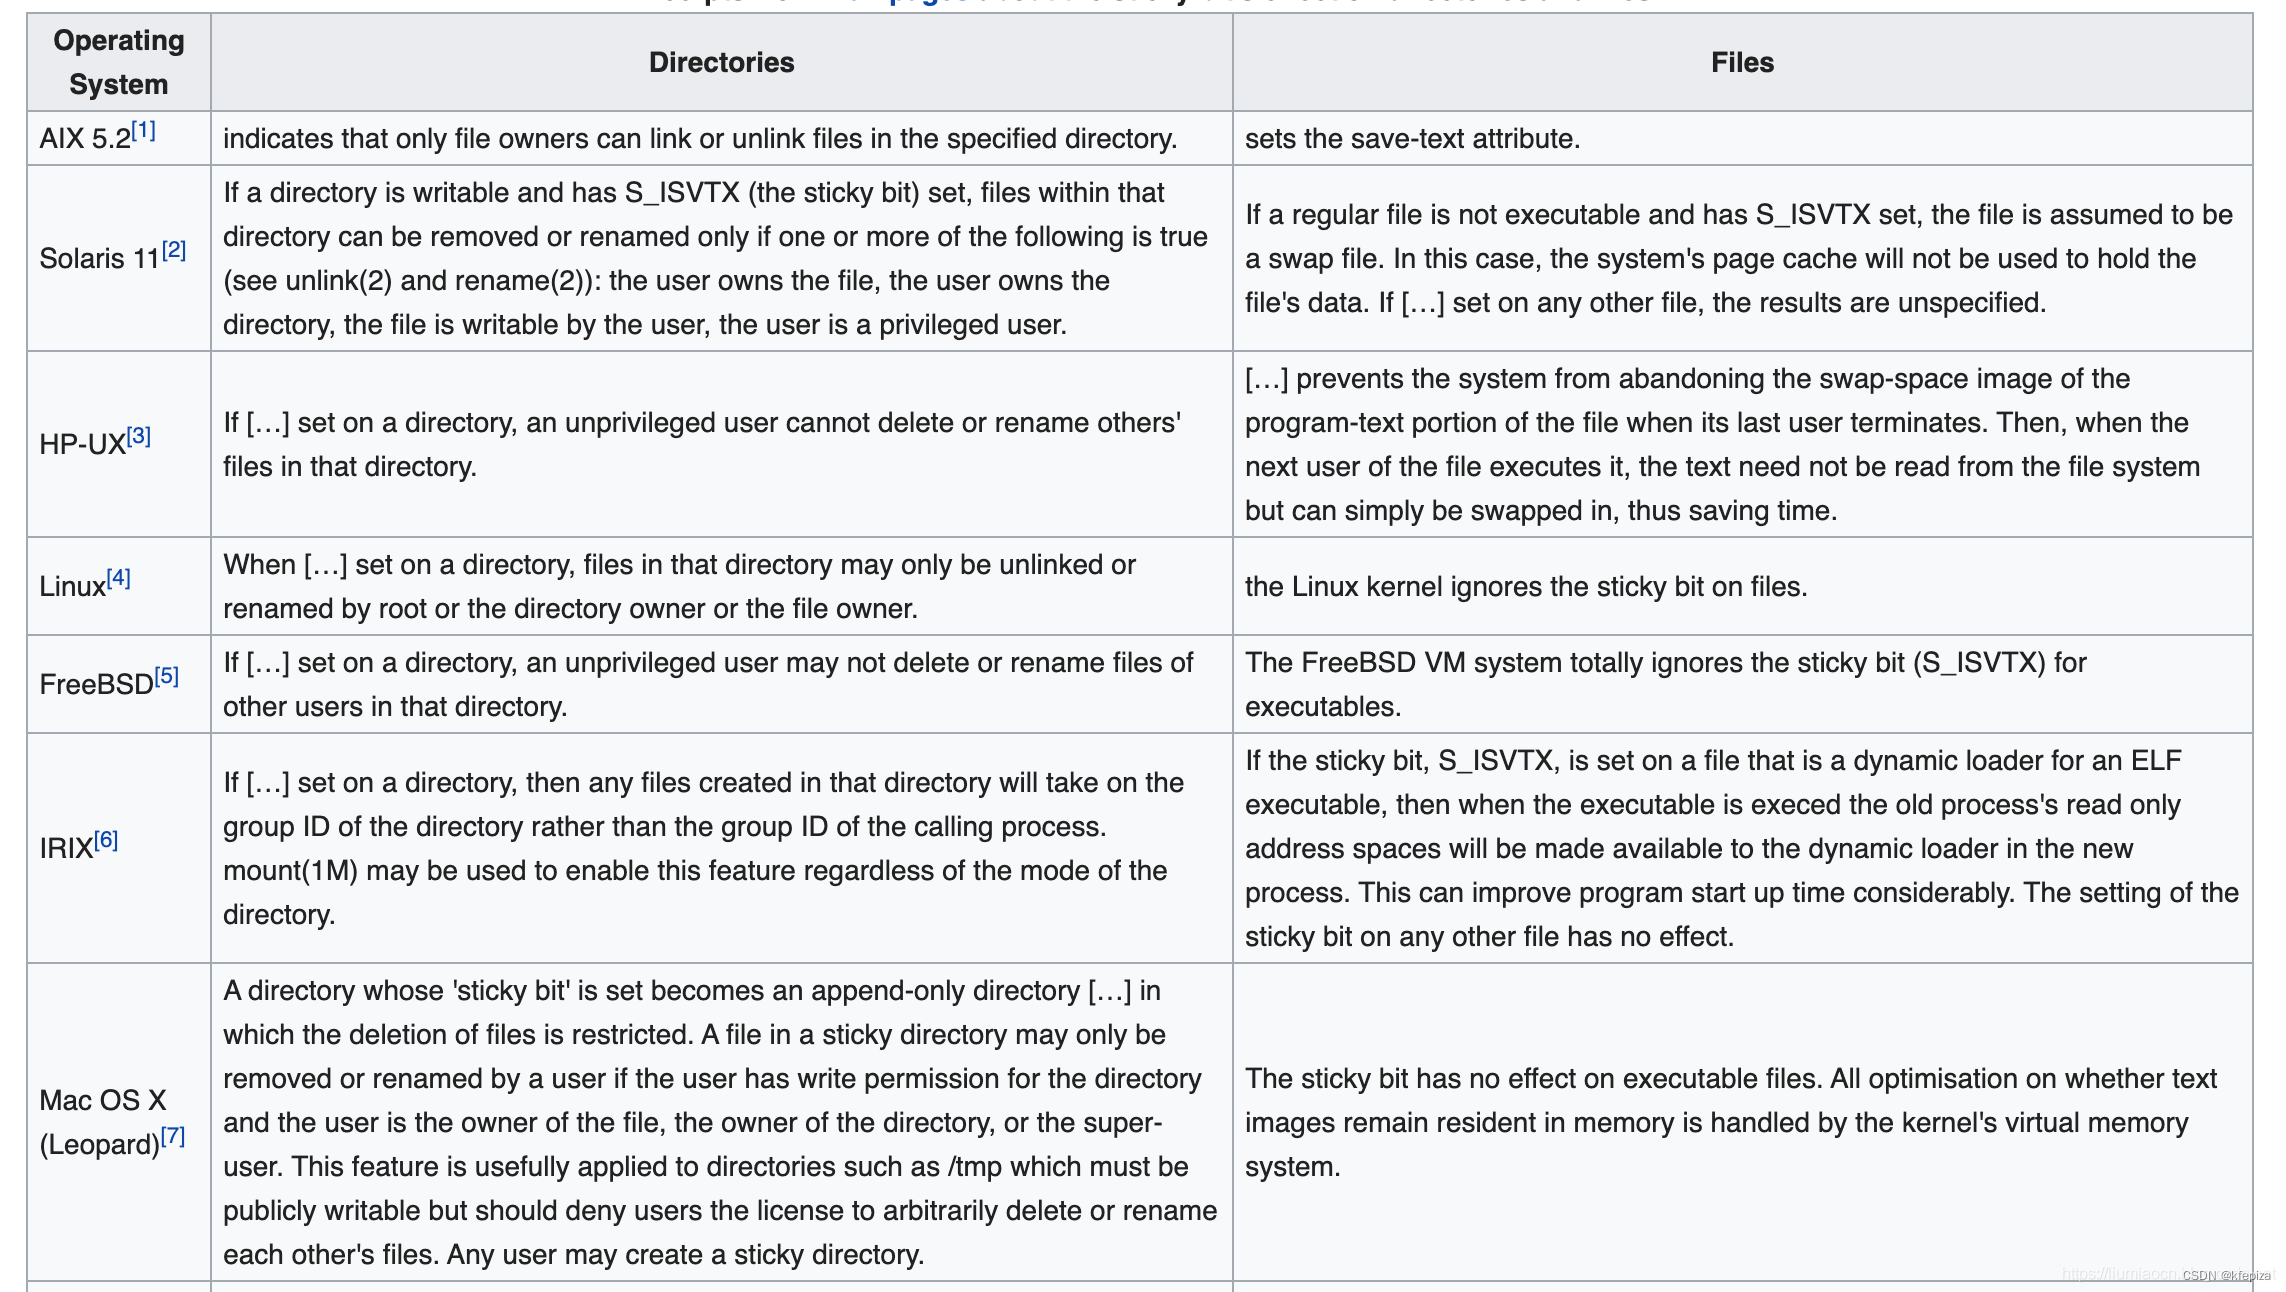
不同操作系统的实现
可以看到本文示例的Linux操作系统下对于文件的Sticky Bit是无视的,而事实上不同的操作系统动作可能是不同的,一部分操作系统关于Sticky Bit的实现如下图所示:
SELinux
SELinux 有三种工作模式,分别是:
-
enforcing:强制模式。违反 SELinux 规则的行为将被阻止并记录到日志中。 -
permissive:宽容模式。违反 SELinux 规则的行为只会记录到日志中。一般为调试用。 -
disabled:关闭 SELinux。
SELinux 工作模式可以在 /etc/selinux/config 中设定
sudo cat /etc/selinux/config
sudo vi /etc/selinux/config
Ubuntu22.04桌面版默认没有/etc/selinux/config 这个文件
Ubuntu22.04Server版默认没有/etc/selinux/config 这个文件
Ubuntu20.04Server版默认没有/etc/selinux/config 这个文件
Debian11默认没有/etc/selinux/config 这个文件
CentOS6默认的/etc/selinux/config 👇
# This file controls the state of SELinux on the system.
# SELINUX= can take one of these three values:
#     enforcing - SELinux security policy is enforced.
#     permissive - SELinux prints warnings instead of enforcing.
#     disabled - No SELinux policy is loaded.
SELINUX=enforcing
# SELINUXTYPE= can take one of these two values:
#     targeted - Targeted processes are protected,
#     mls - Multi Level Security protection.
SELINUXTYPE=targeted
CentOS7默认的/etc/selinux/config 👇
# This file controls the state of SELinux on the system.
# SELINUX= can take one of these three values:
#     enforcing - SELinux security policy is enforced.
#     permissive - SELinux prints warnings instead of enforcing.
#     disabled - No SELinux policy is loaded.
SELINUX=enforcing
# SELINUXTYPE= can take one of three values:
#     targeted - Targeted processes are protected,
#     minimum - Modification of targeted policy. Only selected processes are protected.
#     mls - Multi Level Security protection.
SELINUXTYPE=targeted
CentOS9Stream默认的/etc/selinux/config 👇
# This file controls the state of SELinux on the system.
# SELINUX= can take one of these three values:
#     enforcing - SELinux security policy is enforced.
#     permissive - SELinux prints warnings instead of enforcing.
#     disabled - No SELinux policy is loaded.
# See also:
# https://docs.fedoraproject.org/en-US/quick-docs/getting-started-with-selinux/#getting-started-with-selinux-selinux-states-and-modes
#
# NOTE: In earlier Fedora kernel builds, SELINUX=disabled would also
# fully disable SELinux during boot. If you need a system with SELinux
# fully disabled instead of SELinux running with no policy loaded, you
# need to pass selinux=0 to the kernel command line. You can use grubby
# to persistently set the bootloader to boot with selinux=0:
#
#    grubby --update-kernel ALL --args selinux=0
#
# To revert back to SELinux enabled:
#
#    grubby --update-kernel ALL --remove-args selinux
#
SELINUX=enforcing
# SELINUXTYPE= can take one of these three values:
#     targeted - Targeted processes are protected,
#     minimum - Modification of targeted policy. Only selected processes are protected.
#     mls - Multi Level Security protection.
SELINUXTYPE=targeted
Fedora36默认的/etc/selinux/config 👇
# This file controls the state of SELinux on the system.
# SELINUX= can take one of these three values:
#     enforcing - SELinux security policy is enforced.
#     permissive - SELinux prints warnings instead of enforcing.
#     disabled - No SELinux policy is loaded.
# See also:
# https://docs.fedoraproject.org/en-US/quick-docs/getting-started-with-selinux/#getting-started-with-selinux-selinux-states-and-modes
#
# NOTE: In earlier Fedora kernel builds, SELINUX=disabled would also
# fully disable SELinux during boot. If you need a system with SELinux
# fully disabled instead of SELinux running with no policy loaded, you
# need to pass selinux=0 to the kernel command line. You can use grubby
# to persistently set the bootloader to boot with selinux=0:
#
#    grubby --update-kernel ALL --args selinux=0
#
# To revert back to SELinux enabled:
#
#    grubby --update-kernel ALL --remove-args selinux
#
SELINUX=enforcing
# SELINUXTYPE= can take one of these three values:
#     targeted - Targeted processes are protected,
#     minimum - Modification of targeted policy. Only selected processes are protected.
#     mls - Multi Level Security protection.
SELINUXTYPE=targeted
enforcing 和 permissive 模式可以通过 setenforce 1或0 命令快速切换
setenforce [ Enforcing | Permissive | 1 | 0 ]
sudo setenforce Enforcing
sudo setenforce Permissive
sudo setenforce 0
sudo setenforce 1


 20
20

 被折叠的 条评论
为什么被折叠?
被折叠的 条评论
为什么被折叠?
 到【灌水乐园】发言


