


一、单周期CPU代码实现
学习 了这么久,终于可以完整实现了单周期CPU了。以下是相关代码,供大家学习使用。
为了方便阅读,先进行一些宏定义。
define.v
`define Add     6'b000000
`define Addi    6'b000001
`define Sub     6'b000010
`define Ori     6'b010000
`define And     6'b010001
`define Or      6'b010010
`define Move    6'b100000
`define Sw      6'b100110
`define Lw      6'b100111
`define Beq     6'b110000
`define Halt    6'b111111
`define AaddB   3'b000
`define AsubB   3'b001
`define BsubA   3'b010
`define AorB    3'b011
`define AandB   3'b100
`define nAandB  3'b101
`define AxorB   3'b110  //  异或 A、B两个值不同则为1,相同则为0
`define AxnorB  3'b111  // 同或 A、B两个值不同则为0,相同则为1
先实现ControlUnit单元。
ControlUnit.v
`include "defines.v"
`timescale 1ns  /   1ps
//////////////////////////////////////////////////////////////////////////////////
// Module Name:    ControlUnit
// Function:    give some neccessary signal to other module
//////////////////////////////////////////////////////////////////////////////////
module ControlUnit(
    input wire[5:0] opCode,//6位wire型
    input wire zero,//默认为1位
    output wire PCWre,
    output wire ALUSrcB,
    output wire ALUM2Reg,
    output wire RegWre,
    output wire InsMemRW,
    output wire DataMemRW,
    output wire ExtSel,
    output wire PCSrc,
    output wire RegOut,
    output wire[2:0] ALUOp //三位操作数
    );

    //assign连续赋值语句,主要用于组合逻辑电路
    //左值数据类型必须为wire
    //连续赋值语句总是处于激活状态。只要任意一个操作数发生变化,表达式就会被立即重新计算,并且将结果赋给等号左边的线网。
    //操作数(即右值)可以是标量或向量的线网或寄存器,也可以是函数的调用。
    assign PCWre = (opCode == `Halt)? 0:1;//6`b111111 Verilog HDL语言中常量表示方法,6位2进制数
    assign ALUSrcB = (opCode == `Addi || opCode == `Ori || opCode == `Sw || opCode == `Lw)? 1:0;
    assign ALUM2Reg = (opCode == `Lw)? 1 : 0;
   assign RegWre = (opCode == `Sw || opCode == `Halt)? 0 : 1;
   assign InsMemRW = 0;
   assign DataMemRW = (opCode == `Lw)? 0 : 1;
   assign ExtSel = (opCode == `Ori)? 0 : 1;
   assign PCSrc = (opCode == `Beq && zero == 1)? 1 : 0;
   assign RegOut = (opCode == `Addi || opCode == `Ori || opCode == `Lw)? 0 : 1;
   assign ALUOp[2] = (opCode == `And)? 1 : 0;
   assign ALUOp[1] = (opCode == `Or || opCode == `Ori)? 1 : 0;
   assign ALUOp[0] = (opCode == `Sub || opCode == `Or || opCode == `Ori || opCode == `Beq)? 1 : 0;

endmodule
接下来,分别实现各个模块。
PC.v
`timescale 1ns  /   1ps
//////////////////////////////////////////////////////////////////////////////////
// Module Name:    PC
// Function:    store the next instruction address.
//////////////////////////////////////////////////////////////////////////////////
module PC(
    input wire clk, //时钟信号
    input wire Rst, //重置信号
    input wire PCWre, //PC是否更改
    input wire PCSrc, //PC指令更新方式
    input wire[31:0] immediate,  //32位立即数
    output reg[31:0] address    //下一条指令地址
    );

    always @(posedge clk or posedge Rst)
        begin
            if(Rst == 1) begin
                address = 0;    //初始化
            end
            else if(PCWre == 1) begin
                if(PCSrc == 1) address = address + 4 + immediate*4; //beq跳转
                else address = address + 4; //正常跳转
            end
            else begin
                address <= address; //Halt指令执行以后,PC不变
            end
        end

endmodule
指令存储器比较麻烦,由于不是真正的CPU,需要自己设置指令,以供读取使用。由于32位书写太过麻烦,所以统一转换为16进制,这样只用8位了。
转换表:
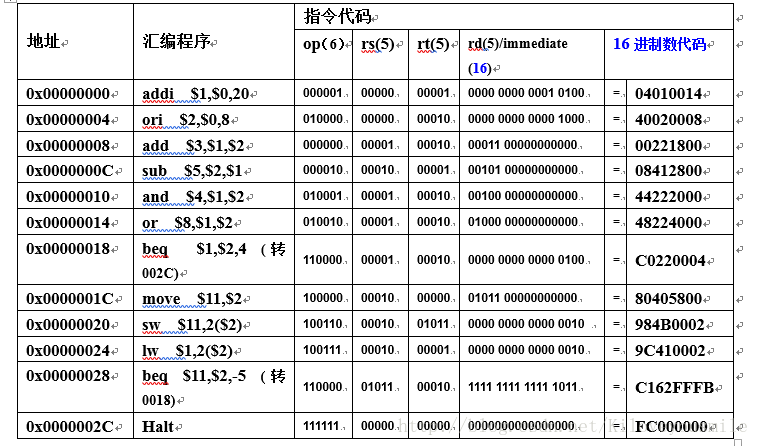
instructionMemory.v
`timescale 1ns / 1ps // 时间单位/时间精度(并非指相除的关系)
//
// Module Name: instructionMemory
// Function: store and read the instruction
//
module instructionMemory(
input wire[31:0] pc,
input wire InsMemRW,
output wire[5:0] op, //操作码
output wire[4:0] rs, //源操作数1寄存器号
output wire[4:0] rt, //源操作数2寄存器号
output wire[4:0] rd, //目的寄存器号
output wire[15:0] immediate //立即数
);
wire[31:0] mem[0:15]; //相当于数组mem[16][32]
assign mem[0] = 32'h04010014;
assign mem[1] = 32'h40020008;
assign mem[2] = 32'h00221800;
assign mem[3] = 32'h08412800;
assign mem[4] = 32'h44222000;
assign mem[5] = 32'h48224000;
assign mem[6] = 32'hC0220004;
assign mem[7] = 32'h80405800;
assign mem[8] = 32'h984B0002;
assign mem[9] = 32'h9C410002;
assign mem[10] = 32'hC162FFFB;
assign mem[11] = 32'hFC000000;
assign mem[12] = 32'h00000000;
assign mem[13] = 32'h00000000;
assign mem[14] = 32'h00000000;
assign mem[15] = 32'h00000000;
//output
assign op = mem[pc[5:2]][31:26];
assign rs = mem[pc[5:2]][25:21];
assign rt = mem[pc[5:2]][20:16];
assign rd = mem[pc[5:2]][15:11];
assign immediate = mem[pc[5:2]][15:0];
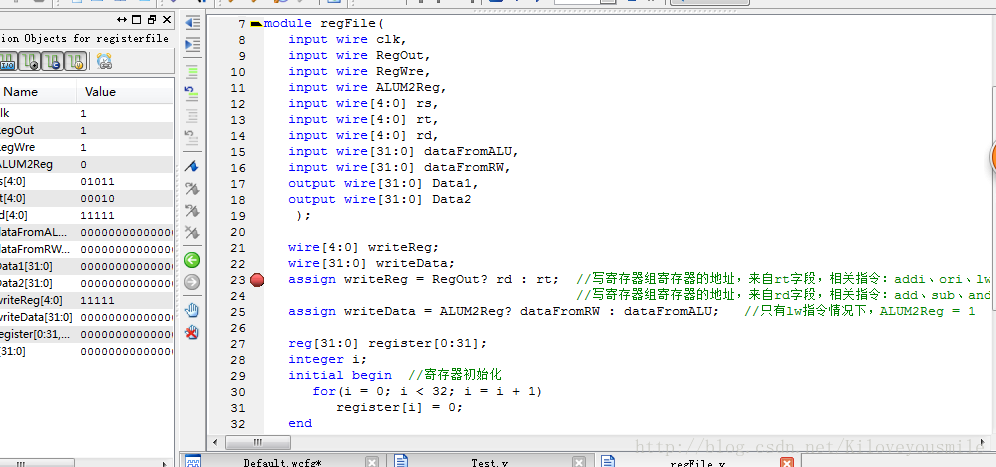
endmoduleregFile.v
`timescale 1ns / 1ps
//////////////////////////////////////////////////////////////////////////////////
// Module Name:    regFile
//  Function:   create 32 registers and initial them,
//                  then use to store and read some data.
//////////////////////////////////////////////////////////////////////////////////
module regFile(
    input wire clk,
    input wire RegOut,
    input wire RegWre,
    input wire ALUM2Reg,
    input wire[4:0] rs,
    input wire[4:0] rt,
    input wire[4:0] rd,
    input wire[31:0] dataFromALU,
    input wire[31:0] dataFromRW,
    output wire[31:0] Data1,
    output wire[31:0] Data2
    );

    wire[4:0] writeReg;
    wire[31:0] writeData;
    assign writeReg = RegOut? rd : rt;  //写寄存器组寄存器的地址,来自rt字段,相关指令:addi、ori、lw  RegOut = 0
                                                    //写寄存器组寄存器的地址,来自rd字段,相关指令:add、sub、and、or、move  RegOut = 1
    assign writeData = ALUM2Reg? dataFromRW : dataFromALU;  //只有lw指令情况下,ALUM2Reg = 1

    reg[31:0] register[0:31];
    integer i;
    initial begin   //寄存器初始化
        for(i = 0; i < 32; i = i + 1)
            register[i] = 0;
    end

    //output
    assign Data1 = register[rs];    //读取寄存器中的值,源操作数1
    assign Data2 = register[rt];    //读取寄存器中的值,源操作数2

    //write Reg
    always @(posedge clk or RegOut or RegWre or ALUM2Reg or writeReg or writeData) begin
        if(RegWre && writeReg) register[writeReg] = writeData;  //防止数据写入0寄存器
    end

endmodule
signZeroExtend.v
`timescale 1ns / 1ps
//
// Module Name:    signZeroExtend
// Function:    extend the immediate to 32 bits.
//
module signZeroExtend(
    input wire[15:0] immediate,
    input wire ExtSel,
    output wire[31:0] out
    );

    assign out[15:0] = immediate;
    /**
    *ExtSel = 1 做符号位扩展;如果符号位为1,则扩展位为1,如果符号位为0,则扩展位为0
    *ExtSel = 0 做0扩展
    **/
    assign out[31:16] = ExtSel? (immediate[15]? 16'hffff : 16'h0000) : 16'h0000;
endmodule
ALU.v
`include "defines.v"
`timescale 1ns  /   1ps
//////////////////////////////////////////////////////////////////////////////////
// Module Name:    ALU
// Function:    implement the logical operation
//////////////////////////////////////////////////////////////////////////////////
module ALU(
    input wire[31:0] ReadData1,     //源操作数1
    input wire[31:0] ReadData2, //源操作数2
    input wire[31:0] ExtData,       //扩展立即数
    input wire ALUSrcB,             //若为1,则为立即数
    input wire[2:0] ALUOp,          //操作符
    output reg zero,                    //结果标志
    output reg[31:0] result         //结果
    );

    wire[31:0] inReadData2;
    assign inReadData2 = ALUSrcB? ExtData : ReadData2;

    always@(ReadData1 or ReadData2 or ExtData or ALUSrcB or ALUOp or inReadData2)
        begin
            case(ALUOp)

                `AaddB: begin
                    result = ReadData1 + inReadData2;
                    zero = (result == 0)? 1 : 0;
                end

                `AsubB: begin
                    result = ReadData1 - inReadData2;
                    zero = (result == 0)? 1 : 0;
                end

                `BsubA: begin
                    result = inReadData2 - ReadData1;
                    zero = (result == 0)? 1 : 0;
                end

                `AorB: begin
                    result = ReadData1 | inReadData2;
                    zero = (result == 0)? 1 : 0;
                end

                `AandB: begin
                    result = ReadData1 & inReadData2;
                    zero = (result == 0)? 1 : 0;
                end

                `nAandB: begin
                    result = (~ReadData1) & inReadData2;
                    zero = (result == 0)? 1 : 0;
                end

                `AxorB: begin
                    result = ReadData1 ^ inReadData2;
                    zero = (result == 0)? 1 : 0;
                end

                `AxnorB: begin
                    result = ReadData1 ^~ inReadData2;
                    zero = (result == 0)? 1 : 0;
                end

            endcase
        end
endmodule
DataMemory.v
`timescale 1ns / 1ps
//////////////////////////////////////////////////////////////////////////////////
// Module Name:    DataMemory
// Function:    store and read the data about result
//////////////////////////////////////////////////////////////////////////////////
module DataMemory(
     input wire[31:0] DAddr,    //数据地址
     input wire[31:0] DataIn,   //输入数据
     input wire DataMemRW,      //=1,写数据; =0,读数据
     output reg[31:0] DataOut   //输出数据
    );
    reg[31:0] memory[0:31];

    //初始化
    integer i;
    initial begin
        for(i = 0; i < 32; i = i + 1) memory[i] = 0;
    end

    //读数据
    always @(DataMemRW) begin   //只要DataMemRW发生变化,则会执行always语句块
        if( DataMemRW == 0) //读取数据,直接读取
            assign DataOut = memory[DAddr];
    end

    always @(DataMemRW or DAddr or DataIn) begin    //除了lw指令外,其他指令下DataMemRW均为1
            if(DataMemRW == 1) memory[DAddr] = DataIn;  //写入操作数2的值,以Result为地址
    end

endmodule
各个模块实现了,需要把模块串联起来。所以需要一个顶层模块。
SingalCycleCPU.v
`timescale 1ns  /   1ps
`include "ALU.v"
`include "ControlUnit.v"
`include "DataMemory.v"
`include "PC.v"
`include "instructionMemory.v"
`include "regFile.v"
`include "signZeroExtend.v"
`timescale 1ns  /   100ps
//////////////////////////////////////////////////////////////////////////////////
// Module Name:    SignalCycleCPU
// Function:    contact all of the module
//////////////////////////////////////////////////////////////////////////////////

module SingalCycleCPU(
    input wire clk,
    input wire Reset
    );

    wire[5:0] opCode;   //操作码
    wire[31:0] Data1;   //来自寄存器的源操作数1
    wire[31:0] Data2;   //来自寄存器的源操作数2
    wire[31:0] curPC;   //目前PC地址
    wire[31:0] Result;  //ALU运算结果

    wire[2:0] ALUOp;    //ALU运算操作码
    wire[31:0] ExtOut;  //扩展后的立即数
    wire[31:0] DMOut;   //读取的寄存器中的树 lw时使用
    wire[15:0] immediate;   //立即数,扩展前
    wire[4:0] rs, rt, rd;   //三个类型的寄存器
    wire zero, PCWre, PCSrc, ALUSrcB, ALUM2Reg, RegWre, InsMemRW, DataMemRW, ExtSel, RegOut;    //controlUnit单元信号

    // module PC(clk, Reset, PCWre, PCSrc, immediate, Address);
    PC pc(clk, Reset, PCWre, PCSrc, ExtOut, curPC);
    // module ALU(ReadData1, ReadData2, inExt, ALUSrcB, ALUOp, zero, result);
    ALU alu(Data1, Data2, ExtOut, ALUSrcB, ALUOp, zero, Result);
    // module controlUnit(opCode, zero, PCWre, ALUSrcB, ALUM2Reg, RegWre, InsMemRW, DataMemRW, ExtSel, PCSrc, RegOut, ALUOp);
   ControlUnit control(opCode, zero, PCWre, ALUSrcB, ALUM2Reg, RegWre, InsMemRW, DataMemRW, ExtSel, PCSrc, RegOut, ALUOp);
    // module dataMemory(DAddr, DataIn, DataMemRW, DataOut);
   DataMemory datamemory(Result, Data2, DataMemRW, DMOut);
      /* module instructionMemory(
    input [31:0] pc,
    input InsMemRW,
     input [5:0] op,
     input [4:0] rs, rt, rd,
     output [15:0] immediate);*/
    instructionMemory insMem(curPC, InsMemRW, opCode, rs, rt, rd, immediate);
    // module registerFile(clk, RegOut, RegWre, ALUM2Reg, rs, rt, rd, dataFromALU, dataFromRW, Data1, Data2);
   regFile registerfile(clk, RegOut,RegWre, ALUM2Reg, rs, rt, rd, Result, DMOut, Data1, Data2);
    // module signZeroExtend(immediate, ExtSel, out);
   signZeroExtend ext(immediate, ExtSel, ExtOut);

endmodule
接下来,为了测试,还需要一个测试文件。
Test.v
`include "SingalCycleCPU.v"
`timescale 1ns  / 1ps
module Test;
    reg Reset; //初始化地址
    reg clk;
    /*wire[5:0] opCode;
    wire[31:0] Out1;
    wire[31:0] Out2;
    wire[31:0] curPC;
    wire[31:0] Result;
    */
    SingalCycleCPU sing(
        .clk(clk),
        .Reset(Reset)
        );

    initial begin
        //Initialize Inputs
        clk = 1;
        Reset = 1;

        #50;
            clk = !clk;
            Reset = 0;

      forever #50 begin // 产生时钟信号
            clk = !clk;
        end
    end

endmodule
都实现了,接下来,就是测试了。
二、测试
测试,需要用到ISE自带的仿真软件ISim。这里,我简单介绍一下它的使用。以下是它的界面:
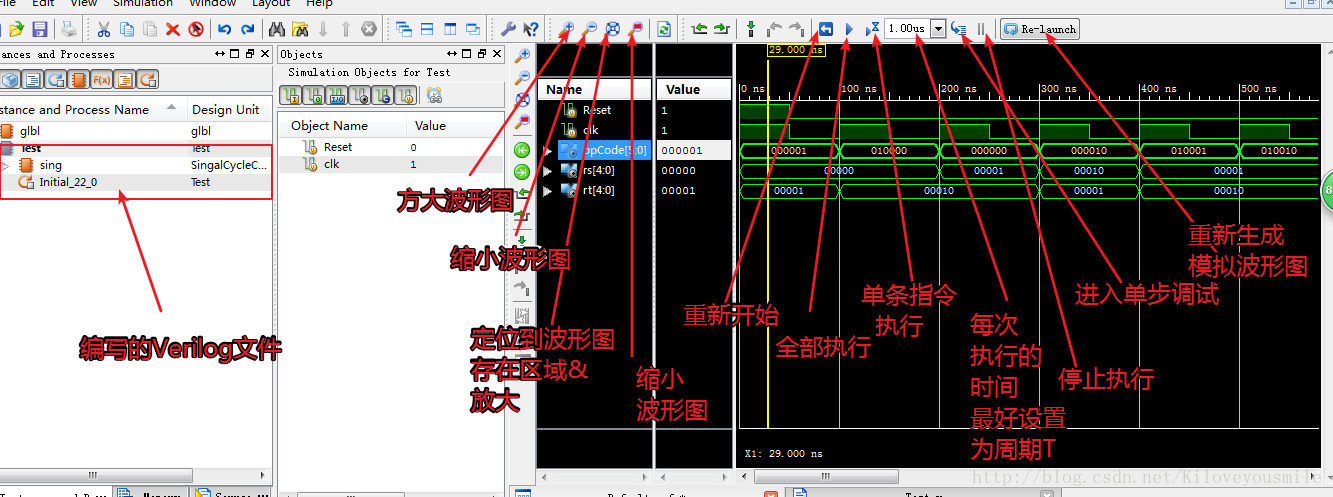
波形图中的数据可能很少,如果想要更多的数据,则可以按一下步骤进行。
选中编写的文件:

该文件只是一个总文件,里面还有很多其他模块文件。展开,可以选择不同模块的数据。接下来,选中需要展示的数据,单击鼠标右键,点击框框的选项,数据即可出现在另一个方形区域。
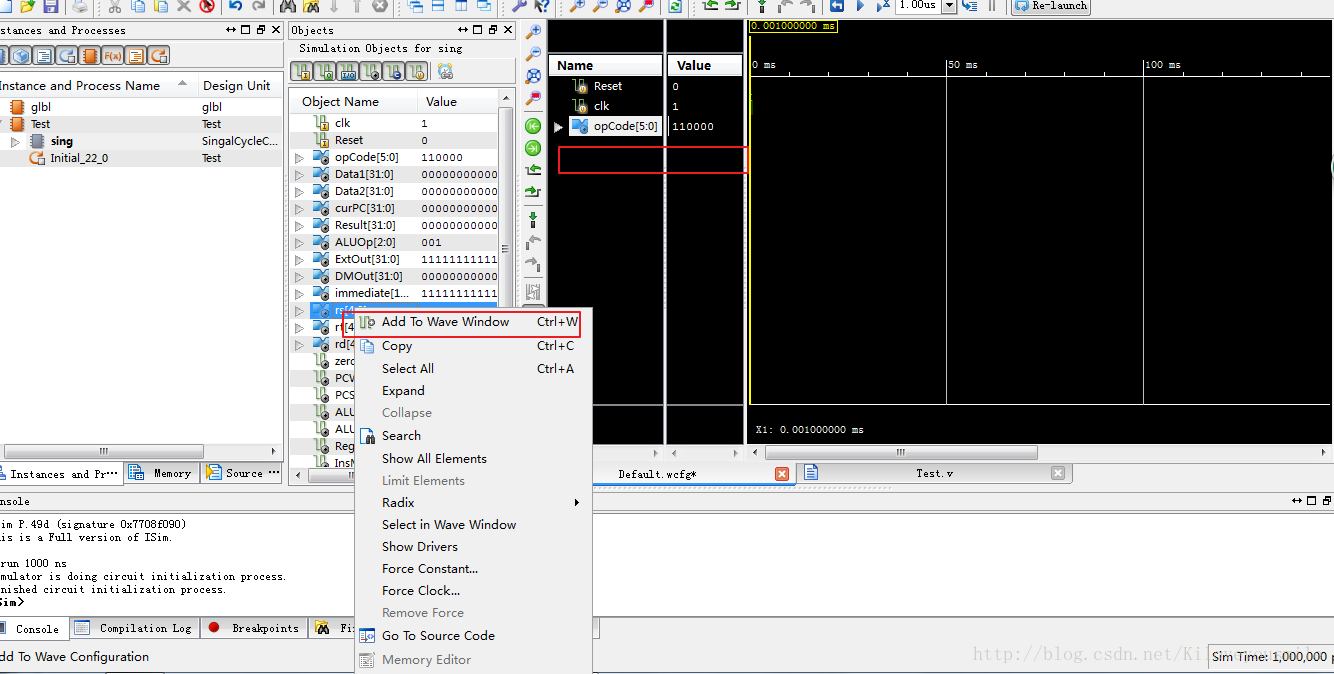
当然,现在不可见。点击一下带叉叉的放大镜,再点击单条指令运行按钮即可出现图像。

剩下的功能大家自己去尝试吧。
三、其他补充
▶使用ISim调试
打开文件。如图,双击框框中的文件即可在右边窗口打开:
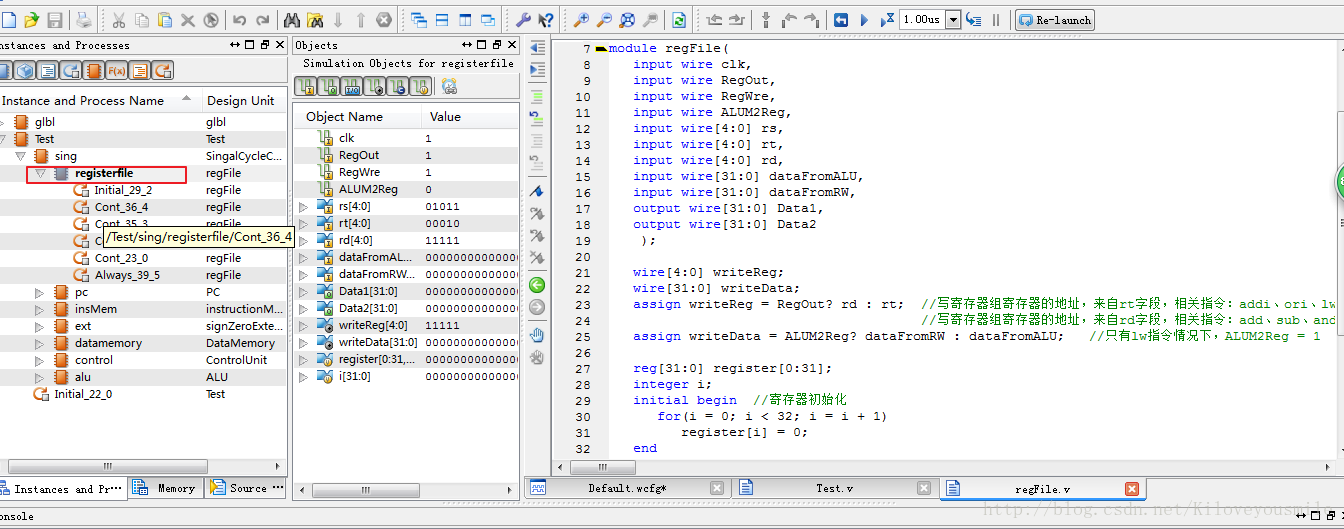
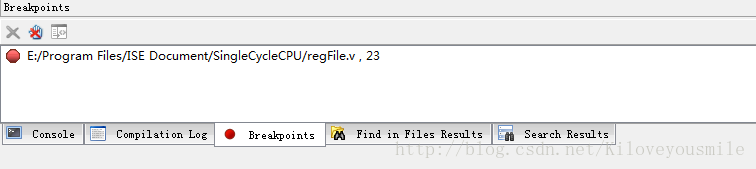
设置断点。选中那只手,每句话对应的红色区域单击鼠标,即可设置断点(出现一个小圆点)。点击带叉叉的手,即可取消断点;或者在控制台取消也可以。

调试开始。点击运行(全部运行或者单挑指令运行都可以),接下执行到断点处会自动停止,点击”进入单独调试”按钮即可一步步执行程序,并通过波形图查看变量变化。同C++是一样的。大家自己尝试。
▶小技巧
ISE编译 常常出现不知名的警告;或者你前一次编译时成功的,下面一次却失败了。那么,如果不是代码问题,可以尝试下面的方法解决:

此次试验到此就结束了,希望对大家有帮助。


 308
308

 被折叠的 条评论
为什么被折叠?
被折叠的 条评论
为什么被折叠?
 到【灌水乐园】发言


