


Qt5开发及实例V2.0-第五章Qt主窗体
第5章 Qt 5主窗体
5.1.1 基本元素
其界面布局如图5.1所示。
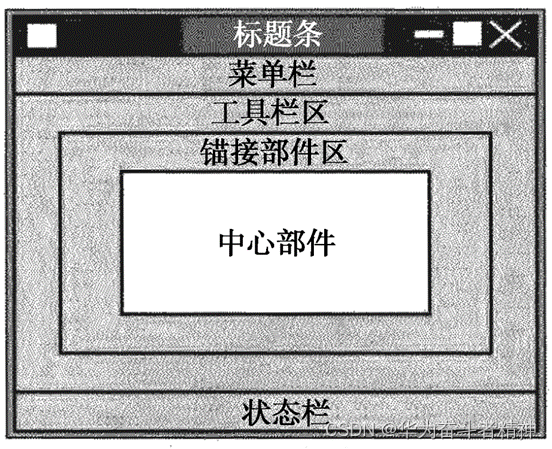
1.菜单栏
菜单是一系列命令的列表。为了实现菜单、工具栏按钮、键盘快捷方式等命令的一致性,Qt使用动作(Action)来表示这些命令。Qt的菜单就是由一系列的QAction动作对象构成的列表,而菜单栏则是包容菜单的面板,它位于主窗口顶部、主窗口标题栏的下面。一个主窗口最多只有一个菜单栏。
2.状态栏
状态栏通常显示GUI应用程序的一些状态信息,它位于主窗口的底部。用户可以在状态栏上添加、使用Qt窗口部件。一个主窗口最多只有一个状态栏。
3.工具栏
工具栏是由一系列的类似于按钮的动作排列而成的面板,它通常由一些经常使用的命令(动作)组成。工具栏位于菜单栏的下面、状态栏的上面,可以停靠在主窗口的上、下、左、右四个方向上。一个主窗口可以包含多个工具栏。
4.锚接部件
锚接部件作为一个容器使用,以包容其他窗口部件来实现某些功能。例如,Qt设计器的属性编辑器、对象监视器等都是由锚接部件包容其他的Qt窗口部件来实现的。它位于工具栏区的内部,可以作为一个窗口自由地浮动在主窗口上面,也可以像工具栏一样停靠在主窗口的上、下、左、右四个方向上。一个主窗口可以包含多个锚接部件。
5.中心部件
中心部件处在锚接部件区的内部、主窗口的中心。一个主窗口只有一个中心部件。
5.1.2 【综合实例】:文本编辑器
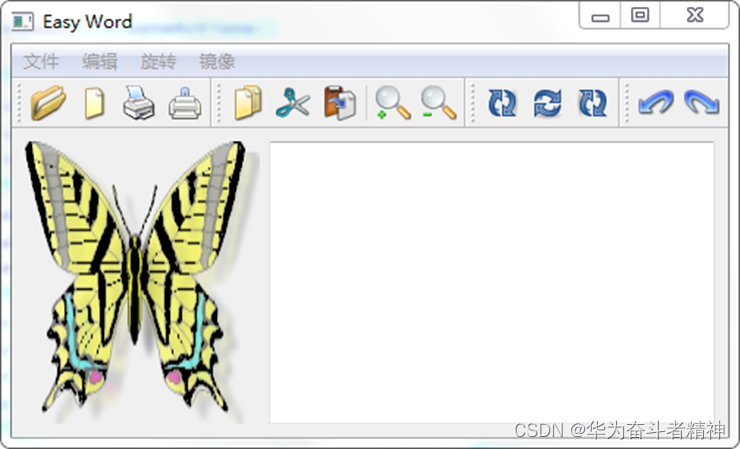
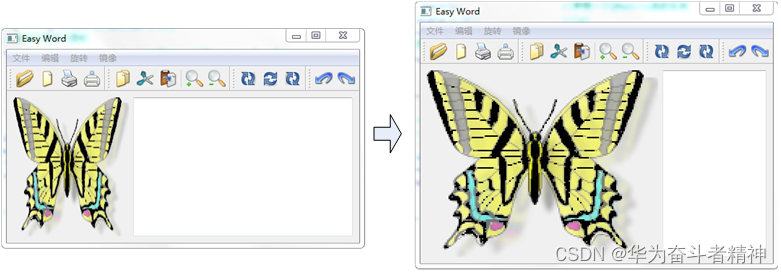
【例】(难度一般)(CH502)设计界面,效果如图5.2所示。

首先建立项目的框架代码,具体步骤如下。
(1)新建Qt Widgets Application(详见1.3.1节),项目名称为“ImageProcessor”,基类选择“QMainWindow”,类名命名为“ImgProcessor”,取消“创建界面”复选框的选中状态。单击“下一步”按钮,最后单击“完成”按钮,完成该项目工程的建立。
(2)添加该工程的提供主要显示文本编辑框函数所在的文件,在“ImageProcessor”项目名上单击鼠标右键,在弹出的快捷菜单中选择“添加新文件…”菜单项,在弹出的对话框中选择“C++ Class”选项,单击“Choose…”按钮,弹出对话框,在“Base class”后面的下拉列表框中选择基类名“QWidget”,在“Class name”后面的文本框中输入类的名称“ShowWidget”。
(3)单击“下一步”按钮,单击“完成”按钮,添加“showwidget.h”头文件和“showwidget.cpp”源文件。
(4)打开“showwidget.h”头文件,具体代码如下:
#include <QWidget>
#include <QLabel>
#include <QTextEdit>
#include <QImage>
class ShowWidget : public QWidget
{
    Q_OBJECT
public:
    explicit ShowWidget(QWidget *parent = 0);
    QImage img;
    QLabel *imageLabel;
    QTextEdit *text;
signals:
public slots:
};
(5)打开“showwidget.cpp”文件,添加如下代码:
#include "showwidget.h"
#include <QHBoxLayout>
ShowWidget::ShowWidget(QWidget *parent):QWidget(parent)
{
    imageLabel =new QLabel;
    imageLabel->setScaledContents(true);
    text =new QTextEdit;
    QHBoxLayout *mainLayout =new QHBoxLayout(this);
    mainLayout->addWidget(imageLabel);
    mainLayout->addWidget(text);
}
(6)主函数ImgProcessor类声明中createActions()函数用于创建所有的动作、createMenus()函数用于创建菜单、createToolBars()函数用于创建工具栏;接着声明实现主窗口所需的各个元素,包括菜单、工具栏及各个动作等;最后声明用到的槽函数,打开“imgprocessor.h”文件,添加如下代码。
(7)下面是主窗口构造函数部分的内容,构造函数主要实现窗体的初始化,打开“imgprocessor.cpp”文件,添加如下代码:
ImgProcessor::ImgProcessor(QWidget *parent)
    : QMainWindow(parent)
{
    setWindowTitle(tr("Easy Word"));			//设置窗体标题
    showWidget =new ShowWidget(this);		//(a)
    setCentralWidget(showWidget);
    /* 创建动作、菜单、工具栏的函数 */
    createActions();
    createMenus();
    createToolBars();
    if(img.load("image.png"))
    {
	   //在imageLabel对象中放置图像
        showWidget->imageLabel->setPixmap(QPixmap::fromImage(img));
    }
}
5.1.3 菜单与工具栏的实现
1.动作(Action)的实现
以下是实现基本文件操作的动作(Action)的代码。
其中,
(a) openFileAction =new QAction(QIcon(“open.png”),tr(“打开”),this):在创建“打开文件”动作的同时,指定了此动作使用的图标、名称及父窗口。
(b) openFileAction->setShortcut(tr(“Ctrl+O”)):设置此动作的组合键为【Ctrl+O】。
© openFileAction->setStatusTip(tr(“打开一个文件”)):设定了状态栏显示,当鼠标光标移至此动作对应的菜单条目或工具栏按钮上时,在状态栏上显示“打开一个文件”的提示。
以下是实现打印文本和图像、图像缩放、旋转和镜像的动作(Action)的代码(位于ImgProcessor::createActions()方法中):
2.菜单(Menus)的实现
在实现了各个动作之后,需要将它们通过菜单、工具栏或快捷键的方式体现出来,以下是菜单的实现函数createMenus()代码。
3.工具栏(ToolBars)的实现
接下来实现相对应的工具栏createToolBars(),主窗口的工具栏上可以有多个工具条,通常采用一个菜单对应一个工具条的方式,也可根据需要进行工具条的划分。
工具条是一个可移动的窗口,它可停靠的区域由QToolBar的allowAreas决定,包括Qt::LeftToolBarArea、Qt::RightToolBarArea、Qt::TopToolBarArea、Qt::BottomToolBarArea和Qt::AllToolBarAreas。默认为Qt::AllToolBarAreas,启动后默认出现于主窗口的顶部。可通过调用setAllowAreas()函数来指定工具条可停靠的区域,例如:
fileTool->setAllowedAreas(Qt::TopToolBarArea|Qt::LeftToolBarArea);
此函数限定文件工具条只可出现在主窗口的顶部或左侧。工具条也可通过调用setMovable()函数设定可移动性,例如:
fileTool->setMovable(false);
指定文件工具条不可移动,只出现于主窗口的顶部。
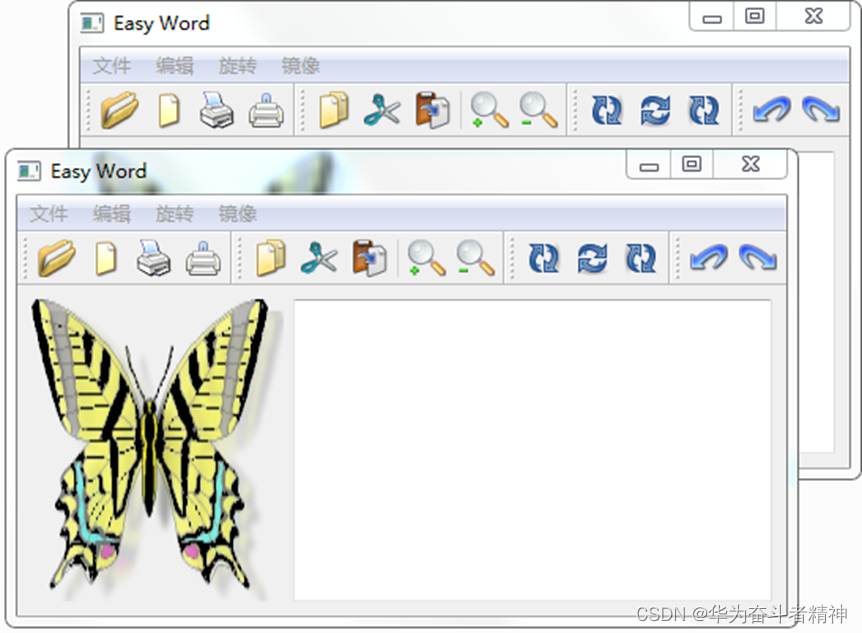
选择“构建”→“构建项目" ImageProcessor"”菜单项,将程序中用到的图片保存到项目D:\Qt\CH5\CH501\build-ImageProcessor-Desktop_Qt_5_8_0_MinGW_32bit-Debug目录下,运行程序,结果如图5.3所示。
5.2 Qt 5文件操作功能
5.2.1 新建文件
在图5.3中,当单击“文件”→“新建”命令时,没有任何反应。下面将介绍如何实现新建一个空白文件的功能。
(1)打开“imgprocessor.h”头文件,添加“protected slots:”变量:
protected slots:
    void ShowNewFile();
(2)在createActions()函数的“"新建"动作”最后添加事件关联:
connect(NewFileAction,SIGNAL(triggered()),this,SLOT(ShowNewFile()));
(3)实现新建文件功能的函数ShowNewFile()如下:
void ImgProcessor::ShowNewFile()
{
    ImgProcessor *newImgProcessor =new ImgProcessor;
    newImgProcessor->show();
}
(4)运行程序,单击“文件”→“新建”命令或单击工具栏上的 按钮,弹出新的文件编辑窗口,如图5.4所示。
5.2.2 打开文件
利用标准文件对话框QFileDialog打开一个已经存在的文件。若当前中央窗体中已有打开的文件,则在一个新的窗口中打开选定的文件;若当前中央窗体是空白的,则在当前窗体中打开。
(1)在“imgprocessor.h”头文件中添加“protected slots:”变量:
void ShowOpenFile();
(2)在createActions()函数的“"打开"动作”最后添加事件关联:
connect(openFileAction,SIGNAL(triggered()),this,SLOT(ShowOpenFile()));
(3)实现打开文件功能的函数ShowOpenFile()如下:
void ImgProcessor::ShowOpenFile()
{
    fileName =QFileDialog::getOpenFileName(this);
    if(!fileName.isEmpty())
    {
        if(showWidget->text->document()->isEmpty())
        {
            loadFile(fileName);
        }
        else
        {
            ImgProcessor *newImgProcessor =new ImgProcessor;
            newImgProcessor->show();
            newImgProcessor->loadFile(fileName);
        }
    }
}
其中,loadFile()函数的实现如下,该函数利用QFile和QTextStream完成具体读取文件内容的工作:
void ImgProcessor::loadFile(QString filename)
{
    printf("file name:%s\n",filename.data());
    QFile file(filename);
    if(file.open(QIODevice::ReadOnly|QIODevice::Text))
    {
        QTextStream textStream(&file);
        while(!textStream.atEnd())
        {
            showWidget->text->append(textStream.readLine());
            printf("read line\n");
        }
        printf("end\n");
    }
}
在此仅详细说明标准文件对话框QFileDialog的getOpenFileName()静态函数各个参数的作用,其他文件对话框类中相关的静态函数的参数有与其类似之处。
QString QFileDialog::getOpenFileName
(
	QWidget* parent=0,				//定义标准文件对话框的父窗口
	const QString & caption=QString(),		//定义标准文件对话框的标题名
	const QString & dir=QString(),			//(a)
	const QString & filter=QString(),		//(b)
	QString * selectedFilter=0,		//用户选择过滤器通过此参数返回
	Options options=0
);
(4)在该源文件的开始部分添加如下头文件:
#include <QFileDialog>
#include <QFile>
#include <QTextStream>
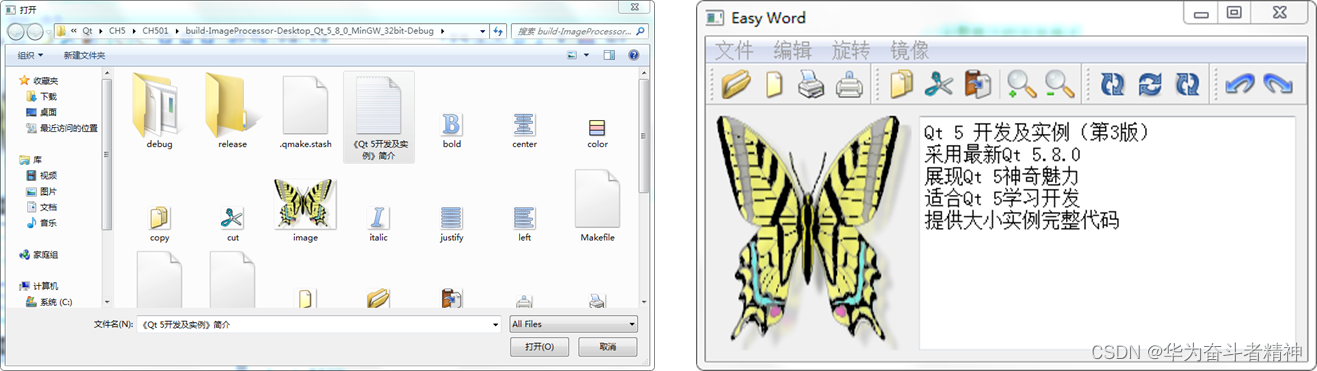
(5)运行程序,单击“文件”→“打开”命令或单击工具栏上的 按钮,弹出“打开”对话框,如图5.5(a)所示。选择某个文件,单击“打开”按钮,文本编辑框中将显示出该文件的内容,如图5.5(b)所示。
5.2.3 打印文件
1.文本打印
打印文本在文本编辑工作中经常使用,下面将介绍如何实现文本打印功能。实现后的效果如图5.6所示。
具体实现步骤如下。
(1)在“imgprocessor.h”头文件中添加“protected slots:”变量:
void ShowPrintText();
(2)在createActions()函数的“"打印文本"动作”最后添加事件关联:
connect(PrintTextAction,SIGNAL(triggered()),this,SLOT(ShowPrintText()));
(3)实现打印文本功能的函数ShowPrintText ()如下:
void ImgProcessor::ShowPrintText()
{
    QPrinter printer;				//新建一个QPrinter对象
    QPrintDialog printDialog(&printer,this);			//(a)
    if(printDialog.exec())					//(b)
    {
	   //获得QTextEdit对象的文档
        QTextDocument *doc =showWidget->text->document();
        doc->print(&printer);					//打印
    }
}
(4)在该源文件的开始部分添加如下头文件:
#include <QPrintDialog>
#include <QPrinter>
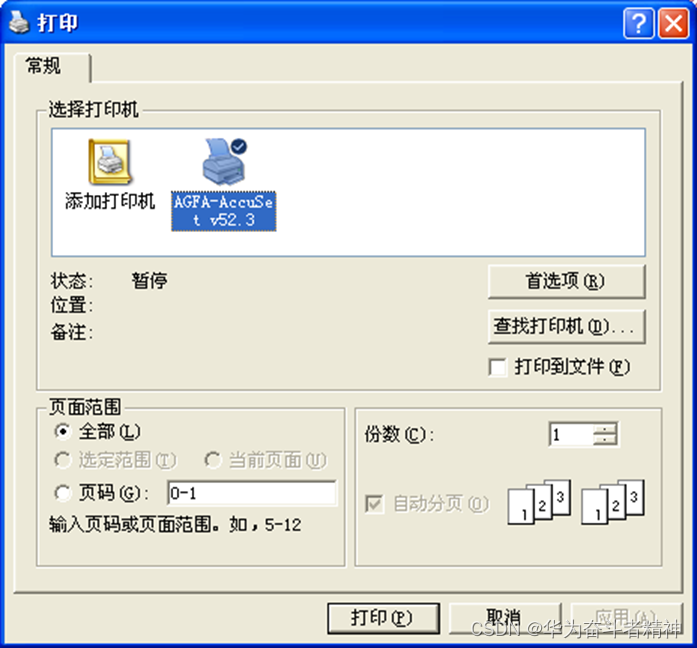
(5)运行程序,单击“文件”→“打印文本”命令或工具栏上的 按钮,弹出标准打印对话框,如图5.6所示。
2.图像打印
打印图像实际上是在一个QPaintDevice中画图,与平常在QWidget、QPixmap和QImage中画图相同,都是创建一个QPainter对象进行画图,只是打印使用的是QPrinter,QPrinter本质上也是一个绘图设备QPaintDevice。下面将介绍如何实现图像打印功能。
(1)在“imgprocessor.h”头文件中添加“protected slots:”变量:
void ShowPrintImage();
(2)在createActions()函数的“"打印图像"动作”最后添加事件关联:
connect(PrintImageAction,SIGNAL(triggered()),this,SLOT(ShowPrintImage()));
(3)实现打印图像功能的函数ShowPrintImage ()如下:
void ImgProcessor::ShowPrintImage()
{
    QPrinter printer;			//新建一个QPrinter对象
    QPrintDialog printDialog(&printer,this);	//(a)
    if(printDialog.exec())			//(b)
    {
        QPainter painter(&printer);		//(c)
        QRect rect =painter.viewport();	//获得QPainter对象的视图矩形区域
        QSize size = img.size();		//获得图像的大小
	   /* 按照图形的比例大小重新设置视图矩形区域 */
        size.scale(rect.size(),Qt::KeepAspectRatio);
        painter.setViewport(rect.x(),rect.y(),size.width(),size.height());
        painter.setWindow(img.rect());	//设置QPainter窗口大小为图像的大小
        painter.drawImage(0,0,img);				//打印图像
    }
}
其中,
(a) QPrintDialog printDialog(&printer,this):创建一个QPrintDialog对象,参数为QPrinter对象。
(b) if(printDialog.exec()):判断打印对话框显示后用户是否单击“打印”按钮。若单击“打印”按钮,则相关打印属性将可以通过创建QPrintDialog对象时使用的QPrinter对象获得;若用户单击“取消”按钮,则不执行后续的打印操作。
© QPainter painter(&printer):创建一个QPainter对象,并指定绘图设备为一个QPrinter对象。
(4)在该源文件的开始部分添加如下头文件:
#include <QPainter>
(5)运行程序,单击“文件”→“打印图像”命令或单击工具栏上的 按钮,弹出标准打印对话框,显示效果如图5.6所示。
5.3 Qt 5图像坐标变换
5.3.1 缩放功能
下面将介绍如何实现缩放功能,具体步骤如下。
(1)在“imgprocessor.h”头文件中添加“protected slots:”变量:
void ShowZoomIn();
(2)在createActions()函数的“"放大"动作”最后添加事件关联:
connect(zoomInAction,SIGNAL(triggered()),this,SLOT(ShowZoomIn()));
(3)实现图形放大功能的函数ShowZoomIn()如下:
void ImgProcessor::ShowZoomIn()
{
    if(img.isNull())			//有效性判断
        return;
    QMatrix martix;			//声明一个QMatrix类的实例
    martix.scale(2,2);			//(a)
    img = img.transformed(martix);
    //重新设置显示图形
    showWidget->imageLabel->setPixmap(QPixmap::fromImage(img));
}
(4)在“imgprocessor.h”头文件中添加“protected slots:”变量:
void ShowZoomOut();
(5)在createActions()函数的“"缩小"动作”最后添加事件关联:
connect(zoomOutAction,SIGNAL(triggered()),this,SLOT(ShowZoomOut()));
(6)实现图形缩小功能的函数ShowZoomOut()如下:
void ImgProcessor::ShowZoomOut()
{
    if(img.isNull())
        return;
    QMatrix matrix;
    matrix.scale(0.5,0.5);			//(a)
    img = img.transformed(matrix);
    showWidget->imageLabel->setPixmap(QPixmap::fromImage(img));
}
(7)运行程序,单击“编辑”→“放大”命令或单击工具栏上的 按钮,图像放大效果如图5.7所示。
5.3.2 旋转功能
ShowRotate90()函数实现的是图形的旋转,此函数实现坐标的逆时针旋转90°。具体实现步骤如下。
(1)在“imgprocessor.h”头文件中添加“protected slots:”变量:
void ShowRotate90();
(2)在createActions()函数的“旋转90°”最后添加事件关联:
connect(rotate90Action,SIGNAL(triggered()),this,SLOT(ShowRotate90()));
(3)ShowRotate90()函数的具体实现代码如下:
void ImgProcessor::ShowRotate90()
{
    if(img.isNull())
        return;
    QMatrix matrix;
    matrix.rotate(90);
    img = img.transformed(matrix);
    showWidget->imageLabel->setPixmap(QPixmap::fromImage(img));
}
(4)在“imgprocessor.h”头文件中添加“protected slots:”变量:
void ShowRotate180();
void ShowRotate270();
(5)在createActions()函数的“旋转180°”、“旋转270°”后面分别添加事件关联:
connect(rotate180Action,SIGNAL(triggered()),this,SLOT(ShowRotate180()));
connect(rotate270Action,SIGNAL(triggered()),this,SLOT(ShowRotate270()));
(6)ShowRotate180()、ShowRotate270()函数的具体实现代码。
(7)运行程序,单击“旋转”→“旋转90°”命令或单击工具栏上的 按钮,图像旋转效果如图5.8所示。

5.3.3 镜像功能
ShowMirrorVertical()函数实现的是图形的纵向镜像,ShowMirrorHorizontal()实现的则是横向镜像。通过QImage::mirrored(bool horizontal,bool vertical)实现图形的镜像功能,参数horizontal和vertical分别指定了镜像的方向。具体实现步骤如下。
(1)在“imgprocessor.h”头文件中添加“protected slots:”变量:
void ShowMirrorVertical();
void ShowMirrorHorizontal();
(2)在createActions()函数的“纵向镜像”、“横向镜像”后面分别添加事件关联:
connect(mirrorVerticalAction,SIGNAL(triggered()),this,SLOT(ShowMirrorVertical()));
connect(mirrorHorizontalAction,SIGNAL(triggered()),this,SLOT(ShowMirrorHorizontal()));
(3)ShowMirrorVertical ()、ShowMirrorHorizontal ()函数的具体实现代码如下:
void ImgProcessor::ShowMirrorVertical()
{
    if(img.isNull())
        return;
    img=img.mirrored(false,true);
    showWidget->imageLabel->setPixmap(QPixmap::fromImage(img));
}
void ImgProcessor::ShowMirrorHorizontal()
{
    if(img.isNull())
        return;
    img=img.mirrored(true,false);
    showWidget->imageLabel->setPixmap(QPixmap::fromImage(img));
}
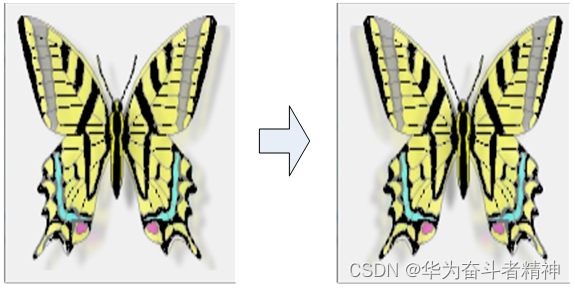
(4)此时运行程序,单击“镜像”→“横向镜像”命令,蝴蝶翅膀底部的阴影从右边移到左边,显示效果如图5.9所示。
5.4 Qt 5文本编辑功能
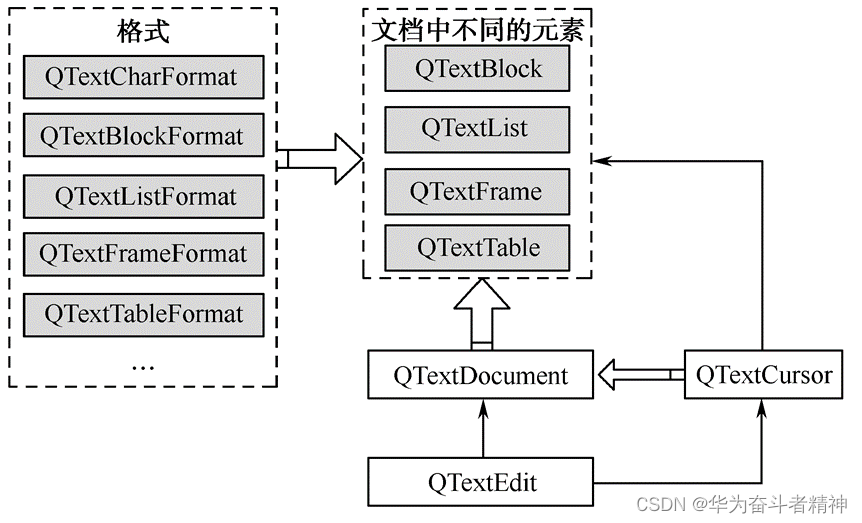
文本编辑各类之间的划分与关系如图5.10所示。
实现文本编辑的具体操作步骤如下。
(1)在“imgprocessor.h”头文件中添加“private:”变量:
QLabel *fontLabel1;                                 	//字体设置项
QFontComboBox *fontComboBox;
QLabel *fontLabel2;
QComboBox *sizeComboBox;
QToolButton *boldBtn;
QToolButton *italicBtn;
QToolButton *underlineBtn;
QToolButton *colorBtn;
QToolBar *fontToolBar;                             	//字体工具栏
(2)在“imgprocessor.h”头文件中添加“protected slots:”变量:
void ShowFontComboBox(QString comboStr);
void ShowSizeSpinBox(QString spinValue);
void ShowBoldBtn();
void ShowItalicBtn();
void ShowUnderlineBtn();
void ShowColorBtn();
void ShowCurrentFormatChanged(const QTextCharFormat &fmt);
(3)在相对应的构造函数中,在语句“setCentralWidget(showWidget);”与语句“createActions();”之间添加如下代码。
(4)在该构造函数的最后部分添加相关的事件关联:
connect(fontComboBox,SIGNAL(activated(QString)),
    this,SLOT(ShowFontComboBox(QString)));
connect(sizeComboBox,SIGNAL(activated(QString)),
    this,SLOT(ShowSizeSpinBox(QString)));
connect(boldBtn,SIGNAL(clicked()),this,SLOT(ShowBoldBtn()));
connect(italicBtn,SIGNAL(clicked()),this,SLOT(ShowItalicBtn()));
connect(underlineBtn,SIGNAL(clicked()),this,SLOT(ShowUnderlineBtn()));
connect(colorBtn,SIGNAL(clicked()),this,SLOT(ShowColorBtn()));
connect(showWidget->text,SIGNAL(currentCharFormatChanged(QTextCharFormat&)),this,SLOT(ShowCurrentFormatChanged(QTextCharFormat&)));
(5)在相对应的工具栏createToolBars()函数中添加如下代码:
//字体工具条
fontToolBar =addToolBar("Font");
fontToolBar->addWidget(fontLabel1);
fontToolBar->addWidget(fontComboBox);
fontToolBar->addWidget(fontLabel2);
fontToolBar->addWidget(sizeComboBox);
fontToolBar->addSeparator();
fontToolBar->addWidget(boldBtn);
fontToolBar->addWidget(italicBtn);
fontToolBar->addWidget(underlineBtn);
fontToolBar->addSeparator();
fontToolBar->addWidget(colorBtn);
调用QFontComboBox的setFontFilters接口可过滤只在下拉列表框中显示某一类字体,默认情况下为QFontComboBox::AllFonts列出所有字体。
5.4.1 设置字体
完成设置选定文字字体的函数ShowFontComboBox()代码如下:
void ImgProcessor::ShowFontComboBox(QString comboStr)	//设置字体
{
    QTextCharFormat fmt;		 //创建一个QTextCharFormat对象
    fmt.setFontFamily(comboStr); //选择的字体名称设置给QTextCharFormat对象
    mergeFormat(fmt);     		 //将新的格式应用到光标选区内的字符
}
前面介绍过,所有对于QTextDocument进行的修改都通过QTextCursor类来完成,具体代码如下:
void ImgProcessor::mergeFormat(QTextCharFormat format)
{
    QTextCursor cursor =showWidget->text->textCursor();
//获得编辑框中的光标
    if(!cursor.hasSelection())							//(a)
        cursor.select(QTextCursor::WordUnderCursor);
    cursor.mergeCharFormat(format);						//(b)
    showWidget->text->mergeCurrentCharFormat(format);	//(c)
}
5.4.2 设置字号
设置选定文字字号大小的ShowSizeSpinBox()函数代码如下:
void ImgProcessor::ShowSizeSpinBox(QString spinValue)	//设置字号
{
   QTextCharFormat fmt;
   fmt.setFontPointSize(spinValue.toFloat());
   showWidget->text->mergeCurrentCharFormat(fmt);
}
5.4.3 设置文字加粗
设置选定文字为加粗显示的ShowBoldBtn()函数代码如下:
void ImgProcessor::ShowBoldBtn() 		//设置文字显示加粗
{
    QTextCharFormat fmt;
    fmt.setFontWeight(boldBtn->isChecked()?QFont::Bold:QFont:: Normal);
    showWidget->text->mergeCurrentCharFormat(fmt);
}
5.4.4 设置文字斜体
设置选定文字为斜体显示的ShowItalicBtn()函数代码如下:
void ImgProcessor::ShowItalicBtn()		//设置文字显示斜体
{
    QTextCharFormat fmt;
    fmt.setFontItalic(italicBtn->isChecked());
    showWidget->text->mergeCurrentCharFormat(fmt);
}
5.4.5 设置文字加下画线
在选定文字下方加下画线的ShowUnderlineBtn()函数代码如下:
void ImgProcessor::ShowUnderlineBtn()		//设置文字加下画线
{
    QTextCharFormat fmt;
    fmt.setFontUnderline(underlineBtn->isChecked());
    showWidget->text->mergeCurrentCharFormat(fmt);
}
5.4.6 设置文字颜色
设置选定文字颜色的ShowColorBtn()函数代码如下:
void ImgProcessor::ShowColorBtn()						//设置文字颜色
{
	QColor color=QColorDialog::getColor(Qt::red,this);	//(a)
	if(color.isValid())
    {
		QTextCharFormat fmt;
        	fmt.setForeground(color);
        	showWidget->text->mergeCurrentCharFormat(fmt);
    }
}
在“imgprocessor.cpp”文件的开头添加声明:
#include <QColorDialog>
#include <QColor>
标准颜色对话框QColorDialog类的使用:
QColor getColor
(
    const QColor& initial=Qt::white,
    QWidget* parent=0
);
第1个参数指定了选中的颜色,默认为白色。通过QColor::isValid()可以判断用户选择的颜色是否有效,若用户单击“取消”(Cancel)按钮,QColor::isValid()将返回false。第2个参数定义了标准颜色对话框的父窗口。
5.4.7 设置字符格式
当光标所在处的字符格式发生变化时调用此槽函数,函数根据新的字符格式将工具栏上各个格式控件的显示更新。
void ImgProcessor::ShowCurrentFormatChanged(const QTextCharFormat &fmt)
{
	fontComboBox->setCurrentIndex(fontComboBox->findText(fmt
		 .fontFamily()));
   	sizeComboBox->setCurrentIndex(sizeComboBox->findText(
           QString::number(fmt.fontPointSize())));
   	boldBtn->setChecked(fmt.font().bold());
   	italicBtn->setChecked(fmt.fontItalic());
   	underlineBtn->setChecked(fmt.fontUnderline());
}
此时运行程序,可根据需要设置字体的各种形式。
5.5 Qt 5排版功能
具体实现步骤如下。
(1)在“imgprocessor.h”头文件中添加“private:”变量:
QLabel *listLabel;                                    	//排序设置项
QComboBox *listComboBox;
QActionGroup *actGrp;
QAction *leftAction;
QAction *rightAction;
QAction *centerAction;
QAction *justifyAction;
QToolBar *listToolBar;                               	//排序工具栏
(2)在“imgprocessor.h”头文件中添加“protected slots:”变量:
void ShowList(int);
void ShowAlignment(QAction *act);
void ShowCursorPositionChanged();
(3)在相对应的构造函数中,在语句“setCentralWidget(showWidget);”与语句“createActions();”之间添加如下代码:
//排序
listLabel =new QLabel(tr("排序"));
listComboBox =new QComboBox;
listComboBox->addItem("Standard");
listComboBox->addItem("QTextListFormat::ListDisc");
listComboBox->addItem("QTextListFormat::ListCircle");
listComboBox->addItem("QTextListFormat::ListSquare");
listComboBox->addItem("QTextListFormat::ListDecimal");
listComboBox->addItem("QTextListFormat::ListLowerAlpha");
listComboBox->addItem("QTextListFormat::ListUpperAlpha");
listComboBox->addItem("QTextListFormat::ListLowerRoman");
listComboBox->addItem("QTextListFormat::ListUpperRoman");
(4)在构造函数的最后部分添加相关的事件关联:
connect(listComboBox,SIGNAL(activated(int)),this,SLOT(ShowList(int)));
connect(showWidget->text->document(),SIGNAL(undoAvailable(bool)),
      redoAction,SLOT(setEnabled(bool)));
connect(showWidget->text->document(),SIGNAL(redoAvailable(bool)),
      redoAction,SLOT(setEnabled(bool)));
connect(showWidget->text,SIGNAL(cursorPositionChanged()),
      this,SLOT(ShowCursorPositionChanged()));
(5)在相对应的工具栏createActions()函数中添加如下代码:
//排序:左对齐、右对齐、居中和两端对齐
actGrp =new QActionGroup(this);
leftAction =new QAction(QIcon("left.png"),"左对齐",actGrp);
leftAction->setCheckable(true);
rightAction =new QAction(QIcon("right.png"),"右对齐",actGrp);
rightAction->setCheckable(true);
centerAction =new QAction(QIcon("center.png"),"居中",actGrp);
centerAction->setCheckable(true);
justifyAction =new QAction(QIcon("justify.png"),"两端对齐",actGrp);
justifyAction->setCheckable(true);
connect(actGrp,SIGNAL(triggered(QAction*)),this,SLOT(ShowAlignment (QAction*)));
(6)在相对应的工具栏createToolBars()函数中添加如下代码:
//排序工具条
listToolBar =addToolBar("list");
listToolBar->addWidget(listLabel);
listToolBar->addWidget(listComboBox);
listToolBar->addSeparator();
listToolBar->addActions(actGrp->actions());
5.5.1 实现段落对齐
完成对按下某个对齐按钮的响应用ShowAlignment()函数,根据比较判断触发的是哪个对齐按钮,调用QTextEdit的setAlignment函数可以实现当前段落的对齐调整。具体代码如下:
void ImgProcessor::ShowAlignment(QAction *act)
{
    if(act==leftAction)
        showWidget->text->setAlignment(Qt::AlignLeft);
    if(act==rightAction)
        showWidget->text->setAlignment(Qt::AlignRight);
    if(act==centerAction)
        showWidget->text->setAlignment(Qt::AlignCenter);
    if(act==justifyAction)
        showWidget->text->setAlignment(Qt::AlignJustify);
}
响应文本中光标位置处发生改变的信号的ShowCursorPositionChanged()函数代码如下:
void ImgProcessor::ShowCursorPositionChanged()
{
    if(showWidget->text->alignment()==Qt::AlignLeft)
        leftAction->setChecked(true);
    if(showWidget->text->alignment()==Qt::AlignRight)
        rightAction->setChecked(true);
    if(showWidget->text->alignment()==Qt::AlignCenter)
        centerAction->setChecked(true);
    if(showWidget->text->alignment()==Qt::AlignJustify)
        justifyAction->setChecked(true);
}
5.5.2 实现文本排序
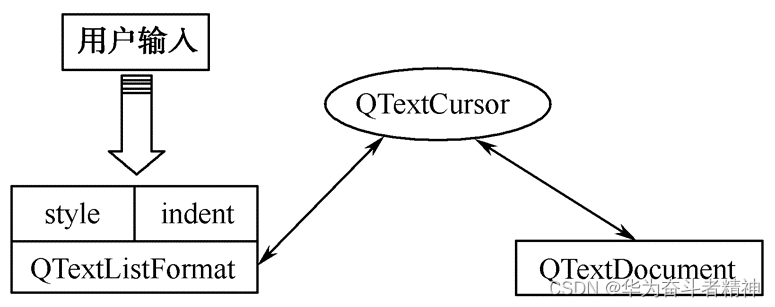
首先,介绍文本排序功能实现的基本流程,如图5.11所示。
实现根据用户选择的不同排序方式对文本进行排序的ShowList()函数代码。
设置QTextListFormat的缩进值首先通过QTextCursor获得QTextBlockFormat对象,由QTextBlockFormat获得段落的缩进值,在此基础上定义QTextListFormat的缩进值,本实例是在段落缩进的基础上加1,也可根据需要进行其他设定。
在“imgprocessor.cpp”文件的开头添加声明:
#include <QTextList>
最后,打开“main.cpp”文件,具体代码如下(加黑代码是后添加的):
#include "imgprocessor.h"
#include <QApplication>
int main(int argc, char *argv[])
{
    QApplication a(argc, argv);
    QFont f("ZYSong18030",12);                        //设置显示的字体格式
    a.setFont(f);
    ImgProcessor w;
    w.show();
    return a.exec();
}
这样修改的目的是定制程序主界面的显示字体。
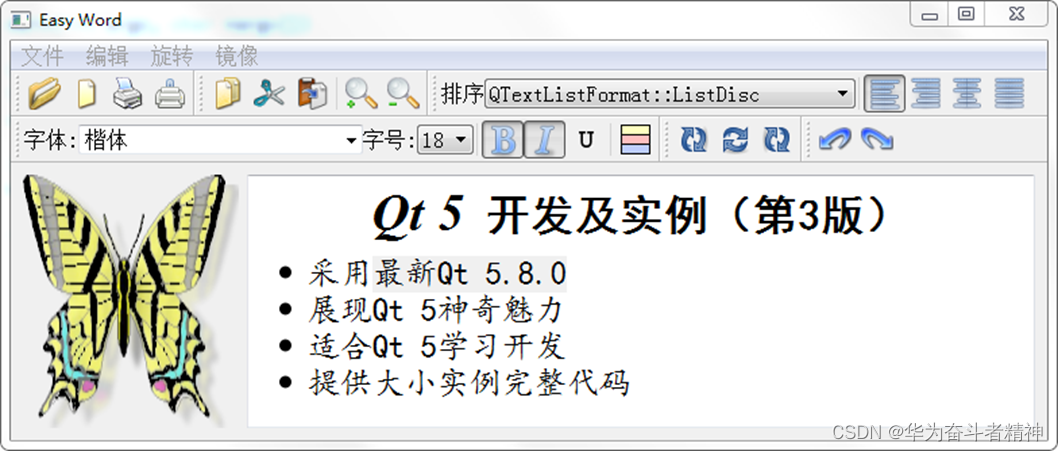
此时运行程序,可实现段落的对齐和文本排序功能,如图5.12所示为一段文本的排版示例,本书选择使用了“QTextListFormat::ListDisc”(黑色实心圆点)的文本排序方式。


 3993
3993


 被折叠的 条评论
为什么被折叠?
被折叠的 条评论
为什么被折叠?
 到【灌水乐园】发言


