


1.OAuth2.0概念
OAuth 2.0 是一种授权框架,允许第三方应用在用户的批准下访问其存储在另一服务提供方上的受保护资源,而无需直接暴露用户的凭证。
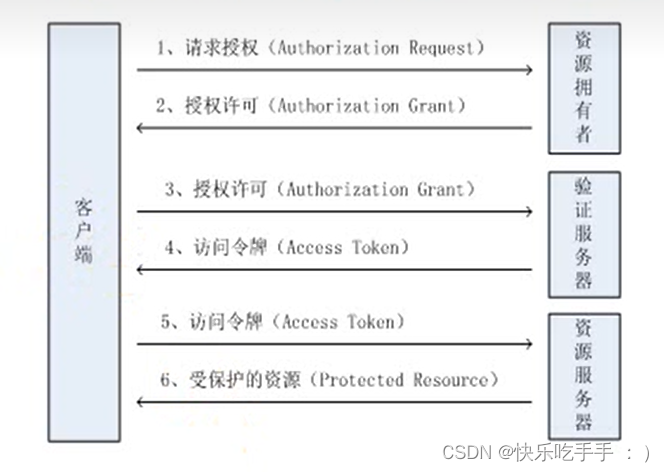
客户端:本身不存储资源,需要通过资源拥有者去请求资源服务器的资源。
资源拥有者:通常可以理解为用户
授权服务器:用于对资源拥有者的身份进行认证,对访问资源进行授权。客户端如果想要访问资源的话需要 资源拥有者 通过向 授权服务器 授权后才可以访问
资源服务器:存储资源的服务器,客户端最终需要通过资源服务器来获取资源。
2.授权模式
2.1 授权码(Authorization Code)模式 *
这是最常见的模式,适用于服务器端的应用程序。
流程包括:
客户端引导用户到授权服务器请求授权;
用户同意后,授权服务器返回一个授权码给客户端;
客户端使用授权码与授权服务器交换访问令牌(access token);
客户端持有访问令牌访问资源服务器。
2.2 简化授权(Implicit)模式
在用户授权之后,授权服务器直接将访问令牌返回给客户端(通常是在重定向URI的hash fragment中);
因为没有涉及到授权码交换的过程,所以这种模式相对简单,但存在安全隐患,不适合敏感资源的授权。
2.3 密码(Resource Owner Password Credentials)模式 *
在用户对客户端高度信任的情况下使用,例如企业内部应用。
客户端直接接收用户提供的用户名和密码,并使用这些凭证向授权服务器请求访问令牌;
这种模式安全性较低,因为它要求用户将密码提供给第三方应用,违反了最小权限原则。
2.4 客户端凭证(Client Credentials)模式
用于客户端自身的授权,而非用户的授权。
客户端使用自己的凭证向授权服务器请求访问令牌;
在这种模式下,客户端代表自己而不是用户去获取对受保护资源的访问权;
主要应用于机器对机器通信,或者不需要用户干预的后台服务之间的交互。
3. 引入依赖
        <dependency>
            <groupId>org.springframework.cloud</groupId>
            <artifactId>spring-cloud-starter-security</artifactId>
        </dependency>
        <dependency>
            <groupId>org.springframework.cloud</groupId>
            <artifactId>spring-cloud-starter-oauth2</artifactId>
        </dependency>
4. 架构实现步骤
开启单点登录:@EnableOAuth2Sso
@SpringBootApplication
//用于开启SpringSecurity提供的隐藏注解
@EnableGlobalMethodSecurity(securedEnabled = true,prePostEnabled = true)
//开启单点登录
@EnableOAuth2Sso
public class OauthDemoApplication {
    public static void main(String[] args) {
        SpringApplication.run(OauthDemoApplication.class, args);
    }

}
4.1授权码模式(authorization_code)
(1)自定义登录逻辑
@Service
public class UserSecurityServiceImpl implements UserDetailsService {
    @Autowired
    private PasswordEncoder pe;
    @Override
    public UserDetails loadUserByUsername(String username) throws UsernameNotFoundException {
        //1.查询数据库,获取用户名和密码
        User u=userMapper.findUser(username);
        //2。拿密码(密文)进行解析
        String password=pe.encode(u.getPassword);
        //返回的User和上面的User不是一个类,此处返回的User为SpringSecurity中的,AuthorityUtils.commaSeparatedStringToAuthorityList用于生成权限
        return new User(username,password, AuthorityUtils.commaSeparatedStringToAuthorityList("admin,normal,ROLE_A"));
        //admin和normal为权限,而ROLE_XXX为角色
    }
}
(2)配置SpringSecurityConfig
@Configuration
@EnableWebSecurity
public class SecurityConfig extends WebSecurityConfigurerAdapter {
    @Bean
    public PasswordEncoder getPasswordEncode(){
        return new BCryptPasswordEncoder();
    }

    @Override
    protected void configure(HttpSecurity http) throws Exception {
        http.csrf().disable()
                //允许以下url的访问
                .authorizeRequests()
                .antMatchers("/oauth/**","/login/**","/logout")
                .permitAll()
                //剩余的都需要认证才可以访问
                .anyRequest()
                .authenticated()
                .and()
                //表单的访问,配置都为默认值
                .formLogin()
                .permitAll();
    }
}
(3)配置授权服务器
@Configuration
@EnableAuthorizationServer
public class AuthorizationServerConfig extends AuthorizationServerConfigurerAdapter {
    @Autowired
    private PasswordEncoder passwordEncoder;

    @Override
    public void configure(ClientDetailsServiceConfigurer clients) throws Exception {
        clients.inMemory()
                //配置client-id
                .withClient("admin")
                //配置client-secret
                .secret(passwordEncoder.encode("123456"))
                //有效期
                .accessTokenValiditySeconds(3600)
                //授权后跳转连接
                .redirectUris("http://www.baidu.com")
                //配置申请权限范围
                .scopes("all")
                //配置grant_type 授权类型
                .authorizedGrantTypes("authorization_code");
    }
}
(4)配置资源服务器
@Configuration
@EnableResourceServer
public class ResourceServerConnfig extends ResourceServerConfigurerAdapter {
    @Override
    public void configure(HttpSecurity http) throws Exception {
        http.authorizeRequests()
                .anyRequest()
                .authenticated()
                .and()
                .requestMatchers()
                 //需要被获取的资源链接都需要在此处放行
                .antMatchers("/user/**");
    }
}
(5)通过链接跳转至登录页获取授权码
例:https://example.com/oauth/authorize?response_type=code&client_id=your_client_id&redirect_uri=https%3A%2F%2Fclient.example.com%2Fcallback&scope=read write请求URL包含以下参数:
response_type: 必须设置为code,表明请求的是授权码。
client_id: 客户端在授权服务器注册时获得的ID。
redirect_uri: 客户端预先注册的重定向URI,授权服务器会在授权完成后将用户代理重定向至此地址,并附带授权码。
scope: 请求的权限范围,可选。
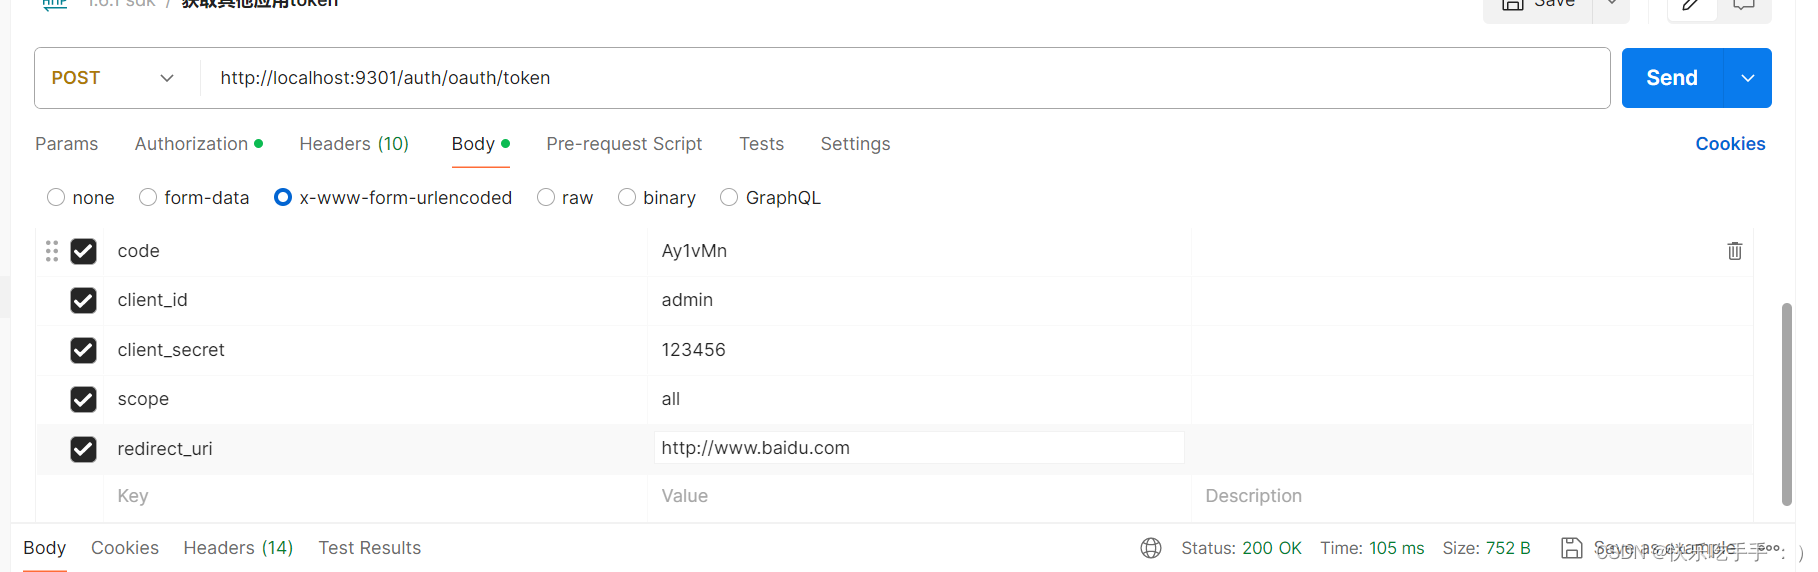
(6)使用获取到的验证码,通过/oauth/token获取到访问的token
4.2 密码模式(password)
(1)重写并注册AuthenticationManager
@Configuration
@EnableWebSecurity
public class SecurityConfig extends WebSecurityConfigurerAdapter {
    @Bean
    public PasswordEncoder getPasswordEncode(){
        return new BCryptPasswordEncoder();
    }


    //重写并注册Bean :AuthenticationManager
    @Bean
    @Override
    public AuthenticationManager authenticationManagerBean() throws Exception{
        return super.authenticationManagerBean();
    }

     //......
}
(2)修改授权服务器配置(改为密码模式),并重写configure
@Configuration
@EnableAuthorizationServer
public class AuthorizationServerConfig extends AuthorizationServerConfigurerAdapter {
@Autowired
private PasswordEncoder passwordEncoder;
@Autowired
private AuthenticationManager authenticationManager;
@Autowired
private UserSecurityServiceImpl userSecurityService;
//使用密码模式所需配置authenticationManager和userSecurityService
@Override
public void configure(AuthorizationServerEndpointsConfigurer endpoints) throws Exception {
endpoints.authenticationManager(authenticationManager).userDetailsService(userSecurityService);
}
@Override
public void configure(ClientDetailsServiceConfigurer clients) throws Exception {
clients.inMemory()
//配置client-id
.withClient("admin")
//配置client-secret
.secret(passwordEncoder.encode("123456"))
//有效期
.accessTokenValiditySeconds(3600)
//授权后跳转连接
.redirectUris("http://www.baidu.com")
//配置申请权限范围
.scopes("all")
//配置grant_type 授权类型
.authorizedGrantTypes("password");
}
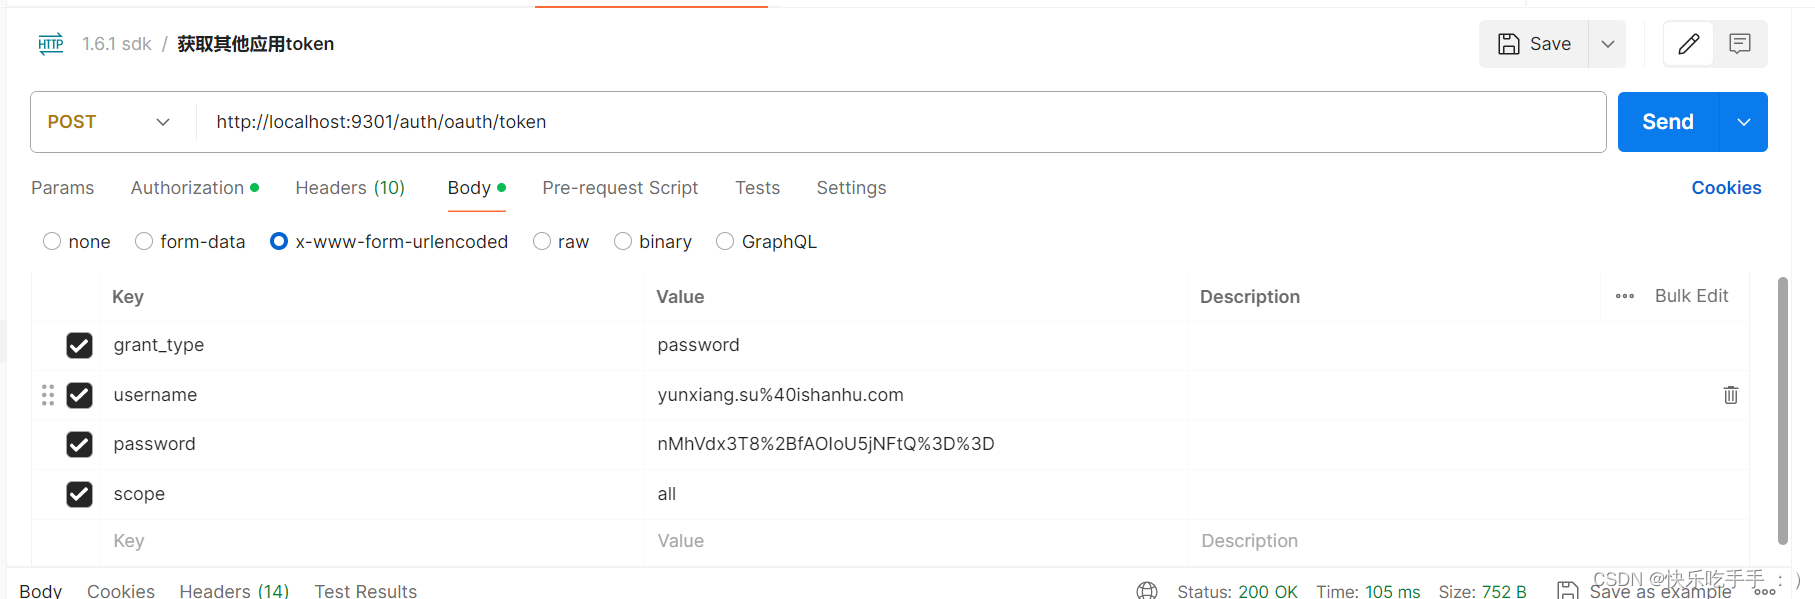
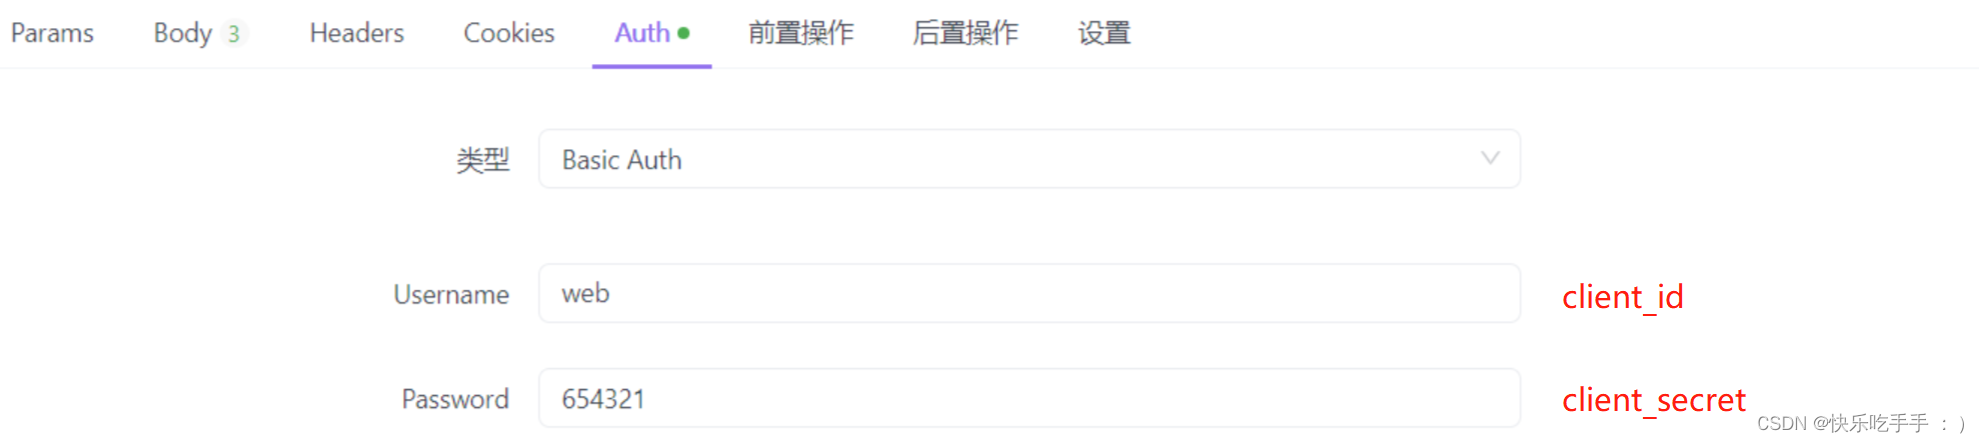
}(3)使用用户名和密码通过oauth/token获取token,client_id和client_secret配置于Auth或Form中
4.3 客户端模式(client_credentials)
(1)修改授权服务器配置(改为客户端模式)
@Configuration
@EnableAuthorizationServer
public class AuthorizationServerConfig extends AuthorizationServerConfigurerAdapter {
    @Autowired
    private PasswordEncoder passwordEncoder;
    @Autowired
    private AuthenticationManager authenticationManager;
    @Autowired
    private UserSecurityServiceImpl userSecurityService;

    //......

    @Override
    public void configure(ClientDetailsServiceConfigurer clients) throws Exception {
        clients.inMemory()
                //配置client-id
                .withClient("admin")
                //配置client-secret
                .secret(passwordEncoder.encode("123456"))
                //有效期
                .accessTokenValiditySeconds(3600)
                //授权后跳转连接
                .redirectUris("http://www.baidu.com")
                //配置申请权限范围
                .scopes("all")
                //配置grant_type 授权类型
                .authorizedGrantTypes("password,client_credentials");
    }
}
(2)使用client_id和client_scret通过oauth/token获取token

5. redis存储token
(1)配置RedisConfig
@Configuration
public class RedisConfig {

    @Autowired
    private RedisConnectionFactory redisConnectionFactory;
    @Bean
    public TokenStore tokenStore(){
        return new RedisTokenStore(redisConnectionFactory);
    }
    @Bean
    public RedisConnectionFactory redisConnectionFactory() {
        return new JedisConnectionFactory();
    }
}
(2)配置认证服务器的tokenStore
@Configuration
@EnableAuthorizationServer
public class AuthorizationServerConfig extends AuthorizationServerConfigurerAdapter {
    //......
    @Autowired
    @Qualifier("tokenStore")
    private TokenStore tokenStore;

    //使用密码模式所需配置authenticationManager和userSecurityService
    @Override
    public void configure(AuthorizationServerEndpointsConfigurer endpoints) throws Exception {
        endpoints.authenticationManager(authenticationManager)
                .userDetailsService(userSecurityService)
                .tokenStore(tokenStore);
    }

    //......
}
6. JWT简介
JWT,全称为JSON Web Token,是一种开放标准(RFC 7519),用于安全地在各方之间传输信息。JWT提供了一种紧凑且自包含的方法,以JSON对象的形式封装信息,这些信息可以被验证和信任,原因在于它被数字签名所保护。JWT主要应用于身份验证和授权场景中,但也可用于其他需要安全传输信息的场合。
JWT结构上分为三个部分:
头部(Header):包含JWT的元数据,如其类型(通常是JWT)和所采用的签名算法(如HS256、RS256等)。
载荷(Payload):包含JWT的实际信息或声明,可以是用户标识符、用户角色、过期时间等。这部分信息可以是不敏感的,因为它是可被解析的。
签名(Signature):通过将头部和载荷分别进行Base64编码后,使用头部中指定的算法和一个秘钥(或密钥对)对这两个编码后的字符串进行签名,确保JWT的完整性和来源的真实性。
JWT的工作流程通常如下:
用户通过认证后,服务器生成一个JWT并发送给用户。
用户在后续的每一次请求中,都将这个JWT附在HTTP请求头中发送给服务器。
服务器收到JWT后,使用相同的秘钥验证JWT的有效性(包括签名校验、过期时间检查等),从而确认用户的身份和权限,无需查询数据库或会话存储。
相比于传统的session认证,JWT减少了服务器存储负担,支持跨域认证,并且易于扩展,特别适合分布式系统和微服务架构。然而,也需要注意JWT的安全管理,例如保护好秘钥、不过度信任JWT内容、合理设置过期时间等。
7. Oauth2.0整合JWT
(1)配置JwtTokenStoreConfig
@Configuration
public class JwtTokenStoreConfig {

    @Bean(name = "jwt")
    public TokenStore JwtTokenStore(){
        return new JwtTokenStore(jwtAccessTokenConverter());
    }

    @Bean
    public JwtAccessTokenConverter jwtAccessTokenConverter(){
        JwtAccessTokenConverter accessTokenConverter=new JwtAccessTokenConverter();
        //配置JWT使用的密钥
        accessTokenConverter.setSigningKey("test_key");
        return accessTokenConverter;
    }
}
(2)修改认证服务器配置
@Configuration
@EnableAuthorizationServer
public class AuthorizationServerConfig extends AuthorizationServerConfigurerAdapter {
    //......
    //1.主动注入配置
    @Autowired
    @Qualifier("jwtTokenStore")
    private TokenStore tokenStore;
    @Autowired
    private JwtAccessTokenConverter jwtAccessTokenConverter;


    //2.配置TokenStore和AccessTokenConverter
    @Override
    public void configure(AuthorizationServerEndpointsConfigurer endpoints) throws Exception {
        endpoints.authenticationManager(authenticationManager).userDetailsService(userSecurityService)
                .tokenStore(tokenStore)
                .accessTokenConverter(jwtAccessTokenConverter);
    }

    //......
}
8. 拓展JWT中存储的内容
(1)配置JwtTokenEnhancer
public class JwtTokenEnhancer implements TokenEnhancer {
    @Override
    public OAuth2AccessToken enhance(OAuth2AccessToken oAuth2AccessToken, OAuth2Authentication oAuth2Authentication) {
        Map<String,Object> info=new HashMap<>();
        //自定义扩展内容
        info.put("enhance","enhance info");
        ((DefaultOAuth2AccessToken)oAuth2AccessToken).setAdditionalInformation(info);
        return oAuth2AccessToken;
    }
}
(2)手动注册Bean:JwtTokenEnhancer
@Configuration
public class JwtTokenStoreConfig {

    //.....

    //手动注册Bean
    @Bean
    public JwtTokenEnhancer jwtTokenEnhancer(){
        return new JwtTokenEnhancer();
    }
}
(3)修改认证服务器配置
@Configuration
@EnableAuthorizationServer
public class AuthorizationServerConfig extends AuthorizationServerConfigurerAdapter {
    //......
    @Autowired
    private JwtAccessTokenConverter jwtAccessTokenConverter;
    @Autowired
    private JwtTokenEnhancer jwtTokenEnhancer;


    //使用密码模式所需配置authenticationManager和userSecurityService
    @Override
    public void configure(AuthorizationServerEndpointsConfigurer endpoints) throws Exception {
        //配置JWT内容增强器
        TokenEnhancerChain enhancerChain=new TokenEnhancerChain();
        List<TokenEnhancer> delegates=new ArrayList<>();
        delegates.add(jwtTokenEnhancer);
        delegates.add(jwtAccessTokenConverter);
        enhancerChain.setTokenEnhancers(delegates);

        endpoints.authenticationManager(authenticationManager).userDetailsService(userSecurityService)
                .tokenStore(tokenStore)
                .accessTokenConverter(jwtAccessTokenConverter);
    }

    //......
}
备注:解析JWT的Token需要使用[ io.jsonwebtoken-jjwt ]

9. 刷新令牌
只需在授权服务器中的授权类型添加 refresh_token即可
@Configuration
@EnableAuthorizationServer
public class AuthorizationServerConfig extends AuthorizationServerConfigurerAdapter {
    //......

    @Override
    public void configure(ClientDetailsServiceConfigurer clients) throws Exception {
        clients.inMemory()
                //配置client-id
                .withClient("admin")
                //配置client-secret
                .secret(passwordEncoder.encode("123456"))
                //有效期
                .accessTokenValiditySeconds(3600)
                //授权后跳转连接
                .redirectUris("http://www.baidu.com")
                //配置申请权限范围
                .scopes("all")
                //配置grant_type 授权类型  及 *添加令牌刷新机制
                .authorizedGrantTypes("password","refresh_token");
    }
}


 702
702


 被折叠的 条评论
为什么被折叠?
被折叠的 条评论
为什么被折叠?
 到【灌水乐园】发言


