


目录
一、问题
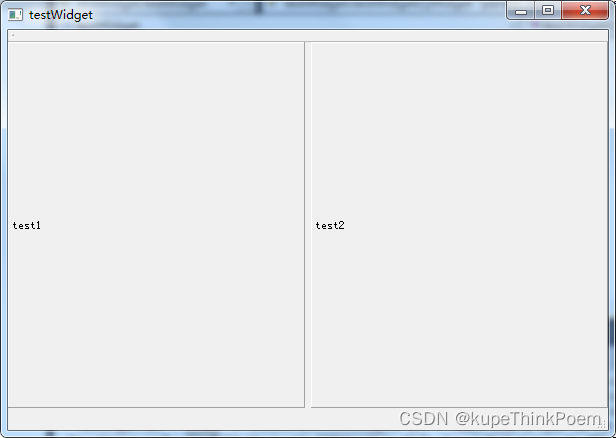
设计了一个窗口控件,继承了QWidget,里面有两个QLabel,用QHBoxLayout将其并排排列。但是这个控件被调用,但是这个控件边缘太大,看起来很丑,主要原因就是这个QHBoxLayout的边缘设置的太大。

二、QLayout
1、概述
Qt中界面开发的一个优势就是QLayout(布局)和QSpacer(弹簧)的结合。通过在Qt Designer中将需要的控件拖到窗口中,在窗口中添加QLayout和QSpacer以确定控件的位置,将所有可视化的控件全部在窗口中布局好,这样一来,代码只需实现功能就可以了,界面布局的代码就会少很多,而且很方便,可以加快页面的开发速度。
2、布局管理系统
Qt的布局管理系统提供了强大的机制来自动排列窗口中的所有部件,确保它们有效地使用空间。所有QWidget的子类的实例(对象)都可以使用布局管理器管理位于它们之中的子部件,可以通过QWidget::setLayout()函数在一个部件上应用布局管理器,也可以在Qt Designer中右键选中部件,选择布局来添加。QWidget在添加布局时,要先确保QWidget中有子部件的存在,否则这时布局管理是不可用的状态。一旦一个部件设置了布局管理器,那它会完成下面这些事情:
(1)定位子部件;
(2)感知窗口默认大小;
(3)感知窗口最小大小;
(4)窗口大小变化时进行处理;
(5)当内容改变时自动更新:
——字体大小、文本或子部件的其他内容随之改变;
——隐藏或显示子部件;
——移除一个子部件。
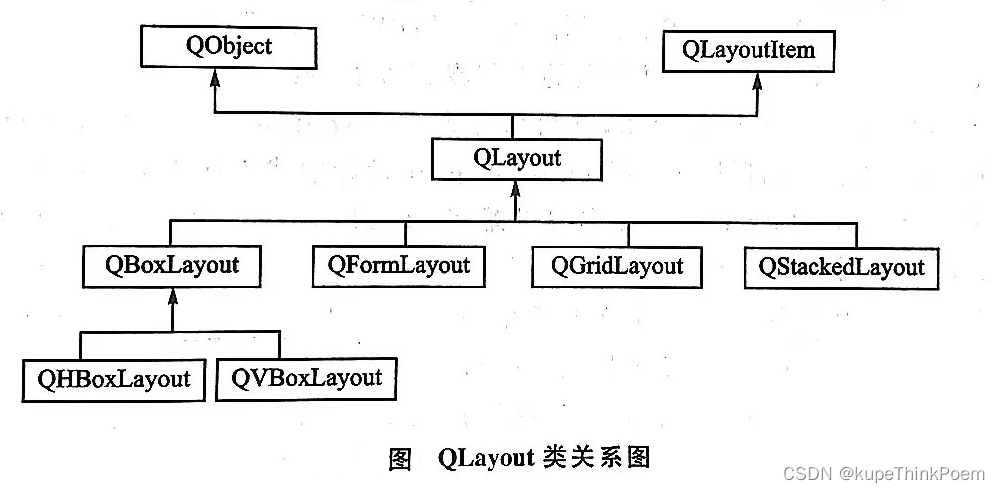
3、布局管理器
(1)QBoxLayout(基本布局管理器;又分为:QHBoxLayout(水平布局管理器)和QVBoxLayout(垂直布局管理器))
(2)QGridLayout(栅格布局管理器)
(3)QFormLayout(窗体布局管理器)
(4)QStackedLayout(栈布局管理器)
4、布局管理器的一些知识
(1)基本布局管理器(QBoxLayout):基本布局管理器QBoxLayout类可以使子部件在水平方向或者垂直方向排成一列。
(2)栅格布局管理器(QGridLayout):栅格布局管理器QGridLayout类使部件在网格中进行布局,它将所有的控件分隔成网格,将部件放入某一个单元格中。
(3)窗体布局管理器(QFormLayout):用来管理表单的输入部件以及与它们相关的标签。窗体布局管理器将它的子部件分为两列,左边是一些标签,右边是一些输入部件。一般主要应用在登录时输入账号、密码;输入个人信息如:姓名:+输入框。
(4) 当部件加入到一个布局管理其中,然后将这个布局管理器再放到一个窗口部件上时,这个布局以及它包含的所有部件都会重新定义自己的父对象(parent)为这个窗口部件,所以在创建布局管理器和其中的部件时不用指定父部件。
(5)在页面上不可能所有控件都排的满满当当,这时就需要用到QSpacer,用来在部件之间产生间隔。QSpacer分为水平分隔符和垂直分隔符。
三、QLayout边缘空白调整
1、原始代码
#include "testwidget.h"
#include <QLayout>
#include <QWidget>
#include <QFrame>
#include <QLabel>
testWidget::testWidget(QWidget *parent, Qt::WFlags flags)
	: QMainWindow(parent, flags)
{
	ui.setupUi(this);

	QHBoxLayout *pLayout= new QHBoxLayout(this->centralWidget());
	this->centralWidget()->setLayout(pLayout);

	QLabel *pl=new QLabel(this);
	pl->setFrameStyle(QFrame::Panel | QFrame::Raised);
	pl->setText("test1");
	pLayout->addWidget(pl);

	QLabel *p2=new QLabel(this);
	p2->setFrameStyle(QFrame::Panel | QFrame::Raised);
	p2->setText("test2");
	pLayout->addWidget(p2);

}

testWidget::~testWidget()
{

}
2、setContentsMargins函数
setContentsMargins(0,0,0,0)void QLayout::setContentsMargins(int left, int top, int right, int bottom)
/*
Sets the left, top, right, and bottom margins to use around the layout.
By default, QLayout uses the values provided by the style. On most platforms, the margin is 11 pixels in all directions.
This function was introduced in Qt 4.3.
See also contentsMargins(), getContentsMargins(), QStyle::pixelMetric(), PM_LayoutLeftMargin, PM_LayoutTopMargin, PM_LayoutRightMargin, and PM_LayoutBottomMargin.
*/
void QLayout::setContentsMargins(const QMargins & margins)
/*
Sets the margins to use around the layout.
By default, QLayout uses the values provided by the style. On most platforms, the margin is 11 pixels in all directions.
This function was introduced in Qt 4.6.
3、修改后代码
#include "testwidget.h"
#include <QLayout>
#include <QWidget>
#include <QFrame>
#include <QLabel>
testWidget::testWidget(QWidget *parent, Qt::WFlags flags)
	: QMainWindow(parent, flags)
{
	ui.setupUi(this);

	QHBoxLayout *pLayout= new QHBoxLayout(this->centralWidget());
	this->centralWidget()->setLayout(pLayout);

	QLabel *pl=new QLabel(this);
	pl->setFrameStyle(QFrame::Panel | QFrame::Raised);
	pl->setText("test1");
	pLayout->addWidget(pl);

	QLabel *p2=new QLabel(this);
	p2->setFrameStyle(QFrame::Panel | QFrame::Raised);
	p2->setText("test2");
	pLayout->addWidget(p2);

    pLayout->setContentsMargins(0,0,0,0);
}

testWidget::~testWidget()
{

}
4、效果图
四、QLayout布局间消除间隙
1、原始代码
#include "testwidget.h"
#include <QLayout>
#include <QWidget>
#include <QFrame>
#include <QLabel>
testWidget::testWidget(QWidget *parent, Qt::WFlags flags)
	: QMainWindow(parent, flags)
{
	ui.setupUi(this);

	QHBoxLayout *pLayout= new QHBoxLayout(this->centralWidget());
	this->centralWidget()->setLayout(pLayout);

	QLabel *pl=new QLabel(this);
	pl->setFrameStyle(QFrame::Panel | QFrame::Raised);
	pl->setText("test1");
	pLayout->addWidget(pl);

	QLabel *p2=new QLabel(this);
	p2->setFrameStyle(QFrame::Panel | QFrame::Raised);
	p2->setText("test2");
	pLayout->addWidget(p2);

	pLayout->setContentsMargins(0,0,0,0);
}

testWidget::~testWidget()
{

}
2、setSpacing函数
spacing : int
This property holds the spacing between widgets inside the layout.

If no value is explicitly set, the layout's spacing is inherited from the parent layout, or from the style settings for the parent widget.

For QGridLayout and QFormLayout, it is possible to set different horizontal and vertical spacings using setHorizontalSpacing() and setVerticalSpacing(). In that case, spacing() returns -1.

Access functions:

int	spacing () const
void	setSpacing ( int )
3、修改后代码
#include "testwidget.h"
#include <QLayout>
#include <QWidget>
#include <QFrame>
#include <QLabel>
testWidget::testWidget(QWidget *parent, Qt::WFlags flags)
	: QMainWindow(parent, flags)
{
	ui.setupUi(this);


	QHBoxLayout *pLayout= new QHBoxLayout(this->centralWidget());
	this->centralWidget()->setLayout(pLayout);

	QLabel *pl=new QLabel(this);
	pl->setFrameStyle(QFrame::Panel | QFrame::Raised);
	pl->setText("test1");
	pLayout->addWidget(pl);

	QLabel *p2=new QLabel(this);
	p2->setFrameStyle(QFrame::Panel | QFrame::Raised);
	p2->setText("test2");
	pLayout->addWidget(p2);

	pLayout->setContentsMargins(0,0,0,0);
	pLayout->setSpacing(0);
}
4、效果图


 2657
2657


 被折叠的 条评论
为什么被折叠?
被折叠的 条评论
为什么被折叠?
 到【灌水乐园】发言


