


20210121
ImportError: No module named ‘tensorflow.python’
https://stackoverflow.com/questions/41415629/importerror-no-module-named-tensorflow-python
卸载后安装需要的tf版本
多标签
def create_model(bert_config, is_training, input_ids, input_mask, segment_ids,
                 labels, num_labels, use_one_hot_embeddings):
    """Creates a classification model."""
    model = modeling.BertModel(
        config=bert_config,
        is_training=is_training,
        input_ids=input_ids,
        input_mask=input_mask,
        token_type_ids=segment_ids,
        use_one_hot_embeddings=use_one_hot_embeddings)

    # In the demo, we are doing a simple classification task on the entire
    # segment.
    #
    # If you want to use the token-level output, use model.get_sequence_output()
    # instead.
    output_layer = model.get_pooled_output()
    print('output_layer的输出:',output_layer[:5])
    #with tf.gfile.GFile(os.path.join(FLAGS.output_dir, "word2vec.txt"),"w") as writer:
    #    writer.write("%s\n"%(str(output_layer)))

    hidden_size = output_layer.shape[-1].value # 768
    #with tf.gfile.GFile(os.path.join(FLAGS.output_dir, "word2vec.txt"),"w") as writer:
     #   writer.write("%s\n"%(str(hidden_size)))

    output_weights = tf.get_variable(
        "output_weights", [num_labels, hidden_size],
        initializer=tf.truncated_normal_initializer(stddev=0.02))

    output_bias = tf.get_variable(
        "output_bias", [num_labels], initializer=tf.zeros_initializer())

    with tf.variable_scope("loss"):
        if is_training:
            # I.e., 0.1 dropout
            output_layer = tf.nn.dropout(output_layer, keep_prob=0.9)
#             with open(os.path.join(FLAGS.output_dir, "output_layer.log"), "a", encoding="utf-8") as f:
#                     f.write(output_layer)
        logits = tf.matmul(output_layer, output_weights, transpose_b=True)
        logits = tf.nn.bias_add(logits, output_bias)

        probabilities = tf.sigmoid(logits)
        label_ids = tf.cast(labels, tf.float32)
        batch_example_loss = tf.reduce_sum(
            tf.nn.sigmoid_cross_entropy_with_logits(logits=logits, labels=label_ids), axis=-1)
            #对每条记录的每个标签都要计算损失再平均
            最后整个batch记录再 求平均
        batch_average_loss = tf.reduce_mean(batch_example_loss)

#         probabilities = tf.nn.softmax(logits, axis=-1)
#         log_probs = tf.nn.log_softmax(logits, axis=-1)

#         one_hot_labels = tf.one_hot(labels, depth=num_labels, dtype=tf.float32)

#         batch_example_loss = -tf.reduce_sum(one_hot_labels * log_probs, axis=-1)
#         batch_loss = tf.reduce_mean(per_example_loss)

        return (output_layer, loss,batch_example_loss, logits, probabilities)
多分类
def create_model(bert_config, is_training, input_ids, input_mask, segment_ids,
                 labels, num_labels, use_one_hot_embeddings):
    """Creates a classification model."""
    model = modeling.BertModel(
        config=bert_config,
        is_training=is_training,
        input_ids=input_ids,
        input_mask=input_mask,
        token_type_ids=segment_ids,
        use_one_hot_embeddings=use_one_hot_embeddings)

    # In the demo, we are doing a simple classification task on the entire
    # segment.
    #
    # If you want to use the token-level output, use model.get_sequence_output()
    # instead.
    output_layer = model.get_pooled_output()

#     print('output_layer的输出:',output_layer[:5])

    hidden_size = output_layer.shape[-1].value # 768

    output_weights = tf.get_variable(
        "output_weights", [num_labels, hidden_size],
        initializer=tf.truncated_normal_initializer(stddev=0.02))

    output_bias = tf.get_variable(
        "output_bias", [num_labels], initializer=tf.zeros_initializer())

    with tf.variable_scope("loss"):
        if is_training:
            # I.e., 0.1 dropout
            output_layer = tf.nn.dropout(output_layer, keep_prob=0.9)
#             with open(os.path.join(FLAGS.output_dir, "output_layer.log"), "a", encoding="utf-8") as f:
#                     f.write(output_layer)
        logits = tf.matmul(output_layer, output_weights, transpose_b=True)
        logits = tf.nn.bias_add(logits, output_bias)
        probabilities = tf.nn.softmax(logits, axis=-1)  #这里不一样
        log_probs = tf.nn.log_softmax(logits, axis=-1)
        #直接转成 onehot?
        one_hot_labels = tf.one_hot(labels, depth=num_labels, dtype=tf.float32)

        per_example_loss = -tf.reduce_sum(one_hot_labels * log_probs, axis=-1)
        loss = tf.reduce_mean(per_example_loss)

        return (output_layer,loss, per_example_loss, logits, probabilities)
利用return 可以把tensorflow的值打印出来
tensorflow多标签和多分类代码对比
 output_layer = tf.nn.dropout(output_layer, keep_prob=0.9)
#             with open(os.path.join(FLAGS.output_dir, "output_layer.log"), "a", encoding="utf-8") as f:
#                     f.write(output_layer)
        logits = tf.matmul(output_layer, output_weights, transpose_b=True)
        logits = tf.nn.bias_add(logits, output_bias)
        #模型最终输出值
        probabilities = tf.nn.softmax(logits, axis=-1)  #这里不一样
        #经过softmax处理成概率
        log_probs = tf.nn.log_softmax(logits, axis=-1)
        #直接转成 onehot? 相当于sklearn的那个函数?
        不sklearn是多标签的转换 这是只是one hot的转换
        one_hot_labels = tf.one_hot(labels, depth=num_labels, dtype=tf.float32)

        batch_example_loss = -tf.reduce_sum(one_hot_labels * log_probs, axis=-1)
        a=[1,2]
        b=[2,3]
        a*b=[1x2,2x3]

        * 对应位置相乘 batchsize 保存保持不变
        batch_average_loss = tf.reduce_mean(batch_example_loss)
        多分类
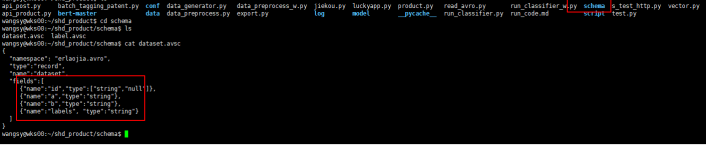
{
  "namespace": "erlaojia.avro",
  "type":"record",
  "name":"dataset",
  "fields":[
     {"name":"id","type":["string","null"]},
     {"name":"texta","type":"string"},
     {"name":"textb","type":["string","null"]},
     {"name":"labels", "type":"string"}
  ]
}

schema 相当于规定数据表框架 格式
20210120
Schema对应位置的字段也要更改
如果有字段有空值还的像id字段一样设默认值为空值
tfrecord问题
20210111
 expected dtype float does not equal original dtype double

InvalidArgumentError (see above for traceback): Restoring from checkpoint failed. This is most likely due to a mismatch between the current graph and the graph from the checkpoint. Please ensure that you have not altered the graph expected based on the checkpoint. Original error:

答案是路径没传对,初始化类的时候需要传入路径
而在类里面却把路径写死了,应该是这里产生的冲突
estimator 的epoch 和steps的关系
epoch 是整个数据集一次
设置了epoch 就不用设置steps了
相反 设置了是 steps了就不用 epoch了
steps=数据总数/batch_size 需要自己去算 很麻烦
20210106
注:为了简单起见,本示例仅使用标量输入。要处理非标量特征,最简单的方法是使用 tf.io.serialize_tensor 将张量转换为二进制字符串。在 TensorFlow 中,字符串是标量。使用 tf.io.parse_tensor 可将二进制字符串转换回张量。
https://tensorflow.google.cn/tutorials/load_data/tfrecord?hl=zh_cn
https://blog.csdn.net/briblue/article/details/80789608
tfrecord
https://blog.csdn.net/briblue/article/details/53187780
protocol buffer
flags.mark_flag_as_required(“threshold”)
as_required 提示这个参数是必须输入的
20210103
nanloss 应是loss 函数写错了
tf.argmax
https://blog.csdn.net/u012300744/article/details/81240580
如果要训练并比较略微不同的模型版本,请为每一个模型版本(code and model_dir)创建一个单独的文件夹。
Estimators 在训练过程中会自动将以下内容保存到磁盘:
chenkpoints:训练过程中的模型快照。
event files:其中包含 TensorBoard 用于创建可视化图表的信息。
estimator steps 参数用来告诉 train 方法在指定的 training steps 后停止训练。 一个batch size 为一个steps
average_loss(mean loss per sample)、loss(mean loss per mini-batch)和 estimator 的 global_step (the number of training iterations it underwent)。 epoch*the number of batchsize
20210102
ModuleNotFoundError: No module named ‘tensorflow.compat.v2’
安装2.2以上版本
20210101
https://blog.csdn.net/u014061630/article/details/83049781
tensorflow estimator 文档
20201231

InvalidArgumentError (see above for traceback): logits and labels must have the same first dimension, got logits shape [64,2] and labels shape [128]

输入的通道数和实际的数据的通道数不一致

Dense处应该改成2
InvalidArgumentError (see above for traceback): Received a label value of 1 which is outside the valid range of [0, 1).  Label values: 1 1 1 0 1 1 0 1 1 0 1 0 0 1 0 1 1

最后输出的类别个数和实际的类别个数不一致

输入地方定义的image 再灌入模型的时候是需要的
https://blog.csdn.net/jiezhouzi/article/details/81366080
estimator mnist 案例
estimator 的准确率名称可以自己定义名称,评估的时候 steps=1
https://blog.csdn.net/u014061630/article/details/83049781
tensorflow文档
https://blog.csdn.net/yanxiaohui1992/article/details/99960745
#查看tensorflow里面变量具体的值
sess=tf.InteractiveSession()
def change_to_right(wrong_labels):
    right_labels=[]
    for x in wrong_labels:
        for i in range(0,len(wrong_labels[0])):
            if x[i]==1:
                right_labels.append(i+1)
    return right_labels

wrong_labels =np.array([[0,0,1,0], [0,0,1,0], [1,0,0,0],[0,1,0,0]])
right_labels =tf.convert_to_tensor(np.array(change_to_right(wrong_labels)))
print(right_labels)

tf.global_variables_initializer().run()
aa=sess.run(right_labels)
报错解决:InvalidArgumentError: Can not squeeze dim[1], expected a dimension of 1, got 101
输入不能是one_hot形式?
https://blog.csdn.net/zhangpeterx/article/details/89290303
ValueError: Rank mismatch: Rank of labels (received 2) should equal rank of logits minus 1 (received 2).
函数是将softmax和cross_entropy放在一起计算,对于分类问题而言,最后一般都是一个单层全连接神经网络,比如softmax分类器居多,对这个函数而言,tensorflow神经网络中是没有softmax层,而是在这个函数中进行softmax函数的计算。
这里的logits通常是最后的全连接层的输出结果,labels是具体哪一类的标签,这个函数是直接使用标签数据的,而不是采用one-hot编码形式。
y2 = tf.convert_to_tensor([[0, 0, 1, 0]], dtype=tf.int64)
y_2 = tf.convert_to_tensor([[-2.6, -1.7, 3.2, 0.1]], dtype=tf.float32)
y_3=[3 3 1 2]
标签数据是y_3 而不是y_2 相当于多分类?
https://www.cnblogs.com/lovychen/p/9439221.html
[tensorflow] tf.nn.sparse_softmax_cross_entropy_with_logits的使用方法及常见报错
在计算交叉熵之前,通常要用到softmax层来计算结果的概率分布。因为softmax层并不会改变最终的分类结果(排序),所以,tensorflow将softmax层与交叉熵函数进行封装,形成一个函数方便计算: tf.nn.softmax_cross_entropy_with_logits(logits= , labels=) 。
为了加速计算过程,针对只有一个正确答案(例如MNIST识别)的分类问题,tensorflow提供了 tf.nn.sparse_softmax_cross_entropy_with_logits(logits= , labels=) 。
二者的区别sparse 的y是标签数据 ,另一个是one_hot 形式
https://blog.csdn.net/u013084616/article/details/79138380
从这里开始都是关于estimator的问题
https://blog.csdn.net/jiezhouzi/article/details/81355903
https://blog.csdn.net/jiezhouzi/article/details/81366080
Estimator Mnist 简单
20201230
tensorflow.python.framework.errors_impl.InvalidArgumentError: logits and labels must be broadcastable: logits_size=[2,2] labels_size=[0,2]
	 [[{{node softmax_cross_entropy_with_logits_sg}}]]

数据记录条数和标签的个数不相等
20201228
return 处理可以看到真实的值?print 看不到?
我已经看到了很多人对 TensorFlow 的 tf.Graph 和 tf.Session 的规则感到困惑。其实很简单:
Graph(图形)定义了计算。但它不计算任何东西,也不包含任何值,它只是定义您在代码中指定的操作。
Session(会话)允许执行图形或部分图形。它为此分配资源(在一台或多台机器上)并保存中间结果和变量的实际值。
https://blog.csdn.net/weixin_33725272/article/details/88692031
from tensorflow.python.keras import Sequential
from tensorflow.python.keras.wrappers.scikit_learn import KerasClassifier
from tensorflow.python.keras.utils import np_utils, plot_model
from sklearn.model_selection import cross_val_score, train_test_split, KFold
from sklearn.preprocessing import LabelEncoder
from tensorflow.python.keras.layers import Dense, Dropout, Flatten, Conv1D, MaxPooling1D,BatchNormalization,Dropout
from tensorflow.python.keras.models import model_from_json
# import matplotlib.pyplot as plt
from sklearn.metrics import confusion_matrix
import itertools
# import pydot_ng as pydot
import torch
from os import walk
from tqdm import tqdm
import warnings
warnings.simplefilter('ignore')
from tensorflow.python.keras.backend import set_session
import os
from tensorflow.python.keras import models
from sklearn.metrics import classification_report

tensorflow 1.x版本的keras导包
tensorflow 本地加载Mnist
https://www.cnblogs.com/xiexiaokui/p/10409676.html
先下载下来 不要解压 直接换一下路径 注意路径最后不要加斜杠

>>> import tensorflow as tf

>>> from tensorflow.examples.tutorials.mnist import input_data

>>> MNIST_data =r'D:\tensorflow\mnist'

>>> mnist = input_data.read_data_sets(MNIST_data,one_hot=True)
20201226
去掉警告信息下面的
import warnings
warnings.filterwarnings(“ignore”)
import os
os.environ[“TF_CPP_MIN_LOG_LEVEL”] = ‘2’
对于 TF 1.X版本
import tensorflow as tf
tf.compat.v1.logging.set_verbosity(tf.compat.v1.logging.ERROR)
对于 TF 2.X版本
import tensorflow as tf
tf.logging.set_verbosity(tf.logging.ERROR)
20201225
https://www.cnblogs.com/xiximayou/p/12690353.html
tensorflow2.0的模型构建方式
20201224
init_op=tf.global_variables_initializer()
with tf.Session() as sess:
    sess.run(init_op)
    writer=tf.summary.FileWriter('graphs',sess.graph)
    a,b=sess.run([a,b])
FileWriter 是什么作用 是为了下面的变量写一起?
变量的定义将指定变量如何被初始化,但是必须显式初始化所有的声明变量。在计算图的定义中通过声明初始化操作对象来实现:

对文中所有涉及到的变量同时初始化
#tensorflow 调用GPU
- Tensorflow中指定程序在哪一块GPU上训练
Python中代码:
import os
# 使用第一张与第三张GPU卡
os.environ["CUDA_VISIBLE_DEVICES"] = "0, 2"
命名行代码:
CUDA_VISIBLE_DEVICES=0,2 python train.py
- 按需增加GPU的内存
import tensorflow as tf

#allow growth
config = tf.ConfigProto()
config.gpu_options.allow_growth = True
session = tf.Session(config=config)
# 使用allow_growth option,刚一开始分配少量的GPU容量,然后按需慢慢的增加,由于不会释放内存,所以会导致碎片
#tensorflow 调用GPU
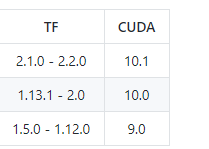
TF 和 cuda 版本对应问题
from tensorflow.python._pywrap_tensorflow_internal import *
ImportError: DLL load failed: 找不到指定的模块。
20201222
ValueError: Cannot assign to variable dense/kernel:0 due to variable shape (1664, 3) and value shape (1664, 4) are incompatible
keras 的load weight 的路径有错
20201221
model.add(Dense(4, activation='softmax'))
dense 是全连接

16 是卷积核 相当于输出的通道数 3 是卷积核大小 766 是最后输出的尺寸
768 是输入的单通道 向量维度 2 是输入的通道数
20201208
tf.train.Int64List()问题
tf.io.FixedLenFeature函数
https://www.w3cschool.cn/tensorflow_python/tf_io_FixedLenFeature.html
tf.gfile.GFile
https://www.w3cschool.cn/tensorflow_python/tensorflow_python-ys1p2emt.html
tf 只想预测的话 直接把 do_train 和do_predict 改成 false
20201207
tf.cast
https://www.w3cschool.cn/tensorflow_python/tensorflow_python-zfsn2coc.html
20201202
1.公司是读的数据库文件然后用 dataprocess 处理成 avro 格式
在linux 里面 通过cat命令可以查看
如果要把avro 转成 txt 里面文件夹里面有一个 read_avro.py 来读 然后转成avro结构
https://www.w3cschool.cn/tensorflow_python/tensorflow_python-l5x72feg.html
tensorflow 手册
20201130
tf.metrics.accuracy(labels=row_label_ids, predictions=row_predict_ids)
查看准确率
tf.equal(predict_ids, label_ids)
比较两个数是否相等
20201127
https://www.jianshu.com/p/b636de7c251a
图和会话的关系
https://blog.csdn.net/kyle1314608/article/details/110236373
会话
https://blog.csdn.net/qq_34113993/article/details/84070293
https://www.cnblogs.com/hypnus-ly/p/8040951.html
计算图
https://www.w3cschool.cn/tensorflow_python/tensorflow_python-mt3n2no2.html
TensorFlow函数:tf.trainable_variables
https://www.w3cschool.cn/tensorflow_python/tensorflow_python-xp3r2dl5.html
https://www.w3cschool.cn/tensorflow_python/tensorflow_python-8gjs2p9i.html
TensorFlow函数:tf.estimator.ModeKeys

tf.train.Feature
每个数据对象有多种特征
https://blog.csdn.net/kyle1314608/article/details/110235046
https://www.w3cschool.cn/tensorflow_python/tensorflow_python-hckq2htb.html
TensorFlow函数:tf.reduce_mean
https://www.w3cschool.cn/tensorflow_python/tf_nn_sigmoid_cross_entropy_with_logits.html
TensorFlow函数教程:tf.nn.sigmoid_cross_entropy_with_logits
https://www.w3cschool.cn/tensorflow_python/tensorflow_python-5y4d2i2n.html
TensorFlow函数:tf.reduce_sum
减少某个轴再求和
https://www.w3cschool.cn/tensorflow_python/tensorflow_python-5y4d2i2n.html
TensorFlow函数:tf.reduce_sum
https://www.w3cschool.cn/tensorflow_python/tensorflow_python-ht8s2j1k.html
TensorFlow函数:tf.saturate_cast
https://www.w3cschool.cn/tensorflow_python/tf_nn_bias_add.html
TensorFlow函数:tf.nn.bias_add
https://www.w3cschool.cn/tensorflow_python/tensorflow_python-l5x72feg.html
TensorFlow:tf.matmul函数
tf.nn.dropout()是tensorflow里面为了防止或减轻过拟合而使用的函数,它一般用在全连接层
Dropout就是在不同的训练过程中随机扔掉一部分神经元。也就是让某个神经元的激活值以一定的概率p,让其停止工作,这次训练过程中不更新权值,也不参加神经网络的计算。但是它的权重得保留下来(只是暂时不更新而已),因为下次样本输入时它可能又得工作了
tf.nn.dropout函数说明
tf.nn.dropout(
    x,
    keep_prob,
    noise_shape=None,
     seed=None,
    name=None
)
参数说明:
x:指输入,输入tensor
keep_prob: float类型,每个元素被保留下来的概率,设置神经元被选中的概率,在初始化时keep_prob是一个占位符, keep_prob = tf.placeholder(tf.float32) 。tensorflow在run时设置keep_prob具体的值,例如keep_prob: 0.5
noise_shape : 一个1维的int32张量,代表了随机产生“保留/丢弃”标志的shape。
seed : 整形变量,随机数种子。
name:指定该操作的名字
dropout必须设置概率keep_prob,并且keep_prob也是一个占位符,跟输入是一样的
keep_prob = tf.placeholder(tf.float32)
train的时候才是dropout起作用的时候,test的时候不应该让dropout起作用
tf.name_scope()、tf.variable_scope()
https://zhuanlan.zhihu.com/p/52055580
作为参考,貌似讲的还是有点错
变量共享主要涉及两个函数:tf.variable() 和tf.get_variable();即就是必须要在tf.variable_scope的作用域下使用tf.get_variable()函数。这里用tf.get_variable( ) 而不用tf.Variable( ),是因为前者拥有一个变量检查机制,会检测已经存在的变量是否设置为共享变量,如果已经存在的变量没有设置为共享变量(reuse=True),TensorFlow 运行到第二个拥有相同名字的变量的时候,就会报错。
TF中有两种作用域类型:命名域 (name scope),通过tf.name_scope 或 tf.op_scope创建;
变量域 (variable scope),通过tf.variable_scope 或 tf.variable_op_scope创建;
这两种作用域,对于使用tf.Variable()方式创建的变量,具有相同的效果,都会在变量名称前面,加上域名称。对于通过tf.get_variable()方式创建的变量,只有variable scope名称会加到变量名称前面,而name scope不会作为前缀。
with tf.name_scope("my_name_scope"):
    v1 = tf.get_variable("var1", [1], dtype=tf.float32)
    v2 = tf.Variable(1, name="var2", dtype=tf.float32)
    a = tf.add(v1, v2)
    print(v1.name)
    print(v2.name)
    print(a.name)
var1:0
my_name_scope/var2:0
my_name_scope/Add:0
tf.get_variable的使用方法
参数数量及其作用
该函数共有十一个参数,常用的有:名称name、变量规格shape、变量类型dtype、变量初始化方式initializer、所属于的集合collections。
该函数的作用是创建新的tensorflow变量,常见的initializer有:常量初始化器tf.constant_initializer、正太分布初始化器tf.random_normal_initializer、截断正态分布初始化器tf.truncated_normal_initializer、均匀分布初始化器tf.random_uniform_initializer。
Normal Distribution 称为正态分布,也称为高斯分布,Truncated Normal Distribution一般翻译为截断正态分布,也有称为截尾正态分布。
截断正态分布是截断分布(Truncated Distribution)的一种,那么截断分布是什么?截断分布是指,限制变量x 取值范围(scope)的一种分布。例如,限制x取值在0到50之间,即{0<x<50}。因此,根据限制条件的不同,截断分布可以分为:
2.1 限制取值上限,例如,负无穷<x<50
2.2 限制取值下限,例如,0<x<正无穷
2.3 上限下限取值都限制,例如,0<x<50
正态分布则可视为不进行任何截断的截断正态分布,也即自变量的取值为负无穷到正无穷;
https://blog.csdn.net/kyle1314608/article/details/110229384
bert 模型的输出
0、概述
想要获取获取bert模型的输出非常简单,使用 model.get_sequence_output()和model.get_pooled_output() 两个方法,但这两种方法针对NLP的任务需要进行一个选择
1、output_layer = model.get_sequence_output()
这个获取每个token的output 输出[batch_size, seq_length, embedding_size] 如果做seq2seq 或者ner 用这个
2、output_layer = model.get_pooled_output()
这个输出 是获取句子的output
3、注意
bert模型对输入的句子有一个最大长度,对于中文模型,我看到的是512个字。
当我们用model.get_sequence_output()获取每个单词的词向量的时候注意,头尾是[CLS]和[SEP]的向量。做NER或seq2seq的时候需要注意。
参数drop_remainder:表示在少于batch_size元素的情况下是否应删除最后一批 ; 默认是不删除。
tfrecord文件的使用:tf.data.TFRecordDataset
https://blog.csdn.net/yeqiustu/article/details/79793454
tf.contrib.data.map_and_batch
https://blog.csdn.net/heiheiya/article/details/81032997
berf for tf2
pip install bert-for-tf2
编译过后的tf2
https://github.com/lakshayg/tensorflow-build
https://blog.csdn.net/zaf0516/article/details/103149464
警告信息
WARNING:tensorflow:Entity <bound method TensorFlowOpLayer._defun_call of
成功解决Your CPU supports instructions that this TensorFlow binary was not compiled to use: AVX AVX2
https://blog.csdn.net/qq_41185868/article/details/79127838
pycharm报错:Process finished with exit code -1073741819 (0xC0000005)(tensorflow学习一)
Tensor conversion requested dtype float64 for Tensor with dtype int32
需求64 得到的却是32


 2250
2250


 被折叠的 条评论
为什么被折叠?
被折叠的 条评论
为什么被折叠?
 到【灌水乐园】发言


