


一、介绍
- 1、什么是延时队列?
延时队列即就是放置在该队列里面的消息是不需要立即消费的,而是等待一段时间之后取出消费 - 2、适用场景
(1)商城订单超时未支付,取消订单
(2)使用权限到期前十分钟提醒用户
(3)收益项目,投入后一段时间后产生收益
二、实现方式
从以上场景中,我们可以看出,延时队列的主要功能就是在指定的时间之后做指定的事情,那么,我们思考有哪些工具我们可以使用?
- 1、Redis 监听过期 Key
https://lizhou.blog.csdn.net/article/details/109238083- 2、RabbitMQ等实现延时队列
这也是本<typo id="typo-299" data-origin="片" ignoretag="true">片</typo>文章中要讲的知识点,使用 RabbitMQ 实现延时队列有两种方式
(1)利用两个特性: Time To Live(TTL)、Dead Letter Exchanges(DLX)
(2)利用 RabbitMQ 中的插件 x-delay-message
本文主要讲解第二种方式,使用插件的方式
三、下载插件
RabbitMQ 实现了一个插件 x-delay-message 来实现延时队列,我们可以从 这里 下载到它
https://www.rabbitmq.com/community-plugins.html选择 rabbitmq_delayed_message_exchange 插件,如图所示
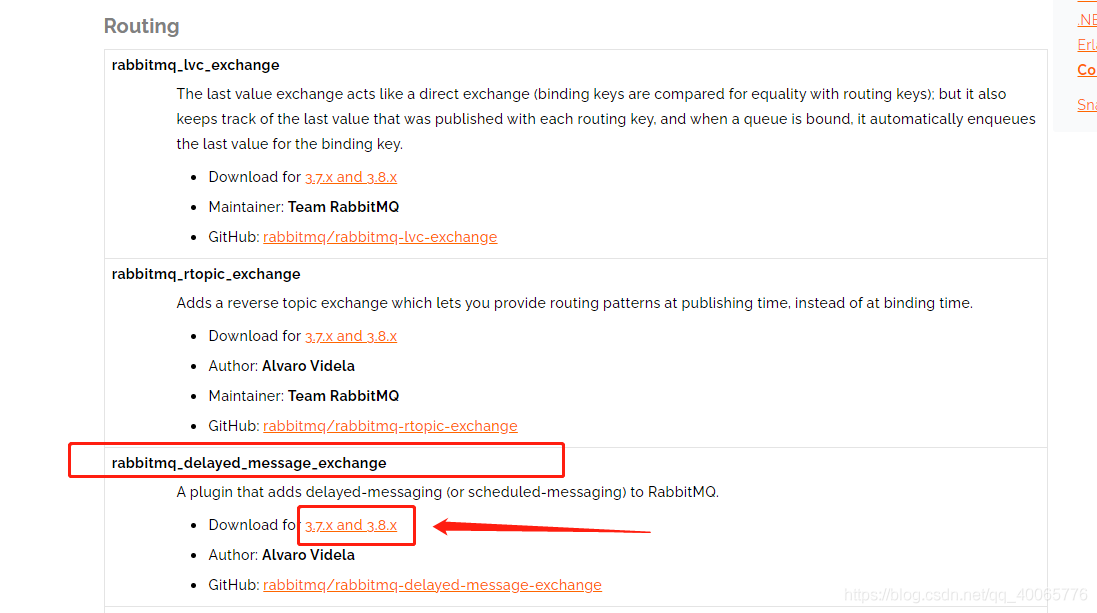
image.png
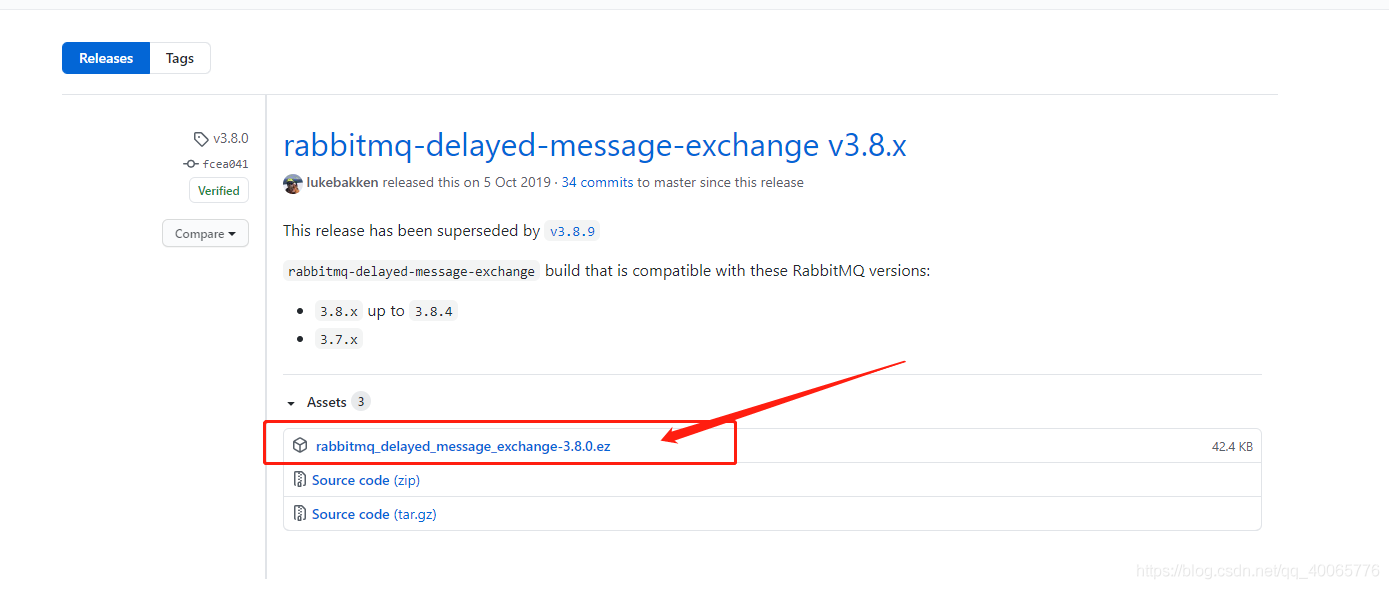
image.png
选择 .ez 格式的文件下载,下载后放置 RabbitMQ 的安装目录下的 plugins 目录下,如我的路径为
D:\Program Files\RabbitMQ Server\rabbitmq_server-3.7.16\plugins执行命令
rabbitmq-plugins enable rabbitmq_delayed_message_exchange安装插件完成
四、在SpringBoot整合RabbitMQ
1、引入 RabbitMQ 依赖
<!-- rabbitmq消息队列 -->
<dependency>
    <groupId>org.springframework.boot</groupId>
    <artifactId>spring-boot-starter-amqp</artifactId>
</dependency>
2、配置 RabbitMQ 信息
spring:
  rabbitmq:
    host: 127.0.0.1
    port: 5672
    username: guest
    password: guest
    listener:
      simple:
        # 手动ACK 不开启自动ACK模式,目的是防止报错后未正确处理消息丢失 默认 为 none
        acknowledge-mode: manual
3、RabbitMQ 常量类
package com.asurplus.common.rabbitmq;

/**
 * rabbit常量类
 *
 * @Author Lizhou
 */
public final class RabbitConst {

    /**
     * 交换机
     */
    public static final String DELAY_EXCHANGE = "delay_exchange";

    /**
     * 队列
     */
    public static final String DELAY_QUEUE = "delay_queue";

    /**
     * 路由
     */
    public static final String DELAY_KEY = "delay_key";

}
4、RabbitMQ 配置类
package com.asurplus.common.rabbitmq;

import org.springframework.amqp.core.Binding;
import org.springframework.amqp.core.BindingBuilder;
import org.springframework.amqp.core.CustomExchange;
import org.springframework.amqp.core.Queue;
import org.springframework.context.annotation.Bean;
import org.springframework.context.annotation.Configuration;

import java.util.HashMap;
import java.util.Map;

/**
 * rabbitmq配置类
 *
 * @Author Lizhou
 */
@Configuration
public class RabbitConfig {

    /**
     * 延时队列交换机
     *
     * @return
     */
    @Bean
    public CustomExchange delayExchange() {
        Map<String, Object> args = new HashMap<>();
        args.put("x-delayed-type", "direct");
        return new CustomExchange(RabbitConst.DELAY_EXCHANGE, "x-delayed-message", true, false, args);
    }

    /**
     * 延时队列
     *
     * @return
     */
    @Bean
    public Queue delayQueue() {
        return new Queue(RabbitConst.DELAY_QUEUE, true);
    }

    /**
     * 给延时队列绑定交换机
     *
     * @return
     */
    @Bean
    public Binding delayBinding(Queue delayQueue, CustomExchange delayExchange) {
        return BindingBuilder.bind(delayQueue).to(delayExchange).with(RabbitConst.DELAY_KEY).noargs();
    }
}
5、RabbitMQ 生产者
package com.asurplus.common.rabbitmq;

import lombok.extern.slf4j.Slf4j;
import org.springframework.amqp.rabbit.core.RabbitTemplate;
import org.springframework.beans.factory.annotation.Autowired;
import org.springframework.stereotype.Component;

/**
 * rabbitMq生产者
 *
 * @Author Lizhou
 */
@Component
@Slf4j
public class RabbitProducer {

    @Autowired
    private RabbitTemplate rabbitTemplate;

    /**
     * 发送消息
     *
     * @param object      发送对象
     * @param millisecond 延时(毫秒)
     */
    public void sendDelayMessage(Object object, long millisecond) {
        this.rabbitTemplate.convertAndSend(
                RabbitConst.DELAY_EXCHANGE,
                RabbitConst.DELAY_KEY,
                object.toString(),
                message -> {
                    message.getMessageProperties().setHeader("x-delay", millisecond);
                    return message;
                }
        );
    }
}
6、RabbitMQ 消费者
package com.asurplus.common.rabbitmq;

import com.rabbitmq.client.Channel;
import lombok.extern.slf4j.Slf4j;
import org.springframework.amqp.core.Message;
import org.springframework.amqp.rabbit.annotation.RabbitListener;
import org.springframework.stereotype.Component;

import java.io.IOException;

/**
 * activeMq消费者
 *
 * @Author Lizhou
 */
@Component
@Slf4j
public class RabbitConsumer {

    /**
     * 接收消息
     *
     * @param object 监听的内容
     */
    @RabbitListener(queues = RabbitConst.DELAY_QUEUE)
    public void cfgUserReceiveDealy(Object object, Message message, Channel channel) throws IOException {
        channel.basicAck(message.getMessageProperties().getDeliveryTag(), false);
        try {
            log.info("接受消息:{}", object.toString());
        } catch (Exception e) {
            log.error(e.getMessage());
            /**
             * basicRecover方法是进行补发操作,
             * 其中的参数如果为true是把消息退回到queue但是有可能被其它的consumer(集群)接收到,
             * 设置为false是只补发给当前的consumer
             */
            channel.basicRecover(false);
        }
    }
}
五、测试
package com.asurplus;

import com.asurplus.common.rabbitmq.RabbitProducer;
import org.springframework.beans.factory.annotation.Autowired;
import org.springframework.boot.SpringApplication;
import org.springframework.boot.autoconfigure.SpringBootApplication;
import org.springframework.web.bind.annotation.GetMapping;
import org.springframework.web.bind.annotation.RestController;

@SpringBootApplication
@RestController
public class RabbitmqApplication {

    @Autowired
    private RabbitProducer product;

    @GetMapping("init")
    public void init() {
        String message1 = "这是第一条消息";
        String message2 = "这是第二条消息";
        product.sendDelayMessage(message1, 5000);
        product.sendDelayMessage(message2, 10000);
    }

    public static void main(String[] args) {
        SpringApplication.run(RabbitmqApplication.class, args);
    }

}
通过测试,第一条消息在 5s后接收到,第二条消息在 10s后接收到,说明我们的延时队列已经成功
作者:Asurplus、
原文链接:https://lizhou.blog.csdn.net/article/details/113917675


 978
978


 被折叠的 条评论
为什么被折叠?
被折叠的 条评论
为什么被折叠?
 到【灌水乐园】发言


