


caffe的官网教程
先看看这个转换mnist的cpp文件,convert_mnist_siamese_data.cpp
//
// This script converts the MNIST dataset to the leveldb format used
// by caffe to train siamese network.
// Usage:
//    convert_mnist_data input_image_file input_label_file output_db_file
// The MNIST dataset could be downloaded at
//    http://yann.lecun.com/exdb/mnist/
#include <fstream>  // NOLINT(readability/streams)
#include <string>

#include "glog/logging.h"
/*
关于:#include <glog/logging.h>
日志系统初始化
初始化函数:google::InitGoogleLogging(argv[0])
初始化参数一般是第一个命令行参数--即程序的名称
结束时可以调用关闭日志系统函数
关闭日志库函数:google::ShutdownGoogleLogging()
程序运行时,可通过命令行参数或环境变量来控制程序的日志行为
*/
#include "google/protobuf/text_format.h"//解析proto类型文件中,解析prototxt类型的头文件
#include "leveldb/db.h"
#include "stdint.h"

#include "caffe/proto/caffe.pb.h"
#include "caffe/util/math_functions.hpp"
//大小端转换。mnist原始数据文件中32为整型值为大端存储,c/c++的微小端存储
uint32_t swap_endian(uint32_t val) {
//<<为位操作符,“<<”左移一位,实际数值乘以2,整形数字2,对应二进制为:……010,2<<2 ……01000,左移两位后,变成8
//变量之间的“&”为按照“位”,进行与操作,二进制数:1010 & 0110 =0010
// 变量之间的“|”操作符为按照“位”进行或操作,二进制数:1010 & 0110 =1110
    val = ((val << 8) & 0xFF00FF00) | ((val >> 8) & 0xFF00FF);
    return (val << 16) | (val >> 16);
}

void read_image(std::ifstream* image_file, std::ifstream* label_file,
        uint32_t index, uint32_t rows, uint32_t cols,
        char* pixels, char* label) {
//seekg()是对输入文件定位,它有两个参数:第一个参数是偏移量,第二个参数是基地址。
  image_file->seekg(index * rows * cols + 16);
  image_file->read(pixels, rows * cols);
  label_file->seekg(index + 8);
  label_file->read(label, 1);
}

void convert_dataset(const char* image_filename, const char* label_filename,
        const char* db_filename) {
  // 用c++输入文件流以二进制方式打开文件
  std::ifstream image_file(image_filename, std::ios::in | std::ios::binary);
  std::ifstream label_file(label_filename, std::ios::in | std::ios::binary);
  CHECK(image_file) << "Unable to open file " << image_filename;
  CHECK(label_file) << "Unable to open file " << label_filename;
  // 读取 the magic and the meta data
  uint32_t magic;
  uint32_t num_items;
  uint32_t num_labels;
  uint32_t rows;
  uint32_t cols;
/*reinterpret_cast
从指针类型到一个足够大的整数类型
从整数类型或者枚举类型到指针类型
从一个指向函数的指针到另一个不同类型的指向函数的指针
从一个指向对象的指针到另一个不同类型的指向对象的指针
从一个指向类函数成员的指针到另一个指向不同类型的函数成员的指针
从一个指向类数据成员的指针到另一个指向不同类型的数据成员的指针
*/
  image_file.read(reinterpret_cast<char*>(&magic), 4);
  magic = swap_endian(magic);
  CHECK_EQ(magic, 2051) << "Incorrect image file magic.";
  label_file.read(reinterpret_cast<char*>(&magic), 4);
  magic = swap_endian(magic);
  CHECK_EQ(magic, 2049) << "Incorrect label file magic.";
  image_file.read(reinterpret_cast<char*>(&num_items), 4);
  num_items = swap_endian(num_items);
  label_file.read(reinterpret_cast<char*>(&num_labels), 4);
  num_labels = swap_endian(num_labels);
  CHECK_EQ(num_items, num_labels);
  image_file.read(reinterpret_cast<char*>(&rows), 4);
  rows = swap_endian(rows);
  image_file.read(reinterpret_cast<char*>(&cols), 4);
  cols = swap_endian(cols);

  // 打开 leveldb,创建leveldb类型的指针  ,其实是创建数据库
  leveldb::DB* db;
  //Options打开leveldb文件的方式,类似这种“存在就打开,不存在就创建”的文件打开
  //方式,创建对数据库的操作对象,通过options来对db做操作。
  leveldb::Options options;
  options.create_if_missing = true;// 存在就报错
  options.error_if_exists = true;// 不存在就创建
  leveldb::Status status = leveldb::DB::Open(
      options, db_filename, &db);
  CHECK(status.ok()) << "Failed to open leveldb " << db_filename
      << ". Is it already existing?";

  char label_i;
  char label_j;
  //定义char指针,指向字符串数组,字符串数组的容量为一个图片的大小
  char* pixels = new char[2 * rows * cols];
  const int kMaxKeyLength = 10;//最大的键值长度
  char key[kMaxKeyLength];
  std::string value;
//设置datum数据对象的结构,其结构和源图像结构相同
  caffe::Datum datum;
  // 在一对图像中,每个图像都是一个通道
  datum.set_channels(2);
  datum.set_height(rows);
  datum.set_width(cols);
  LOG(INFO) << "A total of " << num_items << " items.";
  LOG(INFO) << "Rows: " << rows << " Cols: " << cols;
  for (int itemid = 0; itemid < num_items; ++itemid) {
    int i = caffe::caffe_rng_rand() % num_items;  // pick a random  pair
    int j = caffe::caffe_rng_rand() % num_items;
    read_image(&image_file, &label_file, i, rows, cols,
        pixels, &label_i);
    read_image(&image_file, &label_file, j, rows, cols,
        pixels + (rows * cols), &label_j);
    datum.set_data(pixels, 2*rows*cols);
    if (label_i  == label_j) {
      datum.set_label(1);
    } else {
      datum.set_label(0);
    }
    datum.SerializeToString(&value);
    snprintf(key, kMaxKeyLength, "%08d", itemid);
    db->Put(leveldb::WriteOptions(), std::string(key), value);
  }

  delete db;
  delete pixels;
}
/*
Argc为统计main函数接受的参数个数,正常调用时argc=4,argv为对应的参数值,
argv[0]=可执行文件名,argv[1]=源数据路径,arg[2]=标签数据路径,
arg[3]=保存lmdb数据的路径
*/
int main(int argc, char** argv) {
  if (argc != 4) {
    printf("This script converts the MNIST dataset to the leveldb format used\n"
           "by caffe to train a siamese network.\n"
           "Usage:\n"
           "    convert_mnist_data input_image_file input_label_file "
           "output_db_file\n"
           "The MNIST dataset could be downloaded at\n"
           "    http://yann.lecun.com/exdb/mnist/\n"
           "You should gunzip them after downloading.\n");
  } else {
    google::InitGoogleLogging(argv[0]);
    convert_dataset(argv[1], argv[2], argv[3]);
  }
  return 0;
}
./data/mnist/get_mnist.sh
./examples/siamese/create_mnist_siamese.sh./examples/siamese/mnist_siamese_train_leveldb和./examples/siamese/mnist_siamese_test_leveldb。
我们定义用siamese网络训练的模型,使用./examples/siamese/mnist_siamese.prototxt中定义的卷积网络,这个网络几乎和LeNet model一样,唯一的不同就是把生成10个数字类别概率的顶层替换为了生成二维向量的“特征”层。
name: "mnist_siamese"
input: "data"
input_dim: 10000
input_dim: 1
input_dim: 28
input_dim: 28
layer {
  name: "conv1"
  type: "Convolution"
  bottom: "data"
  top: "conv1"
  param {
    lr_mult: 1
  }
  param {
    lr_mult: 2
  }
  convolution_param {
    num_output: 20
    kernel_size: 5
    stride: 1
  }
}
layer {
  name: "pool1"
  type: "Pooling"
  bottom: "conv1"
  top: "pool1"
  pooling_param {
    pool: MAX
    kernel_size: 2
    stride: 2
  }
}
layer {
  name: "conv2"
  type: "Convolution"
  bottom: "pool1"
  top: "conv2"
  param {
    lr_mult: 1
  }
  param {
    lr_mult: 2
  }
  convolution_param {
    num_output: 50
    kernel_size: 5
    stride: 1
  }
}
layer {
  name: "pool2"
  type: "Pooling"
  bottom: "conv2"
  top: "pool2"
  pooling_param {
    pool: MAX
    kernel_size: 2
    stride: 2
  }
}
layer {
  name: "ip1"
  type: "InnerProduct"
  bottom: "pool2"
  top: "ip1"
  param {
    lr_mult: 1
  }
  param {
    lr_mult: 2
  }
  inner_product_param {
    num_output: 500
  }
}
layer {
  name: "relu1"
  type: "ReLU"
  bottom: "ip1"
  top: "ip1"
}
layer {
  name: "ip2"
  type: "InnerProduct"
  bottom: "ip1"
  top: "ip2"
  param {
    lr_mult: 1
  }
  param {
    lr_mult: 2
  }
  inner_product_param {
    num_output: 10
  }
}
layer {
  name: "feat"
  type: "InnerProduct"
  bottom: "ip2"
  top: "feat"
  param {
    lr_mult: 1
  }
  param {
    lr_mult: 2
  }
  inner_product_param {
    num_output: 2
  }
}./examples/siamese/mnist_siamese_train_test.prototxt中。name: "mnist_siamese_train_test"
layer {
name: "pair_data"
type: "Data"
top: "pair_data"
top: "sim"
include {
phase: TRAIN
}
transform_param {
scale: 0.00390625
}
data_param {
source: "examples/siamese/mnist_siamese_train_leveldb"
batch_size: 64
}
}
#从读取LevelDB数据库的data层开始,数据库中的每个条目包含的图像数据为一对
#图像(pair_data)和一个二进制标签,说明它们是属于同一类还是不同类(sim)。
layer {
name: "pair_data"
type: "Data"
top: "pair_data"
top: "sim"
include {
phase: TEST
}
transform_param {
scale: 0.00390625
}
data_param {
source: "examples/siamese/mnist_siamese_test_leveldb"
batch_size: 100
}
}
#为了把一对图像打包到数据库的同一个blob中,每个通道打包一个图像。
#想要能够分别使用这两个图像,所以在data层后面加一个slice层,
#它把pair_data按通道数切分,这样在data中只有一个图像,与它成对的图像在data_p中。
layer {
name: "slice_pair"
type: "Slice"
bottom: "pair_data"
top: "data"
top: "data_p"
slice_param {
slice_dim: 1
slice_point: 1
}
}
layer {
name: "conv1"
type: "Convolution"
bottom: "data"
top: "conv1"
param {
name: "conv1_w"
lr_mult: 1
}
param {
name: "conv1_b"
lr_mult: 2
}
convolution_param {
num_output: 20
kernel_size: 5
stride: 1
weight_filler {
type: "xavier"
}
bias_filler {
type: "constant"
}
}
}
layer {
name: "pool1"
type: "Pooling"
bottom: "conv1"
top: "pool1"
pooling_param {
pool: MAX
kernel_size: 2
stride: 2
}
}
layer {
name: "conv2"
type: "Convolution"
bottom: "pool1"
top: "conv2"
param {
name: "conv2_w"
lr_mult: 1
}
param {
name: "conv2_b"
lr_mult: 2
}
convolution_param {
num_output: 50
kernel_size: 5
stride: 1
weight_filler {
type: "xavier"
}
bias_filler {
type: "constant"
}
}
}
layer {
name: "pool2"
type: "Pooling"
bottom: "conv2"
top: "pool2"
pooling_param {
pool: MAX
kernel_size: 2
stride: 2
}
}
layer {
name: "ip1"
type: "InnerProduct"
bottom: "pool2"
top: "ip1"
param {
name: "ip1_w"
lr_mult: 1
}
param {
name: "ip1_b"
lr_mult: 2
}
inner_product_param {
num_output: 500
weight_filler {
type: "xavier"
}
bias_filler {
type: "constant"
}
}
}
layer {
name: "relu1"
type: "ReLU"
bottom: "ip1"
top: "ip1"
}
layer {
name: "ip2"
type: "InnerProduct"
bottom: "ip1"
top: "ip2"
param {
name: "ip2_w"
lr_mult: 1
}
param {
name: "ip2_b"
lr_mult: 2
}
inner_product_param {
num_output: 10
weight_filler {
type: "xavier"
}
bias_filler {
type: "constant"
}
}
}
layer {
name: "feat"
type: "InnerProduct"
bottom: "ip2"
top: "feat"
param {
name: "feat_w"
lr_mult: 1
}
param {
name: "feat_b"
lr_mult: 2
}
inner_product_param {
num_output: 2
weight_filler {
type: "xavier"
}
bias_filler {
type: "constant"
}
}
}
#在原始名后加_p表示这是“作为成对的”层。
layer {
name: "conv1_p"
type: "Convolution"
bottom: "data_p"
top: "conv1_p"
param {
name: "conv1_w"
lr_mult: 1
}
param {
name: "conv1_b"
lr_mult: 2
}
convolution_param {
num_output: 20
kernel_size: 5
stride: 1
weight_filler {
type: "xavier"
}
bias_filler {
type: "constant"
}
}
}
layer {
name: "pool1_p"
type: "Pooling"
bottom: "conv1_p"
top: "pool1_p"
pooling_param {
pool: MAX
kernel_size: 2
stride: 2
}
}
layer {
name: "conv2_p"
type: "Convolution"
bottom: "pool1_p"
top: "conv2_p"
param {
name: "conv2_w"
lr_mult: 1
}
param {
name: "conv2_b"
lr_mult: 2
}
convolution_param {
num_output: 50
kernel_size: 5
stride: 1
weight_filler {
type: "xavier"
}
bias_filler {
type: "constant"
}
}
}
layer {
name: "pool2_p"
type: "Pooling"
bottom: "conv2_p"
top: "pool2_p"
pooling_param {
pool: MAX
kernel_size: 2
stride: 2
}
}
layer {
name: "ip1_p"
type: "InnerProduct"
bottom: "pool2_p"
top: "ip1_p"
param {
name: "ip1_w"
lr_mult: 1
}
param {
name: "ip1_b"
lr_mult: 2
}
inner_product_param {
num_output: 500
weight_filler {
type: "xavier"
}
bias_filler {
type: "constant"
}
}
}
layer {
name: "relu1_p"
type: "ReLU"
bottom: "ip1_p"
top: "ip1_p"
}
layer {
name: "ip2_p"
type: "InnerProduct"
bottom: "ip1_p"
top: "ip2_p"
param {
name: "ip2_w"
lr_mult: 1
}
param {
name: "ip2_b"
lr_mult: 2
}
inner_product_param {
num_output: 10
weight_filler {
type: "xavier"
}
bias_filler {
type: "constant"
}
}
}
layer {
name: "feat_p"
type: "InnerProduct"
bottom: "ip2_p"
top: "feat_p"
param {
name: "feat_w"
lr_mult: 1
}
param {
name: "feat_b"
lr_mult: 2
}
inner_product_param {
num_output: 2
weight_filler {
type: "xavier"
}
bias_filler {
type: "constant"
}
}
}
#对比损失函数,它由Raia Hadsell、Sumit Chopra和Yann LeCun在
#”Dimensionality Reduction by Learning an Invariant Mapping”中提出,
#使得在特征空间里匹配的图像对离得近,不匹配的图像对离得远。
layer {
name: "loss"
type: "ContrastiveLoss"
bottom: "feat"
bottom: "feat_p"
bottom: "sim"
top: "loss"
contrastive_loss_param {
margin: 1
}
}训练模型./examples/siamese/train_mnist_siamese.sh,速度很快。
最后看看网络图


运行:
sudo apt-get install graphviz
sudo pip install pydot2
./python/draw_net.py \
    ./examples/siamese/mnist_siamese.prototxt \
    ./examples/siamese/mnist_siamese.png
./python/draw_net.py \
    ./examples/siamese/mnist_siamese_train_test.prototxt \
    ./examples/siamese/mnist_siamese_train_test.png
用iPython notebook载入学到的模型并绘制特征,mnist_siamese.ipynb
import numpy as np
import matplotlib.pyplot as plt
%matplotlib inline

# Make sure that caffe is on the python path:
caffe_root = '../../'  # this file is expected to be in {caffe_root}/examples/siamese
import sys
sys.path.insert(0, caffe_root + 'python')
import caffe
MODEL_FILE = 'mnist_siamese.prototxt'
# decrease if you want to preview during training
PRETRAINED_FILE = 'mnist_siamese_iter_50000.caffemodel'
caffe.set_mode_cpu()
net = caffe.Net(MODEL_FILE, PRETRAINED_FILE, caffe.TEST)
TEST_DATA_FILE = '../../data/mnist/t10k-images-idx3-ubyte'
TEST_LABEL_FILE = '../../data/mnist/t10k-labels-idx1-ubyte'
n = 10000

with open(TEST_DATA_FILE, 'rb') as f:
    f.read(16) # skip the header
    raw_data = np.fromstring(f.read(n * 28*28), dtype=np.uint8)

with open(TEST_LABEL_FILE, 'rb') as f:
    f.read(8) # skip the header
    labels = np.fromstring(f.read(n), dtype=np.uint8)
# reshape and preprocess
caffe_in = raw_data.reshape(n, 1, 28, 28) * 0.00390625 # manually scale data instead of using `caffe.io.Transformer`
out = net.forward_all(data=caffe_in)
# feat = out['feat']
f = plt.figure(figsize=(16,9))
c = ['#ff0000', '#ffff00', '#00ff00', '#00ffff', '#0000ff',
     '#ff00ff', '#990000', '#999900', '#009900', '#009999']
for i in range(10):
    plt.plot(feat[labels==i,0].flatten(), feat[labels==i,1].flatten(), '.', c=c[i])
plt.legend(['0', '1', '2', '3', '4', '5', '6', '7', '8', '9'])
plt.grid()
plt.show()
git clone --recursive https://github.com/ipython/ipython.git
cd ipython
pip install -e ".[notebook]" --user
sudo apt-get install ipython-notebook
sudo pip install jsonschema
ipython notebook ./examples/siamese/mnist_siamese.ipynb
如果可以运行最好,不能运行也没事,我们继续操作。
网上教程很多,但是我试了好多都不行。
sudo pip install ipython --upgrade#升级,速度很慢
sudo apt-get remove ipython#卸载ipython
sudo pip install jupyter#安装jupyter
jupyter notebook#运行notebook
然后又报错了"The Jupyter Notebook requires tornado >= 4.0",什么贵。
然后我就升级
sudo pip install --upgrade tornado -i http://pypi.douban.com/simple
pip show tornado | grep Version
可是发现还是3.1,我去。。。。
sudo apt-get remove python-tornado#我卸载了tornado
再运行
sudo pip install --upgrade tornado -i http://pypi.douban.com/simple
pip show tornado | grep Version
这下就是Version: 4.4.2,开心了。
jupyter notebook#运行notebook
进去喽,开心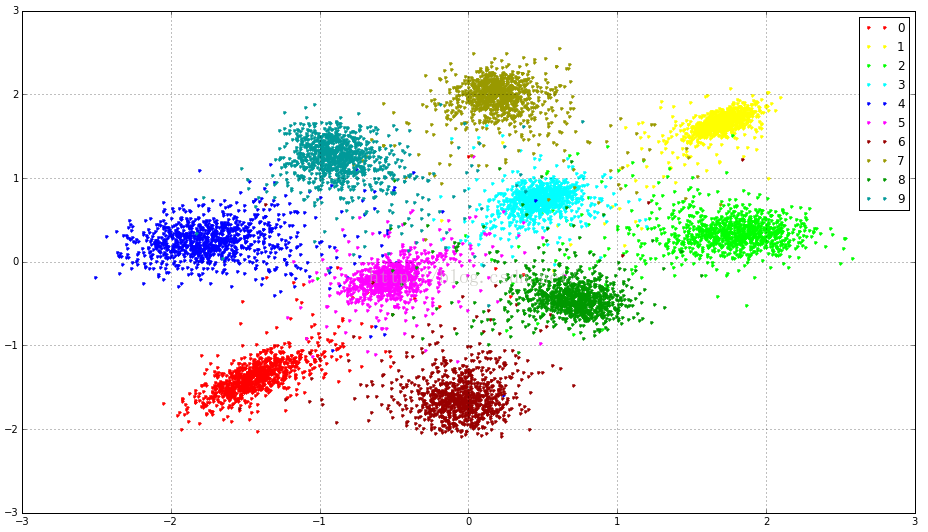
收工。。。。。。。。。。。。


 被折叠的 条评论
为什么被折叠?
被折叠的 条评论
为什么被折叠?
 到【灌水乐园】发言


