


Struts2与Spring整合后,可以使用Spring的配置文件applicationContext.xml来描述依赖关系,在Struts2的配置文件struts.xml来使用Spring创建的bean。
1、导入依赖包
除了导入Struts2和Spring的核心库之外,还要导入commons-logging和struts2-spring-plugin包,否则启动会出异常
2、web.xml的配置
既然有Struts2,核心拦截器的配置是不可少的
    <filter>
         <filter-name>struts2</filter-name>
         <filter-class>org.apache.struts2.dispatcher.FilterDispatcher</filter-class>
    </filter>
    <filter-mapping>
         <filter-name>struts2</filter-name>
         <url-pattern>/*</url-pattern>
    </filter-mapping>
通过配置ContextLoaderListener监听器,使容器启动时,自动加载applicationContext配置,
因为它实现了ServletContextListener这个接口,容器启动时会自动执行它实现的方法。
    <context-param>
         <param-name>contextConfigLocation</param-name>
         <param-value>WEB-INF/classes/applicationContext.xml</param-value>
    </context-param>
以上配置均在web.xml文件的区域
3、测试类
在浏览器请求一个Action方法,在Action方法内向一个对象请求一个List,然后转到index.jsp页面,在页面中输出Action请求到的List。
通过Spring依赖配置,控制Action请求的对象。
首先要编写一个接口,Action方法依赖这个接口,通过调用接口中的方法获取List
public interface IocTestInterface {
     public List getList();
}
下面编写Action类,这个类继承ActionSupport类,并覆盖其中的execute方法,
execute方法执行时,调用实现了上述接口对象的getList方法获取List
public class IocAction extends ActionSupport {
    private IocTestInterface iti;
    private List list;

    public List getList() {
        return list;
    }
    public void setList(List list) {
        this.list = list;
    }
    public IocTestInterface getIti() {
        return iti;
    }
    public void setIti(IocTestInterface iti) {
        this.iti = iti;
    }

    public String execute() throws Exception {
        this.setList(iti.getList());
        return super.execute();
    }
}
编写用来显示运行结果的jsp文件
遍历list,并将每个元素作为一行来显示
<%@ page language="java" import="java.util.*" pageEncoding="ISO-8859-1"%>
<%@ taglib prefix="s" uri="/struts-tags" %>

<!DOCTYPE HTML PUBLIC "-//W3C//DTD HTML 4.01 Transitional//EN">
<html>

  <body>
    This is my JSP page. <br><br>

    <s:iterator value="list" id="current">
        <li><s:property value="current"/></li>
    </s:iterator>

  </body>
</html>
系统的结构就是这样。下面编写两个实现IocTestInterface接口的类,用来提供数据
public class IocTestImpl implements IocTestInterface {
    public List getList() {
        List l = new ArrayList();
        l.add("abc");
        l.add("def");
        l.add("hig");
        return l;
    }
}
public class IocTest2Impl implements IocTestInterface {
public List getList() {
List l = new ArrayList();
l.add("123");
l.add("456");
l.add("789");
return l;
}
}4、编写applicationContext.xml配置依赖关系
    <beans xmlns ="http://www.springframework.org/schema/beans"
        xmlns:xsi ="http://www.w3.org/2001/XMLSchema-instance"
        xsi:schemaLocation ="http://www.springframework.org/schema/beans
        http://www.springframework.org/schema/beans/spring-beans-2.0.xsd">

        <bean name="IocAction" class="sy.struts2.ioc.IocAction">
            <property name="iti">
                <bean class="sy.struts2.ioc.IocTestImpl"></bean>
            </property>
        </bean>

    </beans>
文件配置了id为IocAction的bean,路径为刚刚编写的Action类的路径,其中iti对象(请求数据的对象)配置为IocTestImpl(这里使用了匿名bean)
5、编写struts.xml配置文件
首先要告知Struts 2运行时使用Spring来创建对象
在区域加入以下配置
<constant name="struts.objectFactory" value="spring" />创建package并配置Action
    <package name="hs" extends="struts-default">
         <action name="ioc" class="IocAction">
              <result>/index.jsp</result>
         </action>
    </package>
6、发布并运行
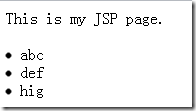
发布后启动Tomcat,用浏览器打开地址http://localhost:8080/StrutsIoc/ioc.action,获得了下面的页面
修改spring配置文件applicationContext.xml中配置
    <bean name="IocAction" class="sy.struts2.ioc.IocAction">
         <property name="iti">
              <bean class="sy.struts2.ioc.IocTest2Impl"></bean>
         </property>
    </bean>
只是将注入到IocAction中的IocTestImpl修改为IocTest2Impl,也就是使用了另一个实现了IocTestInterface接口的类
重启服务器,再次打开刚才的地址

这也就是spring的“控制反转”.


 1244
1244


 被折叠的 条评论
为什么被折叠?
被折叠的 条评论
为什么被折叠?
 到【灌水乐园】发言


