


前言
接下来进入了本周的前端开发工作,本周主要完成主页面的编写。
预期效果展示
主页面的预期效果是美观、简介,内容主要是以下几个:
顶栏有问候语,根据时间自动变化;
然后是基本信息,介绍了我们的项目信息;
然后是一副满足美化效果的插画;
然后是训练记录界面;
最后是一个美观的走马灯,可以向客户展示图片信息等等。
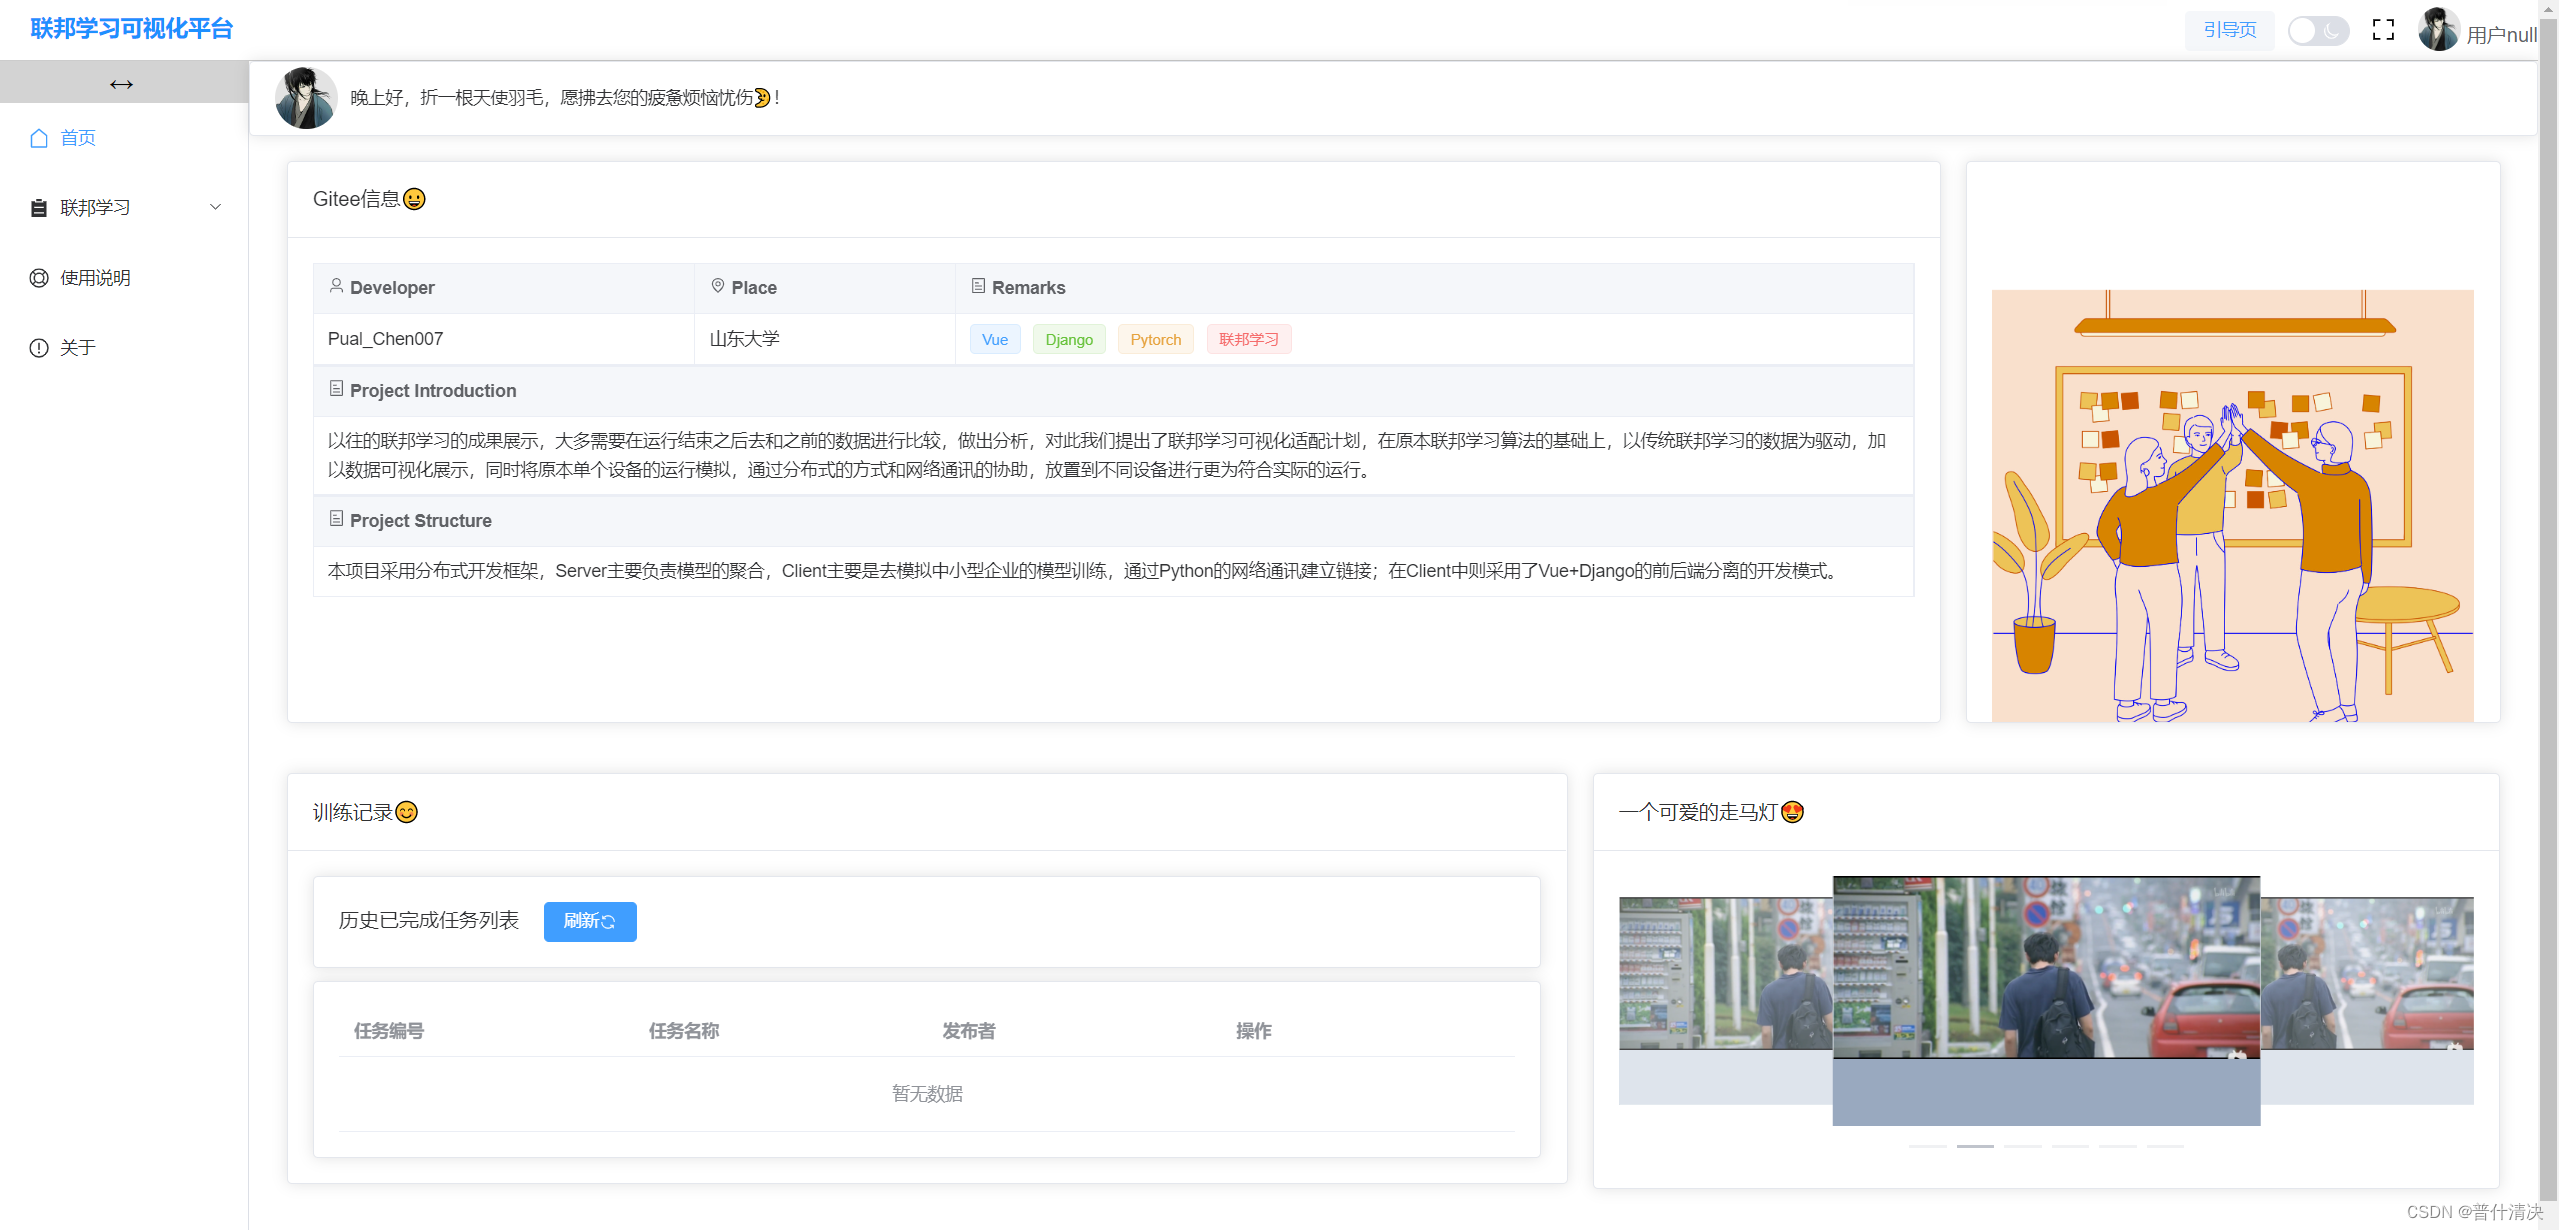
顶栏
问候语根据计算得到的日期生成,然后是头像;
      <el-card class="top-content">
        <div class="left-mark">
          <img
            :src="top_content_avatar"
            title="直达仓库地址"
            @click="openGitee()"
          />
          <span>{{ greetings }}</span>
        </div>
      </el-card>
这里用到了计算属性,用来计算日期:
  computed: {
    now() {
      return Date.now();
    },
    greetings() {
      const date = new Date();
      if (date.getHours() >= 0 && date.getHours() < 12) {
        return "上午阳光明媚,祝你薪水翻倍🌞!";
      } else if (date.getHours() >= 12 && date.getHours() < 18) {
        return "下午小风娇好,愿你青春不老😃!";
      } else {
        return "晚上好,折一根天使羽毛,愿拂去您的疲惫烦恼忧伤🌛!";
      }
    },
  },
基本信息
这里主要就是一个card卡片包裹着一个el-description界面,里面进行内容填充。
        <el-col :span="18" style="margin-bottom: 20px">
          <el-card style="height: 450px">
            <template #header>
              <span style="font-size: 16px; font-weight: 500">Gitee信息😀</span>
            </template>
            <template #default>
              <DescriptionCard />
            </template>
          </el-card>
        </el-col>
描述页我抽成了一个组件,如下:
<template>
  <el-descriptions class="margin-top" :column="3" direction="vertical" border>
    <el-descriptions-item>
      <template #label>
        <div class="cell-item">
          <el-icon >
            <user />
          </el-icon>
          Developer
        </div>
      </template>
      Pual_Chen007
    </el-descriptions-item>

    <el-descriptions-item>
      <template #label>
        <div class="cell-item">
          <el-icon >
            <location />
          </el-icon>
          Place
        </div>
      </template>
      山东大学
    </el-descriptions-item>

    <el-descriptions-item>
      <template #label>
        <div class="cell-item">
          <el-icon >
            <tickets />
          </el-icon>
          Remarks
        </div>
      </template>
      <el-tag type="" size="default">Vue</el-tag>
      <el-tag type="success" size="default">Django</el-tag>
      <el-tag type="warning" size="default">Pytorch</el-tag>
      <el-tag type="danger" size="default">联邦学习</el-tag>
    </el-descriptions-item>
  </el-descriptions>

  <el-descriptions class="margin-top" :column="1" direction="vertical" border>
    <el-descriptions-item>
      <template #label>
        <div class="cell-item">
          <el-icon >
            <tickets />
          </el-icon>
          Project Introduction
        </div>
      </template>
      以往的联邦学习的成果展示,大多需要在运行结束之后去和之前的数据进行比较,做出分析,对此我们提出了联邦学习可视化适配计划,在原本联邦学习算法的基础上,以传统联邦学习的数据为驱动,加以数据可视化展示,同时将原本单个设备的运行模拟,通过分布式的方式和网络通讯的协助,放置到不同设备进行更为符合实际的运行。
    </el-descriptions-item>
  </el-descriptions>

  <el-descriptions class="margin-top" :column="1" direction="vertical" border>
    <el-descriptions-item>
      <template #label>
        <div class="cell-item">
          <el-icon >
            <tickets />
          </el-icon>
          Project Structure
        </div>
      </template>
      本项目采用分布式开发框架,Server主要负责模型的聚合,Client主要是去模拟中小型企业的模型训练,通过Python的网络通讯建立链接;在Client中则采用了Vue+Django的前后端分离的开发模式。
    </el-descriptions-item>
  </el-descriptions>
</template>
插画
主要起到美化效果。插画网站还是很多的。
        <el-col :span="6" style="margin-bottom: 20px">
          <el-card style="height: 450px; text-align: center; display: flex">
            <template #default>
              <img
                :src="pic"
                style="width: 100%; padding-top: 12px; margin-top: 70px"
                title="一幅可爱的插画"
                alt="一幅可爱的插画"
              />
            </template>
          </el-card>
        </el-col>
训练记录
记录了训练的记录,以流水的形式向用户展示:
<template>
  <div>
    <Motion>
      <el-card style="margin-bottom: 10px">
        <span>历史已完成任务列表</span>
        <el-button
            style="margin-left: 20px"
            type="primary"
            @click="refresh"
        >刷新
          <el-icon>
            <Refresh/>
          </el-icon>
        </el-button>
      </el-card>
    </Motion>

    <Motion :delay="100">
      <el-card>
        <el-table :data="tableData" stripe style="width: 100%">
          <el-table-column prop="taskId" label="任务编号"/>
          <el-table-column prop="taskName" label="任务名称"/>
          <el-table-column prop="publisher" label="发布者"/>
          <el-table-column label="操作">
            <template #default="scope">
              <el-button size="small" @click="viewDetails(scope.$index, scope.row)"
              >查看详情
              </el-button
              >
            </template>
          </el-table-column>
        </el-table>
      </el-card>
    </Motion>
  </div>
</template>
走马灯
这是我认为很美观和炫酷的功能,是elementplus提供的。算是信息展示里面很炫酷的一种形式:

<template>
  <el-carousel :interval="4000" type="card" height="200px">
    <el-carousel-item v-for="item in imgList" :key="item.name">
      <img
        :src="item.src"
        style="width: 100%;"
        alt="图片丢失了"
        :title="item.title"
      />
    </el-carousel-item>
  </el-carousel>
</template>
对应的数据文件,写在data里面:
return {
      pic: require("@/assets/pic.jpg"),
      imgList: [
        {
          name: "0",
          src: require("@/assets/master/0.png"),
          title: "这是master.png"
        },
        {
          name: "1",
          src: require("@/assets/master/1.png"),
          title: "这是master.png"
        },
        {
          name: "2",
          src: require("@/assets/master/2.png"),
          title: "这是master.png"
        },
        {
          name: "3",
          src: require("@/assets/master/3.png"),
          title: "这是master.png"
        },
        {
          name: "4",
          src: require("@/assets/master/4.png"),
          title: "这是master.png"
        },
        {
          name: "5",
          src: require("@/assets/master/5.png"),
          title: "这是master.png"
        },
      ],
    };


 796
796


 被折叠的 条评论
为什么被折叠?
被折叠的 条评论
为什么被折叠?
 到【灌水乐园】发言


