


 本文详细介绍了如何在Linux环境下安装必要的库,如Clang和NASM,然后通过Git克隆FFmpeg源码,切换至特定版本,以及使用AndroidNDK进行64位和32位的交叉编译。文章还提供了配置脚本和CMakeLists示例,展示了如何在AndroidStudio中使用FFmpeg库进行应用开发。
安装好相关的库
sudo apt install clang
sudo apt-get install yasm
如果不安装上面两个库可能会报类似如下的错:
clang is unable to create an executable file
clang: not found
nasm: not found
下载FFmpeg相关源码:
git clone https://gitee.com/mirrors/ffmpeg/
切换一下相关的分支为5.1的:
git checkout -b remotes/origin/release/5.1 remotes/origin/release/5.1
准备好相关的ndk的开发包android-ndk-r22b-linux-x86_64.zip:
https://dl.google.com/android/repository/android-ndk-r22b-linux-x86_64.zip
android-ndk-r22b-linux-x86_64.zip
然后对它进行解压既可以,这里也可以使用as自带的版本,或者不是ndk的r22版本试试,最好就下载和这里一样的版本
准备编译的config脚本arm64位和32:
#!/bin/bash
#这个API其实写其他版本也可以的,这里先写个21
API=21
#arm64  x86 x86_64 <----> aarch64  i686  x86_64
ARCH=arm64
ARCH2=aarch64
#编译的so输出路径
PREFIX=/home/test/ffmpeg_64/out/
#此处路径替换为当前NDK路径
TOOLCHAIN=/home/test/Downloads/android-ndk-r22b/toolchains/llvm/prebuilt/linux-x86_64

build()
{
    #配置各个开关选项及NDK相关的工具链路径等
    ./configure \
    --prefix=$PREFIX \
    --disable-static \
    --enable-shared \
    --enable-small \
    --enable-gpl \
    --disable-doc \
    --disable-programs \
    --disable-avdevice \
    --enable-cross-compile \
    --target-os=android \
    --arch=$ARCH \
    --cc=$TOOLCHAIN/bin/$ARCH2-linux-android$API-clang \
    --cross-prefix=$TOOLCHAIN/bin/$ARCH2-linux-android-

    #清除上次编译
    make clean
    make -j40
    make install
}
#开始编译
build
一般上面脚本可以直接拷贝使用,只需要改如下两项和路径直接关联的
PREFIX=/home/test/ffmpeg_64/out/
#此处路径替换为当前NDK路径
TOOLCHAIN=/home/test/Downloads/android-ndk-r22b/toolchains/llvm/prebuilt/linux-x86_64
准备上面脚本拷贝到FFmpeg的源码路径进行执行:
~/demos/ffmpeg$ sudo sh build_64_1.sh
注意带上sudo 哈
执行成功后如果没有报啥错,既可以在设置的目录看到如下几个部分
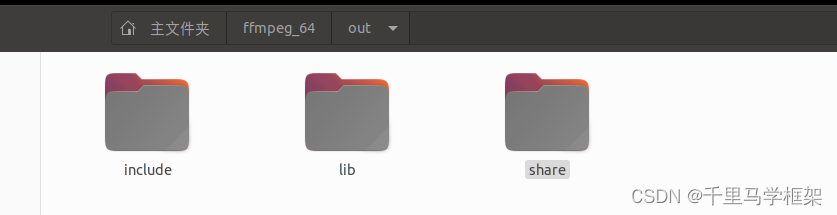
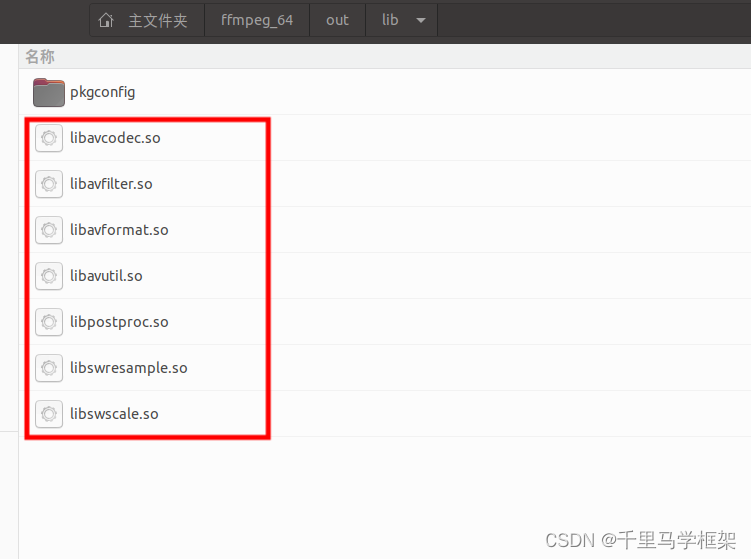
一般使用include和lib既可以
上面就是ndk编译ffmepg的64位库简单过程哈,同理32位库也是一样,只需要改动一点config参数既可以,具体也给出对应sh脚本
#!/bin/bash
API=21
#arm64  x86 x86_64 <----> aarch64  i686  x86_64
ARCH=arm
ARCH2=armv7a
PREFIX=/home/test/ffmpeg_32/out/

TOOLCHAIN=/home/test/Downloads/android-ndk-r22b/toolchains/llvm/prebuilt/linux-x86_64

build()
{

    ./configure \
    --prefix=$PREFIX \
    --disable-static \
    --enable-shared \
    --enable-small \
    --enable-gpl \
    --disable-doc \
    --disable-programs \
    --disable-avdevice \
    --enable-cross-compile \
    --target-os=android \
    --arch=$ARCH \
    --cc=$TOOLCHAIN/bin/$ARCH2-linux-androideabi$API-clang \
    --cross-prefix=$TOOLCHAIN/bin/$ARCH-linux-androideabi-


    make clean
    make -j40
    make install
}

build
有了相关的so和include后,既可以把它们用于开发app啦
Android Studio上使用相关FFmpeg的so进行开发
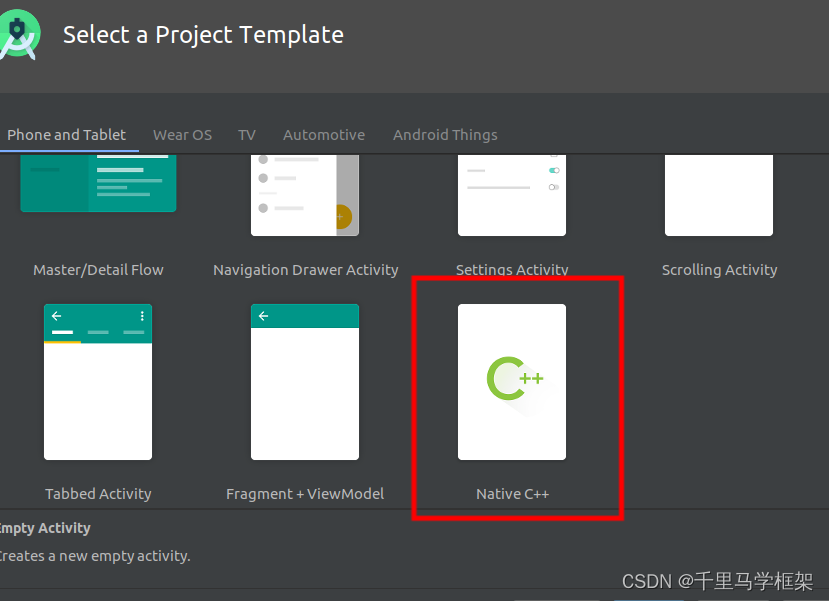
建立一个简单的native c++的工程
然后进行同步编译通过,在进行导入FFmpeg相关的头文件和lib
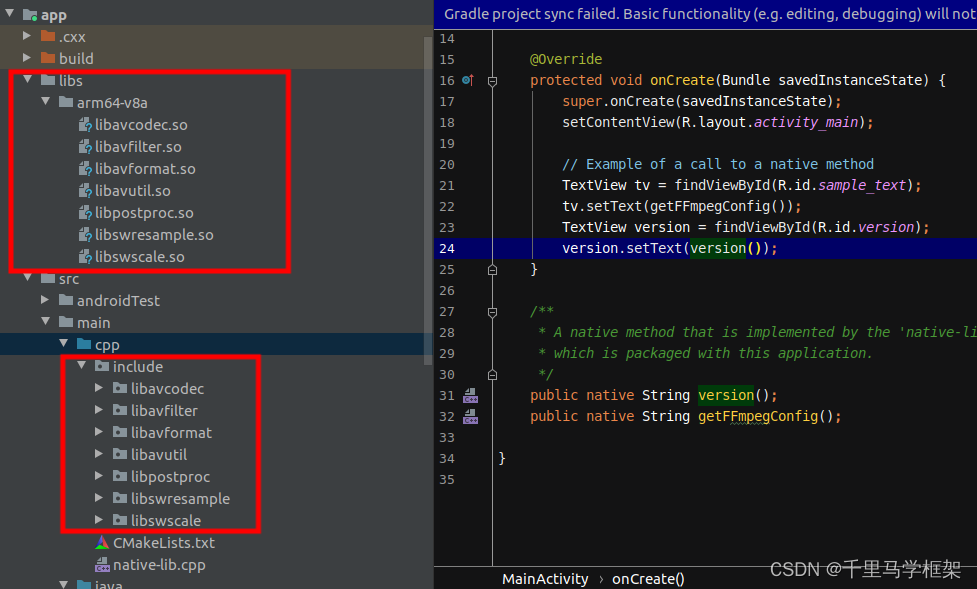
这些库和include的头文件放好,然后开始编写对应的CMakeList进行相关的修改
# For more information about using CMake with Android Studio, read the
# documentation: https://d.android.com/studio/projects/add-native-code.html

# Sets the minimum version of CMake required to build the native library.

cmake_minimum_required(VERSION 3.4.1)
include_directories(${CMAKE_CURRENT_SOURCE_DIR}/include)
#设置好ffmpeg_lib_dir这个变量的路径
set(ffmpeg_lib_dir ${CMAKE_CURRENT_SOURCE_DIR}/../../../libs/${CMAKE_ANDROID_ARCH_ABI})
# Creates and names a library, sets it as either STATIC
# or SHARED, and provides the relative paths to its source code.
# You can define multiple libraries, and CMake builds them for you.
# Gradle automatically packages shared libraries with your APK.

add_library( # Sets the name of the library.
             native-lib

             # Sets the library as a shared library.
             SHARED

             # Provides a relative path to your source file(s).
             native-lib.cpp )

# Searches for a specified prebuilt library and stores the path as a
# variable. Because CMake includes system libraries in the search path by
# default, you only need to specify the name of the public NDK library
# you want to add. CMake verifies that the library exists before
# completing its build.

find_library( # Sets the name of the path variable.
              log-lib

              # Specifies the name of the NDK library that
              # you want CMake to locate.
              log )
#针对一个个的库进行挨个导入
add_library(avutil SHARED IMPORTED)
set_target_properties( avutil PROPERTIES IMPORTED_LOCATION  ${ffmpeg_lib_dir}/libavutil.so)

add_library(avcodec SHARED IMPORTED)
set_target_properties( avcodec PROPERTIES IMPORTED_LOCATION  ${ffmpeg_lib_dir}/libavcodec.so)

add_library(avformat SHARED IMPORTED)
set_target_properties( avformat PROPERTIES IMPORTED_LOCATION  ${ffmpeg_lib_dir}/libavformat.so)

add_library(swscale SHARED IMPORTED)
set_target_properties( swscale PROPERTIES IMPORTED_LOCATION  ${ffmpeg_lib_dir}/libswscale.so)

add_library(avfilter SHARED IMPORTED)
set_target_properties( avfilter PROPERTIES IMPORTED_LOCATION  ${ffmpeg_lib_dir}/libavfilter.so)

add_library(postproc SHARED IMPORTED)
set_target_properties( postproc PROPERTIES IMPORTED_LOCATION  ${ffmpeg_lib_dir}/libpostproc.so)

add_library(swresample SHARED IMPORTED)
set_target_properties( swresample PROPERTIES IMPORTED_LOCATION  ${ffmpeg_lib_dir}/libswresample.so)

# Specifies libraries CMake should link to your target library. You
# can link multiple libraries, such as libraries you define in this
# build script, prebuilt third-party libraries, or system libraries.

target_link_libraries( # Specifies the target library.
                       native-lib

                        avutil
                        avcodec
                        avformat
                        swscale
                        avfilter
                        postproc
                        swresample
                       # Links the target library to the log library
                       # included in the NDK.
                       ${log-lib} )
上面配置好了以后既可以进入下一步编写测试代码了,代码如下:
MainActivity.java
package com.example.myffmpeg;

import androidx.appcompat.app.AppCompatActivity;

import android.os.Bundle;
import android.widget.TextView;

public class MainActivity extends AppCompatActivity {

    // Used to load the 'native-lib' library on application startup.
    static {
        System.loadLibrary("native-lib");
    }

    @Override
    protected void onCreate(Bundle savedInstanceState) {
        super.onCreate(savedInstanceState);
        setContentView(R.layout.activity_main);

        // Example of a call to a native method
        TextView tv = findViewById(R.id.sample_text);
        tv.setText(getFFmpegConfig());
        TextView version = findViewById(R.id.version);
        version.setText(version());
    }

    /**
     * A native method that is implemented by the 'native-lib' native library,
     * which is packaged with this application.
     */
    public native String version();
    public native String getFFmpegConfig();

}
native-lib.cpp
#include <jni.h>
#include <string>

extern "C" {
#include <libavcodec/avcodec.h>
#include <libavutil/avutil.h>

JNIEXPORT jstring JNICALL Java_com_example_myffmpeg_MainActivity_version(
    JNIEnv* env,
    jobject /* this */) {
std::string hello = "Hello from C++";
//返回FFmpeg的版本
return env->NewStringUTF(av_version_info());
}
JNIEXPORT jstring JNICALL  Java_com_example_myffmpeg_MainActivity_getFFmpegConfig(
        JNIEnv* env,
jobject /* this */) {
//返回FFmpeg的相关配置,其实就是编译时候的
return env->NewStringUTF(avcodec_configuration());
}

}
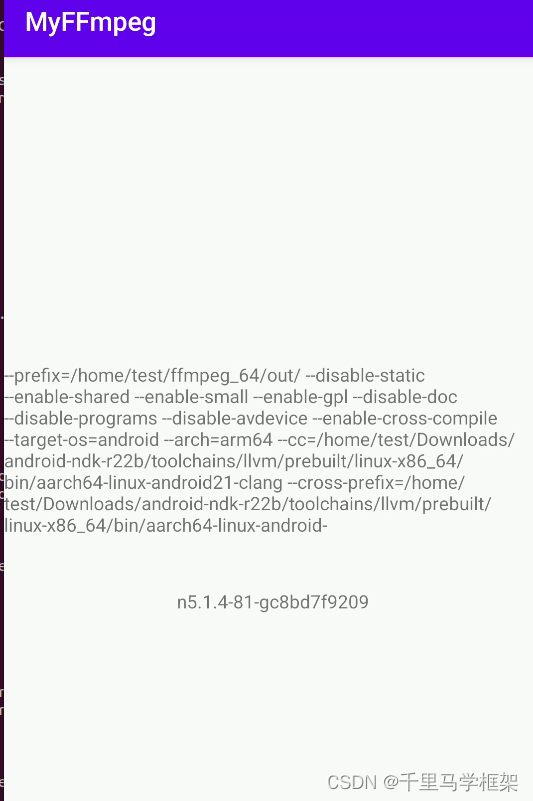
最后运行如下:
本文章更多详细代码和资料需要购买课程获取
hal+perfetto+surfaceflinger
https://mp.weixin.qq.com/s/LbVLnu1udqExHVKxd74ILg

私聊作者+v(androidframework007)
其他课程七件套专题:
点击这里
https://mp.weixin.qq.com/s/Qv8zjgQ0CkalKmvi8tMGaw


 2829
2829

 被折叠的 条评论
为什么被折叠?
被折叠的 条评论
为什么被折叠?
 到【灌水乐园】发言


