


ConstraintLayout是一个用于构建复杂布局的组件。它通过将子视图限制在给定的约束条件下来定位和排列视图。
使用ConstraintLayout,您可以通过定义视图之间的约束关系来指定它们的位置。这些约束可以是水平和垂直的对齐、边距、宽度和高度等。这允许您创建灵活而响应式的布局,可以根据屏幕大小和设备方向进行自动适应。
ConstraintLayout使用单独的库,因此使用之前需要添加依赖。
implementation "androidx.constraintlayout:constraintlayout-compose:1.0.1"下面通过示例来了解ConstraintLayout的使用方法。
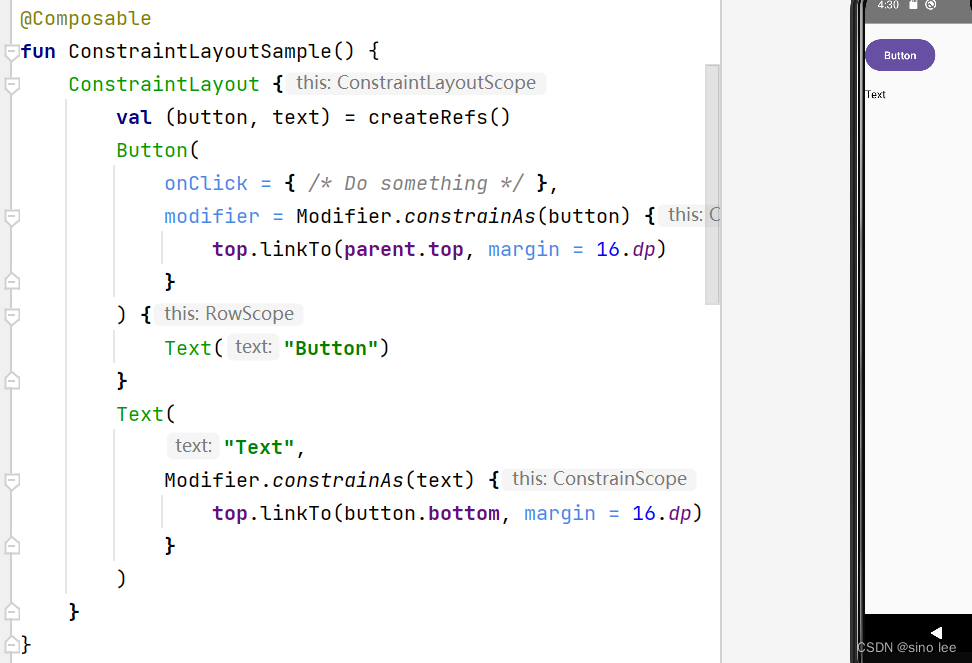
在ConstraintLayout的作用域中,通过createRefs创建索引。子视图通过constrainAs关联索引。在上面的示例中,Button关联索引button,Text关联索引text。
Text被Button约束,显示在Button的下面,并且离Button有16dp的距离。
在上面的例子中,可以看到约束条件与组件耦合在一起,这样不容易让这个约束重复利用,其实可以把这些约束代码解耦出来,示例如下。
@Composable
fun DecoupledConstraintLayout() {
    BoxWithConstraints {

        val constraints = if (maxWidth < 500.dp) {
            decoupledConstraints(margin = 6.dp)
        } else {
            decoupledConstraints(margin = 32.dp)
        }

        ConstraintLayout(constraints) {
            Button(
                onClick = { /* Do something */ },
                modifier = Modifier.layoutId("button")
            ) {
                Text("Button")
            }

            Text("Text", Modifier.layoutId("text"))
        }
    }
}

private fun decoupledConstraints(margin: Dp): ConstraintSet {
    return ConstraintSet {
        val button = createRefFor("button")
        val text = createRefFor("text")

        constrain(button) {
            top.linkTo(parent.top, margin = margin)
        }
        constrain(text) {
            top.linkTo(button.bottom, margin)
        }
    }
}
在解耦的实现中,通过layoutId指定某个视图的id,在约束实现中,通过createRefFor为某个id创建索引,有了索引,即可对视图建立约束关系。
以上便是ConstraintLayout的常见用法,示例代码已经上传到github,地址如下


 2166
2166


 被折叠的 条评论
为什么被折叠?
被折叠的 条评论
为什么被折叠?
 到【灌水乐园】发言


