


概述
对于医疗dicom图像来说,为了更好的突出病灶点,对图像做伪彩和反色是必不可少的,今天就来介绍一下如何对dicom图像进行伪彩和反色操作。
步骤
- 对dicom图像进行解析,生成图片(可以参考我的另一篇博客 DCM4CHE图像显示)
- 对生成出来的图片进行伪彩和反色处理
注意:对图像进行伪彩处理需要伪彩表,简单来说就是一个256大小的数组,里面包含颜色值,为啥是256大家也能猜到,因为灰度图像的颜色范围是8位也就是2的8次方256,没一个灰度像素值(数组下标)对应一个彩色的颜色值。
具体实现
/*
 * 对图像进行伪彩处理
 */
public void pseudoColorProcess(BufferedImage BI) throws IOException {
		String[] colorTable = {"#000000", "#000003", "#000007", "#00000b", "#00000f", "#000013", "#000017", "#00001b", "#00001f", "#000023", "#000027", "#00002b", "#00002f", "#000033", "#000037", "#00003b", "#00003f", "#000043", "#000047", "#00004b", "#00004f", "#000053", "#000057", "#00005b", "#00005f", "#000063", "#000067", "#00006b", "#00006f", "#000073", "#000077", "#00007b", "#00007f", "#000083", "#000087", "#00008b", "#00008f", "#000093", "#000097", "#00009b", "#00009f", "#0000a3", "#0000a7", "#0000ab", "#0000af", "#0000b3", "#0000b7", "#0000bb", "#0000bf", "#0000c3", "#0000c7", "#0000cb", "#0000cf", "#0000d3", "#0000d7", "#0000db", "#0000df", "#0000e3", "#0000e7", "#0000eb", "#0000ef", "#0000f3", "#0000f7", "#0000fb", "#0000ff", "#0003fb", "#0107f7", "#020bf3", "#030fef", "#0313eb", "#0417e7", "#051be3", "#061fdf", "#0723db", "#0727d7", "#082bd3", "#092fcf", "#0a33cb", "#0b37c7", "#0b3bc3", "#0c3fbf", "#0d43bb", "#0e47b7", "#0f4bb3", "#0f4faf", "#1053ab", "#1157a7", "#125ba3", "#135f9f", "#13639b", "#146797", "#156b93", "#166f8f", "#17738b", "#177787", "#187b83", "#197f7f", "#1a837b", "#1b8777", "#1b8b73","#1c8f6f", "#1d936b", "#1e9767", "#1f9b63", "#1f9f5f", "#20a35b", "#21a757", "#22ab53", "#23af4f", "#23b34b", "#24b747", "#25bb43", "#26bf3f", "#27c33b", "#27c737", "#28cb33", "#29cf2f", "#2ad32b", "#2bd727", "#2bdb23", "#2cdf1f", "#2de31b", "#2ee717", "#2feb13", "#2fef0f", "#30f30b", "#31f707", "#32fb03", "#33ff00", "#36ff00", "#39ff01", "#3cff02", "#3fff03", "#42ff03", "#46ff04", "#49ff05", "#4cff06", "#4fff07", "#52ff07", "#56ff08", "#59ff09", "#5cff0a", "#5fff0b", "#62ff0b", "#66ff0c", "#69ff0d", "#6cff0e", "#6fff0f", "#72ff0f", "#75ff10", "#79ff11", "#7cff12", "#7fff13", "#82ff13", "#85ff14", "#89ff15", "#8cff16", "#8fff17", "#92ff17", "#95ff18", "#99ff19", "#9cff1a", "#9fff1b", "#a2ff1b", "#a5ff1c", "#a8ff1d", "#acff1e", "#afff1f", "#b2ff1f", "#b5ff20", "#b8ff21", "#bcff22", "#bfff23", "#c2ff23", "#c5ff24", "#c8ff25", "#ccff26", "#cfff27", "#d2ff27", "#d5ff28", "#d8ff29", "#dbff2a", "#dfff2b", "#e2ff2b", "#e5ff2c", "#e8ff2d", "#ebff2e", "#efff2f", "#f2ff2f", "#f5ff30", "#f8ff31", "#fbff32", "#ffff33", "#fefb32", "#fef731", "#fef330", "#feef2f", "#fdeb2f", "#fde72e", "#fde32d","#fddf2c", "#fcdb2b", "#fcd72b", "#fcd32a", "#fccf29", "#fbcb28", "#fbc727", "#fbc327", "#fbbf26", "#fbbb25", "#fab724", "#fab323", "#faaf23", "#faab22", "#f9a721", "#f9a320", "#f99f1f", "#f99b1f", "#f8971e", "#f8931d", "#f88f1c", "#f88b1b", "#f7871b", "#f7831a", "#f77f19", "#f77b18", "#f77717", "#f67317", "#f66f16", "#f66b15", "#f66714", "#f56313", "#f55f13", "#f55b12", "#f55711", "#f45310", "#f44f0f", "#f44b0f", "#f4470e", "#f3430d", "#f33f0c", "#f33b0b", "#f3370b", "#f3330a", "#f22f09", "#f22b08", "#f22707", "#f22307", "#f11f06", "#f11b05", "#f11704", "#f11303", "#f00f03", "#f00b02", "#f00701", "#f00300"};

		int w = BI.getWidth();
		int h = BI.getHeight();

		for(int i=0;i<w;i++) {
			for(int j=0;j<h;j++) {
				int pixel = BI.getRGB(i, j);
				int nR = (pixel >> 16) & 0xFF;

				int colorPixel = Integer.parseInt(colorTable[nR].replace("#", ""), 16);
				BI.setRGB(i, j, colorPixel);
			}
		}

		ImageIO.write(BI, "jpg", new File("D:/dicomFile/test/des.jpg"));
	}

	/*
	 * 对图像进行反色处理
	 */
	public void invertProcess(BufferedImage BI) throws IOException {
		int w = BI.getWidth();
		int h = BI.getHeight();

		for(int i=0;i<w;i++) {
			for(int j=0;j<h;j++) {
				int pixel = BI.getRGB(i, j);
				int nR = 255 - (pixel >> 16) & 0xFF;
				int nG = 255 - (pixel >> 8) & 0xFF;
				int nB = 255 - pixel & 0xFF;

				int colorPixel = convertRGBToInt(nR, nG, nB);

				BI.setRGB(i, j, colorPixel);
			}
		}

		ImageIO.write(BI, "jpg", new File("D:/dicomFile/test/des_invert.jpg"));
	}

	private int convertRGBToInt(int nR, int nG, int nB) {
		return ((0xFF << 24) | (nR << 16) | (nG << 8) | nB);
	}
main方法
	public static void main(String[] args) {
		File imageFile = new File("D:/dicomFile/test/src.jpg");
		ImageProcess process = new ImageProcess();
		 ImageReader reader = getImageReader();
		try {

			ImageInputStream iis = ImageIO.createImageInputStream(imageFile);
			reader.setInput(iis, true);

			process.pseudoColorProcess(reader.read(0));
			process.invertProcess(reader.read(0));
		} catch (IOException e) {
			// TODO Auto-generated catch block
			e.printStackTrace();
		}
	}
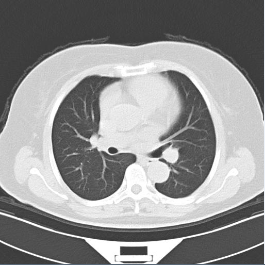
结果
原始图片
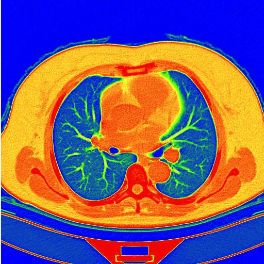
伪彩图片
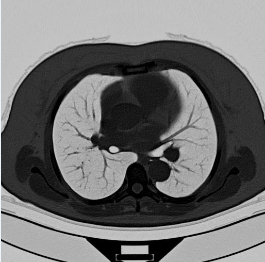
反色图片
好了,到此为止成功,大家要明白原理,知其然也要知其所以然。


 6616
6616


 被折叠的 条评论
为什么被折叠?
被折叠的 条评论
为什么被折叠?
 到【灌水乐园】发言


