


文章目录
一、问题描述
最近刚好有一个需要,就是需要服务端推送消息到客户端,解决方案第一个想到的便是前端轮询服务器,查询服务器是否有请求。对于这种方法,优点是简单,但缺点也十分明显,那就是十分耗费服务器资源。因此在这里介绍了第二种方法,使用webSocket。
二、websocket与http 区别
http协议是用在应用层的协议,他是基于tcp协议的,http协议建立链接也必须要有三次握手才能发送信息。http链接分为短链接,长链接,短链接是每次请求都要三次握手才能发送自己的信息。即每一个request对应一个response。长链接是在一定的期限内保持链接。保持TCP连接不断开。客户端与服务器通信,必须要有客户端发起然后服务器返回结果。客户端是主动的,服务器是被动的。
WebSocket是HTML5中的协议, 他是为了解决客户端发起多个http请求到服务器资源浏览器必须要经过长时间的轮训问题而生的,他实现了多路复用,他是全双工通信。在webSocket协议下客服端和浏览器可以同时发送信息。服务器也可以主动推送消息给客户端。

三、springboot整合WebSocket
1、maven依赖
<dependency>
    <groupId>org.springframework.boot</groupId>
    <artifactId>spring-boot-starter-websocket</artifactId>
</dependency>
2、配置WebSocketConfig
@Configuration
public class WebSocketConfig {
    //如果使用了springboot启动项目,则需要bean注入,而如果使用了外置tomcat容器,则并不要bean注入,否侧会报错
    @Bean
    public ServerEndpointExporter serverEndpointExporter() {
        return new ServerEndpointExporter();
	}
}
3、设置WebSocketServer(重点)
直接@ServerEndpoint("/wsserver/{userId}") 、@Component启用即可,然后在里面实现@OnOpen开启连接,@onClose关闭连接,@onMessage接收消息等方法
@Component
@ServerEndpoint("/wsserver/{userId}")
public class WebSocketServer {

    private final static Logger logger = LogManager.getLogger(WebSocketServer.class);
    /**静态变量,用来记录当前在线连接数。应该把它设计成线程安全的。*/
    private static final AtomicInteger onlineCount = new AtomicInteger();
    /**concurrent包的线程安全Set,用来存放每个客户端对应的MyWebSocket对象。*/
    private static ConcurrentHashMap<String,WebSocketServer> webSocketMap = new ConcurrentHashMap<>();
    /**与某个客户端的连接会话,需要通过它来给客户端发送数据*/
    private Session session;
    /**接收userId*/
    private String userId="";

    /**
     * 连接建立成功调用的方法*/
    @OnOpen
    public void onOpen(Session session,@PathParam("userId") String userId) throws IOException{
        this.session = session;
        this.userId=userId;
        if(webSocketMap.containsKey(userId)){
            //必须显示关闭,否则Map里没有了但是sesseion还能连接
            webSocketMap.get(userId).session.close();
            webSocketMap.remove(userId);
            webSocketMap.put(userId,this);
        }
        //加入set中,如果配置了nginx,会存在缓存
        webSocketMap.put(userId,this);
        //在线数加1
        addOnlineCount();

        logger.info("用户连接:"+userId+",当前在线人数为:" + getOnlineCount());

        try {
            sendMessage("连接成功");
        } catch (IOException e) {
            logger.error("用户:"+userId+",网络异常!!!!!!");
        }
    }

    /**
     * 连接关闭调用的方法
     */
    @OnClose
    public void onClose() throws IOException{
        if(webSocketMap.containsKey(userId)){
            this.session.close();
            webSocketMap.remove(userId);
            //从set中删除
            subOnlineCount();
        }
        logger.info("用户退出:"+userId+",当前在线人数为:" + getOnlineCount());
    }

    /**
     * 收到客户端消息后调用的方法
     *需要有
     * {
     *     xxx:xxx,
     *     "toUserId","xx"
     * }
     * @param message 客户端发送过来的消息*/
    @OnMessage
    public void onMessage(String message, Session session) {
            logger.info("用户消息:"+userId+",报文:"+message);
            //可以群发消息
            //消息保存到数据库、redis
            if(StringUtils.isNotBlank(message)){
                try {
                    //解析发送的报文
                    JSONObject jsonObject = JSON.parseObject(message);
                    //追加发送人(防止串改)
                    jsonObject.put("fromUserId",this.userId);
                    String toUserId=jsonObject.getString("toUserId");
                    //传送给对应toUserId用户的websocket
                    if(StringUtils.isNotBlank(toUserId)&&webSocketMap.containsKey(toUserId)){
                        webSocketMap.get(toUserId).sendMessage(jsonObject.toJSONString());
                    }else{
                        logger.error("请求的userId:"+toUserId+"不在该服务器上");
                        //否则不在这个服务器上,发送到mysql或者redis
                    }
                }catch (Exception e){
                    e.printStackTrace();
                }
            }
    }

    /**
     *
     * @param session
     * @param error
     */
    @OnError
    public void onError(Session session, Throwable error) {
        logger.error("用户错误:"+this.userId+",原因:"+error.getMessage());
        error.printStackTrace();
    }
    /**
     * 实现服务器主动推送
     * 这里需要
     * {xxx:xxx}格式
     */
    public void sendMessage(String message) throws IOException {
        System.out.println(this);
        System.out.println(this.session);
        this.session.getBasicRemote().sendText(message);
    }


    /**
     * 发送自定义消息
     * */
    public static void sendInfo(String message,@PathParam("userId") String userId) throws IOException {
        logger.info("发送消息到:"+userId+",报文:"+message);
        if(StringUtils.isNotBlank(userId)&&webSocketMap.containsKey(userId)){
            webSocketMap.get(userId).sendMessage(message);
        }else{
            logger.error("用户"+userId+",不在线!");
        }
    }

    public static synchronized int getOnlineCount() {
        return onlineCount.get();
    }

    public static synchronized void addOnlineCount() {
        WebSocketServer.onlineCount.incrementAndGet();
    }

    public static synchronized void subOnlineCount() {
        WebSocketServer.onlineCount.decrementAndGet();
    }

    // 返回sessionMap,用来多个websocket进行通信,可以在外面的类发送消息
    public static ConcurrentHashMap<String, WebSocketServer> getWebSocketMap(){
        return webSocketMap;
    }
}
注意:如果项目使用了nginx反向代理,则需要在nginx的配置文件的location/位置处添加
proxy_http_version 1.1;
proxy_set_header Upgrade $http_upgrade;
proxy_set_header Connection "upgrade";
# 超时时间设置为两小时
proxy_read_timeout 7200s;
4、前端页面调用
<!DOCTYPE HTML>
<html>

<head>
    <title>Test My WebSocket</title>
</head>

<body>
    Test<br/>
    <input id="text" type="text" />
    <button onclick="send()">Send</button>
    <button onclick="closeWebSocket()">Close</button>
    <div id="message">
    </div>
</body>

<script type="text/javascript">
    var websocket = null;
    //判断当前浏览器是否支持WebSocket
    if ('WebSocket' in window) {
        //连接WebSocket节点
        //这里的userid自己修改就可以模拟开多个界面
        //这里的地址写上你websocket的服务地址
        websocket = new WebSocket("ws://localhost:8888/wsserver/1");
    } else {
        alert('Not support websocket')
    }
    //连接发生错误的回调方法
    websocket.onerror = function() {
        setMessageInnerHTML("error");
    };
    //连接成功建立的回调方法
    websocket.onopen = function(event) {
            setMessageInnerHTML("open");
        }
        //接收到消息的回调方法
    websocket.onmessage = function(event) {
        setMessageInnerHTML(event.data);
    }

    //连接关闭的回调方法
    websocket.onclose = function() {
        setMessageInnerHTML("close");
    }

    //监听窗口关闭事件,当窗口关闭时,主动去关闭websocket连接,防止连接还没断开就关闭窗口,server端会抛异常。
    window.onbeforeunload = function() {
        websocket.close();
    }

    //将消息显示在网页上
    function setMessageInnerHTML(innerHTML) {
        document.getElementById('message').innerHTML += innerHTML + '<br/>';
    }

    //关闭连接
    function closeWebSocket() {
        websocket.close();
    }

    //发送消息
    function send() {
        var message = document.getElementById('text').value;
        console.log(message);
        websocket.send(message);
    }
</script>

</html>
5、运行结果
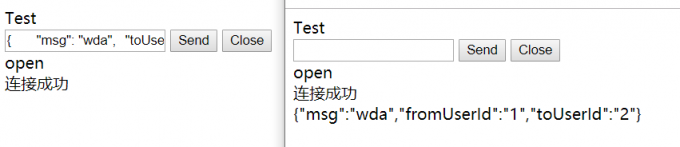
在这里我开了两个界面,userId分别是1和2,这里我在1发送了如下json串,这会经过服务器自动转发到仍然在线的2。同时我们可以查看到服务端可以统计当前在线人数,还打印出了转发的报文
{
	"msg": "wda",
	"toUserId": "2"
}

简单的实战到此为止,再次基础上可以修改很多功能啦~
四、SpringBoot整合Netty
1、导入依赖
<dependency>
    <groupId>io.netty</groupId>
    <artifactId>netty-all</artifactId>
    <version>4.1.36.Final</version>
</dependency>

<dependency>
    <groupId>org.projectlombok</groupId>
    <artifactId>lombok</artifactId>
    <optional>true</optional>
</dependency>
2、配置自定义handelr
通道处理器
public class MyChannelHandler {

    public MyChannelHandler() {
    }

    public static ChannelGroup channelGroup = new DefaultChannelGroup(GlobalEventExecutor.INSTANCE);

    private static ConcurrentMap<String, ChannelId> ChannelMap = new ConcurrentHashMap();

    public static void addChannel(String apiToken, Channel channel) {
        channelGroup.add(channel);
        if (null != apiToken) {
            ChannelMap.put(apiToken, channel.id());
        }
    }

    public static void updateChannel(String apiToken, Channel channel) {
        Channel chan = channelGroup.find(channel.id());
        if (null == chan) {
            addChannel(apiToken, channel);
        } else {
            ChannelMap.put(apiToken, channel.id());
        }
    }

    public static void removeChannel(Channel channel) {
        channelGroup.remove(channel);
        channel.close();
        Collection<ChannelId> values = ChannelMap.values();
        values.remove(channel.id());
    }

    public static Channel findChannel(String apiToken) {
        ChannelId chanId = ChannelMap.get(apiToken);
        if (null == chanId) {
            return null;
        }
        return channelGroup.find(ChannelMap.get(apiToken));
    }

    public static void sendToAll(String message) {
        channelGroup.writeAndFlush(new TextWebSocketFrame(message));
    }

    //给每个人发送消息,除发消息人外
    private void SendAllExceptMy(String apiToken, String msg) {
        Channel myChannel = channelGroup.find(ChannelMap.get(apiToken));
        if(null != myChannel){
            for(Channel channel:channelGroup){
                if(!channel.id().asLongText().equals(myChannel.id().asLongText())){
                    channel.writeAndFlush(new TextWebSocketFrame(msg));
                }
            }
        }
    }

    public static void sendToSimple(String apiToken, String message) {
        channelGroup.find(ChannelMap.get(apiToken)).writeAndFlush(new TextWebSocketFrame(message));
    }

}
websocket处理器
/**
 * TextWebSocketFrame是netty用于处理websocket发来的文本对象
 */
public class MyWebSocketHandler extends SimpleChannelInboundHandler<TextWebSocketFrame> {


    @Override
    public void channelActive(ChannelHandlerContext ctx) throws Exception {
        System.out.println(ctx.channel().id() + "与客户端建立连接,通道开启!");
        //添加到channelGroup通道组
        MyChannelHandler.channelGroup.add(ctx.channel());
    }

    /**
     * 要想实现客户端感知服务端的存活情况,需要进行双向的心跳;
     * Netty中的channelInactive()方法是通过Socket连接关闭时挥手数据包触发的,
     * 因此可以通过channelInactive()方法感知正常的下线情况,但是因为网络异常等非正常下线则无法感知;
     *
     * @param ctx
     * @throws Exception
     */
    @Override
    public void channelInactive(ChannelHandlerContext ctx) throws Exception {
        System.out.println(ctx.channel().id() + "与客户端断开连接,通道关闭!");
        //添加到channelGroup 通道组
        MyChannelHandler.channelGroup.remove(ctx.channel());
    }

    @Override
    public void channelRead(ChannelHandlerContext ctx, Object msg) throws Exception {
        Channel channel = ctx.channel();
        ChannelId id = channel.id();
        //首次连接是FullHttpRequest,处理参数
        if (msg instanceof FullHttpRequest) {
            FullHttpRequest request = (FullHttpRequest) msg;
            String uri = request.uri();
            Map paramMap = getUrlParams(uri);
            System.out.println("接收到的参数是:" + paramMap);
            //如果url包含参数,需要处理
            if (uri.contains("?")) {
                String newUri = uri.substring(0, uri.indexOf("?"));
                System.out.println(newUri);
                request.setUri(newUri);
            }
        }
        if (msg instanceof TextWebSocketFrame) {
            //正常的TEXT消息类型
            TextWebSocketFrame frame = (TextWebSocketFrame) msg;
            System.out.println(new Date() + "客户端收到服务器数据:" + frame.text());
            MyChannelHandler.sendToAll(frame.text());
        }
        super.channelRead(ctx, msg);
    }

    @Override
    protected void channelRead0(ChannelHandlerContext channelHandlerContext, TextWebSocketFrame textWebSocketFrame) throws Exception {

    }

    @Override
    public void exceptionCaught(ChannelHandlerContext ctx, Throwable cause) {
        System.out.println("异常发生了...");
        cause.printStackTrace();
        ctx.close();
    }


    private static Map getUrlParams(String url) {
        Map<String, String> map = new HashMap<>();
        url = url.replace("?", ";");
        if (!url.contains(";")) {
            return map;
        }
        if (url.split(";").length > 0) {
            String[] arr = url.split(";")[1].split("&");
            for (String s : arr) {
                String key = s.split("=")[0];
                String value = s.split("=")[1];
                map.put(key, value);
            }
            return map;

        } else {
            return map;
        }
    }
}
3、配置心跳包
/**
 * 检查客户端心跳机制
 * IdleStateHandler心跳检测主要是通过向线程任务队列中添加定时任务,判断channelRead()方法或write()方法是否调用空闲超时,如果超时则触发超时事件执行自定义userEventTrigger()方法;
 *
 * Netty通过IdleStateHandler实现最常见的心跳机制不是一种双向心跳的PING-PONG模式,而是客户端发送心跳数据包,服务端接收心跳但不回复,
 * 因为如果服务端同时有上千个连接,心跳的回复需要消耗大量网络资源;如果服务端一段时间内没有收到客户端的心跳数据包则认为客户端已经下线,
 * 将通道关闭避免资源的浪费;在这种心跳模式下服务端可以感知客户端的存活情况,无论是宕机的正常下线还是网络问题的非正常下线,
 * 服务端都能感知到,而客户端不能感知到服务端的非正常下线;
 */
public class HeartBeatHandler extends ChannelInboundHandlerAdapter {

    @Override
    public void userEventTriggered(ChannelHandlerContext ctx, Object obj){
        if (obj instanceof IdleStateEvent){
            IdleStateEvent event = (IdleStateEvent)obj;
            if (event.state()== IdleState.READER_IDLE){
                System.out.println(ctx.channel().id() +"客户端读超时" + new Date());
                MyChannelHandler.removeChannel(ctx.channel());
            }else if (event.state()== IdleState.WRITER_IDLE){
                System.out.println(ctx.channel().id() +"客户端写超时" + new Date());
            }else if (event.state()==IdleState.ALL_IDLE){
                System.out.println(ctx.channel().id() +"客户端所有操作超时");
            }
        }
    }

}
4、配置Netty服务器
@Component
public class NettyServer {

    @Value("${server.port:8080}")
    private Integer port;

    @PostConstruct
    public void start() throws Exception {
        EventLoopGroup group = new NioEventLoopGroup();// 主线程组
        EventLoopGroup bossGroup = new NioEventLoopGroup();//创建从线程组,处理主线程组分配下来的io操作
        try {
            ServerBootstrap sb = new ServerBootstrap();
            sb.option(ChannelOption.SO_BACKLOG, 1024);// 存放已完成三次握手的请求的等待队列
            //  要求高实时性,有数据时马上发送,就将该选项设置为true关闭Nagle算法;
            //  如果要减少发送次数,就设置为false,会累积一定大小后再发送
            sb.childOption(ChannelOption.TCP_NODELAY,true);
            sb.group(group, bossGroup) // 绑定线程池
                    .channel(NioServerSocketChannel.class) // 指定使用的channel
                    .localAddress(this.port)// 绑定监听端口
                    .childHandler(new ChannelInitializer<SocketChannel>() { // 绑定客户端连接时候触发操作
                        @Override
                        protected void initChannel(SocketChannel ch){
                            System.out.println("收到新连接"+ new Date());
                            //websocket协议本身是基于http协议的,所以这边也要使用http解编码器
                            ch.pipeline().addLast(new HttpServerCodec());
                            //以块的方式来写的处理器
                            ch.pipeline().addLast(new ChunkedWriteHandler());
                             /*
                            说明
                                1. http数据在传输过程中是分段, HttpObjectAggregator ,就是可以将多个段聚合
                                2. 这就就是为什么,当浏览器发送大量数据时,就会发出多次http请求
                             */
                            ch.pipeline().addLast(new HttpObjectAggregator(8192));
                            // 对客户端,如果在40秒内没有向服务端发送心跳,就主动断开
                            // 前三个的参数解释如下:
                            //1)readerIdleTime:为读超时时间(即服务端一定时间内未接收到客户端消息的时间,服务端一段时间内没有数据读取)
                            //2)writerIdleTime:为写超时时间(即服务端一定时间内未向客户端发送消息的时间,服务端一段时间内没有数据发送)
                            //3)allIdleTime:所有类型的超时时间(以上两种满足其中一个即可)
                            ch.pipeline().addLast(new IdleStateHandler(40,0,0));
                            ch.pipeline().addLast(new HeartBeatHandler());
                            ch.pipeline().addLast(new MyWebSocketHandler());
                             /*
                            说明
                                1. 对应websocket ,它的数据是以 帧(frame) 形式传递
                                2. 可以看到WebSocketFrame 下面有六个子类
                                3. 浏览器请求时 ws://localhost:8888/hello 表示请求的uri
                                4. WebSocketServerProtocolHandler 核心功能是将 http协议升级为 ws协议 , 保持长连接
                                5. 是通过一个 状态码 101
                             */
                            ch.pipeline().addLast(new WebSocketServerProtocolHandler("/ws", null, true, 65536 * 10));

                        }
                    });
            ChannelFuture cf = sb.bind().sync(); // 启动server 服务器异步创建绑定
            cf.channel().closeFuture().sync(); // 监听服务器关闭channel通道
            if (cf.isSuccess()) {
                System.out.println(NettyServer.class + " 启动正在监听: " + cf.channel().localAddress());
            }
        } finally {
            System.out.println("释放线程池资源");
            group.shutdownGracefully().sync(); // 释放线程池资源
            bossGroup.shutdownGracefully().sync();
        }
    }

}
5、前端测试验证
和上面的前端一样,修改部分即可,websocket = new WebSocket("ws://localhost:8080/ws?ss=1234");或websocket = new WebSocket("ws://localhost:8080/ws");
或者WS在线测试网站
五、WebSocket注意事项
1、问题一
1.1 问题描述
在websocket服务中,有时候可能需要加其他类,比如我需要VideoService类,这时候使用@Autowired自动注入,但是运行的时候报错java.lang.NullPointerException
@Autowired
private VideoService videoService;
1.2 原因与解决方法
这个线程是tomcat启动的,在这个tomcat启动的线程中是不能使用spring容器提供的@Autowired的单例bean。
如果不是static,这个repository就是null。在这个线程中也没有办法从spring容器中取到这个bean,所以只能把这个bean设置为static,这样这个单例bean就脱离了spring容器的限制,可以在所有线程中使用了
/**
 * 视频服务
 */
private static VideoService videoService;

@Autowired
public void setRepository(CallService callService) {
    StudentWebSocketServer.callService=callService;
}
另一个思路:实现BeanFactoryAware,这样可以通过注入的BeanFactory拿到这个bean,应该也是可行的
2、问题二
2.1 问题描述
刚开始的时候用户退出只将Session从Map中取出,发现用户退出了,但是用户仍然可以发送消息,经过测试才发现单纯从Map去除并不会断开session连接,需要显示调用session.close()才能真正断开连接
3、问题三
3.1 问题描述
配置了Nginx的proxy_read_timeout参数后,websocket会进行缓存,当websocket再次进行onOpen()重连时,websocket仍然会检测到原来的连接(即session),直到proxy_read_timeout参数过期;同时客户端发送心跳包给websocket连接,会使得proxy_read_timeout参数延续;或者websocket手动关闭
4、问题四
4.1 问题描述
http的session对象和websocket的session是不一样的。http的时候,是javax.servlet.http.HttpSession,而websocket的时候javax.websocket.Session。
http的session一般用于保存用户信息,根据用户,http请求的时候携带Cookie:JSESSIONID,进行区分,实现多例。http的session的getId()就是JSESSIONID,比如BD70D706E4B975EA5CE7418152D3F8DC这种。而websocket的Session则有很多用处,保存信息,发送请求,可以说websocket前后端交互用的变量和方法,都保存在websocket的Session里。同时,websocket的Session是根据前端创建连接多例的,也就是说,前端每new WebSocket进行open一次,就创建一个websocket的Session。websocket的Session的getId()是从1开始递增的序列。
六、未来与展望
websocket对于并发并不是很好,一般使用netty,下面是一些参考链接
SpringBoot(23) 集成socket.io服务端和客户端实现通信


 1602
1602


 被折叠的 条评论
为什么被折叠?
被折叠的 条评论
为什么被折叠?
 到【灌水乐园】发言


