


- $(document).ready(function(){
- var height1 = $(window).height()-20;
- $("#main_layout").attr("style","width:100%;height:"+height1+"px");
- $("#main_layout").layout("resize",{
- width:"100%",
- height:height1+"px"
- });
- });
-
-
- $(window).resize(function(){
- var height1 = $(window).height()-30;
- $("#main_layout").attr("style","width:100%;height:"+height1+"px");
- $("#main_layout").layout("resize",{
- width:"100%",
- height:height1+"px"
- });
- });
<table id="grid">
</table>
</div>
用这个监听方法,我也是刚解决
$(window).resize(function(){
$('#tt').datagrid('resize', {
width:function(){return document.body.clientWidth;},
height:function(){return document.body.clientHeight;},
});
});
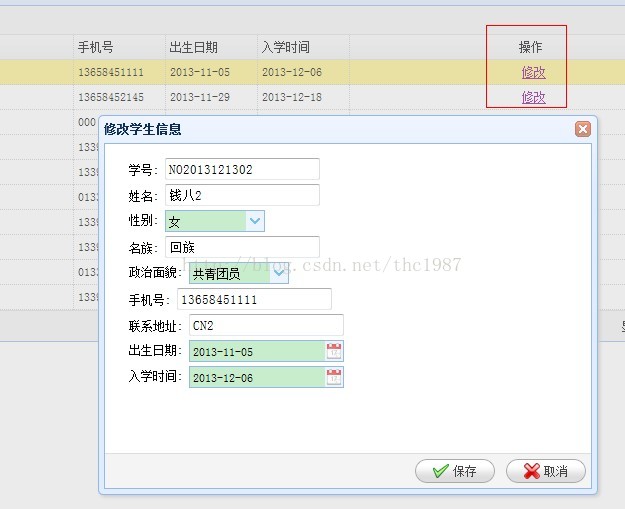
做项目的时候因为需求,要在表格的最后添加一列操作列,easyUI貌似没有提供这种功能,不过没关系,我们可以自定义来实现
版本:jquery easyUI 1.3.2
这里我的实现方式是采用HTML形式,js方式暂时还没用到
首先是HTML部分
<th data-options="field:'_operate',width:80,align:'center',formatter:formatOper">操作</th>
注意红色部分,就是我们的操作列,field的名字随便取,我这里是_operate,关键是formatOper函数
formatOper()函数中有三个参数,val指当前单元格的值,row,当前行对象,index当前行的索引.这里我们就需要这个index
我把这个index传入了一个叫editUser的函数中,为什么要传这个index呢,我们在来看下这个editUser函数
翻阅easyUI文档可以发现datagrid有一个方法叫selectRow
| selectRow | index | Select a row, the row index start with 0. |
它的作用就是手动选中表格的行,参数就是index值,从0开始
这样,我们就能实时获取到鼠标点击行所对应的数据了
$('#dg').datagrid('selectRow',index);
var row = $('#dg').datagrid('getSelected');
这两句话就是获取选中的行
具体效果如图
第一种(简单粗暴,个人推荐):
if(user==1){
//隐藏第一个按钮$('div.datagrid-toolbar a').eq(0).hide();
//隐藏第一条分隔线
$('div.datagrid-toolbar div').eq(0).hide();
//显示第一个按钮
$('div.datagrid-toolbar a').eq(0).show();
//显示第一条分隔线
$('div.datagrid-toolbar div').eq(0).hide();
disable toolbar按钮
$('#btnpichuli').linkbutton('disable');
enable toolbar按钮
$('#btnpichuli').linkbutton('enable');
}
全部隐藏
$(".datagrid-toolbar").hide();
第二种(扩展easyui datagrid方法):
$.extend($.fn.datagrid.methods, {
 2     addToolbarItem: function(jq, items){
 3         return jq.each(function(){
 4             var toolbar = $(this).parent().prev("div.datagrid-toolbar");
 5             for(var i = 0;i<items.length;i++){
 6                 var item = items[i];
 7                 if(item === "-"){
 8                     toolbar.append('<div class="datagrid-btn-separator"></div>');
 9                 }else{
10                     var btn=$("<a href=\"javascript:void(0)\"></a>");
11                     btn[0].οnclick=eval(item.handler||function(){});
12                     btn.css("float","left").appendTo(toolbar).linkbutton($.extend({},item,{plain:true}));
13                 }
14             }
15             toolbar = null;
16         });
17     },
18     removeToolbarItem: function(jq, param){
19         return jq.each(function(){
20             var btns = $(this).parent().prev("div.datagrid-toolbar").children("a");
21             var cbtn = null;
22             if(typeof param == "number"){
23                 cbtn = btns.eq(param);
24             }else if(typeof param == "string"){
25                 var text = null;
26                 btns.each(function(){
27                     text = $(this).data().linkbutton.options.text;
28                     if(text == param){
29                         cbtn = $(this);
30                         text = null;
31                         return;
32                     }
33                 });
34             }
35             if(cbtn){
36                 var prev = cbtn.prev()[0];
37                 var next = cbtn.next()[0];
38                 if(prev && next && prev.nodeName == "DIV" && prev.nodeName == next.nodeName){
39                     $(prev).remove();
40                 }else if(next && next.nodeName == "DIV"){
41                     $(next).remove();
42                 }else if(prev && prev.nodeName == "DIV"){
43                     $(prev).remove();
44                 }
45                 cbtn.remove();
46                 cbtn= null;
47             }
48         });
49     }
50 });

1 $('#tt').datagrid("addToolbarItem",[{"text":"xxx"},"-",{"text":"xxxsss","iconCls":"icon-ok"}])
1 $('#tt').datagrid("removeToolbarItem","GetChanges")//根据btn的text删除
1 $('#tt').datagrid("removeToolbarItem",0)//根据下标删除
JQuery EasyUI 动态隐藏
一、隐藏datagrid某一列
$('#dg').datagrid('hideColumn', 'field');
二、隐藏html的lable、input标签
1 <td align="right" style="width: 165px">
2       <label for="lbltxrq" id="lbltxrq">提醒时间:</label>
3 </td>
4 <td style="width: 130px">
5      <input class="Wdate" type="text" id="txrq" name="txrq"    style="width:121px" onfocus="WdatePicker({dateFmt:'yyyy-MM-dd HH:00', autoPickDate:true})"/>
6 </td>
1、使用js传统方法
document.getElementById('txrq').style.display = 'none';
2、使用jquery的hide方法
$('#txrq').hide();
========================================================
jquery easyUI checkbox复选项获取并传后台
先上效果图


再上代码:
              <div>
                <input type="checkbox" name="qx" value="1"   />用户管理
                <input type="checkbox" name="qx" value="2"  />业务模板定制管理<br />
                <input type="checkbox" name="qx" value="3" />部门管理
                <input type="checkbox" name="qx" value="4"  />业务短信人工群发<br />
                <input type="checkbox" name="qx" value="5"  />业务申请
                <input type="checkbox" name="qx" value="6"  />业务取消
                </div>
           var qx = $("input[name='qx']:checked").map(function () {
               return $(this).val();
           }).get().join('#');
后台接收代码:
context.Request["qx"]
jQuery EasyUI combobox多选及赋值
1、多选属性multiple
multiple:true多选 multiple:false单选
<input class="easyui-combobox" id="xgr" name="xgr" style="width:435px" url='../Source/Public/json.ashx?action=zhymch'
data-options="valueField:'zhymch', textField:'zhymch',multiple:true,panelHeight:'auto'" >
2、赋值
(1)单选赋值setValue
$('#Id').combobox('setValue','key')
(2)多选赋值setValues
多选key值是一个数组,$('#Id').combobox('setValues','key1,key2,key3'.split(','))
(3) 取值
$('#Id').combobox('getValues')


 6219
6219

 被折叠的 条评论
为什么被折叠?
被折叠的 条评论
为什么被折叠?
 到【灌水乐园】发言


