


http://gabriel-tips.blogspot.com/2011/10/uitableview-display-and-hide-cells-as.html
When creating iOS applications, the need to pick a value from a list while displaying an UITableView comes up quite often. One obvious solution to that matter, and the hard one in most cases, is to load another UIView which may contain an UIPickerView or an UITableView that will list the values you need, let the user pick the value and then get back into your table and set the picked (by the user) value.
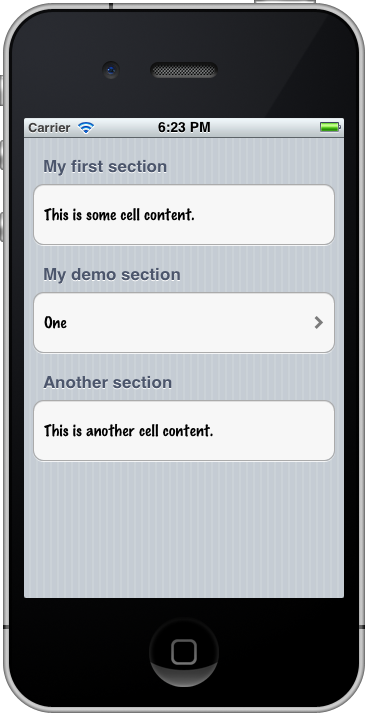
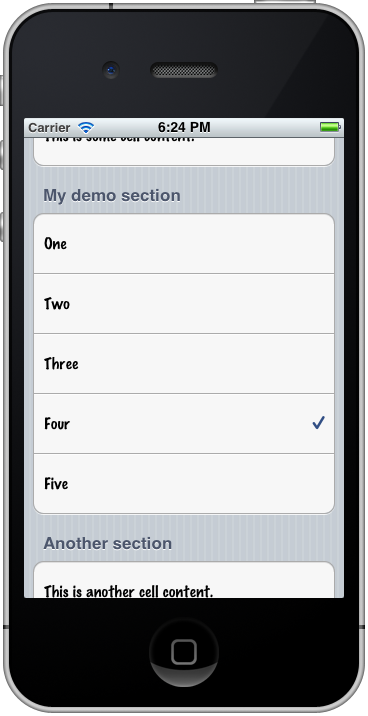
Another solution, more attractive and probably easier for the user is to display the list you need inside the UITableView that's been shown. Perhaps that approach sounds more difficult, but once you try it you'll find out yourself how fast, easy and beautiful solution is. Because an image equals to a thousand words, the following image might give an idea of what I mean:

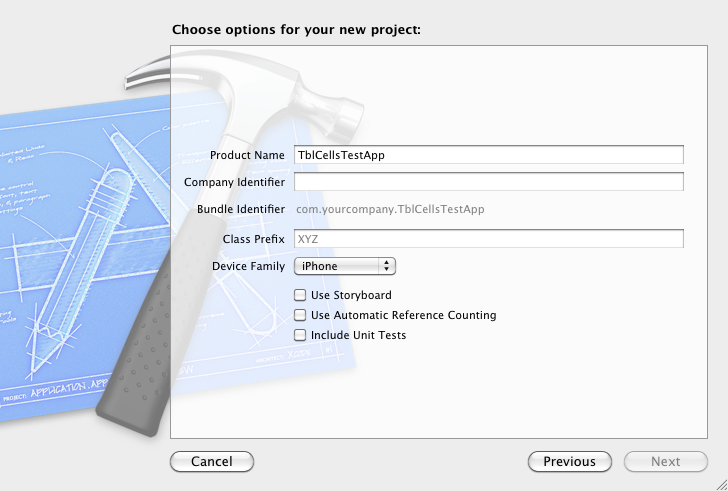
Implementing a drop down list inside an UITableView is not hard and it complies with the way that an UITableView works. For this example we'll create a new project, named TblCellsTestApp (you can name it anything you like, I' ll give it that name). Note that I use XCode 4.2 (which I'd suggest you use it as well, if you don't already do), so if you use an older version of the XCode you may notice some differences in the interface and in the view controller names.
Begin a single view application and make sure while creating the project NOT to check the three options at the bottom of the window:
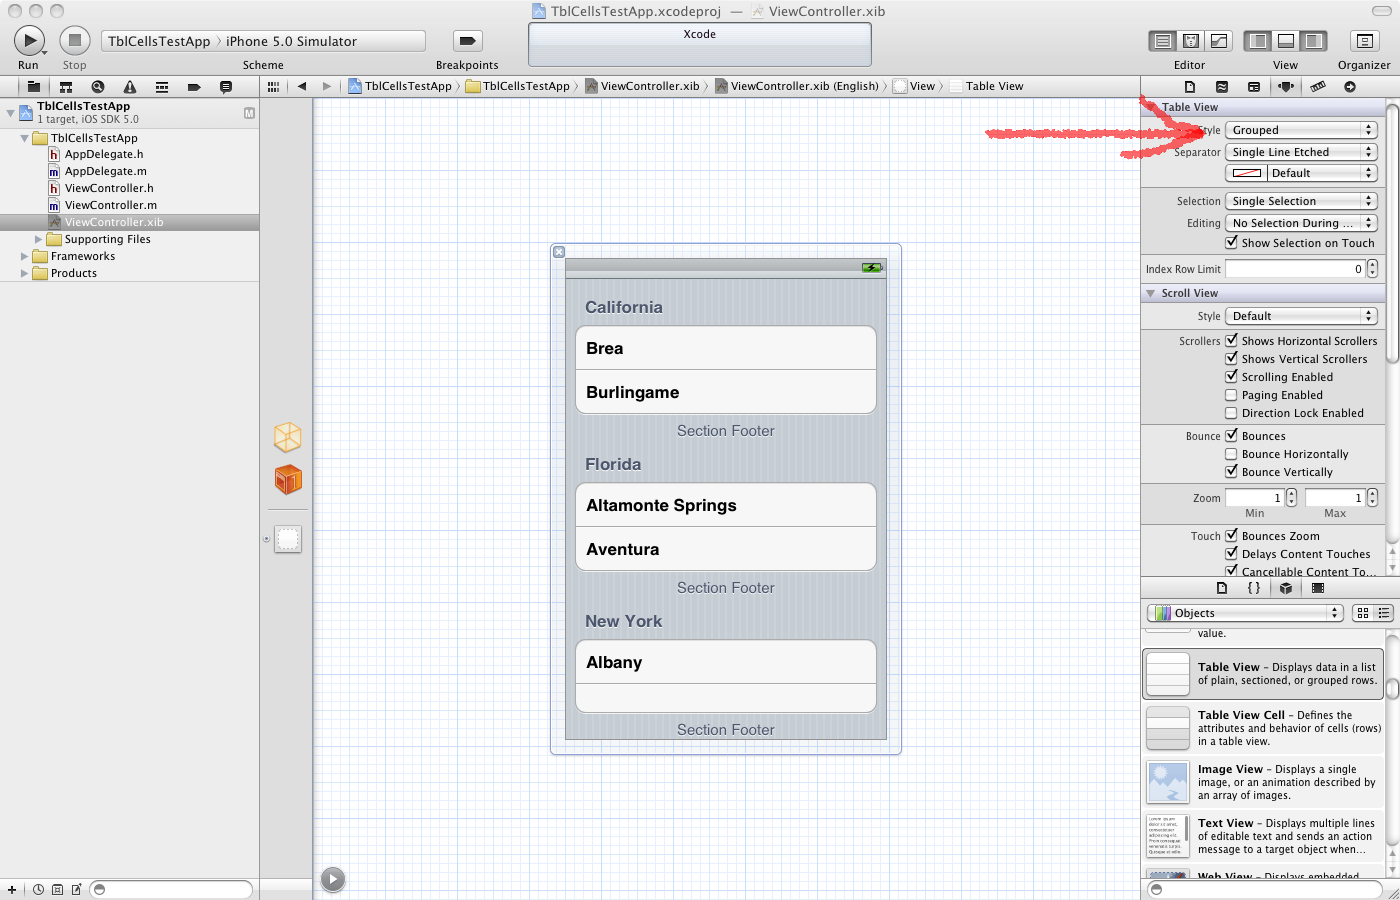
When your project is ready, go to design the view in the one and only XIB file in the Interface Builder. Add an UITableView to the view and for the purposes of this example set its style to "Grouped":
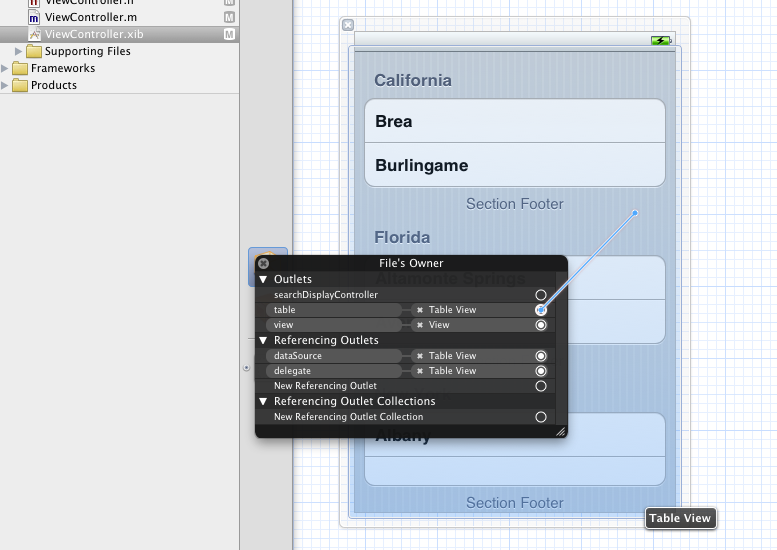
Also, don't forget to make the table delegate and datasource connections:

Before we go any further, let's discuss for a moment what the idea is. To make it more clear we'll base the explanation on this example.
In this project, we're going to have three sections in our UITableView. The first and the third section will just exist in there, we don't care about them and we'll use them just to make our table view more rich. So, we are going to give in both of these sections just one row, with a single, standard text inside them.
What we care about is the second section. While being in normal state, which means that no picking item from a list is needed, we're going to display only one row, containing the selected value by the user, or the pre-selected value by the view when it loads.
On the other hand, while being in picking item state, the number of rows for the specific section that will be displayed will match the number of our data, which will reside into a NSMutableArray array.
The transition between the two states will be taking place as simply as possible. By tapping on the single row, the section will animate an expand and all the values of our array will be shown, one in each row. By tapping again on any value, the list of the rows will collapse and the picked value will show up in the single row.
We're going to know what our state is at any time, simply by using a Boolean variable, or in other words a flag. Inside our project that flag will take the name "isShowingList". When that flag is True (YES), then all of our demo values/items are being displayed in our section, one in each row. When that flag is False (NO), then the list is not shown and we're in normal mode.
Let's begin with the implementation.
Go to the view controller's header file (.h) and make it look like the next one:
#import <UIKit/UIKit.h>
@interface ViewController :
UIViewController{
UITableView *table;
NSString *dataForSection0;
NSString *dataForSection2;
NSMutableArray *demoData;
int selectedValueIndex;
bool isShowingList;
}
@property
(retain
, nonatomic
) IBOutlet
UITableView
*table;
@property (
retain,
nonatomic)
NSString *dataForSection0;
@property (
retain,
nonatomic)
NSString *dataForSection2;
@property
(retain
, nonatomic
)
NSMutableArray
*demoData;
@property (
nonatomic)
int selectedValueIndex;
@property
(nonatomic
) bool
isShowingList;
@end
The objects we declared are:
- table: the UITableView we'll use.
- dataForSection0: The string value that will be displayed into the row of the first section.
- dataForSection2: The string value that will be displayed into the row of the third section.
- demoData: An array that will keep the values/items we need to display or to pick from.
- selectedValueIndex: An integer value that will show at any time the index of the selected value inside the demoData array.
- isShowingList: Already mentioned about it. Our state indicator.
Next, go to the .m file and synthesize those objects:
#import "ViewController.h"
@implementation ViewController
@synthesize
table;
@synthesize dataForSection0;
@synthesize dataForSection2;
@synthesize
demoData;
@synthesize selectedValueIndex;
@synthesize isShowingList;
If you don't want to forget to release the objects, do it now:
- (
void)viewDidUnload
{
[
self
setTable:
nil];
[
self
setDataForSection0
:
nil
];
[
self
setDataForSection2
:
nil
];
[
self
setDemoData
:
nil
];
[
super
viewDidUnload
];
// Release any retained subviews of the main view.
// e.g. self.myOutlet = nil;
}
- (
void)dealloc {
[
table
release];
[dataForSection0
release
];
[dataForSection2
release
];
[
demoData
release];
[
super
dealloc];
}
Now, that's a good point to go to the Interface Builder and connect the table object with the UITableView we added at the beggining:
Keep coding now. Inside the .m file, in the viewDidLoad method add the following (the comments are quite explanatory):
- (
void)viewDidLoad
{
[
super
viewDidLoad
];
// Do any additional setup after loading the view, typically from a nib.
// For the beginning, let's give some values to the strings we declared.
// Those values will be displayed in the first and the third sections.
dataForSection0
= @"This is some cell content."
;
dataForSection2
= @"This is another cell content."
;
// Let's preprare our actual test data.
demoData = [[
NSMutableArray
alloc]
init];
// We'll give five values, from one to five.
[
demoData
addObject:
@"One"];
[
demoData
addObject:
@"Two"];
[
demoData
addObject:
@"Three"];
[
demoData
addObject:
@"Four"];
[
demoData
addObject:
@"Five"];
// Initially, the isShowingList value will be set to NO.
// We don't want the list to be dislplayed when the view loads.
isShowingList
=
NO
;
// By default, when the view loads, the first value of the five we created
// above will be set as selected.
// We'll do that by pointing to the first index of the array.
// Don't forget that for the five items of the array, the indexes are from
// zero to four (0 - 4).
selectedValueIndex
=
0
;
}
Add some standard UITableView methods:
// Customize the number of sections in the table view.
- (
NSInteger)numberOfSectionsInTableView:(
UITableView *)tableView {
// We are going to have only three sections in this example.
return
3;
}
// Customize the number of rows in the table view.
- (
NSInteger)tableView:(
UITableView *)tableView numberOfRowsInSection:(
NSInteger)section{
// The number of the rows is depending on the section index.
// The sections with indexes 0 and 2 will have only one row.
if (section ==
0 || section ==
2) {
return
1;
}
else{
// For the number of rows of the section with index 1 (our test section) there
// are two cases.
//
// First case: If the isShowingList variable is set to NO, then no list
// with values should be displayed (the values of the demoData array) and
// it should exist only one row.
//
// Second case: If the isShowingList variable is set to YES, then the
// demoData array values should be displayed as a list and the returned
// number of rows should match the number of the items in the array.
if (!
isShowingList) {
return
1;
}
else{
return [
demoData
count];
}
}
}
How about adding some header titles in our sections?
// Add header titles in sections.
- (
NSString *)tableView:(
UITableView *)tableView titleForHeaderInSection:(
NSInteger)section{
if (section ==
0) {
return
@"My first section"
;
}
else
if (section ==
1){
return
@"My demo section"
;
}
else{
return
@"Another section"
;
}
}
Let's specify the height of our rows:
// Set the row height.
- (
CGFloat)tableView:(
UITableView *)tableView heightForRowAtIndexPath:(
NSIndexPath *)indexPath{
return
60.0
;
}
Let's go now to something really important. What the cells are going to display:
// Customize the appearance of table view cells.
- (
UITableViewCell *)tableView:(
UITableView *)tableView cellForRowAtIndexPath:(
NSIndexPath *)indexPath {
static
NSString *CellIdentifier =
@"Cell";
UITableViewCell *cell = [tableView
dequeueReusableCellWithIdentifier: CellIdentifier];
if (cell ==
nil) {
cell = [[[
UITableViewCell
alloc
] initWithStyle
:UITableViewCellStyleDefault
reuseIdentifier
:CellIdentifier]autorelease
];
}
// Configure the cell.
cell.
selectionStyle
= UITableViewCellSelectionStyleBlue
;
cell.
accessoryType
= UITableViewCellAccessoryNone
;
// Let's set another font for the cells.
[[cell textLabel
] setFont
:[
UIFont
fontWithName
:
@"Marker Felt"
size
:
16.0
]];
// Depending on the section, the appropriate data will be displayed.
// For the demo section especially, the data display requires a different
// handling.
if ([indexPath
section] ==
0) {
// We'll set the dataForSection0 string value to the cell of that section.
[[cell
textLabel]
setText:
dataForSection0];
}
else
if ([indexPath
section] ==
2){
// We'll set the dataForSection2 string value to the cell of that section.
[[cell
textLabel]
setText:
dataForSection2];
}
else{
// Depending on the isShowingList variable value, we'll display either
// the selected value of the demoData array only, or the whole array's
// contents.
// Remember that if the isShowingList is set to NO, then only a single row
// is displayed, containing the selected value.
// If the isShowingList is set to YES, then a list of values is displayed
// and all the items of the demoData array should be used.
if (!
isShowingList) {
// Not a list in this case.
// We'll only display the item of the demoData array of which array
// index matches the selectedValueList.
[[cell textLabel
] setText
:[
demoData
objectAtIndex
:
selectedValueIndex
]];
// We'll also display the disclosure indicator to prompt user to
// tap on that cell.
cell.
accessoryType
= UITableViewCellAccessoryDisclosureIndicator
;
}
else{
// Listing the array items.
[[cell
textLabel]
setText:[
demoData
objectAtIndex:[indexPath
row]]];
// We'll display the checkmark next to the already selected value.
// That means that we'll apply the checkmark only to the cell
// where the [indexPath row] value is equal to selectedValueIndex value.
if ([indexPath
row] ==
selectedValueIndex) {
cell.
accessoryType
= UITableViewCellAccessoryCheckmark
;
}
else{
cell.
accessoryType
= UITableViewCellAccessoryNone
;
}
}
}
return cell;
}
Of course, we should't forget what is going to happen when the user taps on a table cell:
- (
void)tableView:(
UITableView *)tableView didSelectRowAtIndexPath:(
NSIndexPath *)indexPath{
// We don't care about taps on the cells of the section 0 or section 2.
// We want to handle only the taps on our demo section.
if ([indexPath
section] ==
1) {
// The job we have to do here is pretty easy.
// 1. If the isShowingList variable is set to YES, then we save the
// index of the row that the user tapped on (save it to the selectedValueIndex variable),
// 2. Change the value of the isShowingList variable.
// 3. Reload not the whole table but only the section we're working on.
//
// Note that only that last two steps are necessary when the isShowingList
// variable is set to NO.
// Step 1.
if (
isShowingList) {
selectedValueIndex = [indexPath
row];
}
// Step 2.
isShowingList
= !isShowingList
;
// Step 3. Here I chose to use the fade animation, but you can freely
// try all of the provided animation styles and select the one it suits
// you the best.
[
table
reloadSections
:[
NSIndexSet
indexSetWithIndex
:
1
] withRowAnimation
:UITableViewRowAnimationFade
];
}
else{
return;
}
}
Ready to go! Our test app is ready to run now! Test it and see the results.


That's all! I hope that post will help you and you find it really useful.
Happy coding hours!


 418
418


 被折叠的 条评论
为什么被折叠?
被折叠的 条评论
为什么被折叠?
 到【灌水乐园】发言


