


文章目录
React的介绍
- 文件的下载地址链接:
https://pan.baidu.com/s/1QGmnr3DKNkIjqS-MHhNbuw提取码:h20e - 使用时需要引入
react核心库文件及操作DOM,视图相关的操作文件(需要依赖核心文件) - 文件的解释:
- react核心库文件:
react.development.js - 操作DOM,视图相关的操作文件。需要依赖核心文件:
react-dom.development.js - 可以将ES6–》ES5,让浏览器所识别
babel.min.js
- react核心库文件:
- React代码展示
<!DOCTYPE html>
<html lang="en">
<head>
    <meta charset="UTF-8">
    <title>Title</title>
<!--    react核心库文件。-->
    <script src="lib/react.development.js"></script>
<!--    操作DOM,视图相关的操作文件。需要依赖核心文件-->
    <script src="lib/react-dom.development.js"></script>
</head>
<body>
    <div id="root"></div>
</body>
<script>
    // 将指定的内容(第一个参数)呈现到指定的位置(第二个参数DOM元素)。挂载的元素不能够是body,html
    // 如果多个render所挂载的元素相同,最后一次会把之前的覆盖掉
    ReactDOM.render("从今天开始进入到react的学习",document.querySelector("#root"));
</script>
</html>
- 使用的步骤:
1、引入依赖
<!--    react核心库文件。-->
    <script src="lib/react.development.js"></script>
<!--    操作DOM,视图相关的操作文件。需要依赖核心文件-->
    <script src="lib/react-dom.development.js"></script>
2、划定应用范围
    <div id="root">
    </div>
React的注释
{
        // 单选注释
    }
    {/*多行注释*/}
    {/
    *多行注释
    */}
jsx介绍及解析的方式
- jsx是对js的一个扩展,解析jsx需要引入babel.min.js文件
- 解析用
{ }可以输出、可以执行JS、对属性进行绑定。
<!DOCTYPE html>
<html lang="en">
<head>
    <meta charset="UTF-8">
    <title>Title</title>
    <!--    react核心库文件。-->
    <script src="lib/react.development.js"></script>
    <!--    操作DOM,视图相关的操作文件。需要依赖核心文件-->
    <script src="lib/react-dom.development.js"></script>
    <!--    可以将ES6--》ES5,让浏览器所识别 -->
    <script src="lib/babel.min.js"></script> //注意:一定要引入这个文件
     <style>
        .bg{ background:red; }
    </style>
</head>
<body>
<div id="root"></div>
</body>
script写在这里
</html>
- 1.标签的解析
<script type="text/babel">
    // 将指定的内容(第一个参数)呈现到指定的位置(第二个参数DOM元素)。挂载的元素不能够是body,html
    // 如果多个render所挂载的元素相同,最后一次会把之前的覆盖掉。
    ReactDOM.render(<h1>12345</h1>,document.querySelector("#root"));//
</script>
- 2.元素变量:变量存储的信息是一个元素,称该变量为元素变量
<script type="text/babel">
    // 元素变量:变量存储的信息是一个元素,称该变量为元素变量
    const my = <h2>你好,我是一个元素变量。</h2>;
    ReactDOM.render(my,document.querySelector("#root"));
</script>
- 3.外部引入
<script src="lib/react-my.js" type="text/babel"></script>//引入的外部文件
<script type="text/babel">
    ReactDOM.render(my,document.querySelector("#root"));
</script>
- 4.有且只能有一个根元素,如果要多个,在外部加div就可以
<script type="text/babel">
    ReactDOM.render(<div><div>123123123</div><div>23123123123123</div></div>,
    document.querySelector("#root"));
</script>
- 5.解析的方式:如果换行,建议在ReactDOM.render()里增加()
<script type="text/babel">
 const str = "你好,世界!"
    ReactDOM.render((
        <div>
            可以直接加一个括号:{str}
        </div>
    ),document.querySelector("#root"));
- 6.className:指定样式名,起class名字的时候用className
const bg = 'one';
   <div className='bg'></div>    //解析的是className名
   <div className={'bg'}></div>  //解析的是className名
   <div className={bg}></div>  //解析的是变量
   元素.className = xxx
- 7.元素.style.background=""
<script type="text/babel">
	//解析需要套{{}}双层嵌套
    ReactDOM.render((
        <div>
            <div style={
        	    {
           		     width:"200px",
              		  height:"200px",
               		 background:"red"
           		 }
            }>one</div>
        </div>
    ),document.querySelector("#root"));
</script>
- 8.事件:事件要使用驼峰命名法
<script type="text/babel">
    function fn(){
        console.log(111111111111);
    }
    function fn2(){
        return function () {
            console.log(222222222)
        }
    }
    ReactDOM.render((
      <div>
         <input type="button" value="你过来点我呀" onClick={fn}/>
         <input type="button" value="你过来点我呀2" onClick={fn2()}/>
         <input type="button" value="你过来点我呀3" onClick={()=>{console.log(333333333); }}/>
    </div>
    ),document.querySelector("#root"));
</script>
- 解析数组:可以直接展开数组
- 1.如果数组的元素值是一个DOM,那么有且只能是一个根元素。
- 2.需要指定KEY
<script type="text/babel">
    // 可以直接展开数组
    const arr =[1,2,3,4,5,6];
    const arr2 = [<h1>1</h1>,<h2>2</h2>,<h3>3</h3>,<h4>4</h4>,<h5>5</h5>];
    ReactDOM.render((
        <div>{arr}
            {arr2}
        </div>
    ),document.querySelector("#root"));
</script>
React状态组件的分类
无状态组件(函数组件)
在VScode中安装插件后的无状态组件快捷方式是:rfc
- 在解析JSX时,遇到首字母小写的标签时,会作为一个普通标签,
- 如果能到首字母大写的标签,则被认为是一个自定义的组件。
- 定义组件时,首字母要大写
- 函数的名字即是组件的名字,返回的内容即是组件的内容。
- 组件返回值有且只能是一个根元素
- 组件与组件之间可以进行嵌套使用
<script type="text/babel">
    function My(){
        return (
            <div>
                大家好,我是一个名字叫My的组件
            </div>
        )
    }
    ReactDOM.render(
        <div>
            <My></My>
            <My></My>
        </div>
    ),document.querySelector("#root"));
</script>
</html>
组件传值
- 组件的第一个参数即是接收的内容。接收的值不允许修改
<script type="text/babel">
    // 组件的第一个参数即是接收的内容。接收的值不允许修改
    function My(props){
        console.log(props);
        return (
            <div>my,我的名字叫{props.userName},今年{props.num}岁了
                <input type="button" value={props.num} onClick={()=>props.num+=1}/>
            </div>
        )
    }
    // 通过属性向下传
    ReactDOM.render((
        <div>
            {/*向下传递了一个userName,一个num*/}
            <My userName="laoli" num="1"></My>
        </div>
    ),document.querySelector("#root"));
</script>
状态组件(类组件)
在VScode中安装插件后状态组件的快捷方式是:rcc
在VScode中安装插件后 constructo的快捷方式是:conc
<script type="text/babel">
// class的名字即是组件名。组件的名字要求大写。
 class My extends React.Component{
// constructor内的是实例对象,当你不在实例中增加属性,或没有逻辑时,constructor是可以省略不写的。
            constructor(){
                super();// 调用 父级的构造器。
                this.state = {
                    userName:"wang"
                    // 声明状态。
                }
                this.setState({
                    userName:"zhang"
                })
            }
            render(){
               return (
                    <div></div>
               )
            }
        }
状态组件之state
- 通过 this.setState更改你的数据状态,render才会被重新执行。
		1、如何使用: this.state.xxxx
        2、如何定义
            constructor(props){
                super(props);
                this.state = {
                }// 定义状态
            }
        3、修改
            this.setState({
                userName:this.state.userName+"123"
            })
状态组件与无状态组件区别
无状态组件是通过函数定义的。状态组件是通过class来定义的。
- 相同点:
- 首字母都要大写
- 都要有返回内容,返回的内容有且只能是一个根元素。return false;return null
- 不同点
- 状态组件是通过class来定义。它拥有state属性。生命周期。当你的状态通过this.setState进行重置时,它会重新执行render方法。
- 非状态组件是通过函数来定义。它没有state属性。
- 场景
- 非状态组件:只是做一些数据方法的渲染。里面的数据不会发生变化时。
- 状态组件:逻辑比较复杂。拥有自身的状态。可以使用状态组件。
事件的绑定
bind绑定
- 直接.bind绑定。(用的最多)
- 当绑定的函数不多时,使用。
- 优点:可以传递参数。
- 缺点:每次使用时要加上bind.如果该函数在组件内使用的频率比较高不建议这样使用
<input type={"button"} onClick={this.changeNum.bind(this,2)} value={this.state.num} />
箭头函数
- 直接使用箭头函数
- 当你的逻辑比较简单,且没有重复使用时,可以使用箭头函数。
- 优点:可以直接用。
- 缺点:如果指定的函数逻辑比较复杂,代码量比较多。另外在多个地方都要使用该代码时。
<input type={"button"}
   onClick={()=>{
        this.setState({
            num:this.state.num+3
        })
    }} value={this.state.num} />
constructor中绑定(最好)
- 当你不需要传递参数时,且多次使用该方法的时候可以使用这种方式。
- 优点:一次定义多次使用
- 缺点:无法直接传参。
this.changeNum = this.changeNum.bind(this);
直接将函数定义为箭头函数。
- 如果需要传递参数不要使用该方法。
- 优点:不需要bind.
- 缺点:无法直接传递参数
 changeNum=()=>{
             this.setState({
                 num:this.state.num+1
             })
         }
受控组件
- 受state的控制。当你的表单元素与state结合使用时,那么意味着表单元素的值只会在你状态发生变时化而变化。
- 需要与 onChange事件结合使用。可以通过 onChange获得你修改的内容,然后将你要修改的内容在该方法当中对state进行更新。
非受控组件ref
ref配合defaultValue使用
- 1.defaultValue可以设置初始值
- 2.可以获得input的value值
- 3.修改input的value值
<script type="text/babel">
    class My extends React.Component{
        constructor(props) {
            super(props);
            this.state = {
                userName:"余金浪"
            }
        }
        render(){
         // 1、defaultValue可以设置初始值  // 2、可以获得input的value值// 3、修改input的value值
            return (
                <div>
                   <input type={"text"} ref={"userName"} defaultValue={this.state.userName}/>
                    <input type={"button"} onClick={()=>{
                        console.log(this.refs.userName.value)
                    }}/>
                </div>
            )
        }
    }
    ReactDOM.render(<My/>,document.querySelector("#root"));
</script>
ref绑定多个元素
- 如果ref的值相同,则绑定的是最后一次的组件。
<script type="text/babel">
    // 如果ref的值相同,则绑定的是最后一次的组件。
    class My extends React.Component{
        render(){
            return (
                <div>
                    <div ref={"one"}>one2</div>
                    <div ref={"one"}>one1</div>

                    <input type={"button"}  onClick={()=>{
                        console.log(this.refs.one.innerHTML)
                    }} value={"点我"}/>
                </div>
            )
        }
    }
    ReactDOM.render(<My/>,document.querySelector("#root"));
</script>
ref与map结合使用
- 如果ref与map结合使用,则绑定的是最后一次的组件。
<script type="text/babel">
    class My extends React.Component{
        constructor(props) {
            super(props);
            this.arr = [1,2,3,4]
        }

        render(){
            return (
                <div>
                    {
                        this.arr.map(v=>(
                            <div ref={"one"} key={v}>{v}</div>
                        ))
                    }

                    <input type={"button"}  onClick={()=>{
                        console.log(this.refs.one.innerHTML)
                    }} value={"点我"}/>
                </div>
            )
        }
    }
    ReactDOM.render(<My/>,document.querySelector("#root"));
</script>
ref与组件结合使用
- ref与组件结合使用,那么得到的即是该组件实例
<script type="text/babel">
    // ref与组件结合使用,那么得到的即是该组件实例 。
    class One extends React.Component{
        constructor(props) {
            super(props);
            this.a = 1;
            this.b = 2;
        }
        run(_this){
            console.log("runrunrun",_this === this);// true
        }
        render(){
            return (
                <div>one</div>
            )
        }
    }
    class My extends React.Component{
        constructor(props) {
            super(props);
        }
        render(){
            return (
                <div>
                    <One ref={"one"}></One>
                    <input type={"button"}  onClick={()=>{
                        this.refs.one.run(this.refs.one);
                    }} value={"点我"}/>
                </div>
            )
        }
    }
    ReactDOM.render(<My/>,document.querySelector("#root"));
</script>
ref 箭头函数
- ref的值可以是两种类型:1、字符串 2、函数
<script type="text/babel">
    // ref的值可以是两种类型:1、字符串 2、函数
    class My extends React.Component{
        constructor() {
            super();
            this.userName = "";
        }
        render(){
            return (
                <div>
                    <input type={"text"} ref={el=>this.userName=el}/>
                    <input type={"button"} value={"点我"} onClick={()=>{
                        console.log(this.userName.value)
                    }}/>
                </div>
            )
        }
    }
    ReactDOM.render(<My/>,document.querySelector("#root"));
</script>
生命周期(只要状态组件有)
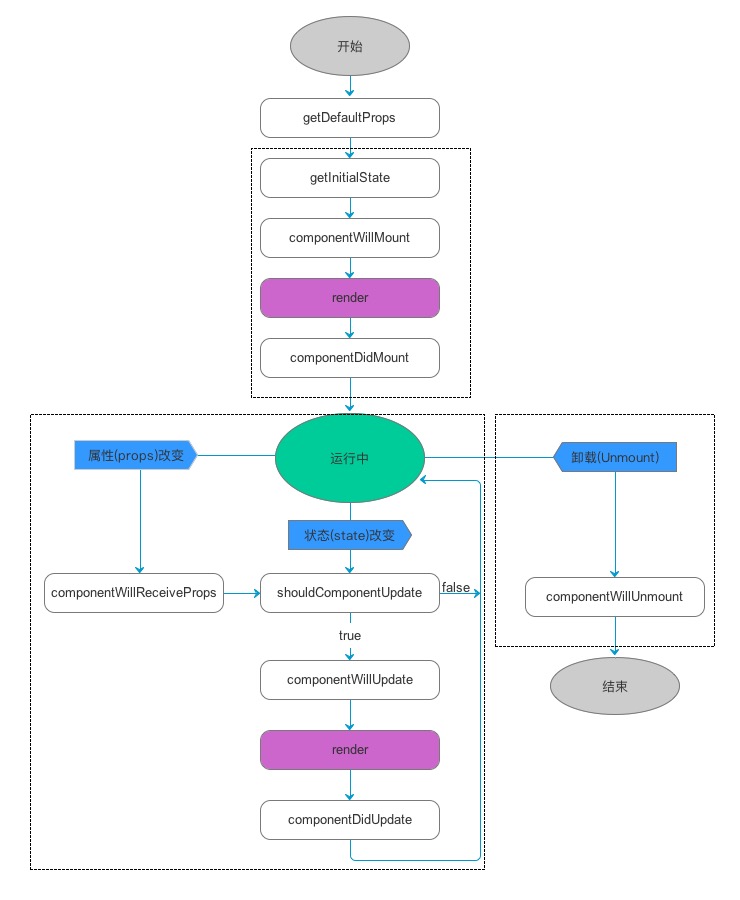
- react从创建到销毁的过程称为生命周期。
- 在该过程当中所暴露(自动运行)出来的函数称为钩子函数。
- 在vscode中声明周期的快捷创建方式
rfcc
生命周期分为三个阶段
挂载阶段(mounting):在生命当中只会运行一次
- 1.constructor 构造器
- 2.componentWillMount 视图挂载之前
- 3.render 挂载
- 4.componentDidMount 视图挂载之后
<script type="text/babel">
    class My extends React.Component{
        constructor() {
            super();
            this.state = {
                num:1
            }
            console.log("1、constructor")
        }
        run(){
            console.log("奔跑吧")
        }
        // 组件内容挂载之前
        componentWillMount(){
            console.log("2、componentWillMount")
            // console.log(this.refs.lala.innerHTML);
            // console.log(this.state.num);
            // console.log(this.run);
        }
        render(){
            console.log("3、render");
            return (
                <div>
                    <div ref={"lala"}>我是在ref为lala的标签内</div>
                    我是一个My组件。
                </div>
            )
        }
        componentDidMount(){
            console.log("4、componentDidMount")
            console.log(this.refs.lala.innerHTML);
        }
    }
    ReactDOM.render(<My/>,document.querySelector("#root"));
</script>
更新阶段(updating):
- 1.props
- 1 componentWillReceiveProps:接收属性
- 2 shouldComponentUpdate
- 3 componentWillUpdate
- 4 render
- 5 componentDidUpdate
<script type="text/babel">
    class One extends React.Component{
        render(){
            console.log("4、render")
            return (
                <div>One{this.props.num}</div>
            )
        }
        // 当你的属性发生改变时会执行。this.props当中的数据并未更新
        // nextProps:属性最新的值。
        componentWillReceiveProps(nextProps){
            console.log("1、componentWillReceiveProps",this.props.num,nextProps.num);
        }
        // 判断是否继续更新。更新视图
        shouldComponentUpdate(nextProps){
            console.log("2、shouldComponentUpdate",this.props.num,nextProps.num);
            if(nextProps.num > 5)
                return false;
            else
                return true;
        }
        // nextProps:要更改的值
        componentWillUpdate(nextProps){// 1,2
            console.log("3、componentWillUpdate",this.props.num,nextProps.num)
        }
        // preProps:更改之前的值
        componentDidUpdate(preProps){// 2,1
            console.log("5、componentDidUpdate",this.props.num,preProps.num)
        }

    }
    class My extends React.Component{
        constructor(props) {
            super(props);
            this.state = {
                num:1
            }
        }

        render(){
            return (
                <div>My
                    <input type={"button"} value={"更改num"} onClick={
                    						()=>this.setState({num:this.state.num+1})}/>
                    <One num={this.state.num}></One>
                </div>
            )
        }
    }
    ReactDOM.render(<My/>,document.querySelector("#root"));
</script>
- 2.state
- 1 shouldComponentUpdate
- 2 componentWillUpdate
- 3 render
- 4 componentDidUpdate
<script type="text/babel">
    class My extends React.Component{
        constructor(props) {
            super(props);
            this.state = {
                num:1
            }
        }
        changeNum(){
            this.setState({
                num:++this.state.num
            },function () {
                // 当数据更新完毕之后会执行
                // console.log(this.state.num);
            })
            // this.state.num++;//2
            // console.log(11111,this.state.num);//2
        }
        render(){
            console.log("3、render")
            return (
                <div>My
                    <input type={"button"}
                           value={this.state.num}
                           onClick={this.changeNum.bind(this)}/>
                </div>
            )
        }
        // 视图
        shouldComponentUpdate(nextProps,nextState){
            console.log("1、shouldComponentUpdate",this.state.num,nextState.num)//2 2
            return true;
        }
        componentWillUpdate(nextProps,nextState){
            console.log("2、componentWillUpdate",this.state.num,nextState.num)
        }
        componentDidUpdate(preProps,preState){
            console.log("4、componentDidUpdate",this.state.num,preState.num)
        }
    }
    ReactDOM.render(<My/>,document.querySelector("#root"));
</script>
销毁阶段(unmounting):
- componentWillUnmount
<script type="text/babel">
    class One extends React.Component{
        constructor() {
            super();
            this.timer = null;// 计时器
            // 数据是否会影响视图。
            this.state = {
                num:1
            }
        }
        render(){
            return (
                <div>One{this.state.num}</div>
            )
        }
        componentWillMount(){
            console.log("componentWillMount");
        }
        componentDidMount(){
            this.timer = setInterval(()=>{
                console.log(this.state.num);
                this.setState({
                    num:++this.state.num
                })
            },1000)
            console.log("componentDidMount");
        }
        componentWillUnmount(){
            clearInterval(this.timer);
            console.log("componentWillUnmount");
        }
    }
    class My extends React.Component{
        constructor() {
            super();
            this.state = {
                isShow:true
            }
        }
        render(){
            return (
                <div>my
                    <input type={"button"} onClick={()=>this.setState({
                              isShow:!this.state.isShow})} value={"显示与隐藏"}/>
                    {
                        this.state.isShow?<One/>:null
                    }
                </div>
            )
        }
    }
    ReactDOM.render(<My/>,document.querySelector("#root"));
</script>
react-cli:脚手架。
- 通过该脚手架快速搭建react项目。
脚手架的安装方式(两种)
- 第一种:
1、全局安装
cnpm install create-react-app -g
2、查看版本号:
    create-react-app -V
3、创建项目
create-react-app 项目的名字
- 第二种:(推荐使用)
- npx:是npm5.2之后增加的一个功能,npx可以避免全局安装。
- 先会查看npm path 是否安装过。如果安装过,直接使用。如果未安装,它才会帮你安装。
1、创建项目
npx create-react-app xxxxx
2、运行项目:
    cnpm run start
    cnpm start
脚手架中的项目结构
- 如果创建项目慢,就切换下载源
- public:指定的运行页面,就是运行的资源。index.js运行的页面。
- src:开发环境: index.js:是入口文件,APP.js定义一个组件
路由(React)
- 路由:根据访问的地址,来判断所要使用的组件. 根据你访问的地址,来决定渲染的内容。
- 掌握1.如何配置路由
- 掌握2.如何对路由进行传参
- 掌握3.如何接收路由的参数
- 掌握4.如何进行跳转的跳转
单页面
- SPA. 不管你的地址是什么,均访问同一个页面。
如何配置路由
路由是不区分大小写
如果使用路由需要将其嵌套在路由器中
- 1.下载路由模块:记住是在项目下进行,
cnpm install react-router-dom -S - 2.引入: 在src下App.js中引入,
import { BrowserRouter } from "react-router-dom" - 3.引入中{ } 里面的具体配置
- 1.BrowserRouter :路由器
- 2.HashRouter :路由器,有一个#号的区别
- 3.BrowserRouter as Router,// 相当vue mode:history /就是BrowserRouter重新命名Router
- 4.Route,// 路由
- 5.NavLink,// 导航链接
- 6.Link,// 只是跳转
- 7.Switch//自上向下寻找符合要求的路由
- 8.Redirect:重定向
路由中组件的解释
如果使用路由需要将其嵌套在路由器中
-
1.路由器
- BrowserRouter(history)
- HashRouter(hash)
- BrowserRouter as Router,//就是BrowserRouter重新命名Router
-
1-1:路由器属性
- 1.basename:给路由地址统一增加前缀。
- 2.forceRefresh:强制刷新。每切换一个路由,会重新去服务器抓取数据。
<Router basename={"m"} forceRefresh={true}></Router>
-
2.Route组件:
- 1.path:指定地址。当访问的地址与该属性相匹配时,则会使用该路由
- 2.component:指定组件
- 3.exact:是否与地址精确匹配。
- 4.路由及路由相关配置必须要放置在路由器内(必须要被路由器标签所包裹)
- 5.路由的path只要和具体访问的地址能够匹配,路由均会生效。
- 6.如果只是想让第一个起效果,可以使用 Switch将Route进行包裹。
1.需要进行路由的配置:BrowserRouter或HashRouter 和Route import { HashRouter as Router, Route} from 'react-router-dom' <Router> <Route path={"/"} exact ={true} component = {()=><div>大家好,我是首页</div>}></Route> <Route path={"/my"} component={()=><div>大家好,我是My</div>}></Route> </Router> -
3.Link链接
- 常用于列表链接。只有一个to属性。activaClassName exact没有该属性。
-
4.NavLink组件:实现路由的跳转
- 默认的选中样式active,如果想更改其它样式名,可以使用activeClassName属性
- 1.exact:是否精确匹配
- 2.to:指定要跳转的地址
- 3.activeClassName:指定选中样式
- 4.className:指定样式
1.需要进行路由的配置	import { HashRouter as Router, Route,NavLink} from 'react-router-dom'
	<Router>
		 	<nav>
                <NavLink to={"/"} exact>首页</NavLink> |
                <NavLink to={"/my"}>我的</NavLink> |
                <NavLink to={"/order"}>订单</NavLink> |
                <NavLink to={"/login"}>登录</NavLink>
            </nav>
            //这块可以写成一个组件
	 <Route path={"/"} exact={true} component={() => <div>大家好,我是首页</div>}></Route>
      <Route path={"/my"} component={() => <div>大家好,我是我的</div>}></Route>
      <Route path={"/order"} component={Order}></Route>
      <Route path={"/login"} component={LongIn}></Route>
	</Router>
<nav> <NavLink className={"App-link"} activeClassName={"App-active"} exact to={"/"}>首页</NavLink>| <NavLink className={"App-link"} activeClassName={"App-active"} to={"/my"}>我的</NavLink> </nav> -
5.Switch组件:是需要将Route进行包裹的。
- 自上向下寻找符合要求的路由。当找到第一个符合要求路由以后,不会再向下查找。
- 就是将嵌套在要结构的样式的外边,同时也必须是在路由下
<Switch> <Route path={"/"} exact component={()=><div>首页</div>}></Route> <Route path={"/my"} component={()=><div>我的</div>}></Route> <Route path={"/my"} component={()=><div>我的2</div>}></Route> <Route path={"*"} component={()=><div>404</div>}></Route> </Switch> -
6.Redirect:重定向
- from to:当地址为from时,会被重定向到path为to的路由
<Redirect to={"/my"} from={"/lala"}></Redirect>
- from to:当地址为from时,会被重定向到path为to的路由
-
7.
404的设置- 将path设置为
*:<Route path={"*"} component={Error}></Route> - 可以省略path:
<Route component={Error}></Route>
- 将path设置为
路由传值
to的写法(两种)
- 1.字符串:"/one"
- 2.对象:{pathname:’/one’}
传值的方式(3种)
- 非状态组件,没有办法接收信息
通过query形式进行传值
- 1.如何传值:
<NavLink className={"App-link"} activeClassName={"App-active"} to={{pathname:'/one',query:{a:1,b:2}}}>One </NavLink> - 2.如何接收:
this.props.location.querycomponentDidMount(){ const {a=0,b=0} = this.props.location.query || {}; console.log(a,b) // console.log(this.props.location.query.a,this.props.location.query.b) } - 3.特点:刷新数据会丢失。可以传递对象
state传值
- 1.如何传值:
<NavLink className={"App-link"} activeClassName={"App-active"} to={{ pathname:'/two', state:{c:3,d:{id:2,type:90}} }}>Two </NavLink> - 2.如何接收:
console.log(this.props.location.state); - 3.特点:刷新不会丢失。可以接收对象。*如果该地址重新打开数据会丢失。
params传值(推荐)
- 1.如何传值:
<NavLink className={"App-link"} activeClassName={"App-active"} to={{pathname:'/three/1/33'}}>Three </NavLink> - 2.如何接收:
console.log(this.props.match.params) - 3.特点:刷新数据不会丢失。不可以直接传对象。
普通组件如何获取路由信息(2种)
只有路由组件的实例当中的props属性才会有路由信息。console.log(this.props)
第一种获取路由信息的方式
- 向下传递:路由组件的props通过属性传给你的的普通组件:
<My {...this.props}></My>
第二种获取路由信息的方式
- withRouter:来自于react-router-dom.该高阶组件的作用就是给接收的组件增加路由属性。
- 使用方式代码
import {withRouter} from "react-router-dom" export default withRouter(My); 是一个方法。该方法会接收一个组件,然后给你返回一个新的组件。 高阶组件:该组件是一个函数,它接收一个组件,返回一个新的组件。 高阶组件作用:属性代理,反向继承 - 高阶组件代码演示
 class My extends React.Component{
    render(){
        return (
            <div></div>
        )
    }
}
function wrap(component){
    component.prototype.userName = 12;
    return component;
}
export default wrap(My);
React中的技巧
- 1.当某个状态使用频率较高时。
const {goodsList} = this.state; - 2.包裹标签
- 1.不可以增加属性
<></> - 2.Fragment:片段,可以增加属性
import React, {Component,Fragment} from 'react'; <Fragment></Fragment> <React.Fragment></React.Fragment> - 1.不可以增加属性
如何设置代理
- 1.在package.json当中增加:proxy:xxxxxxx
- 2.在src(开发环境当中)下新建一个setupProxy.js
- 3.、下载 http-proxy-middleware:
cnpm install http-proxy-middleware -S - 4.引入
const {createProxyMiddleware} = require("http-proxy-middleware");
拓展:通过JS来实现跳转
<input type="button" onClick={()=>{
                    this.props.history.go(-2);
                }} value={"返回"}/>

   <input onClick={()=>{
         this.props.history.push("/three/19-39.html")
     }} type="button" value={"跳转至three"}/>

     <input onClick={()=>{
         // this.props.history.push("/one")
         this.props.history.push({pathname:'/one',query:{a:4,b:10}})
     }} type="button" value={"跳转至one"}/>

     <input onClick={()=>{
         // this.props.history.push("/one")
         this.props.history.push({pathname:'/two',state:{id:40,type:100}})
     }} type="button" value={"跳转至two"}/>


 1万+
1万+


 被折叠的 条评论
为什么被折叠?
被折叠的 条评论
为什么被折叠?
 到【灌水乐园】发言


