


一. 简介
二. 准备工作
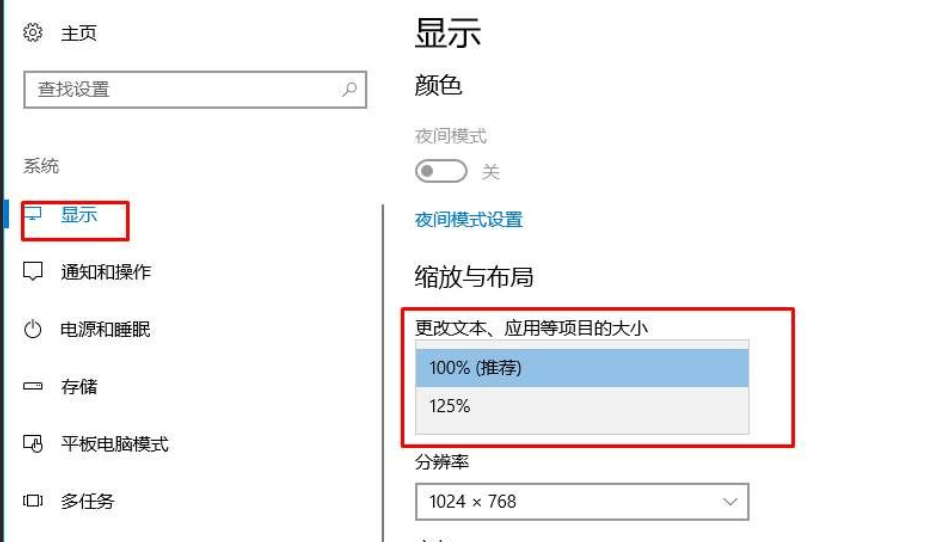
1 官网本地部署
Three.js的官网在国外, 访问速度比较慢, 而我们需要经常参考文档和示例
因此, 考虑将Three.js的官网部署到本地
1) 官网
Three.js – JavaScript 3D library
2) GitHub
GitHub - mrdoob/three.js: JavaScript 3D Library.
我们可以直接从GitHub上clone最新的dev分支, 部署在本地方便查看
3) 具体操作
通过git clone到本地
git clone https://github.com/mrdoob/three.js.git
安装依赖
npm install
运行
npm run start
2 搭建开发环境
1) 开发建议
在开发之前, 我有几点建议
- 一定使用代码自动补全!!!
由于three.js有众多的API, 名字长, 单词容易拼错, 基本上记不住
- 模块化开发
threejs的官方从150+版本后打算废弃直接引入的方式, 并在160版本移除
2) 初始化项目
创建一个目录three-basic, 执行
npm init -y
3) 安装three.js
npm install three@0.152
:::danger
⚠️ 特别注意
由于threejs的更新非常快, 这里默认安装会自动安装最新版的three.js, 不同的版本下API和目录结构可能不同
本教程(2023-05-10)使用的版本是最新版(v0.152.2)
为了保证一致性, 建议大家在安装时指定版本
:::
4) 使用vite
vite是开箱即用的下一代打包工具, 原生支持模块化开发
相比于webpack``Rollup Parcel更快, 更好用
将vite安装成开发时依赖, 使用vite启动开发服务
npm i vite -D
创建入口文件index.html, 在入口文件中引入
- 初始化样式
reset.css - 主入口文件
main.js
<!doctype html>
<html lang="en">
  <head>
    <meta charset="UTF-8" />
    <meta http-equiv="X-UA-Compatible" content="IE=edge" />
    <meta name="viewport" content="width=device-width, initial-scale=1.0" />
    <title>Document</title>
    <!-- 引入初始化样式 -->
    <link rel="stylesheet" href="./src/assets/styles/reset.css" />
  </head>
  <body>
    <!-- 使用模块化方式引入入口文件 -->
    <script src="./src/main.js" type="module"></script>
  </body>
</html>
* {
  margin: 0;
  padding: 0;
}

body {
  background-color: skyblue;
}
// 导入THREE
import * as THREE from "three";

// 创建一个场景
const scene = new THREE.Scene();
console.log(scene);
编辑package.json脚本
"scripts": {
  "dev": "vite"
},
启动开发服务
npm run dev
测试
三. 起步案例
接下来, 我们通过一个起步案例来快速体验threejs
示例效果
1 基础概念
在三维世界中, 有这样几个概念我们需要先理解
- 场景
- 相机
- 物体
- 光源
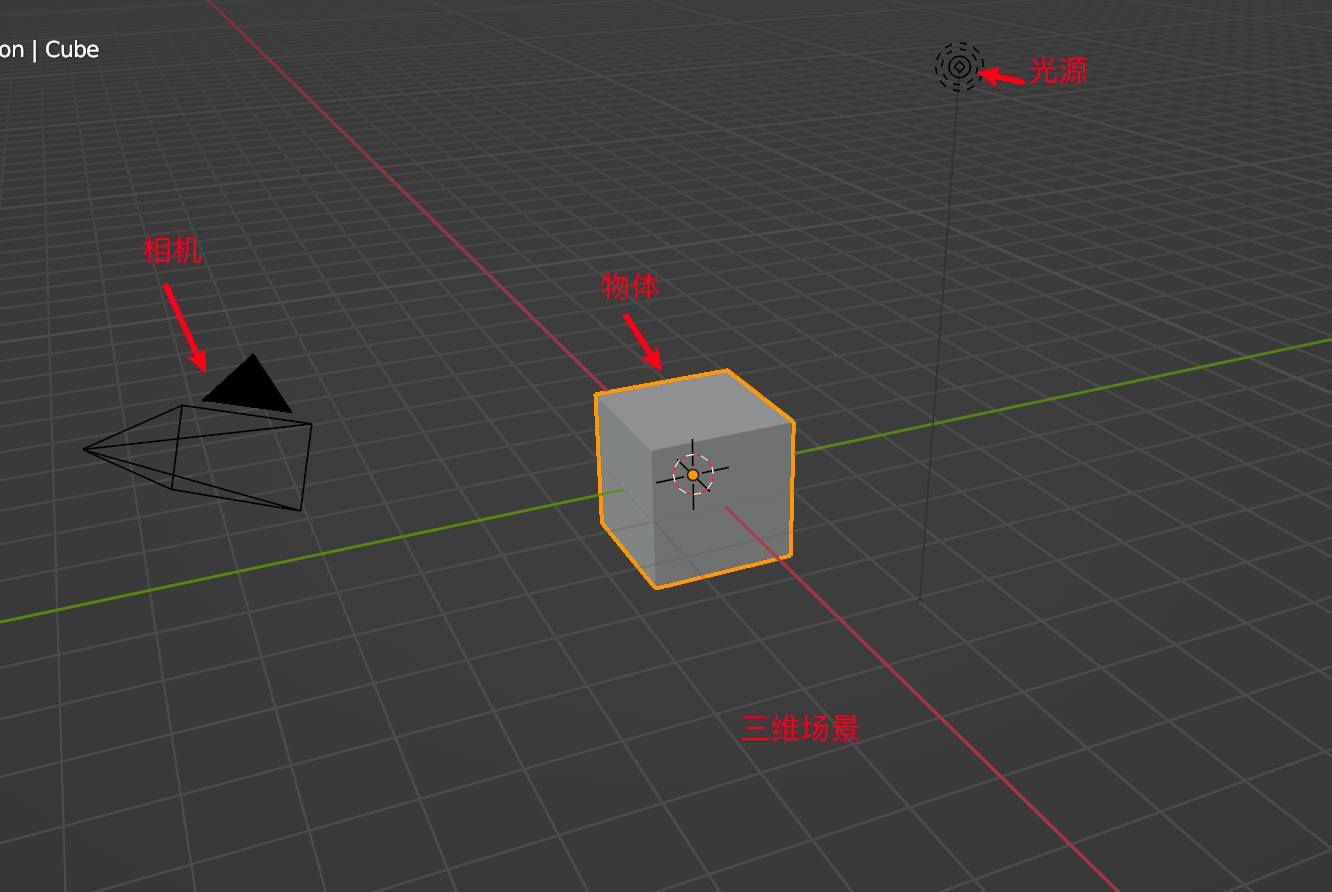
1) 场景
如何理解场景
场景就是一个三维的世界, 在这个世界中可以放置各种各样的物体
可以理解成一个空间, 或者容器
2) 相机
如何理解相机
:::warning
🤔 **思考: **如何在二维平面表现三维效果
由于我们的显示器是二维平面, 只有两个维度, 如何在一个二维平面表现出三维效果呢?
在现实生活中, 得益于拍照技术, 从不同的角度拍射(观察)同一个物体, 然后通过一些光照阴影我们的大脑可以自行脑补出三维的画图
:::
这里的相机就是三维空间的观察者
当相机从不同的角度观察同一个物体会得到不同的图像, 然后把这些图像使用一定的技术拼接组合, 我们的大脑会根据生活在三维世界的经验自行脑补出三维空间
3) 物体
在三维空间, 可以放置一些物体, 这些物体就是被观察的对象
不同的物体形状, 大小, 材质和纹理不相同
尽可能模拟现实生活中的实际物体, 比如
4) 光源
为了更好的模拟三维效果, 需要一些光照和阴影
2 实现步骤
使用three.js需要这样几步
- 创建一个三维场景(Scene)
- 创建一个相机(Camera)
- 创建渲染器渲染(Renderer)
1) 创建三维场景
const scene = new THREE.Scene();
2) 创建相机
// 2. 创建透视相机
const camera = new THREE.PerspectiveCamera(
  45,
  window.innerWidth / window.innerHeight,
  1,
  1000,
);
camera.position.z = 5;
3) 创建渲染器
// 3. 创建渲染器
const renderer = new THREE.WebGLRenderer();
renderer.setSize(window.innerWidth, window.innerHeight);
document.body.appendChild(renderer.domElement);
// 4. 渲染
renderer.render(scene, camera);
如何理解渲染
渲染就是拿相机在场景中拍照, 拍的照片显示在canvas画布上
上述完整示例
// 导入threejs
import * as THREE from "three";

// 1. 创建场景
const scene = new THREE.Scene();
// 2. 创建透视相机
const camera = new THREE.PerspectiveCamera(
  45,
  window.innerWidth / window.innerHeight,
  1,
  1000,
);
camera.position.z = 5;
// 3. 创建渲染器
const renderer = new THREE.WebGLRenderer();
renderer.setSize(window.innerWidth, window.innerHeight);
document.body.appendChild(renderer.domElement);
// 4. 渲染
renderer.render(scene, camera);
4) 添加物体
创建一个立方体, 添加到场景中
在three.js中, 使用Mesh(网格)表示一个物体, 包括
- 几何形状(Geometry)
- 表面材质(Material)
// 5. 创建立方体(几何+材质)
const cubeGeometry = new THREE.BoxGeometry(1, 1, 1);
const cubeMaterial = new THREE.MeshNormalMaterial();
const cube = new THREE.Mesh(cubeGeometry, cubeMaterial);
// 添加到场景
scene.add(cube);
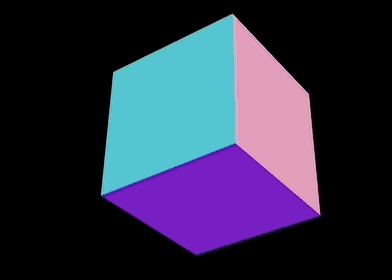
上述代码
-
创建了长宽高均为1个单位的立方体
BoxGeometry -
使用法向量材质
MeshNormalMaterial -
基于几何形状和材质创建立方体
-
添加到场景中
效果
:::warning
🤔 思考
为什么感觉是一个二维的正方形?
:::
5) 添加动画
为了方便观察三维效果, 我们可以使用两种方式
- 物体不变, 相机围绕物体旋转, 从不同的位置观察
- 相机不变, 物体旋转
这里, 为了便于大家理解, 我们先固定相机, 通过动画旋转物体演示
function animation() {
  // 改变角度
  cube.rotation.x += 0.01;
  cube.rotation.y += 0.01;
  // 重新渲染
  renderer.render(scene, camera);

  // 下一帧渲染回调
  requestAnimationFrame(animation);
}

animation();
6) 渲染优化
上述我们会看到明显的锯齿, 显示也不够清晰, 这里我们通过设置两个参数, 改善渲染效果
const renderer = new THREE.WebGLRenderer({ antialias: true });
renderer.setPixelRatio(window.devicePixelRatio);
renderer.setSize(window.innerWidth, window.innerHeight);
document.body.appendChild(renderer.domElement);
上述代码
- 通过设置渲染器的
antialias属性为true, 开启抗锯齿 - 设置DPI, 使用更多的像素点来描述同一个物体
完整示例
// 导入threejs
import * as THREE from "three";

// 1. 创建场景
const scene = new THREE.Scene();
// 2. 创建相机
const camera = new THREE.PerspectiveCamera(
  45,
  window.innerWidth / window.innerHeight,
  1,
  1000,
);

camera.position.z = 5;

// 5. 创建立方体(几何+材质)
const cubeGeometry = new THREE.BoxGeometry(1, 1, 1);
const cubeMaterial = new THREE.MeshNormalMaterial();
const cube = new THREE.Mesh(cubeGeometry, cubeMaterial);
// 添加到场景
scene.add(cube);

// 3. 创建渲染器
const renderer = new THREE.WebGLRenderer({ antialias: true });
renderer.setPixelRatio(window.devicePixelRatio);
renderer.setSize(window.innerWidth, window.innerHeight);
document.body.appendChild(renderer.domElement);
// 4. 渲染
function animation() {
  // 改变角度
  cube.rotation.x += 0.01;
  cube.rotation.y += 0.01;
  // 重新渲染
  renderer.render(scene, camera);

  // 下一帧渲染回调
  requestAnimationFrame(animation);
}

animation();
四. 开发辅助
物体的位置, 大小, 动画都离不开坐标系.
我们先了解坐标系对我们理解threejs的3D世界是非常有帮助的
1 显示坐标系
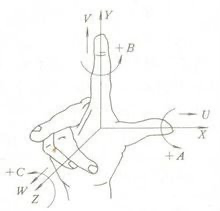
threejs采用的是右手坐标系
- x轴水平方向: 向右为正
- y轴垂直方向: 向上为正
- z轴内外方向(垂直于xy平面): 向外为正
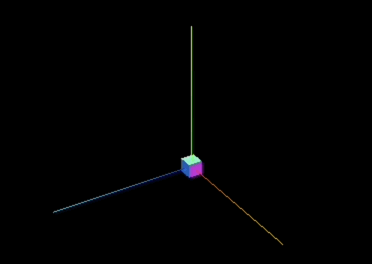
// 6. 显示坐标轴(x轴: 红色; y轴: 绿色; z轴: 蓝色 rgb)
// x轴水平方向(右正); y轴垂直方向(上正); z轴垂直xy平面即屏幕(外正)
const axesHelper = new THREE.AxesHelper(10);
scene.add(axesHelper);
完整示例
// 导入threejs
import * as THREE from "three";

// 1. 创建场景
const scene = new THREE.Scene();
// 2. 创建相机
const camera = new THREE.PerspectiveCamera(
  45,
  window.innerWidth / window.innerHeight,
  1,
  1000,
);

camera.position.z = 100;

// 5. 创建立方体(几何+材质)
const cubeGeometry = new THREE.BoxGeometry(1, 1, 1);
const cubeMaterial = new THREE.MeshNormalMaterial();
const cube = new THREE.Mesh(cubeGeometry, cubeMaterial);
// 添加到场景
scene.add(cube);

// 6. 显示坐标轴(x轴: 红色; y轴: 绿色; z轴: 蓝色 rgb)
// x轴水平方向(右正); y轴垂直方向(上正); z轴垂直xy平面即屏幕(外正)
const axesHelper = new THREE.AxesHelper(10);
scene.add(axesHelper);

// 3. 创建渲染器
const renderer = new THREE.WebGLRenderer({ antialias: true });
renderer.setPixelRatio(window.devicePixelRatio);
renderer.setSize(window.innerWidth, window.innerHeight);
document.body.appendChild(renderer.domElement);

// 4. 渲染
renderer.render(scene, camera);
- 将相机的z坐标设置为100, 在远处观察
- 通过坐标辅助对象
AxesHelper显示三维坐标系- 10表示显示的坐标的长度为10个单位(立方体的宽高为1个单位)
- 将坐标辅助对象添加到场景中
但是我们并没有看到z轴
这是因为我们相机就位于z轴上在观察, 相当于顶视图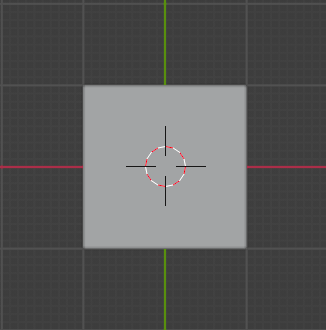
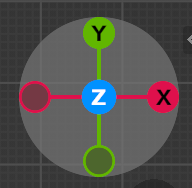
为了方便调试与观察.
我们可以使用OrbitControls(轨道控制器)控制相机的位置
2 轨道控制器
轨道控制器可以改变相机在空间坐标系中的位置
进而方便从不同的角度观察物体
- 轨道控制器响应鼠标事件(按住左键旋转, 滚轮缩放, 按住右键平移)
- 调整相机在空间坐标系中的位置(坐标值)
- 改变坐标后, 重新渲染
:::info
相对运动
这里有两套坐标系统
- 3D世界的坐标系, 由红绿蓝三色线表示
- 相机观察的坐标系
由于人眼的位置是固定不变的, 相当于站在相机的角度看3D世界
相机不变, 3D世界做相对运动
:::
效果
1) 导入组件
OrbitControls是一个附加组件, 在使用之前需要先导入
// 导入轨道控制器
import { OrbitControls } from "three/addons/controls/OrbitControls.js";
2) 创建控制器
// 创建轨道控制器
const controls = new OrbitControls(camera, renderer.domElement);
- 相机对象
- 渲染dom
3) 动态渲染
// 4. 动态渲染
function animation() {
  controls.update();
  renderer.render(scene, camera);

  requestAnimationFrame(animation);
}
animation();
完整示例
// 导入threejs
import * as THREE from "three";
// 导入轨道控制器
import { OrbitControls } from "three/addons/controls/OrbitControls.js";

// 1. 创建场景
const scene = new THREE.Scene();
// 2. 创建相机
const camera = new THREE.PerspectiveCamera(
  45,
  window.innerWidth / window.innerHeight,
  1,
  1000,
);

camera.position.z = 50;

// 5. 创建立方体(几何+材质)
const cubeGeometry = new THREE.BoxGeometry(1, 1, 1);
const cubeMaterial = new THREE.MeshNormalMaterial();
const cube = new THREE.Mesh(cubeGeometry, cubeMaterial);
// 添加到场景
scene.add(cube);

// 6. 显示坐标轴(x轴: 红色; y轴: 绿色; z轴: 蓝色 rgb)
// x轴水平方向(右正); y轴垂直方向(上正); z轴垂直xy平面即屏幕(外正)
const axesHelper = new THREE.AxesHelper(10);
scene.add(axesHelper);

// 3. 创建渲染器
const renderer = new THREE.WebGLRenderer({ antialias: true });
renderer.setPixelRatio(window.devicePixelRatio);
renderer.setSize(window.innerWidth, window.innerHeight);
document.body.appendChild(renderer.domElement);

// 7. 创建轨道控制器
const controls = new OrbitControls(camera, renderer.domElement);

// 4. 动态渲染
function animation() {
  controls.update();
  renderer.render(scene, camera);

  requestAnimationFrame(animation);
}
animation();
3 自适应画布
当浏览器的显示窗口改变时, 会引起尺寸改变(innerWidth/innerHeight).
此时, 需要调整相机的宽高比和渲染器的成像大小
// 监听window的resize事件, 在回调中重绘canvas
window.addEventListener("resize", () => {
  // 设置相机宽高比
  camera.aspect = window.innerWidth / window.innerHeight;
  camera.updateProjectionMatrix();

  // 设置渲染器
  renderer.setSize(window.innerWidth, window.innerHeight);
});
五. 基础变换
接下来, 我们通过三种基础的变换来加深对3D坐标系中坐标和单位的理解, 同时也是动画的基础. 分别是
-
移动
-
缩放
-
旋转
效果

1 网络辅助工具
为了更好的理解坐标和单位, 我们引入网格辅助工具(GridHelper)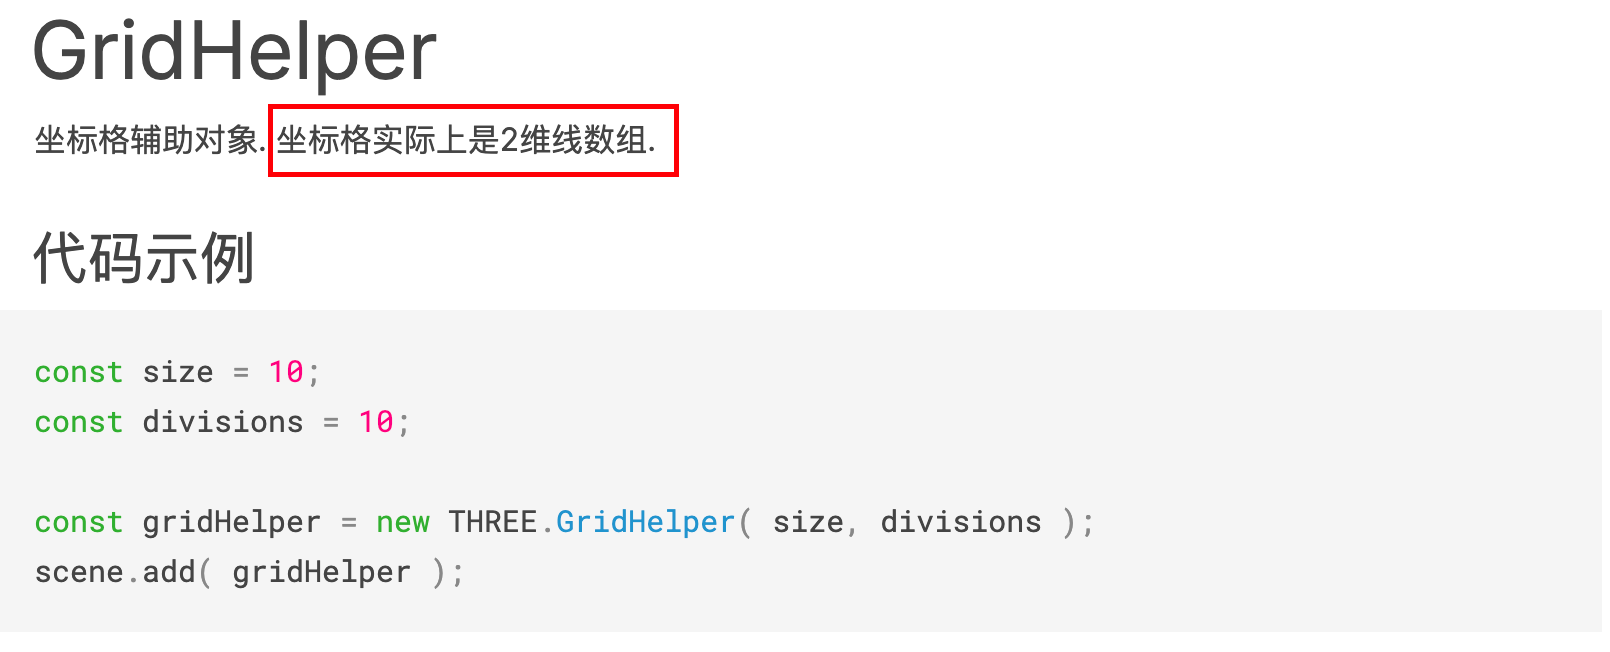
// 5. 创建立方体(几何+材质)
const cubeGeometry = new THREE.BoxGeometry(2, 2, 2);
const cubeMaterial = new THREE.MeshNormalMaterial();
const cube = new THREE.Mesh(cubeGeometry, cubeMaterial);

// 创建网格辅助工具
const gridHelper = new THREE.GridHelper(20, 20, 0xffffff, 0xffffff);
// 为了更方便观察, 设置opacity透明度
gridHelper.material.transparent = true;
gridHelper.material.opacity = 0.5;

// 添加到场景中
scene.add(gridHelper);
- 为了方便观察, 我们把立方体的大小改成了(2,2,2). 这种x轴的范围为(-1, 1)
- 创建网格辅助工具, 并添加到场景中
- 第一个参数(size): 网格的总宽高, 设置为20, 对应x轴的坐标范围为(-10, 10), 默认值为
10 - 第二个参数(divisions): 网格分成多少份, 设置为20, 每份就是1个单位, 默认值为
10 - 第三个参数(colorCenterLine): 中线的颜色, 默认值为
0x444444 - 第四个参数(colorGrid): 网络线的颜色, 默认值为
0x888888
- 第一个参数(size): 网格的总宽高, 设置为20, 对应x轴的坐标范围为(-10, 10), 默认值为
2 移动
通过改变物体的position属性, 控制物体的移动
// 通过设置三维向量的属性控制移动
cube.position.x = 2;
cube.position.y = 2;
cube.position.z = 2;
// 通过调用三维向量的方法控制移动
cube.position.set(3, 3, 3);
// 添加到场景
scene.add(cube);
通过设置cube的position(三维向量)对象的x, y, z的值来控制立方体分别沿x, y, z轴移动
3 缩放
通过改变物体的scale属性, 控制物体的缩放
// 通过设置三维向量的属性控制缩放比例
cube.scale.x = 1;
cube.scale.y = 2;
cube.scale.z = 3;
// 通过调用三维向量的方法控制缩放
cube.scale.set(3, 3, 3);
4 旋转
通过改变物体的rotation属性, 控制物体的旋转.
这里需要注意的是: 旋转的单位是弧度, 不是角度
:::info
换算公式
π弧度 = 180度
- 弧度=角度×(π ÷ 180)
- 角度=弧度×(180 ÷ π)
常用弧度
π/2弧度 = 90度
π/3弧度 = 60度
π/4弧度 = 45度
π/6弧度 = 30度
:::
按照右手法则, 大拇指指向x轴, 四指方向为正方向, 即从x轴方向观察, 逆时间旋转
// 通过设置三维向量的属性控制旋转
cube.rotation.x = Math.PI / 4;
// 通过三维向量的方法控制旋转
cube.rotation.set(Math.PI / 4, 0, 0);
5 集成Gui工具
我们发现, 如果每次通过修改代码的方式修改属性值效率太低
这里我们可以集成一种Gui工具, 通过UI交互界面来修改方便很多
dat.gui的npm链接
1) 安装
npm i dat.gui
2) 基本使用
// 导入dat
import * as dat from "dat.gui";
// 初始化
const gui = new dat.GUI();
gui.add(cube.position, "x").min(-10).max(10).step(1);
这里我们可以做一个分组
// 5. 创建立方体(几何+材质)
const cubeGeometry = new THREE.BoxGeometry(2, 2, 2);
const cubeMaterial = new THREE.MeshNormalMaterial();
const cube = new THREE.Mesh(cubeGeometry, cubeMaterial);

const gui = new dat.GUI();
const guiPosition = gui.addFolder("移动");
guiPosition.add(cube.position, "x").min(-10).max(10).step(1);
guiPosition.add(cube.position, "y").min(-10).max(10).step(1);
guiPosition.add(cube.position, "z").min(-10).max(10).step(1);

const guiScale = gui.addFolder("缩放");
guiScale.add(cube.scale, "x").min(1).max(10).step(1);
guiScale.add(cube.scale, "y").min(1).max(10).step(1);
guiScale.add(cube.scale, "z").min(1).max(10).step(1);

const guiRotation = gui.addFolder("旋转");
guiRotation.add(cube.rotation, "x").min(-Math.PI).max(Math.PI).step(0.01);
guiRotation.add(cube.rotation, "y").min(-Math.PI).max(Math.PI).step(0.01);
guiRotation.add(cube.rotation, "z").min(-Math.PI).max(Math.PI).step(0.01);
完整示例
// 导入threejs
import * as THREE from "three";
import { OrbitControls } from "three/addons/controls/OrbitControls.js";

// 导入Gui工具
import * as dat from "dat.gui";

// 1. 创建场景
const scene = new THREE.Scene();
// 2. 创建相机
const camera = new THREE.PerspectiveCamera(
  45,
  window.innerWidth / window.innerHeight,
  1,
  1000,
);

camera.position.set(20, 20, 20);

// 5. 创建立方体(几何+材质)
const cubeGeometry = new THREE.BoxGeometry(2, 2, 2);
const cubeMaterial = new THREE.MeshNormalMaterial();
const cube = new THREE.Mesh(cubeGeometry, cubeMaterial);

const gui = new dat.GUI();
const guiPosition = gui.addFolder("移动");
guiPosition.add(cube.position, "x").min(-10).max(10).step(1);
guiPosition.add(cube.position, "y").min(-10).max(10).step(1);
guiPosition.add(cube.position, "z").min(-10).max(10).step(1);

const guiScale = gui.addFolder("缩放");
guiScale.add(cube.scale, "x").min(1).max(10).step(1);
guiScale.add(cube.scale, "y").min(1).max(10).step(1);
guiScale.add(cube.scale, "z").min(1).max(10).step(1);

const guiRotation = gui.addFolder("旋转");
guiRotation.add(cube.rotation, "x").min(-Math.PI).max(Math.PI).step(0.01);
guiRotation.add(cube.rotation, "y").min(-Math.PI).max(Math.PI).step(0.01);
guiRotation.add(cube.rotation, "z").min(-Math.PI).max(Math.PI).step(0.01);
// 添加到场景
scene.add(cube);

// 6. 坐标轴辅助工具(x轴: 红色; y轴: 绿色; z轴: 蓝色 rgb)
// x轴水平方向(右正); y轴垂直方向(上正); z轴垂直xy平面即屏幕(外正)
const axesHelper = new THREE.AxesHelper(10);
scene.add(axesHelper);

// 3. 创建渲染器
const renderer = new THREE.WebGLRenderer({ antialias: true });
renderer.setPixelRatio(window.devicePixelRatio);
renderer.setSize(window.innerWidth, window.innerHeight);
document.body.appendChild(renderer.domElement);

// 创建网络辅助工具
const gridHelper = new THREE.GridHelper(20, 20, 0xffffff, 0xffffff);
gridHelper.material.transparent = true;
gridHelper.material.opacity = 0.5;

scene.add(gridHelper);

const controls = new OrbitControls(camera, renderer.domElement);
// 4. 渲染
function animation() {
  renderer.render(scene, camera);
  requestAnimationFrame(animation);
}
animation();

// 监听window的resize事件, 在回调中重绘canvas
window.addEventListener("resize", () => {
  // 设置相机宽高比
  camera.aspect = window.innerWidth / window.innerHeight;
  camera.updateProjectionMatrix();

  // 设置渲染器
  renderer.setSize(window.innerWidth, window.innerHeight);
});
六. 项目规划
一个three.js的项目由这么几个部分组成
- 场景
- 物体
- 灯光
- 相机
- 渲染器
- 工具
这里我们可以对项目目录结构进行拆分, 分为
- scene: 场景
- mesh: 网格(物体)
- light: 灯光
- camera: 相机
- renderer: 渲染器
- utils: 工具
1 封装场景
创建src/scene/index.js
import * as THREE from "three";

const scene = new THREE.Scene();

export default scene;
2 封装相机
创建src/camera/index.js
import * as THREE from "three";

const camera = new THREE.PerspectiveCamera(
  45,
  window.innerWidth / window.innerHeight,
  0.1,
  1000,
);

camera.position.set(0, 0, 10);

export default camera;
3 封装渲染器
创建src/renderer/index.js
import * as THREE from "three";

function isFunction(val) {
  return typeof val === "function";
}

class Renderer extends THREE.WebGLRenderer {
  constructor(scene, camera) {
    super({ antialias: true });
    this.scene = scene;
    this.camera = camera;
    this.init();
  }
  init() {
    this.setPixelRatio(window.devicePixelRatio);
    this.setSize(window.innerWidth, window.innerHeight);
    document.body.appendChild(this.domElement);

    // 默认渲染
    this.render(this.scene, this.camera);
  }
  animation(cb) {
    if (!isFunction(cb)) {
      console.error("param must be a function");
      return;
    }

    this.setAnimationLoop(cb);
  }
}

export default Renderer;
4 封装物体
创建src/mesh/index.js
import * as THREE from "three";

const cubeGeometry = new THREE.BoxGeometry(2, 2, 2);
const cubeMaterial = new THREE.MeshNormalMaterial();

const cube = new THREE.Mesh(cubeGeometry, cubeMaterial);

export default cube;
5 封装工具集
创建src/untils/index.js
import * as THREE from "three";

import { OrbitControls } from "three/addons/controls/OrbitControls";

export default class Utils {
  constructor(options = {}) {
    this.scene = options.scene;
    this.camera = options.camera;
    this.renderer = options.renderer;

    if (!this.scene || !this.camera || !this.renderer) {
      console.error("scene, camera, renderer can not be null");
      return;
    }
    this.init(options);
  }
  init(options) {
    this.initOrbitControls(options.orbitControl);
    this.initAxesHelper(options.axesHelper);
    this.initGridHelper(options.gridHelper);
  }
  // 默认开启轨道控制器, 只有当传入的orbitControl===false时关闭
  initOrbitControls(value) {
    if (value === false) {
      console.log("orbitControl disabled");
      return;
    }

    new OrbitControls(this.camera, this.renderer.domElement);
  }
  // 默认开启坐标轴辅助工具, 只有当传入的axesHelper===false时关闭
  initAxesHelper(value) {
    if (value === false) {
      console.log("axesHelper disabled");
      return;
    }

    const init = {
      size: 10,
    };
    const params = Object.assign(init, value);

    const axesHelper = new THREE.AxesHelper(params.size);
    this.scene.add(axesHelper);
  }
  // 默认开启网格辅助工具, 只有当传入的gridHelper===false时关闭
  initGridHelper(value) {
    if (value === false) {
      console.log("gridHelper disabled");
      return;
    }
    const init = {
      size: 20,
      divisions: 20,
      color1: 0xffffff,
      color2: 0xffffff,
    };
    const params = Object.assign(init, value);

    const gridHelper = new THREE.GridHelper(...Object.values(params));
    gridHelper.material.transparent = true;
    gridHelper.material.opacity = 0.5;

    this.scene.add(gridHelper);
  }
}
6 导入使用
在main.js中导入
import scene from "./scene";
import camera from "./camera";
import mesh from "./mesh";
import Renderer from "./renderer";
import Utils from "./utils";

scene.add(mesh);

const renderer = new Renderer(scene, camera);

renderer.animation(() => {
  renderer.render(scene, camera);
});

new Utils({
  scene,
  camera,
  renderer,
});


 93
93

 被折叠的 条评论
为什么被折叠?
被折叠的 条评论
为什么被折叠?
 到【灌水乐园】发言


