


现在得android网络请求框架中使用得最多得还是okhttp,okhttp得拦截机制很巧妙,所以就看下是如何设计得。
一般得使用例子如下。
OkHttpClient okHttpClient = new OkHttpClient.Builder()
        .build();
Request request = new Request.Builder()
        .url(url)
        .build();
okHttpClient.newCall(request).enqueue(new Callback() {
    @Override
    public void onFailure(Call call, IOException e) {
    }

    @Override
    public void onResponse(Call call, Response response) throws IOException {

    }
});
构建一个OkHttpClient客户端和一个请求Request,然后调用newCall发送请去。先看下一张okhttp整个网络架构图。

网络配置层:利用Builder模式配置各种参数,例如:超时时间、拦截器等,这些参数都会由Okhttp分发给各个需要的子系统。
重定向层:负责重定向。
Header拼接层:负责把用户构造的请求转换为发送给服务器的请求,把服务器返回的响应转换为对用户友好的响应。
HTTP缓存层:负责读取缓存以及更新缓存。
连接层:连接层是一个比较复杂的层级,它实现了网络协议、内部的拦截器、安全性认证,连接与连接池等功能,但这一层还没有发起真正的连接,它只是做了连接器一些参数的处理。
数据响应层:负责从服务器读取响应的数据。
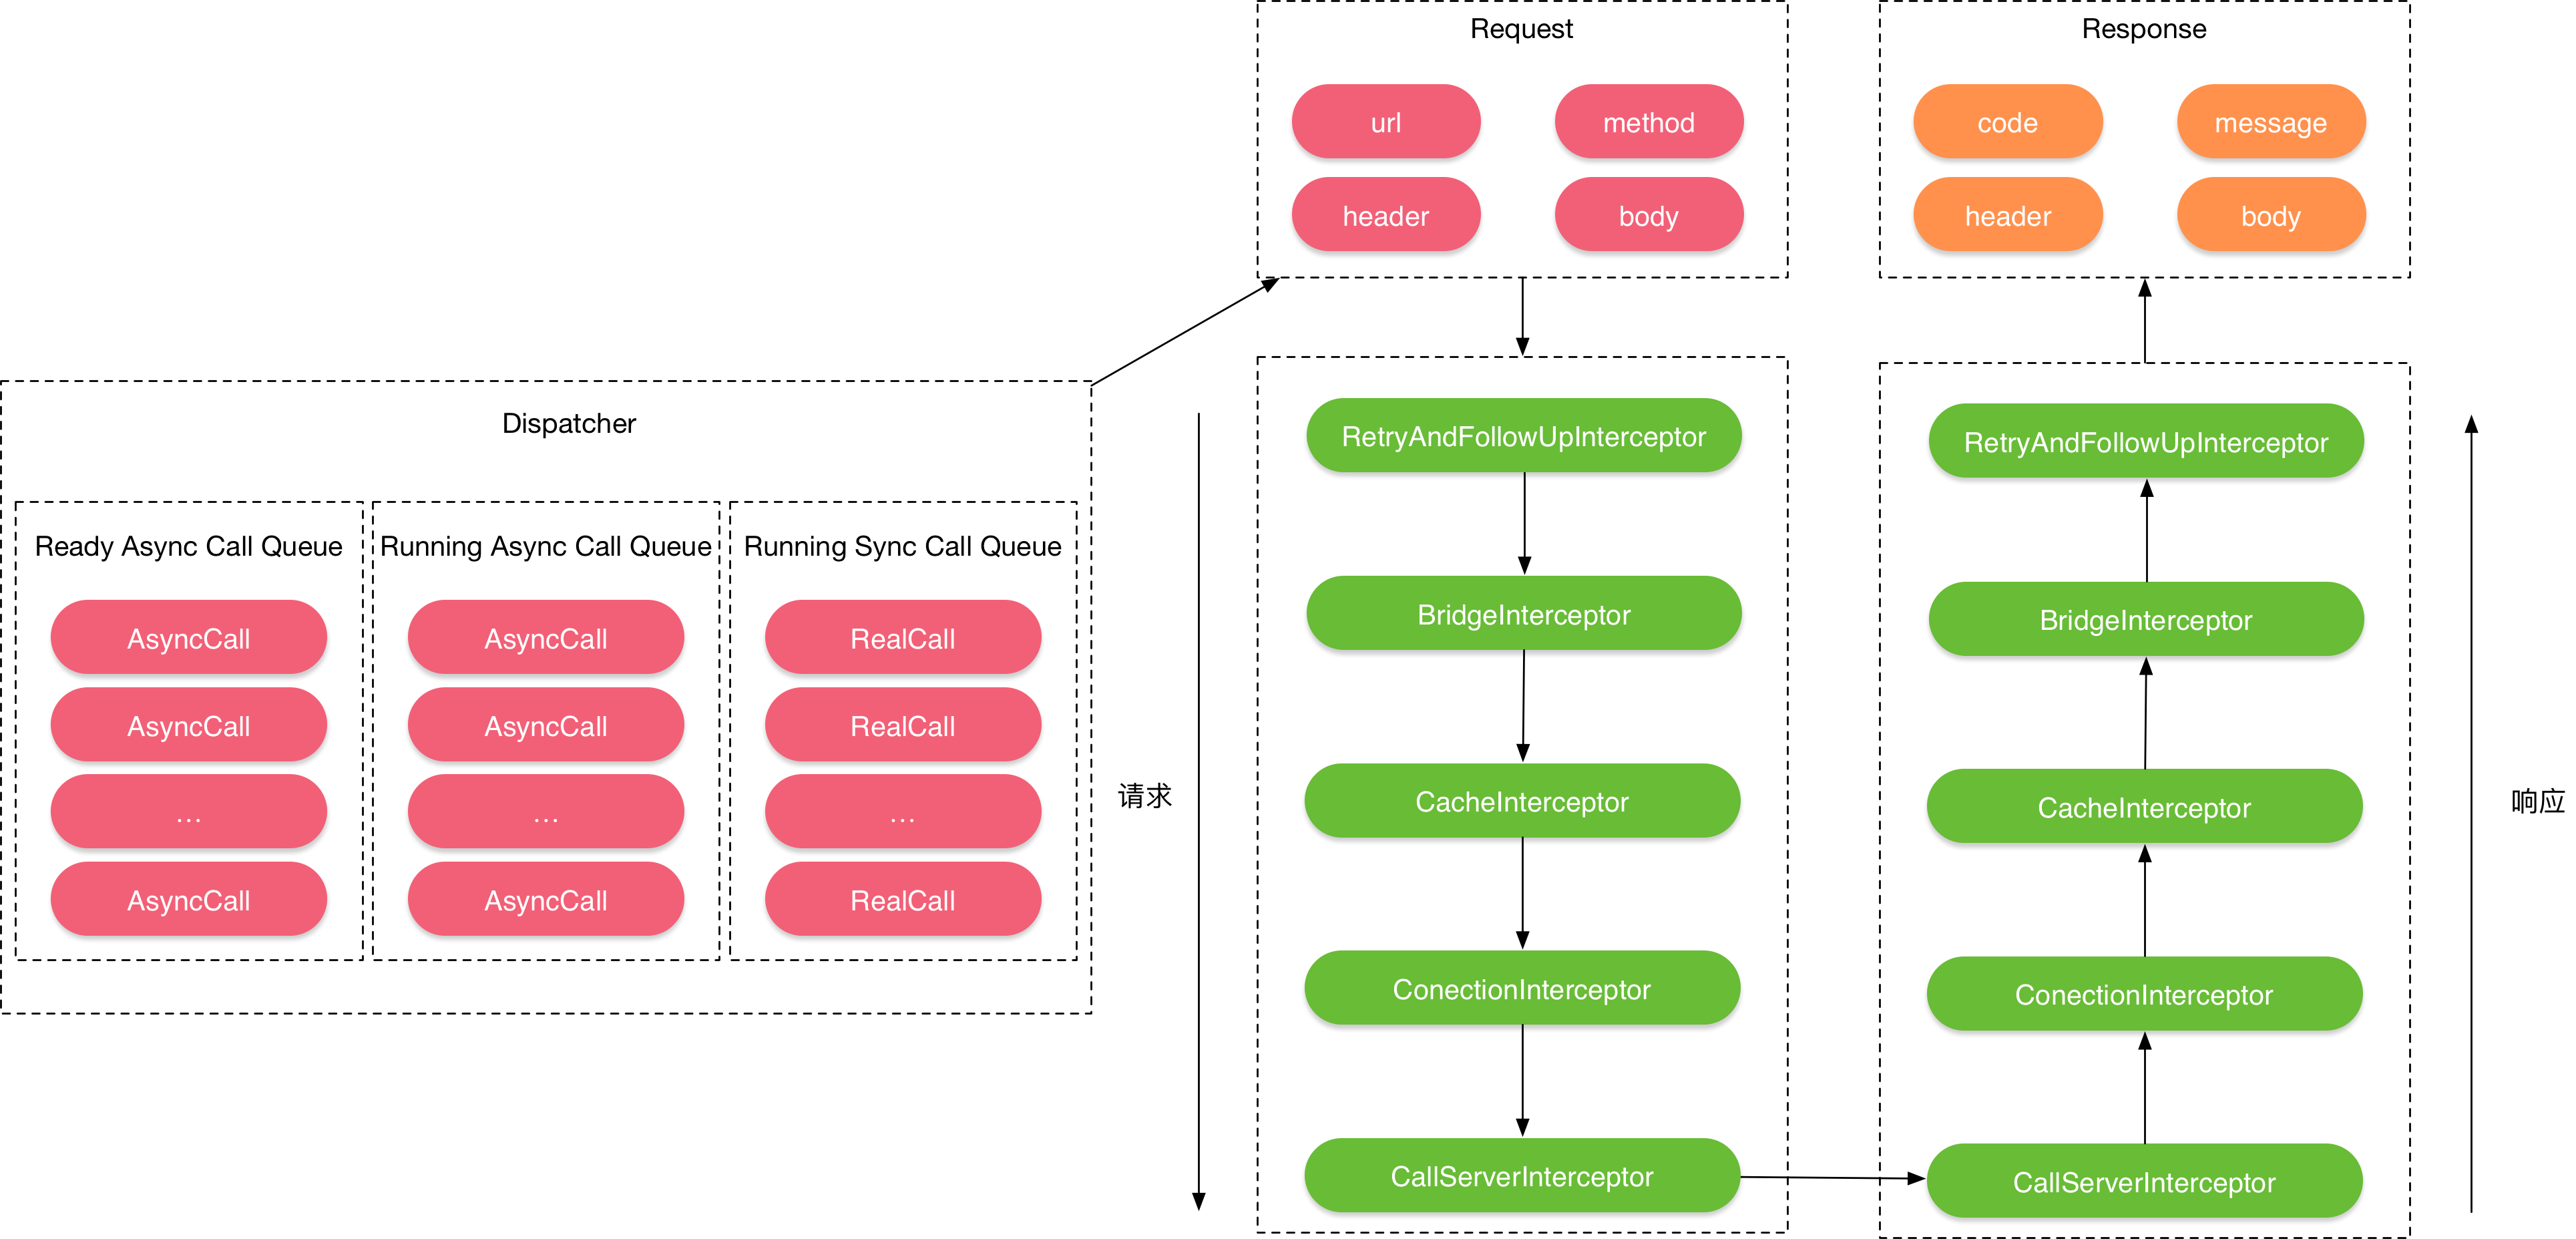
Okhttp的整个请求与响应的流程就是Dispatcher不断从Request Queue里取出请求(Call),根据是否已经存存缓存,从内存缓存或者服务器获取请求的数据,请求分为同步和异步两种,同步请求通过 调用Call.exectute()方法直接返回当前请求的Response,异步请求调用Call.enqueue()方法将请求(AsyncCall)添加到请求队列中去,并通过回调(Callback)获取服务器返回的结果。
整个请求和响应得过程中,设计了一层一层得拦截器,每个拦截器对应相应得功能,简化了设计逻辑,提升了框架得扩展性。接着看下,Dispatcher是如何请求得。
先看下整个拦截流程。

发起请求在newCall中。
  /**
   * Prepares the {@code request} to be executed at some point in the future.
   */
  @Override public Call newCall(Request request) {
    return RealCall.newRealCall(this, request, false /* for web socket */);
  }
真正请求得是RealCall得newRealCall,RealCall是继承Call这个接口得。
public interface Call extends Cloneable {
  //当前请求
  Request request();

  //同步请求方法
  Response execute() throws IOException;

  //异步请求方法
  void enqueue(Callback responseCallback);

  //取消请求
  void cancel();
  //是否执行
  boolean isExecuted();
  //是否取消
  boolean isCanceled();


  Call clone();

  interface Factory {
    Call newCall(Request request);
  }
}
RealCall的构造方法
  private RealCall(OkHttpClient client, Request originalRequest, boolean forWebSocket) {
    this.client = client;
    this.originalRequest = originalRequest;
    this.forWebSocket = forWebSocket;
    this.retryAndFollowUpInterceptor = new RetryAndFollowUpInterceptor(client, forWebSocket);
  }
RealCall实现了Call接口,分装请求,赋值外部传入的OkHttpClient、Request与forWebSocket,并 创建了重试与重定向拦截器RetryAndFollowUpInterceptor。
请求分为同步请求和异步请求。
异步请求。
final class RealCall implements Call {

      @Override public void enqueue(Callback responseCallback) {
        synchronized (this) {
          if (executed) throw new IllegalStateException("Already Executed");
          executed = true;
        }
        captureCallStackTrace();
        client.dispatcher().enqueue(new AsyncCall(responseCallback));
      }
}
同步请求
final class RealCall implements Call {
    @Override public Response execute() throws IOException {
      synchronized (this) {
        if (executed) throw new IllegalStateException("Already Executed");
        executed = true;
      }
      captureCallStackTrace();
      try {
        client.dispatcher().executed(this);
        Response result = getResponseWithInterceptorChain();
        if (result == null) throw new IOException("Canceled");
        return result;
      } finally {
        client.dispatcher().finished(this);
      }
    }
}
从上面可知,无论是同步还是异步请求,都是交给Dispatcher处理。AsyncCall本质上是一个Runnable。
  final class AsyncCall extends NamedRunnable {
    private final Callback responseCallback;

    AsyncCall(Callback responseCallback) {
      super("OkHttp %s", redactedUrl());
      this.responseCallback = responseCallback;
    }

    String host() {
      return originalRequest.url().host();
    }

    Request request() {
      return originalRequest;
    }

    RealCall get() {
      return RealCall.this;
    }

    @Override protected void execute() {
      boolean signalledCallback = false;
      try {
        Response response = getResponseWithInterceptorChain();
        if (retryAndFollowUpInterceptor.isCanceled()) {
          signalledCallback = true;
          responseCallback.onFailure(RealCall.this, new IOException("Canceled"));
        } else {
          signalledCallback = true;
          responseCallback.onResponse(RealCall.this, response);
        }
      } catch (IOException e) {
        if (signalledCallback) {
          // Do not signal the callback twice!
          Platform.get().log(INFO, "Callback failure for " + toLoggableString(), e);
        } else {
          eventListener.callFailed(RealCall.this, e);
          responseCallback.onFailure(RealCall.this, e);
        }
      } finally {
        client.dispatcher().finished(this);
      }
    }
  }
从代码可以看到无论是同步还是异步,最终都是通过getResponseWithInterceptorChain()获取Response。
请求和响应流程完了,接着看下拦截调度是如何实现得。
 Response getResponseWithInterceptorChain() throws IOException {
    // Build a full stack of interceptors.
    List<Interceptor> interceptors = new ArrayList<>();
    //自定义拦截器
    interceptors.addAll(client.interceptors());
    //重试和重定向拦截器
    interceptors.add(retryAndFollowUpInterceptor);
    //请求和响应拦截器
    interceptors.add(new BridgeInterceptor(client.cookieJar()));
    //缓存拦截器
    interceptors.add(new CacheInterceptor(client.internalCache()));
    //连接拦截器
    interceptors.add(new ConnectInterceptor(client));
    if (!forWebSocket) {
      interceptors.addAll(client.networkInterceptors());
    }
    //连接服务器拦截器
    interceptors.add(new CallServerInterceptor(forWebSocket));

    Interceptor.Chain chain = new RealInterceptorChain(interceptors, null, null, null, 0,
        originalRequest, this, eventListener, client.connectTimeoutMillis(),
        client.readTimeoutMillis(), client.writeTimeoutMillis());

    return chain.proceed(originalRequest);
  }
}
可以看到我们得拦截器是在这里添加得,Interceptor将网络请求、缓存、透明压缩等功能统一了起来,它的实现采用责任链模式,各司其职, 每个功能都是一个Interceptor,上一级处理完成以后传递给下一级,它们最后连接成了一个Interceptor.Chain。位置决定功能,位置靠前,先执行,所以我们自定义得拦截器是最先执行得。从发起到服务器返回数据得流程是相反得。
public interface Interceptor {
  Response intercept(Chain chain) throws IOException;

  interface Chain {
    //发起得请求
    Request request();

    //返回的请求
    Response proceed(Request request) throws IOException;

    /**
     * Returns the connection the request will be executed on. This is only available in the chains
     * of network interceptors; for application interceptors this is always null.
     */
    @Nullable Connection connection();

    Call call();
    //连接超时得时间
    int connectTimeoutMillis();
    //设置连接超时
    Chain withConnectTimeout(int timeout, TimeUnit unit);
    //读取超时得时间
    int readTimeoutMillis();
   //设置读取超时
    Chain withReadTimeout(int timeout, TimeUnit unit);
    //写超时
    int writeTimeoutMillis();
    //设置写超时
    Chain withWriteTimeout(int timeout, TimeUnit unit);
  }
}
Okhttp内置的拦截器如下所示:
- RetryAndFollowUpInterceptor:负责失败重试以及重定向。
- BridgeInterceptor:负责把用户构造的请求转换为发送给服务器的请求,把服务器返回的响应转换为对用户友好的响应。
- CacheInterceptor:负责读取缓存以及更新缓存。
- ConnectInterceptor:负责与服务器建立连接。
- CallServerInterceptor:负责从服务器读取响应的数据。
Request是按照interpretor的顺序正向处理,而Response是逆向处理的。这参考了OSI七层模型的原理。上面我们也提到过。CallServerInterceptor相当于最底层的物理层, 请求从上到逐层包装下发,响应从下到上再逐层包装返回。
interceptor的执行顺序:RetryAndFollowUpInterceptor -> BridgeInterceptor -> CacheInterceptor -> ConnectInterceptor -> CallServerInterceptor。
response的拦截的执行顺序是:CallServerInterceptor ->ConnectInterceptor ->CacheInterceptor -> BridgeInterceptor ->
RetryAndFollowUpInterceptor 。
总结:
okhtto的拦截模式像OSI七层模型的原理,按照顺序拦截,理解起来非常的清晰,链路设计通俗易懂。


 531
531

 被折叠的 条评论
为什么被折叠?
被折叠的 条评论
为什么被折叠?
 到【灌水乐园】发言


