


前言:
项目开发中,影响项目进程的常常是由于在前后端数据交互的开发流程中停滞,前端完成静态页面的开发后,后端迟迟未给到接口。而现在,我们就可以通过根据后端接口字段,建立一个REST风格的API接口,进而实现mock数据实现前端的独立开发。
json-server
通过json-server完成mock数据
GitHub介绍:Get a full fake REST API with zero coding in less than 30 seconds (seriously)
Created with <3 for front-end developers who need a quick back-end for prototyping and mocking.
GitHub链接:https://github.com/typicode/json-server
1.安装
cmd命令行安装json-server
npm install json-server -g
安装完执行json-server -h,若安装成功则显示选项
Options:
  --config, -c               Path to config file   [default: "json-server.json"]

  --port, -p                 Set port                            [default: 3000]

  --host, -H                 Set host                       [default: "0.0.0.0"]

  --watch, -w                Watch file(s)                             [boolean]

  --routes, -r               Path to routes file
  --middlewares, -m          Paths to middleware files                   [array]

  --static, -s               Set static files directory
  --read-only, --ro          Allow only GET requests                   [boolean]

  --no-cors, --nc            Disable Cross-Origin Resource Sharing     [boolean]

  --no-gzip, --ng            Disable GZIP Content-Encoding             [boolean]

  --snapshots, -S            Set snapshots directory              [default: "."]

  --delay, -d                Add delay to responses (ms)
  --id, -i                   Set database id property (e.g. _id) [default: "id"]

  --foreignKeySuffix, --fks  Set foreign key suffix (e.g. _id as in post_id)
                                                                 [default: "Id"]

  --quiet, -q                Suppress log messages from output         [boolean]

  --help, -h                 Show help                                 [boolean]

  --version, -v              Show version number                       [boolean]
2.小试身手
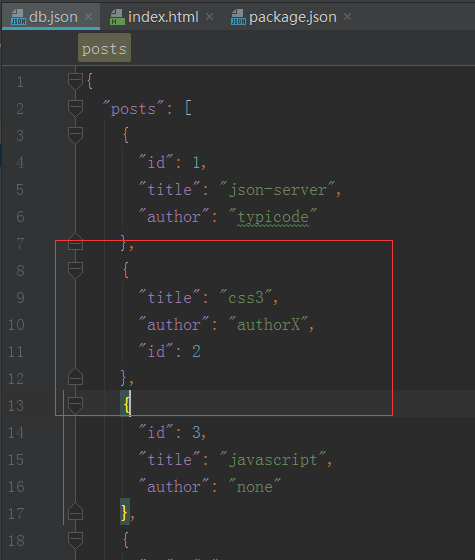
新建db.json文件

运行cmd命令行
json-server --watch db.json
若打印出如下表

则运行成功,因json-server默认监听的3000端口,直接访问地址:http://localhost:3000/posts可得结果

注:json-server里面的id是不可变的。用来标识每一条数据,这就好比该json文件时一个数据库,根属性名对应一张张的表,id是表里面的primary key。因此,如果如果你用put方法推入一条带有id的数据,是会被忽略的。
3.接口及参数
json-server支持CORS和JSONP跨域请求,支持GET, POST, PUT, PATCH 和 DELETE 方法,也提供了一系列的参数查询方法。
3.1简单应用
启动服务:json-server --watch db.json,通过jquery的ajax我们可以简单的应用


3.2接口应用
3.2.1使用get接口查询数据
通过地址:localhost:3000/posts?id=2,这种get方式完成参数请求

3.2.2使用post接口新增数据
 1 $.ajax({
 2             url:'http://localhost:3000/posts',
 3             dataType:'json',
 4             type:'post',
 5             data:{
 6                 "id":4,
 7                 "title":"css",
 8                 "author":"authorX"
 9             },
10             success:(data)=>{
11                 console.log(data);
12             },
13             error:(err)=>{
14                 console.log(err);
15             }
16         })
通过post方式,我们可以在db.json后面追加数据

3.2.3使用put接口修改数据
通过修改type类型为put,对db.json中id=2的数据进行修改
 1 $.ajax({
 2             url:'http://localhost:3000/posts/2',
 3             dataType:'json',
 4             type:'put',
 5             data:{
 6                 "title":"css3",
 7                 "author":"authorX"
 8             },
 9             success:(data)=>{
10                 console.log(data);
11             },
12             error:(err)=>{
13                 console.log(err);
14             }
15         })
3.3参数应用
3.3.1 分页【关键字:_page】
应用:http://localhost:3000/posts?_page=1
3.3.2 排序【关键字:_sort,_order】
_sort后面为要分类的键名
应用:http://localhost:3000/posts?_sort=author
_order为排序的方式。DESC(倒序),ASC(顺序)
应用:http://localhost:3000/posts?_sort=author&_order=DESC
3.3.3 切分【关键字:_start,_end,_limit】
类似于js里面的slice函数。slice(_start,_end),从数据里面取出数据。数据不包括_end,
_limit可以和_start配合,表示从_start位置开始_limit条数据被取出来。
应用:http://localhost:3000/posts?_start=1&_limit=3
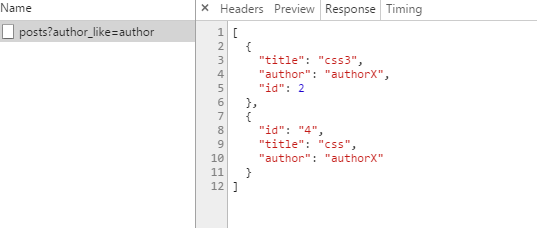
3.3.4 操作【关键字:_gte,_lte,_ne,[key]_like】
_gte:大于或等于,_lte:小于或等于,_ne:不等于,[key]_like:模糊搜索
应用:http://localhost:3000/posts?author_like=author
3.3.5 全局搜索【关键字:q】
q为数据中全局搜索传入的参数
应用:http://localhost:3000/posts?q=json
3.3.6 字段扩展【关键字:_embed,_expand】
_embed:扩展子数据字段
_expand:扩展父数据字段
应用:http://localhost:3000/posts/2?_embed=search
4 结合mock.js生成随机数据
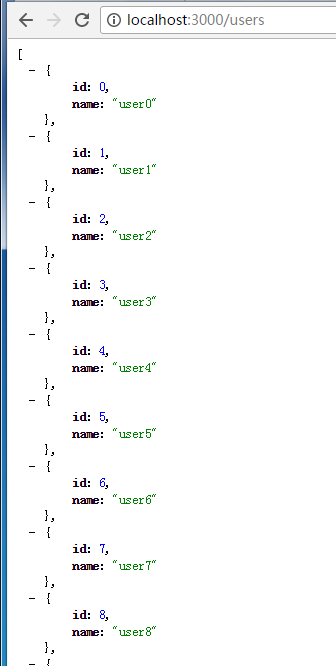
由于通过json-server结合js动态生成的json文件略显单一并且对于大量的数据显得不太适合
如下例子:
 1 module.exports=()=>{
 2     const data={users:[]}
 3     for(let i=0;i<1000;i++){
 4         data.users.push({
 5             id:i,
 6             name:`user${i}`
 7         })
 8     }
 9     return data
10 };
执行json-server index,js
于是我们借助mockjs生成更加符合实际测试的数据。
不少人认识到mockjs也是一个独立的mock servr,为啥不单独使用mockjs而结合json-server使用呢
把mockjs单独作为数据构造器使用是由于mockjs:
不能跨域使用;与某些框架的路由逻辑处理存在冲突;无法定义一些复杂的数据结构等。
4.1 结合mockjs构造数据接口
4.1.1 命令行安装mockjs
npm install mockjs --save
mock新闻列表数据:news.js
 1 let Mock=require('mockjs');
 2 let Random=Mock.Random;
 3
 4 module.exports=()=>{
 5     let data={
 6         news:[]
 7     };
 8
 9     let images=[1,2,3].map(x=>Random.image('120x60',Random.color(),Random.word(2,6)));
10
11     for(let i=0;i<100;i++){
12         let content=Random.cparagraph(0,10);
13
14         data.news.push({
15             id:i,
16             title:Random.cword(8,20),
17             desc:content.substr(0,40),
18             tag:Random.cword(2,6),
19             views:Random.integer(100,5000),
20             images:images.slice(0,Random.integer(1,3))
21         })
22     }
23     return data
24 }
4.1.2 运行
json-server news.js
部分截图:

至此,我们就可以通过json-server+mockjs完成完成的数据接口模拟。
更多参考:
json-server:https://github.com/typicode/json-server
mockjs:https://github.com/nuysoft/Mock/wiki/Getting-Started


 422
422


 被折叠的 条评论
为什么被折叠?
被折叠的 条评论
为什么被折叠?
 到【灌水乐园】发言


