


写在前面的话
本文主要分析Android DTMF的流程,研究的代码是Android 5.1的,以CDMA为例,GSM同理。
在手机中,常用的DTMF场景是使用手机拨打一些服务台电话,比如客服热线10086、10000之类;电话接入之后,有对应的语音提示输入不同的数字进入不同的菜单,或者要修改资料,对方要验证我们的账号和密码,这时打开手机拨号盘,输入数字信息,对方就知道我们输入的内容是什么。
1. DTMF的工程术语
双音多频(DTMF)是由贝尔实验室开发的信令方式,通过承载语音的模拟电话线传送电话拨号信息。每个数字利用两个不同频率突发模式的正弦波编码,选择双音方式是由于它能够可靠地将拨号信息从语音中区分出来。一般情况下,声音信号很难造成对DTMF接收器的错误触发。DTMF是“TouchTone”(早期AT&T的商标)的基础, 替代机械式拨号转盘的按键。
本文来自 http://blog.csdn.net/linyongan ,转载请务必注明出处。
2. 拨打服务电话
以拨打10000为例,拨打电话的流程,在《Android 5.1 Phone MO(去电)流程分析(应用层) 》和《Android 5.1 Phone MO(去电)流程分析(Framework层) 》里已经介绍过了,这里就不重复说了。
3. DTMF发起Tone音的流程
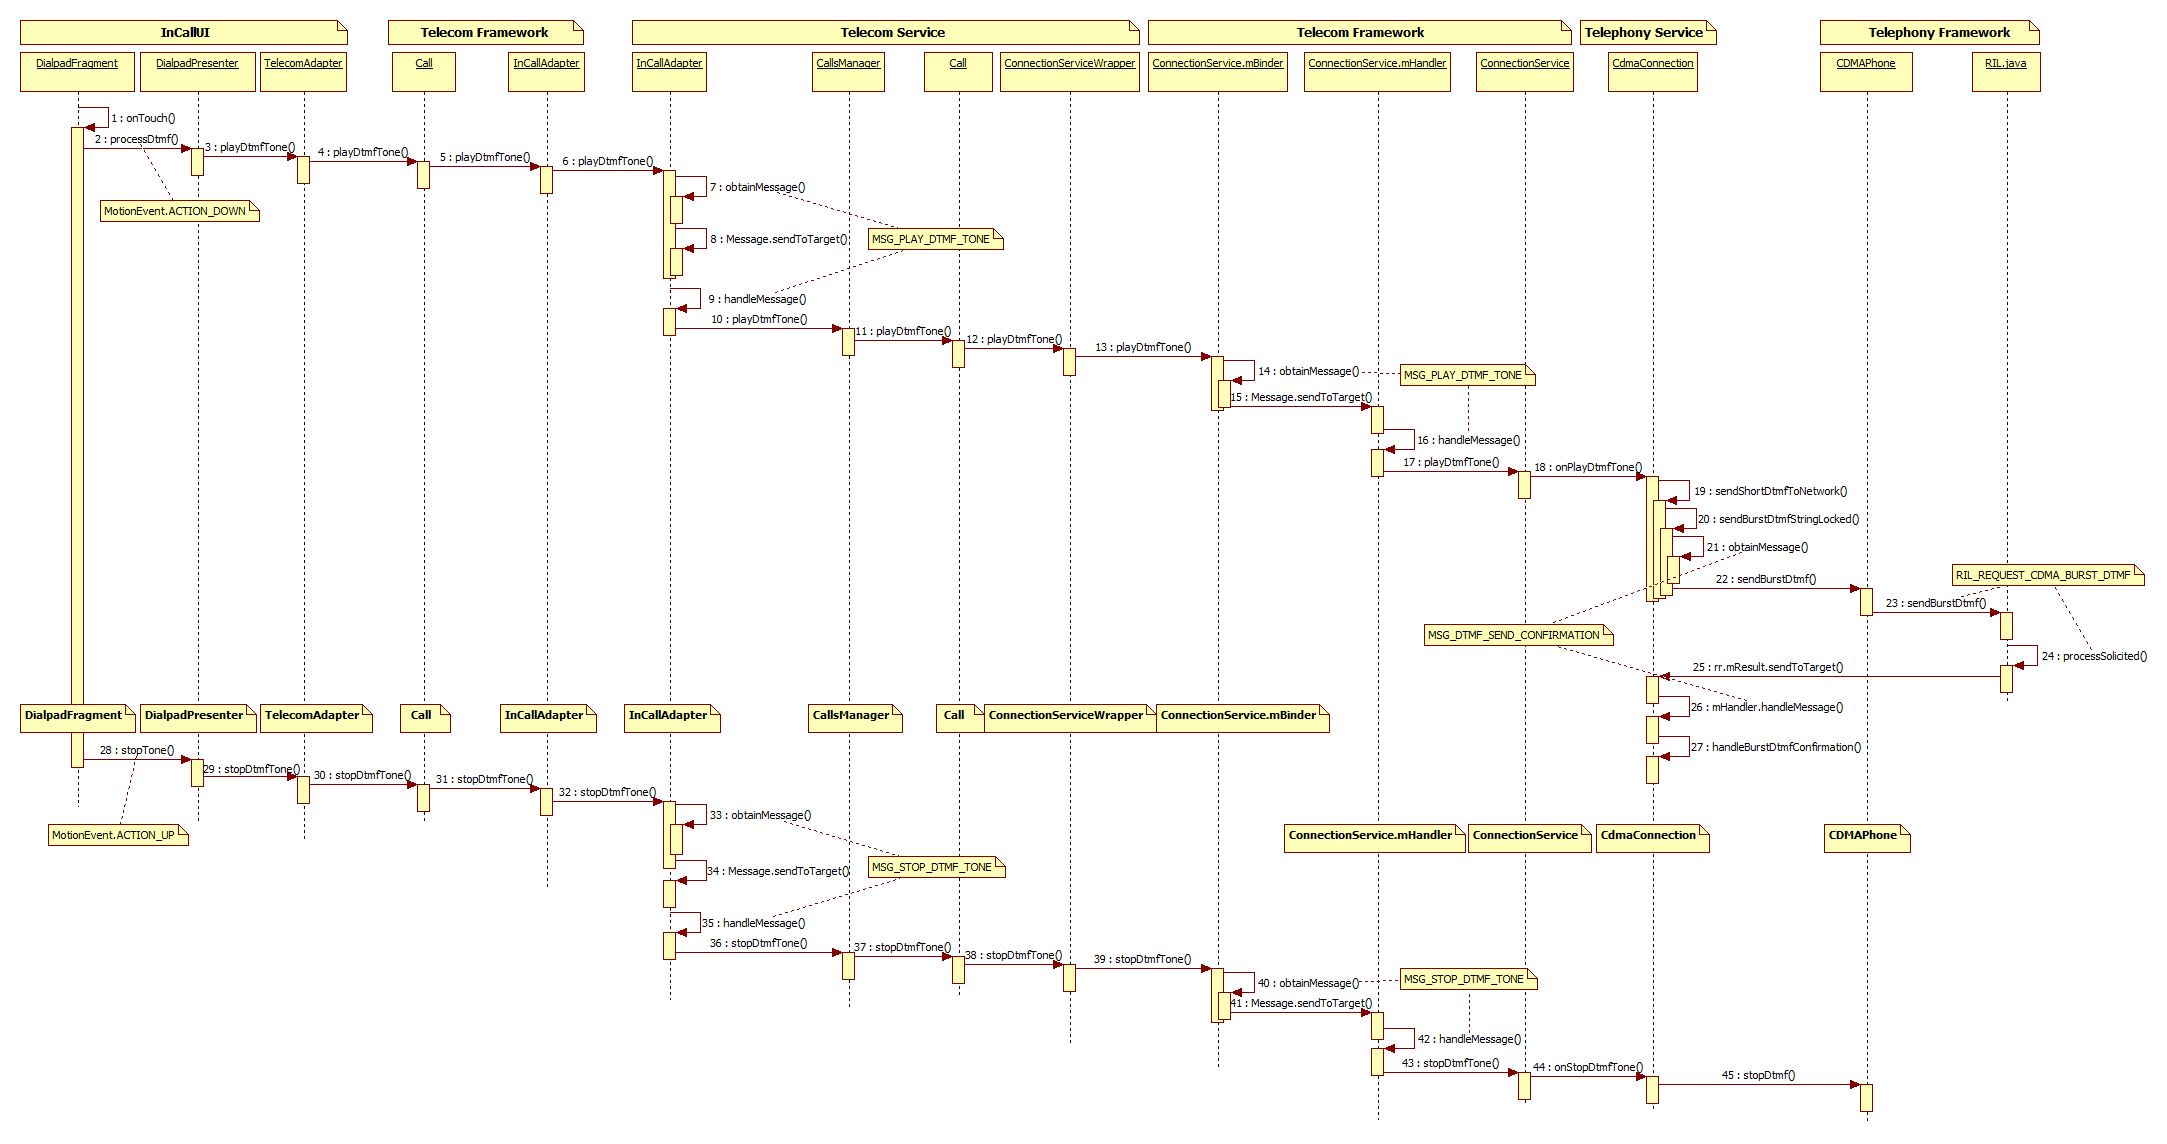
(如果图片看不清的话,可以右键选择在新标签中打开图片,或者把图片另存到自己电脑再查看。)
步骤1:
DialpadFragment.java
的onTouch()方法
从DialpadFragment.java的onTouch方法开始,注意DialpadFragment.java是在packages\apps\InCallUI\src\com\android\incallui目录下的。根据提示音输入数字,当我们的手指触摸屏幕时,就触发了MotionEvent.ACTION_DOWN事件,此时开始发Tone音;接着当我们的手指离开屏幕时,就触发MotionEvent.ACTION_UP事件,此时停止Tone音。我们先分析发Tone音的流程。
    public boolean onTouch(View v, MotionEvent event) {
        Log.d(this, "onTouch");
        int viewId = v.getId();
        // mDisplayMap保存的是按键的ID和按键对应处理的值
        if (mDisplayMap.containsKey(viewId)) {
            switch (event.getAction()) {
                case MotionEvent.ACTION_DOWN:
                    //首先通过单击的按键获取该按键对应的值,
                    //然后调用processDtmf处理Tone音的发送
                    getPresenter().processDtmf(mDisplayMap.get(viewId));
                    break;
                case MotionEvent.ACTION_UP:
                case MotionEvent.ACTION_CANCEL:
                    // stop the tone on ANY other event, except for MOVE.
                    getPresenter().stopTone();
                    break;
            }
            // do not return true [handled] here, since we want the
            // press / click animation to be handled by the framework.
        }
        return false;
   }
步骤2: DialpadPresenter.java 的processDtmf()方法
   /**
     * Processes the specified digit as a DTMF key, by playing the
     * appropriate DTMF tone, and appending the digit to the EditText
     * field that displays the DTMF digits sent so far.
     *
     */
    public final void processDtmf(char c) {
        Log.d(this, "Processing dtmf key " + c);
        // if it is a valid key, then update the display and send the dtmf tone.
        if (PhoneNumberUtils.is12Key(c) && mCall != null) {
            Log.d(this, "updating display and sending dtmf tone for '" + c + "'");

            // Append this key to the "digits" widget.
            getUi().appendDigitsToField(c);
            // Plays the tone through Telecomm.
            TelecomAdapter.getInstance().playDtmfTone(mCall.getId(), c);
        } else {
            Log.d(this, "ignoring dtmf request for '" + c + "'");
        }
    }
步骤3: TelecomAdapter.java 的playDtmfTone()方法
    void playDtmfTone(String callId, char digit) {
        if (mPhone != null) {
            getTelecommCallById(callId).playDtmfTone(digit);
        } else {
            Log.e(this, "error playDtmfTone, mPhone is null");
        }
    }

    private android.telecom.Call getTelecommCallById(String callId) {
        final Call call = CallList.getInstance().getCallById(callId);
        return call == null ? null : call.getTelecommCall();
    }
在getTelecommCallById方法里返回一个Call实例,并且这个Call是android.telecom.Call类型的;它是通过Package目录下InCallUI应用的Call,来间接获取到framework目录下telecomm的Call类。
Telecomm Call是在InCallUI Call实例创建时传入的。
    public Call(android.telecom.Call telecommCall) {
        mTelecommCall = telecommCall;
        mId = ID_PREFIX + Integer.toString(sIdCounter++);
        updateFromTelecommCall();
        mTelecommCall.addListener(mTelecommCallListener);
}步骤4:因此,下面会进入 Call.java (在frameworks\base\telecomm\java\android\telecom目录下)的playDtmfTone()方法里
   /**
     * Instructs this {@code Call} to play a dual-tone multi-frequency signaling (DTMF) tone.
     *
     * Any other currently playing DTMF tone in the specified call is immediately stopped.
     *
     * @param digit A character representing the DTMF digit for which to play the tone. This
     *         value must be one of {@code '0'} through {@code '9'}, {@code '*'} or {@code '#'}.
     */
    public void playDtmfTone(char digit) {
        mInCallAdapter.playDtmfTone(mTelecomCallId, digit);
}步骤5:进入 InCallAdapter.java (在frameworks\base\telecomm\java\android\telecom目录下)的playDtmfTone()方法里
    private final IInCallAdapter mAdapter;

    /**
     * Instructs Telecom to play a dual-tone multi-frequency signaling (DTMF) tone in a call.
     *
     * Any other currently playing DTMF tone in the specified call is immediately stopped.
     *
     * @param callId The unique ID of the call in which the tone will be played.
     * @param digit A character representing the DTMF digit for which to play the tone. This
     *         value must be one of {@code '0'} through {@code '9'}, {@code '*'} or {@code '#'}.
     */
    public void playDtmfTone(String callId, char digit) {
        try {
            mAdapter.playDtmfTone(callId, digit);
        } catch (RemoteException e) {
        }
    }
其中mAdapter是IInCallAdapter类型的。
步骤6~8:进入
InCallAdapter.java
(在packages\services\telecomm\src\com\android\server\telecom目录下)的playDtmfTone()方法里
class InCallAdapter extends IInCallAdapter.Stub {
    @Override
    public void playDtmfTone(String callId, char digit) {
        Log.d(this, "playDtmfTone(%s,%c)", callId, digit);
        if (mCallIdMapper.isValidCallId(callId)) {
            mHandler.obtainMessage(MSG_PLAY_DTMF_TONE,
            (int) digit, 0, callId).sendToTarget();
        }
    }
}在这里通过obtainMessage方法来创建一个消息类型为MSG_PLAY_DTMF_TONE的Message对象,通过Message.sendToTarget方法把消息发送出去,
步骤9:在InCallAdapter.java的内部类
InCallAdapterHandler
的handleMessage()方法里会有MSG_PLAY_DTMF_TONE相应的逻辑处理。
    private final class InCallAdapterHandler extends Handler {
        @Override
        public void handleMessage(Message msg) {
            Call call;
            switch (msg.what) {
            ...
            case MSG_PLAY_DTMF_TONE:
                 call = mCallIdMapper.getCall(msg.obj);
                 if (call != null) {
                     mCallsManager.playDtmfTone(call, (char) msg.arg1);
                 } else {
                   Log.w(this, "playDtmfTone, unknown call id: %s", msg.obj);
                 }
            break;
            ...
}步骤10:接着调用 CallsManager.java 的playDtmfTone()方法
    /**
     * Instructs Telecom to play the specified DTMF tone within the specified call.
     *
     * @param digit The DTMF digit to play.
     */
    void playDtmfTone(Call call, char digit) {
        if (!mCalls.contains(call)) {
            Log.i(this, "Request to play DTMF in a non-existent call %s", call);
        } else {
            call.playDtmfTone(digit);
            mDtmfLocalTonePlayer.playTone(call, digit);
        }
    }
这里的Call是在packages\services\telecomm\src\com\android\server\telecom目录下的;紧接着会调用DtmfLocalTonePlayer的playTone方法播放Tone音。
步骤11:进入 Call.java (在packages\services\telecomm\src\com\android\server\telecom目录下)的playDtmfTone()方法里
   /**
     * Plays the specified DTMF tone.
     */
    void playDtmfTone(char digit) {
        if (mConnectionService == null) {
            Log.w(this, "playDtmfTone() request on a call without a connection service.");
        } else {
            Log.i(this, "Send playDtmfTone to connection service for call %s", this);
            mConnectionService.playDtmfTone(this, digit);
        }
    }
步骤12: ConnectionServiceWrapper.java 的playDtmfTone()方法
    /** @see ConnectionService#playDtmfTone(String,char) */
    void playDtmfTone(Call call, char digit) {
        final String callId = mCallIdMapper.getCallId(call);
        if (callId != null && isServiceValid("playDtmfTone")) {
            try {
                logOutgoing("playDtmfTone %s %c", callId, digit);
                mServiceInterface.playDtmfTone(callId, digit);
            } catch (RemoteException e) {
            }
        }
    }
步骤13~15: ConnectionService.java 里mBinder的playDtmfTone()方法
private final IBinder mBinder = new IConnectionService.Stub() {
   @Override
   public void playDtmfTone(String callId, char digit) {
      mHandler.obtainMessage(MSG_PLAY_DTMF_TONE,
      digit, 0, callId).sendToTarget();
   }
}在这里通过obtainMessage()方法创建了一个消息类型为MSG_PLAY_DTMF_TONE的Message,再通过sendToTarget()把消息发送出去。
步骤16: ConnectionService.java 里mHandler的handleMessage()方法
    private final Handler mHandler = new Handler(Looper.getMainLooper()) {
        @Override
        public void handleMessage(Message msg) {
            switch (msg.what) {
            ...
            case MSG_PLAY_DTMF_TONE:
                 playDtmfTone((String) msg.obj, (char) msg.arg1);
            break;
            ...
    }
步骤17: ConnectionService.java 的playDtmfTone()方法
    private void playDtmfTone(String callId, char digit) {
        Log.d(this, "playDtmfTone %s %c", callId, digit);
        if (mConnectionById.containsKey(callId)) {
            findConnectionForAction(callId, "playDtmfTone").onPlayDtmfTone(digit);
        } else {
            findConferenceForAction(callId, "playDtmfTone").onPlayDtmfTone(digit);
        }
    }

    private Connection findConnectionForAction(String callId, String action) {
        if (mConnectionById.containsKey(callId)) {
            return mConnectionById.get(callId);
        }
        Log.w(this, "%s - Cannot find Connection %s", action, callId);
        return getNullConnection();
    }

    static synchronized Connection getNullConnection() {
        if (sNullConnection == null) {
            sNullConnection = new Connection() {};
        }
        return sNullConnection;
    }
通过findConnectionForAction获得一个Connection实例,在这里获得的是CdmaConnection,注意这个CdmaConnection.java是在packages\services\telephony\src\com\android\services\telephony目录下的。
步骤18~21: CdmaConnection.java 的onPlayDtmfTone()方法
    /** {@inheritDoc} */
    @Override
    public void onPlayDtmfTone(char digit) {
        if (useBurstDtmf()) {
            Log.i(this, "sending dtmf digit as burst");
            if (getPhone() != null) {
                // if LCH is on for this connection, that means that, this DTMF request is to play SCH
                // tones at far end. Hence use # for playing SCH tones over CDMA.
                if (TelephonyConnectionService.isLchActive(getPhone().getPhoneId())) {
                    digit = '#';
                }
            }
            sendShortDtmfToNetwork(digit);
        } else {
            Log.i(this, "sending dtmf digit directly");
            getPhone().startDtmf(digit);
        }
    }

    private void sendShortDtmfToNetwork(char digit) {
        synchronized(mDtmfQueue) {
            if (mDtmfBurstConfirmationPending) {
                mDtmfQueue.add(new Character(digit));
            } else {
                sendBurstDtmfStringLocked(Character.toString(digit));
            }
        }
    }

    private void sendBurstDtmfStringLocked(String dtmfString) {
        getPhone().sendBurstDtmf(
                dtmfString, 0, 0, mHandler.obtainMessage(MSG_DTMF_SEND_CONFIRMATION));
        mDtmfBurstConfirmationPending = true;
}在sendBurstDtmfStringLocked()方法里,通过obtainMessage()创建了一个消息类型为MSG_DTMF_SEND_CONFIRMATION的Message。这个Message会一直被传递到RILJ。
步骤22: CDMAPhone.java 的sendBurstDtmf()方法
    @Override
    public void sendBurstDtmf(String dtmfString, int on, int off, Message onComplete) {
        boolean check = true;
        for (int itr = 0;itr < dtmfString.length(); itr++) {
            if (!PhoneNumberUtils.is12Key(dtmfString.charAt(itr))) {
                Rlog.e(LOG_TAG,
                        "sendDtmf called with invalid character '" + dtmfString.charAt(itr)+ "'");
                check = false;
                break;
            }
        }
        if ((mCT.mState ==  PhoneConstants.State.OFFHOOK)&&(check)) {
            mCi.sendBurstDtmf(dtmfString, on, off, onComplete);
        }
     }
如果要发的Tone音字符合法,则调用RIL.java的sendBurstDtmf发起请求。
步骤23: RIL.java 的sendBurstDtmf()方法
    @Override
    public void
    sendBurstDtmf(String dtmfString, int on, int off, Message result) {
        RILRequest rr = RILRequest.obtain(RIL_REQUEST_CDMA_BURST_DTMF, result);

        rr.mParcel.writeInt(3);
        rr.mParcel.writeString(dtmfString);
        rr.mParcel.writeString(Integer.toString(on));
        rr.mParcel.writeString(Integer.toString(off));

        if (RILJ_LOGD) riljLog(rr.serialString() + "> " + requestToString(rr.mRequest)
                + " : " + dtmfString);

        send(rr);
}RILJ封装了一个RIL_REQUEST_CDMA_BURST_DTMF类型的消息,并且通过send(rr);发送给RILD,RILD继续处理。
步骤24和25: 当RILJ接收到RILD的回应时,在它的processResponse()方法有RIL_REQUEST_CDMA_BURST_DTMF相关的逻辑处理,最后将消息发送给rr. result对应的handler处理,由步骤21可知,最后是由CdmaConnection里mHandler的handleMessage()方法进行处理。
步骤26: CdmaConnection.java 里mHandler的handleMessage()方法
    private final Handler mHandler = new Handler() {
        /** ${inheritDoc} */
        @Override
        public void handleMessage(Message msg) {
            switch (msg.what) {
                ...
                case MSG_DTMF_SEND_CONFIRMATION:
                    handleBurstDtmfConfirmation();
                    break;
                ...
                default:
                    break;
            }
        }

    private void handleBurstDtmfConfirmation() {
        String dtmfDigits = null;
        synchronized(mDtmfQueue) {
            mDtmfBurstConfirmationPending = false;
            if (!mDtmfQueue.isEmpty()) {
                StringBuilder builder = new StringBuilder(mDtmfQueue.size());
                while (!mDtmfQueue.isEmpty()) {
                    builder.append(mDtmfQueue.poll());
                }
                dtmfDigits = builder.toString();

                // It would be nice to log the digit, but since DTMF digits can be passwords
                // to things, or other secure account numbers, we want to keep it away from
                // the logs.
                Log.i(this, "%d dtmf character[s] removed from the queue", dtmfDigits.length());
            }
            if (dtmfDigits != null) {
                sendBurstDtmfStringLocked(dtmfDigits);
            }
        }
    }
}
发Tone音的流程就到此结束了。
4. DTMF停止Tone音的流程
步骤28~43: 通过看时序图就知道,发Tone音的流程跟停止Tone音的流程是大部分相似的。步骤1~17跟步骤28~43都是相似的。
步骤44: CdmaConnection.java 的onStopDtmfTone()方法。(注意这个CdmaConnection.java是在packages\services\telephony\src\com\android\services\telephony目录下的)
    /** {@inheritDoc} */
    @Override
    public void onStopDtmfTone() {
        if (!useBurstDtmf()) {
            getPhone().stopDtmf();
        }
    }

    /**
     * Read the settings to determine which type of DTMF method this CDMA phone calls.
     */
    private boolean useBurstDtmf() {
        if (isImsConnection()) {
            Log.d(this,"in ims call, return false");
            return false;
        }
        int dtmfTypeSetting = Settings.System.getInt(
                getPhone().getContext().getContentResolver(),
                Settings.System.DTMF_TONE_TYPE_WHEN_DIALING,
                Constants.DTMF_TONE_TYPE_NORMAL);
        return dtmfTypeSetting == Constants.DTMF_TONE_TYPE_NORMAL;
    }
因为useBurstDtmf()返回true(作者猜测的,还没自己添加log验证,至少不会再走到RILJ的了),所以流程到此就结束了。


 6866
6866

 被折叠的 条评论
为什么被折叠?
被折叠的 条评论
为什么被折叠?
 到【灌水乐园】发言


