


今天给大家介绍一下SpringBoot中如何搭建Redis缓存功能
因为我的Redis是搭建在windows系统上面的,所以首先给大家介绍一下如何在windows上面搭建Redis缓存数据库。
步骤一:首先下载Redis缓存数据库,大家可以去官网上面下或者也可以在我这里下载:点击打开链接
步骤二:下载后就可以直接启动Redis服务,不需要安装或者配置。案例如下图所示:

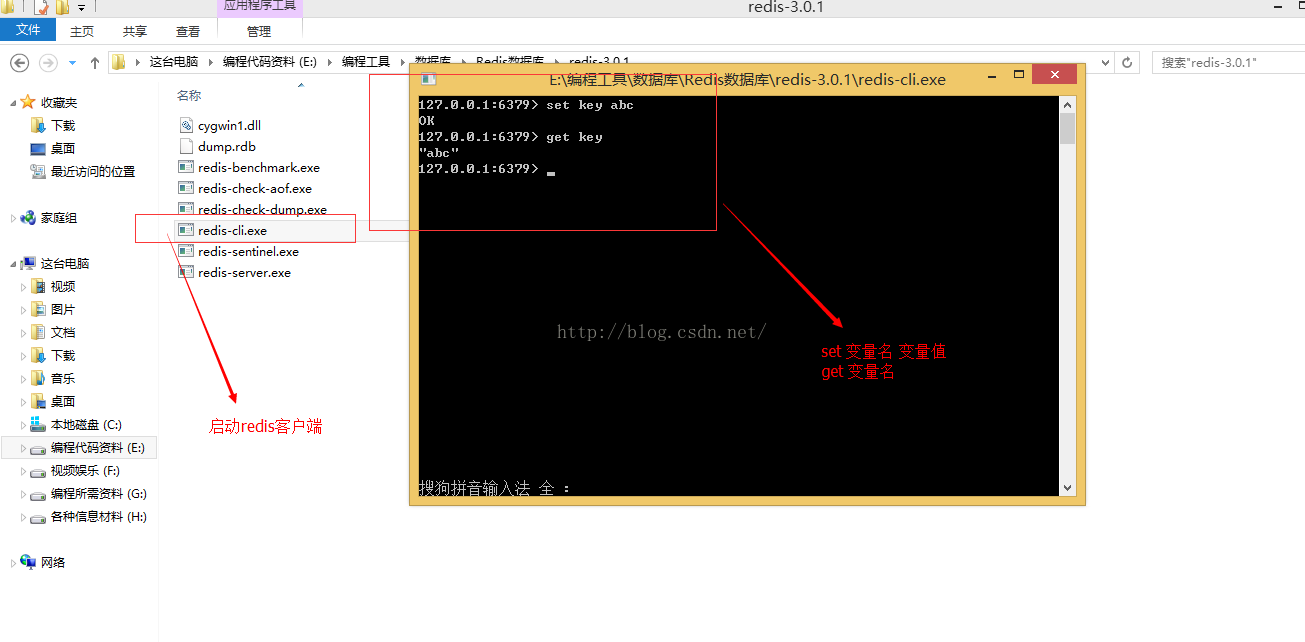
如果显示上面等信息,就表示Windows上面的Redis缓存数据库已经搭建成功了。关于Linux或者其他系统上面的搭建过程,大家可以自己去百度,我就不多介绍了。
然后下面就开始正式介绍SpringBoot中如何搭建使用Redis缓存数据库的具体过程。
1.首先在pom.xml上面添加Redis相关的jar信息,代码如下所示:
        <!--redis配置-->
        <dependency>
            <groupId>org.springframework.boot</groupId>
            <artifactId>spring-boot-starter-redis</artifactId>
</dependency># REDIS (RedisProperties)
# Redis数据库索引(默认为0)
spring.redis.database=0
# Redis服务器地址
spring.redis.host=localhost
# Redis服务器连接端口
spring.redis.port=6379
# Redis服务器连接密码(默认为空)
spring.redis.password=
# 连接池最大连接数(使用负值表示没有限制)
spring.redis.pool.max-active=8
# 连接池最大阻塞等待时间(使用负值表示没有限制)
spring.redis.pool.max-wait=-1
# 连接池中的最大空闲连接
spring.redis.pool.max-idle=8
# 连接池中的最小空闲连接
spring.redis.pool.min-idle=0
# 连接超时时间(毫秒)
spring.redis.timeout=0
RedisConfig配置类:
package example.test;
import org.springframework.context.annotation.Bean;
import org.springframework.context.annotation.Configuration;
import org.springframework.data.redis.connection.RedisConnectionFactory;
import org.springframework.data.redis.connection.jedis.JedisConnectionFactory;
import org.springframework.data.redis.core.RedisTemplate;
import org.springframework.data.redis.serializer.StringRedisSerializer;

@Configuration
public class RedisConfig {
    @Bean
    JedisConnectionFactory jedisConnectionFactory() {
        return new JedisConnectionFactory();
    }
    @Bean
    public RedisTemplate<String, User> redisTemplate(RedisConnectionFactory factory) {
        RedisTemplate<String, User> template = new RedisTemplate<String, User>();
        template.setConnectionFactory(jedisConnectionFactory());
        template.setKeySerializer(new StringRedisSerializer());
        template.setValueSerializer(new RedisObjectSerializer());
        return template;
    }
}package example.test;
import org.springframework.core.convert.converter.Converter;
import org.springframework.core.serializer.support.DeserializingConverter;
import org.springframework.core.serializer.support.SerializingConverter;
import org.springframework.data.redis.serializer.RedisSerializer;
import org.springframework.data.redis.serializer.SerializationException;
public class RedisObjectSerializer implements RedisSerializer<Object> {
private Converter<Object, byte[]> serializer = new SerializingConverter();
private Converter<byte[], Object> deserializer = new DeserializingConverter();
static final byte[] EMPTY_ARRAY = new byte[0];
public Object deserialize(byte[] bytes) {
if (isEmpty(bytes)) {
return null;
}
try {
return deserializer.convert(bytes);
} catch (Exception ex) {
throw new SerializationException("Cannot deserialize", ex);
}
}
public byte[] serialize(Object object) {
if (object == null) {
return EMPTY_ARRAY;
}
try {
return serializer.convert(object);
} catch (Exception ex) {
return EMPTY_ARRAY;
}
}
private boolean isEmpty(byte[] data) {
return (data == null || data.length == 0);
}
}package example.test;
import java.io.Serializable;
public class User implements Serializable {
private static final long serialVersionUID = -1L;
private String username;
private Integer age;
public User(String username, Integer age) {
this.username = username;
this.age = age;
}
// 省略getter和setter
public static long getSerialVersionUID() {
return serialVersionUID;
}
public String getUsername() {
return username;
}
public void setUsername(String username) {
this.username = username;
}
public Integer getAge() {
return age;
}
public void setAge(Integer age) {
this.age = age;
}
}package test;
import example.DemoApplication;
import example.test.User;
import org.junit.Assert;
import org.junit.Test;
import org.junit.runner.RunWith;
import org.springframework.beans.factory.annotation.Autowired;
import org.springframework.boot.test.SpringApplicationConfiguration;
import org.springframework.data.redis.core.RedisTemplate;
import org.springframework.test.context.junit4.SpringJUnit4ClassRunner;
@RunWith(SpringJUnit4ClassRunner.class)
@SpringApplicationConfiguration(DemoApplication.class)
public class TestRedis {
@Autowired
private RedisTemplate<String, User> redisTemplate;
@Test
public void test() throws Exception {
// 保存对象
User user = new User("超人", 20);
redisTemplate.opsForValue().set(user.getUsername(), user);
user = new User("蝙蝠侠", 30);
redisTemplate.opsForValue().set(user.getUsername(), user);
user = new User("蜘蛛侠", 40);
redisTemplate.opsForValue().set(user.getUsername(), user);
Assert.assertEquals(20, redisTemplate.opsForValue().get("超人").getAge().longValue());
Assert.assertEquals(30, redisTemplate.opsForValue().get("蝙蝠侠").getAge().longValue());
Assert.assertEquals(40, redisTemplate.opsForValue().get("蜘蛛侠").getAge().longValue());
}
}
虽然步骤很简单,但是今天在搭建的过程中还是遇到很多的问题,一个是不知道网上下载的Redis数据库到底能不能用,二是Junit中启动类出现jar的冲突老是启动出错。
最终我下载了好几个版本的Redis缓存数据库,终于可以肯定这个是可以用,也就是我上面给出的链接的那个,大家可以放心使用。
对于Jar包冲突,我今天的jar包冲突是tomcat相关包的冲突。下面给出冲突的案例,希望能给大家点帮助。
  <!--<!–打包成war文件的相关配置信息–>-->
        <!--<dependency>-->
            <!--<groupId>org.springframework.boot</groupId>-->
            <!--<artifactId>spring-boot-starter-tomcat</artifactId>-->
            <!--<!–<scope>provided</scope>–>-->
        <!--</dependency>-->

        <!--<dependency>-->
            <!--<groupId>org.springframework.boot</groupId>-->
            <!--<artifactId>spring-boot-legacy</artifactId>-->
            <!--<version>1.0.2.RELEASE</version>-->
        <!--</dependency>-->

        <!--<dependency>-->
            <!--<groupId>javax.servlet</groupId>-->
            <!--<artifactId>javax.servlet-api</artifactId>-->
            <!--<version>3.0.1</version>-->
        <!--</dependency>-->

        <!--<dependency>-->
            <!--<groupId>javax.servlet</groupId>-->
            <!--<artifactId>javax.servlet-api</artifactId>-->
            <!--<version>3.0.1</version>-->
        <!--</dependency>-->

        <!--<dependency>-->
            <!--<groupId>commons-fileupload</groupId>-->
            <!--<artifactId>commons-fileupload</artifactId>-->
            <!--<version>1.3.1</version>-->
        <!--</dependency>-->

        <!--<dependency>-->
            <!--<groupId>org.springframework</groupId>-->
            <!--<artifactId>spring-test</artifactId>-->
            <!--<version>4.1.4.RELEASE</version>-->
        <!--</dependency>-->
案例项目的下载地址:点击打开链接
如果大家想要源代码或者对博客有啥异议都可以加我QQ:208017534 欢迎打扰哦!!!


 1558
1558

 被折叠的 条评论
为什么被折叠?
被折叠的 条评论
为什么被折叠?
 到【灌水乐园】发言


