


微信小程序框架提供的基础组件有八类
一:视图容器 view container
包括:
view 视图容器
scroll-view 可滚动视图容器
swiper 滑块视图容器
view:感觉跟html里的div对应,官方文档里给出的例子是:
<view class="section">
<view class="section_title">flex-direction:row</view>
<view class="flex-wrp" style="flex-direction:row;">
<view class="flex-item bc_green">1</view>
<view class="flex-item bc_red">2</view>
<view class="flex-item bc_blue">3</view>
</view>
</view>
<view class="section1">
<view class="section1_title">flex-direction:column</view>
<view class="flex-wrp" style="height:300px;flex-direction:column;">
<view class="flex-item1 bc_green">1</view>
<view class="flex-item1 bc_red">2</view>
<view class="flex-item1 bc_blue">3</view>
</view>
</view>
但实现效果跟它给出的效果图不一致,style里的flex-direction设置并没有实现
scroll-view:各项属性
scroll-x:允许横向滚动
scroll-y:允许纵向滚动
upper-threshold:距顶部/左边多远时(px),触发scrolltoupper事件
lower-threshold:距底部/右边多远时,触发scrolltolower事件
scroll-top:设置竖向滚动条位置
scroll-left:设置横向滚动条位置
scroll-into-view:值应为某子元素id,则滚动到该元素,元素顶部对齐滚动区域顶部
bindscrolltoupper:滚动到顶部/左边,会触发scrolltoupper事件
bindscrolltolower:滚动到底部/右边,会触发scrolltolower事件
bindsroll:滚动时触发
使用竖向滚动时,需要给scroll-view一个固定高度
=======================================================================================
.wxml代码
<view class="section">
<view>vertical scroll</view>
<scroll-view class="scroll-view" scroll-y="true" bindscrolltoupper="upper" bindscrolltolower="lower"
bindscroll="scroll" scroll-into-view="{{toView}}" scroll-top="{{scrollTop}}">
<view id="green" class="scroll-view-item bc_green"></view>
<view id="red" class="scroll-view-item bc_red"></view>
<view id="yellow" class="scroll-view-item bc_yellow"></view>
<view id="blue" class="scroll-view-item bc_blue"></view>
</scroll-view>
</view>
<view class="btn-area">
<button size="mini" bindtap="tap">click me to scroll into view </button>
<button size="mini" bindtap="tapMove">click me to scroll</button>
</view>
.wxss代码
.bc_green{
background:green;
}
.bc_red{
background:red;
}
.bc_blue{
background:blue;
}
.bc_yellow{
background:yellow;
}
.scroll-view-item{
width:200px;
height:200px;
}
.scroll-view{
width:100%;
height:400px;
}
.js代码
var order=['red','yellow','green','blue','red']
Page({
data:{
toView:'red',
scrollTop:200
},
upper:function(e){
console.log(e)
},
lower:function(e){
console.log(e)
},
scroll:function(e){
console.log(e)
},
tap:function(e){
for(var i=0;i<order.length;++i){
if(order[i]==this.data.toView){
this.setData({
toView:order[i+1]
})
break
}
}
},
tapMove:function(e){
this.setData({
scrollTop:this.data.scrollTop+10
})
}
})
swiper滑块视图容器
属性:
indicator-dots:是否显示面板指示点(类似于我们做轮播那几个点击可切换的圆点)
autoplay:是否自动切换
current:当前所在页面的index
interval:自动切换时间间隔
duration:滑动动画时长
bindchange:current改变时会触发change事件
注意:其中只可放置swiper-item组件,其他节点会被自动删除
swiper-item仅可放置在swiper组件中,宽高自动设置为100%
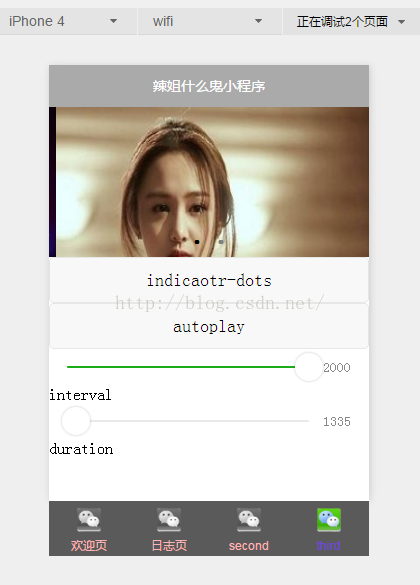
把官方文档里的例子写出来发现,这个swiper滑块视图容器是可以用来做轮播图的
====================================================================================
.wxml代码
<swiper indicator-dots="{{indicatorDots}}" autoplay="{{autoplay}}" interval="{{interval}}"
duration="{{duration}}">
<block wx:for="{{imgUrls}}">
<swiper-item>
<image src="{{item}}" class="slide-image"/>
</swiper-item>
</block>
</swiper>
<button bindtap="changeIndicatorDots">indicaotr-dots</button>
<button bindtap="changeAutoplay">autoplay</button>
<slider bindchange="intervalChange" show-value min="500" max="2000"/>interval
<slider bindchange="durationChange" show-value min="1000" max="10000"/>duration
.js代码
Page({
data:{
imgUrls:[
'../../img/7.jpeg',
'../../img/10.jpg'
],
indicatorDots:false,
autoplay:false,
interval:5000,
duration:1000
},
changeIndicatorDots:function(e){
this.setData({
indicatorDots:!this.data.indicatorDots
})
},
changeAutoplay:function(e){
this.setData({
autoplay:!this.data.autoplay
})
},
intervalChange:function(e){
this.setData({
interval:e.detail.value
})
},
durationChange:function(e){
this.setData({
duration:e.detail.value
})
}
})
效果图:


 7484
7484

 被折叠的 条评论
为什么被折叠?
被折叠的 条评论
为什么被折叠?
 到【灌水乐园】发言


