


1、TensorRT介绍
TensorRT是一个高性能的深度学习推理(Inference)优化器,可以为深度学习应用提供低延迟、高吞吐率的部署推理。TensorRT可用于对超大规模数据中心、嵌入式平台或自动驾驶平台进行推理加速。TensorRT现已能支持TensorFlow、Caffe、Mxnet、Pytorch等几乎所有的深度学习框架,将TensorRT和NVIDIA的GPU结合起来,能在几乎所有的框架中进行快速和高效的部署推理。
TensorRT的核心是一个C++库,用于在Nvidia GPU上进行高性能网络推理。TensorRT采用一个经过优化的网络结构、调整过的参
数,并产生一个高度优化的运行时引擎,对该网络进行推理。
TensorRT优化方式有:
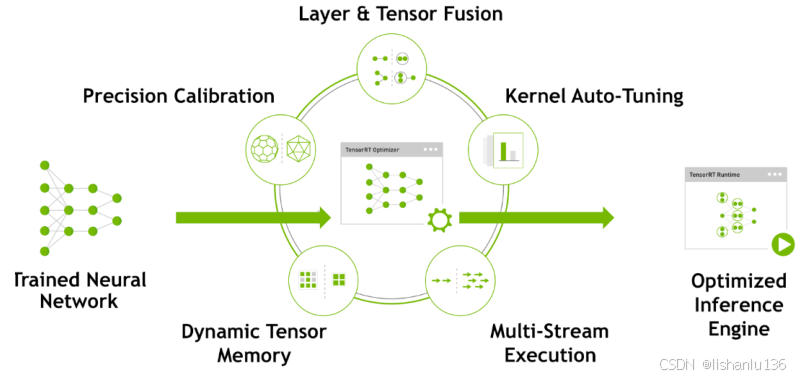
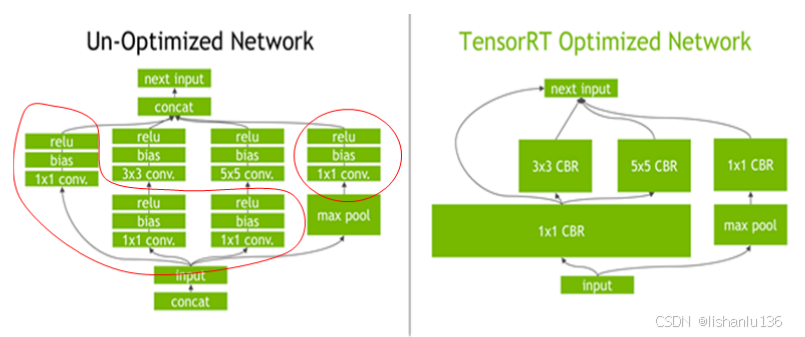
1.1 layer&Tensor Fusion(在构建engine阶段完成)
核融合技术,它的目的是提高gpu利用率,优化内存存储和带宽,将多个内核组合为一个只执行一次的内核。TensorRT通过对层间的横向或纵向合并(合并后的结构称为CBR,意指 convolution, bias, and ReLU layers are fused to form a single layer),使得层的数量大大减少。横向合并可以把卷积、偏置和激活层合并成一个CBR结构,只占用一个CUDA核心。纵向合并可以把结构相同,但是权值不同的层合并成一个更宽的层,也只占用一个CUDA核心。合并之后的计算图(图1右侧)的层次更少了,占用的CUDA核心数也少了,因此整个模型结构会更小,更快,更高效。
1.2 Weight &Activation Precision Calibration(在构建engine阶段完成)
量化精度校准技术,大部分深度学习框架在训练神经网络时网络中的张量(Tensor)都是32位浮点数的精度(Full 32-bit precision,FP32),一旦网络训练完成,在部署推理的过程中由于不需要反向传播,完全可以适当降低数据精度,比如降为FP16或INT8的精度。TensorRT通过使用自动无参数校准步骤来实现这一点。它利用一些具有代表性的输入样本,将权值和激活张量转换为较低的精度,从而使模型的精度损失最小化。更低的数据精度将会使得内存占用和延迟更低,从而提高计算吞吐量,也会使模型体积更小。
| precision | Dynamic range | Memory usage |
|---|---|---|
| fp32(单精度) | [-3.4x1038 , +3.4x1038 ] | 4 Bytes |
| fp16(半精度) | [-65504, +65504] | 2Bytes |
| int8(整型) | [-128, +127] | 1Bytes |
1.3 Kernel Auto-Tuning(在推理阶段完成)
核自动调整,网络模型在推理计算时,是调用GPU的CUDA核进行计算的。TensorRT可以针对不同的算法,不同的网络模型,不同的GPU平台,进行 CUDA核的调整(包括:怎么调用CUDA核心、怎么分配,每个block里面分配多少个线程、每个grid里面有多少个block。),以保证当前模型在特定平台上以最优性能计算。
1.4 Dynamic Tensor Memory(在推理阶段完成)
动态张量存储器,在每个tensor的使用期间,TensorRT会为其指定显存,避免显存重复申请,减少内存占用和提高重复使用效率。
1.5 Multi-Stream Execution(在推理阶段完成)
多流执行,针对GPU底层优化,可扩展设计,允许多个输入流在单个设备上并行使用同一个模型。

TensorRT具有Python和C++API,开发者只需要利用转换器将训练好的模型转换一下就可以将这些技术融入到优化后的模型,最终将其部署到目标平台上。
2、转换方式
-
法一:Torch-TensorRT(https://github.com/pytorch/TensorRT)
工作流程大致如下:
(1). 训练 / 下载 -> 源 PyTorch 模型, model = torch.load()
(2). PyTorch 模型 -> TorchScript 模型: traced_model = torch.jit.trace(model)
(3). TorchScript 模型 -> TensorRT 模型: compiled_trt_model = torch_tensorrt.compile(traced_model, inputs, enabled_precisions)
Torch-TensorRT已经可以在生产中使用了,大部分backbone都支持,因为有torchscript的一层包装,启动时、以及其内部使用VM(虚拟机)调用每个op,性能会有一定的损耗。 -
法二:torch2trt(https://github.com/NVIDIA-AI-IOT/torch2trt)
(1). 训练 / 下载 -> 源 PyTorch 模型, model = torch.load()
(2). PyTorch 模型 -> TensorRT模型: trt_model = torch2trt(model, [x]) -
法三:torch2trt_dynamic(https://github.com/grimoire/torch2trt_dynamic)
它是torch2trt支持动态输入的分支项目,转换过程和torch2trt类似,只是输入x支持多态尺寸输入。 -
法四:pytorch->onnx->TensorRT
3、实践
3.1 环境安装
系统:windows10专业版
显卡:Nvidia GTX1660
cuda10.2、cudnn8.4.1、pytorch1.8.2、pycuda,tensorRT8.4.1,vs2019, python3.8
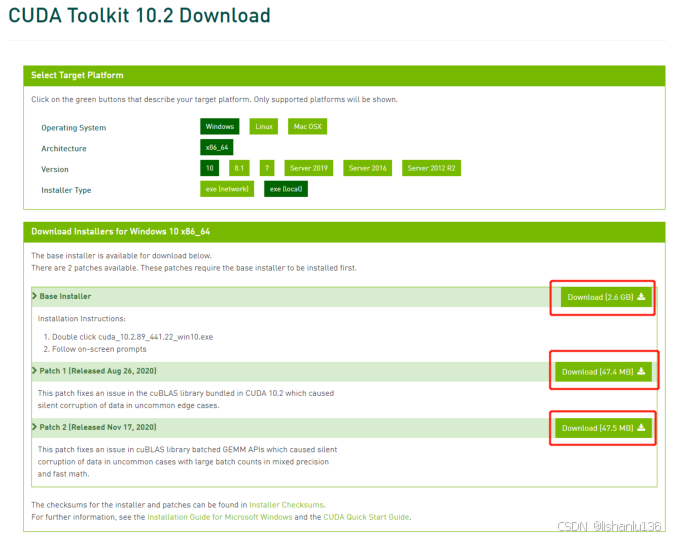
cuda下载地址:https://developer.nvidia.com/cuda-downloads
cuda10.2两个补丁也必须安装,不然运行会报错找不到cuBLAS库。
cudnn下载地址:https://developer.nvidia.com/cudnn
python环境安装pycuda与tensorRT(两个安装包都和cuda版本密切相关,下载的时候需注意)
pycuda:https://www.lfd.uci.edu/~gohlke/pythonlibs/#pycuda,
pycuda‐2021.1+cuda102‐cp38‐cp38‐win_amd64.whl
tensorRT:https://developer.nvidia.com/nvidia-tensorrt-download, 8.4.1.59(源码地址:https://github.com/NVIDIA/TensorRT)
vs2019 community,不安装的话,运行pycuda会报错,找不到cl.exe
python环境中安装tensorRT
下载8.4.1.5版的tensorRT.zip,并解压
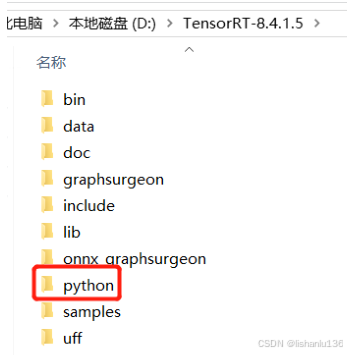
进入python文件夹:
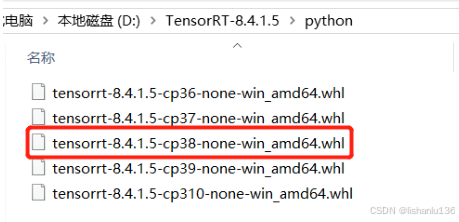
pip install tensorrt-cp38-xxx.whl
另外还需要进入onnx_graphsurgeon安装onnx_graphsurgeon,以及onnx,onnx-simplifier
3.2 pytorch模型转TensorRT流程(pt -> onnx -> trt.engine)
1、使用pytorch训练得到pt文件;
2、将pt文件转换为onnx格式;
3、使用onnxsim.simplify对转换后的onnx进行简化;
4、解析onnx文件构建trt推理引擎;
5、若转换失败需修改onnx结构,重新保存修改后的onnx,再执行第4步;
6、加载引擎执行推理,为引擎输入、输出、模型分配空间;
7、将待推理的数据(预处理后的img数据)赋值给inputs(引擎输入);
8、执行推理,拿到outputs;
9、对outputs后处理,根据构建引擎时的格式取出输出,reshape到指定格式(和torch推理后的格式一样);
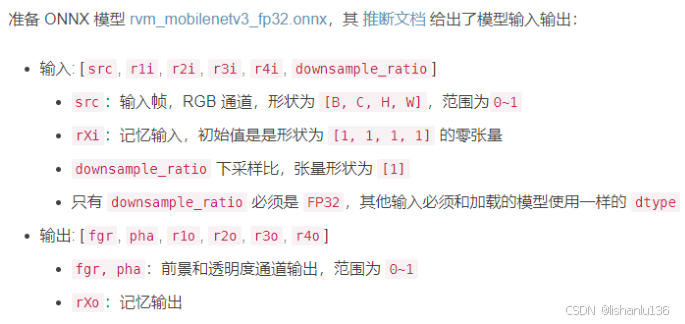
转换示例:RVM实时稳健抠图模型,https://github.com/PeterL1n/RobustVideoMatting
由于github上提供了onnx模型,就省去了pt转onnx步骤
尝试用tensorRT提供的exe直接转trt.engine
trtexec.exe --onnx=rvm_mobilenetv3_fp32.onnx --workspace=64 --saveEngine=rvm_mobilenetv3_fp32.engine -- verbose
报错:
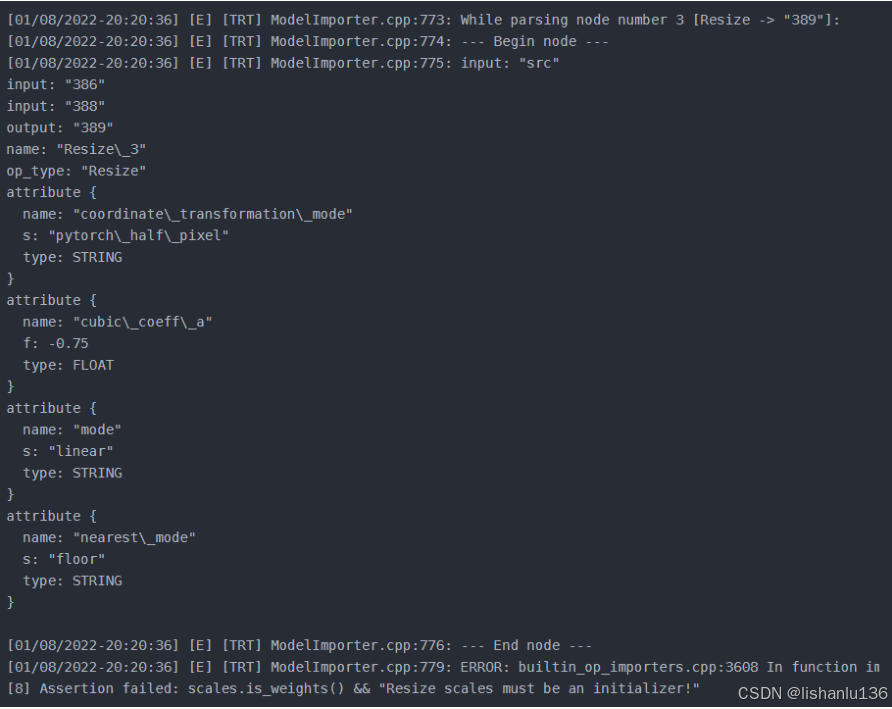
修改onnx结构
用Netron打开onnx模型,查看Resize_3节点。
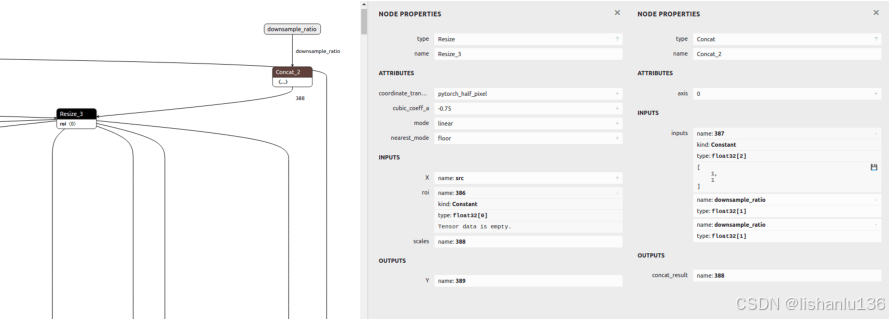
发现其scales输入是依据downsample_ratio 得到的,即[1,1,downsample_ratio,downsample_ratio],可用ONNX GraphSurgeon修改成常量(onnx_graphsurgeon:https://www.cnblogs.com/nanmi/p/14875678.html)。
最后修改步骤如下:
# ONNX 模型简化,并改为静态输入尺寸
python -m onnxsim rvm_mobilenetv3_fp32.onnx rvm_mobilenetv3_fp32_sim.onnx \
--input-shape src:1,3,1920,1080 r1i:1,1,1,1 r2i:1,1,1,1 r3i:1,1,1,1 r4i:1,1,1,1

# ONNX GraphSurgeon 修改模型
python rvm_onnx_modify.py -i rvm_mobilenetv3_fp32_sim.onnx -o rvm_mobilenetv3_fp32_sim_modified.onnx

# trtexec 将 ONNX 转成 TensorRT engine
trtexec.exe --onnx=rvm_mobilenetv3_fp32_sim_modified.onnx --workspace=64 --saveEngine=rvm_mobilenetv3_fp32_sim_modified.engine

# 也可以用tensorrt的pythonAPI接口来转,如给出的get_engine函数。
rvm_onnx_modify.py文件如下:
import onnx
import onnx_graphsurgeon as gs
import argparse
import numpy as np

def get_argument():
    arger = argparse.ArgumentParser()
    arger.add_argument("-i","--input", type=str, help="input onnx path.")
    arger.add_argument("-o","--output", type=str, help="modified onnx path.")
    return arger


def modify(input: str, output: str, downsample_ratio: float = 0.25) -> None:
    print(f'\nonnx load: {input}')
    graph = gs.import_onnx(onnx.load(input))

    #_print_graph(graph)

    # update node Resize_3: scales
    resize_3 = [n for n in graph.nodes if n.name == 'Resize_3'][0]
    print()
    print(resize_3)

    scales = gs.Constant('388', np.asarray([1, 1, downsample_ratio, downsample_ratio], dtype=np.float32))

    resize_3.inputs = [i if i.name != '388' else scales for i in resize_3.inputs]
    print()
    print(resize_3)

    # remove input downsample_ratio
    graph.inputs = [i for i in graph.inputs if i.name != 'downsample_ratio']

    # remove node Concat_2
    concat_2 = [n for n in graph.nodes if n.name == 'Concat_2'][0]
    concat_2.outputs.clear()

    # remove unused nodes/tensors
    graph.cleanup()

    onnx.save(gs.export_onnx(graph), output)


if __name__ == '__main__':
    arger = get_argument().parse_args()
    modify(input=arger.input, output=arger.output)
get_engine函数如下:
def get_engine(onnx_file_path, engine_file_path=""):
    """Attempts to load a serialized engine if available, otherwise builds a new TensorRT engine and saves it."""
    def build_engine():
        """Takes an ONNX file and creates a TensorRT engine to run inference with"""
        with trt.Builder(TRT_LOGGER) as builder, builder.create_network(EXPLICIT_BATCH
        ) as network, builder.create_builder_config() as config, trt.OnnxParser(
            network, TRT_LOGGER
        ) as parser, trt.Runtime(
            TRT_LOGGER
        ) as runtime:
            config.max_workspace_size = 1 << 32
            config.set_tactic_sources(1<<int(trt.TacticSource.CUBLAS))
            builder.max_batch_size = 1
            # Parse model file
            if not os.path.exists(onnx_file_path):
                print("ONNX file {} not found, please run yolov3_to_onnx.py first to generate it.".format(onnx_file_path))
                exit(0)
            print("Loading ONNX file from path {}...".format(onnx_file_path))
            with open(onnx_file_path, "rb") as model:
                print("Beginning ONNX file parsing")
                if not parser.parse(model.read()):
                    print("ERROR: Failed to parse the ONNX file.")
                    for error in range(parser.num_errors):
                        print(parser.get_error(error))
                    return None
            network.get_input(0).shape = [1, 3, 1920, 1080]
            print("Completed parsing of ONNX file")
            print("Building an engine from file {}; this may take a while...".format(onnx_file_path))
            plan = builder.build_serialized_network(network, config)
            engine = runtime.deserialize_cuda_engine(plan)
            print("Completed creating Engine")
            with open(engine_file_path, "wb") as f:
                f.write(plan)
            return engine
    if os.path.exists(engine_file_path):
        # If a serialized engine exists, use it instead of building an engine.
        print("Reading engine from file {}".format(engine_file_path))
        with open(engine_file_path, "rb") as f, trt.Runtime(TRT_LOGGER) as runtime:
            return runtime.deserialize_cuda_engine(f.read())
    else:
        return build_engine()
3.3 使用PythonAPI加载tensorRT引擎进行推理
1、创建runtime
2、反序列化创建engine
3、创建context
4、获取输入输出索引
5、创建buffers
6、为输入输出开辟GPU显存
7、创建cuda流
8、从CPU到GPU----拷贝input数据
9、异步推理
10、从GPU到CPU----拷贝output数据
11、同步cuda流
12、释放资源
class setbg_infer_trt:
    def __init__(self, width=1080, height=1920) -> None:
        self.width=width
        self.height=height
        trt_engine_path = 'set_bg_weights/rvm_mobilenetv3_fp32_trt_841.engine'
        self.ctx = cuda.Device(0).make_context()
        # Build an engine
        self.engine = get_engine(onnx_model_path, trt_engine_path)
        # Create the context for this engine
        self.context = self.engine.create_execution_context()
        self.stream = cuda.Stream()
        # Allocate buffers for input and output
        self.inputs, self.outputs, self.bindings= allocate_buffers(self.engine) # input, output: host # bindings
        print("init complete.")
        self.ctx.pop()

    def do_inference(self, context, bindings, inputs, outputs, stream, batch_size=1):
        # Transfer data from CPU to the GPU.
        [cuda.memcpy_htod_async(inp.device, inp.host, stream) for inp in inputs]
        # Run inference.
        context.execute_async_v2(bindings=bindings, stream_handle=stream.handle)
        # Transfer predictions back from the GPU.
        [cuda.memcpy_dtoh_async(out.host, out.device, stream) for out in outputs]
        # Synchronize the stream
        stream.synchronize()
        # Return only the host outputs.
        return [out.host for out in outputs]

    def inference(self, inp_img, bgr):
        image_cv = cv2.cvtColor(inp_img, cv2.COLOR_BGR2RGB)
        image_cv = cv2.resize(image_cv, (self.width, self.height))
        img_np = np.array(image_cv, dtype=float) / 255.
        img_np = np.transpose(img_np, (2, 0, 1))
        img_np_nchw = np.expand_dims(img_np, axis=0)
        img_np_nchw = img_np_nchw.astype(dtype=np.float32)
        print("input_img shape:", img_np_nchw.shape)
        with self.context as ctx:
            # Load data to the buffer
            self.inputs[0].host = img_np_nchw.reshape(-1)
            # inputs[1].host = ... for multiple input
            t1 = time.time()
            self.ctx.push()
            trt_outputs = self.do_inference(ctx, bindings=self.bindings, inputs=self.inputs, outputs=self.outputs, stream=self.stream) # numpy data
            self.ctx.pop()
            t2 = time.time()
            print("tensorRT infer time: %.3f"%(t2-t1))
            #print(trt_outputs[4].shape)   #fgr
            #print(trt_outputs[5].shape)   #pha
            h_outputs = trt_outputs[5].reshape((max_batch_size, 1, self.height, self.width))
            pha = h_outputs[0]
4、TensorRT的限制
经过tensorRT优化后的模型与特定GPU绑定,例如在1080TI上生成的模型在2080TI上无法使用;高版本的TensorRT依赖于高版本的CUDA版本,而高版本的CUDA版本依赖于高版本的驱动,如果想要使用新版本的TensorRT,更换环境是不可避免的;TensorRT尽管好用,但推理优化infer还是闭源的,不能够完全掌控。
优秀工程参考:
https://github.com/TrojanXu/yolov5-tensorrt
https://github.com/wang-xinyu/tensorrtx
https://github.com/NVIDIA-AI-IOT/torch2trt


 4434
4434

 被折叠的 条评论
为什么被折叠?
被折叠的 条评论
为什么被折叠?
 到【灌水乐园】发言


