


在windows上搭建ES
1.下载ES
官网:https://www.elastic.co/downloads/elasticsearch
官网下载很慢,这里提供一个百度网盘下载链接:
https://pan.baidu.com/s/1FH43S2MbH0yu5AKLVmfaiA
提取码:qnwb
版本:ES 7.3.2
2.搭建ES
下载之后解压如下图所示:

进入bin目录:

双击elasticsearch.bat即可启动ES,但是这个仅仅是本机可以访问。
3.启动远程访问
elasticsearch.yml配置如下:
# ======================== Elasticsearch Configuration =========================
#
# NOTE: Elasticsearch comes with reasonable defaults for most settings.
#       Before you set out to tweak and tune the configuration, make sure you
#       understand what are you trying to accomplish and the consequences.
#
# The primary way of configuring a node is via this file. This template lists
# the most important settings you may want to configure for a production cluster.
#
# Please consult the documentation for further information on configuration options:
# https://www.elastic.co/guide/en/elasticsearch/reference/index.html
#
# ---------------------------------- Cluster -----------------------------------
#
# Use a descriptive name for your cluster:
#
cluster.name: my-application
#
# ------------------------------------ Node ------------------------------------
#
# Use a descriptive name for the node:
#
node.name: node1

node.master: true

node.data: true
#
# Add custom attributes to the node:
#
#node.attr.rack: r1
#
# ----------------------------------- Paths ------------------------------------
#
# Path to directory where to store the data (separate multiple locations by comma):
#
path.data: .\mydata\data
#
# Path to log files:
#
path.logs: .\mydata\log
#
# ----------------------------------- Memory -----------------------------------
#
# Lock the memory on startup:
#
#bootstrap.memory_lock: true
#
# Make sure that the heap size is set to about half the memory available
# on the system and that the owner of the process is allowed to use this
# limit.
#
# Elasticsearch performs poorly when the system is swapping the memory.
#
# ---------------------------------- Network -----------------------------------
#
# Set the bind address to a specific IP (IPv4 or IPv6):
#
network.host: 0.0.0.0
#
# Set a custom port for HTTP:
#
http.port: 9200

transport.tcp.port: 9300
#
# For more information, consult the network module documentation.
#
# --------------------------------- Discovery ----------------------------------
#
# Pass an initial list of hosts to perform discovery when this node is started:
# The default list of hosts is ["127.0.0.1", "[::1]"]
#
#discovery.seed_hosts: ["192.168.210:9200"]
#
# Bootstrap the cluster using an initial set of master-eligible nodes:
#
cluster.initial_master_nodes: ["node1"]
#
# For more information, consult the discovery and cluster formation module documentation.
#
# ---------------------------------- Gateway -----------------------------------
#
# Block initial recovery after a full cluster restart until N nodes are started:
#
#gateway.recover_after_nodes: 3
#
# For more information, consult the gateway module documentation.
#
# ---------------------------------- Various -----------------------------------
#
# Require explicit names when deleting indices:
#
#action.destructive_requires_name: true

#解决跨域问题
http.cors.enabled: true

http.cors.allow-origin: "*"

http.cors.allow-methods: OPTIONS, HEAD, GET, POST, PUT, DELETE

http.cors.allow-headers: "X-Requested-With, Content-Type, Content-Length, X-User"


xpack.ml.enabled: false
注册ES服务
在bin目录下,打开cmd控制台
输入以下命令,即可安装ES服务
elasticsearch-service.bat install
启动ES服务:
elasticsearch-service.bat start
elasticsearch-service.bat后面还可以执行这些命令 :
- install: 安装Elasticsearch服务
- remove: 删除已安装的Elasticsearch服务(如果启动则停止服务)
- start: 启动Elasticsearch服务(如果已安装)
- stop: 停止服务(如果启动)
- manager:启动GUI来管理已安装的服务
C#操作ES
1.新建一个项目,Nuget引用NEST:

2.向ElasticSearch中加入数据,加入数据时需要指定索引,我这里的索引是mymodel:
通讯模型类:
public class Model
    {
        public string Name { get; set; }
        public int Age { get; set; }
        public int ID { get; set; }
        public string UUID { get; set; }

        public DateTime CreatedTime { get; set; }

    }
初始化ElasticSearch客户端:
var node = new Uri("http://10.36.10.13:9200/");
var settings = new ConnectionSettings(node);
settings.DefaultIndex("mymodel");
var client = new ElasticClient(settings);
注意:settings.DefaultIndex(“mymodel”);这里是指定默认的索引,下面的操作便不再需要指定索引
向elasticsearch中添加数据:
var randon = new Random();
var list = new List<Model>();
for (int i = 0; i < 1000; i++)
{
    var model = new Model()
    {
        Name = "test" + i,
        Age = randon.Next(0, 100),
        ID = i,
        UUID = Guid.NewGuid().ToString(),
        CreatedTime = DateTime.Now.AddSeconds(i),
    };
    list.Add(model);
}
var result = client.IndexMany(list);
如果是插入一条数据,用Index方法
特别注意:ES索引的名称必须是小写,大写是插入不了数据的
查询
查询所有数据:
var result = client.Search<Model>();
这样不指定条件,不指定大小,查询默认10条数据
指定大小与开始的索引:
var result = client.Search<Model>(x=>x.From(0).Size(10000));
以上是从0开始,查询10000条数据
按条件查找
字符串包含查找:
var result = client.Search<Model>(x=>x.Query(t=>t.Term(m=>m.UUID, "9479edc0")));
查找UUID包含“9479edc0“的数据
注意:Term查询时,后面的给定关键字必须是小写,不然查询不到值
数字范围查找:
var result = client.Search<Model>(x => x.Query(t => t.Range(a=>a.GreaterThan(80).LessThan(90).Field(b=>b.Age))));
查询年龄在80到90的结果
注意,最后必须要指定Field!!!
日期范围查找:
var result = client.Search<Model>(x => x.Query(t => t.DateRange(a => a.GreaterThan(DateTime.Now).LessThan(DateTime.Now.AddSeconds(3)).Field(m=>m.CreatedTime))).Size(10000));
查询大于当前时间,小于当前时间之后的3s的数据
查找ID在某个数组中:
var list = new List<int>() { 1000, 1001, 1002, 1003 };
var result = client.Search<Model>(x=>x.From(0).Size(10000).Query(t=>t.Terms(m=>m.Field(model=>model.ID).Terms(list))));
Bool查询
 //bool查询  ID大于1000且小于3000 且年龄大于20小于40或年龄大于60小于80  且UUID含有a931b4db的数据

var result = client.Search<Model>(x => x.From(0).Size(10000).Query(a => a.Bool
(
    b => b.Must(c => c.Range(d => d.Field(model => model.ID).GreaterThan(1000).LessThan(3000)))// AND
        .Should(//OR
                c => c.Range(d => d.Field(model => model.Age).GreaterThan(20).LessThan(40)),
                c => c.Range(d => d.Field(model => model.Age).GreaterThan(60).LessThan(80))
                )
        .Must(c => c.Term(d => d.UUID, "a931b4db"))
)));
查询ES自动生成的id:
var results = response.Hits.Select(hit =>
 {
      var result = hit.Source;
      result.Id = hit.Id;
      return result;
 });
C#操作ES总结
一、获取NEST执行时的请求响应报文
1.初始化Setting的时候,加上settings.DisableDirectStreaming(true);
var node = new Uri("http://10.36.10.13:9200/");
var settings = new ConnectionSettings(node);
settings.DefaultIndex("mymodel");
settings.DisableDirectStreaming(true);//设置将请求响应信息写入到RequestBodyInBytes和ResponseBodyInBytes
var client = new ElasticClient(settings);
这样,请求响应的报文就会在ApiCall的RequestBodyInBytes和ResponseBodyInBytes
2.打印请求响应报文,在setting的OnRequestCompleted方法中处理
settings.OnRequestCompleted(x =>
{
    if (x.RequestBodyInBytes != null)
        {
            Console.WriteLine(Encoding.UTF8.GetString(x.RequestBodyInBytes));
        }

        if (x.ResponseBodyInBytes != null)
        {
            Console.WriteLine(Encoding.UTF8.GetString(x.RequestBodyInBytes));
        }
});
二、注意事项
1.建立索引,索引名称必须是小写
settings.DefaultIndex("mymodel");//这里的mymodel必须是小写!!!
2.Term查询时,关键字也必须是小写
c => c.Term(d => d.UUID, "a931b4db")//a931b4db必须是小写,否则查询不到数据!!!
三、查询中文短语
在字段没有特殊标注的默认情况下,string类型的字段会被分词,用Term去查中文短语、英文短语,是查询不到结果的。这种情况下有两种方法处理
1.使用match查询,设置minimum_should_match为100%
client.Search<EventModel>(m => m.Query(x => x.Match(y => y.Field(model => model.device_name).Query("陈岗变").MinimumShouldMatch(MinimumShouldMatch.Percentage(100)))))
这里设置100%,意思是字段device_name中必须包含陈岗变三个字,100%包含。但是陈岗变三个字可以是不连续的,查询出来的结果如下所示:

2.建立索引时,设置字段为keyword
var result = client.Indices.Create(nameof(EV_COMBINED).ToLower(), c =>
	            c.Map<EV_COMBINED>(m =>m.AutoMap().Properties(n => n.Keyword(x => x.Name(model => model.AssetName).Index(true)))
	            .Properties(n => n.Keyword(x => x.Name(model => model.Description).Index(true))))
);
在创建索引时,设置映射,设置AssetName和Description两个字段为keyword。
然后再往改索引里插入数据。
这样,在查询的时候,我们就可以查询中文短语了,但是这样好像不能中英文混查,没有深入继续研究,而且设置了不分词之后,不能全文检索
3.设置查询结果大于10000条不报错:
PUT alarm/_settings
{
  "max_result_window" : 200000000
}
其中alarm是ES的索引名称
参考:
https://www.cnblogs.com/huhangfei/p/7524886.html
https://www.cnblogs.com/huhangfei/p/5726650.html
使用C#代码设置max_result_window
var r = client.Indices.Create(index, c => c.Map<BatDataInfo>(m => m.AutoMap()).Settings(
            s => s.Setting(UpdatableIndexSettings.MaxResultWindow, 1000000)));
if (!r.IsValid)
{
   //...
}
else
{
   //...
}
ES配置模板
# ======================== Elasticsearch Configuration =========================
#
# NOTE: Elasticsearch comes with reasonable defaults for most settings.
#       Before you set out to tweak and tune the configuration, make sure you
#       understand what are you trying to accomplish and the consequences.
#
# The primary way of configuring a node is via this file. This template lists
# the most important settings you may want to configure for a production cluster.
#
# Please consult the documentation for further information on configuration options:
# https://www.elastic.co/guide/en/elasticsearch/reference/index.html
#
# ---------------------------------- Cluster -----------------------------------
#
# Use a descriptive name for your cluster:
#
cluster.name: my-application
#
# ------------------------------------ Node ------------------------------------
#
# Use a descriptive name for the node:
#
node.name: node1

node.master: true

node.data: true
#
# Add custom attributes to the node:
#
#node.attr.rack: r1
#
# ----------------------------------- Paths ------------------------------------
#
# Path to directory where to store the data (separate multiple locations by comma):
#
path.data: .\mydata\data
#
# Path to log files:
#
path.logs: .\mydata\log
#
# ----------------------------------- Memory -----------------------------------
#
# Lock the memory on startup:
#
#bootstrap.memory_lock: true
#
# Make sure that the heap size is set to about half the memory available
# on the system and that the owner of the process is allowed to use this
# limit.
#
# Elasticsearch performs poorly when the system is swapping the memory.
#
# ---------------------------------- Network -----------------------------------
#
# Set the bind address to a specific IP (IPv4 or IPv6):
#
network.host: 192.168.123.210
#
# Set a custom port for HTTP:
#
http.port: 9200

transport.tcp.port: 9300
#
# For more information, consult the network module documentation.
#
# --------------------------------- Discovery ----------------------------------
#
# Pass an initial list of hosts to perform discovery when this node is started:
# The default list of hosts is ["127.0.0.1", "[::1]"]
#
#discovery.seed_hosts: ["192.168.210:9200"]
#
# Bootstrap the cluster using an initial set of master-eligible nodes:
#
cluster.initial_master_nodes: ["node1"]
#
# For more information, consult the discovery and cluster formation module documentation.
#
# ---------------------------------- Gateway -----------------------------------
#
# Block initial recovery after a full cluster restart until N nodes are started:
#
#gateway.recover_after_nodes: 3
#
# For more information, consult the gateway module documentation.
#
# ---------------------------------- Various -----------------------------------
#
# Require explicit names when deleting indices:
#
#action.destructive_requires_name: true

#解决跨域问题
http.cors.enabled: true

http.cors.allow-origin: "*"

http.cors.allow-methods: OPTIONS, HEAD, GET, POST, PUT, DELETE

http.cors.allow-headers: "X-Requested-With, Content-Type, Content-Length, X-User"


xpack.ml.enabled: false
使用kibana Dev Tools进行基本操作
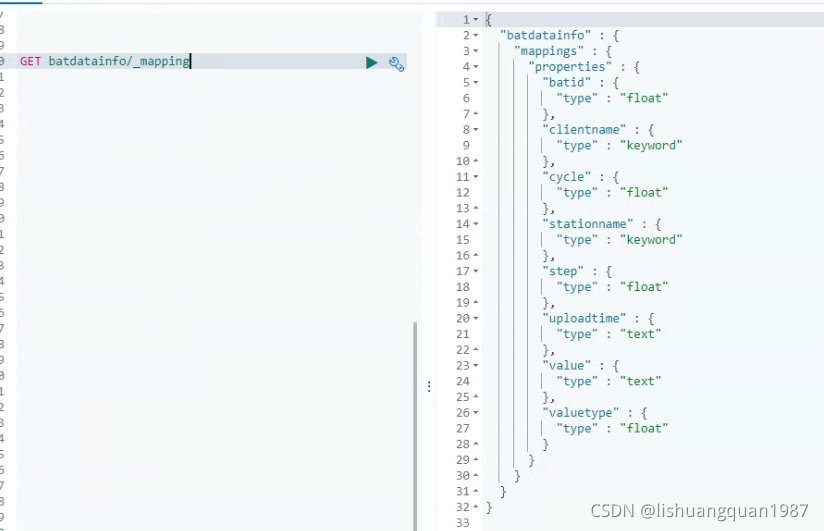
获取索引的Mapping:
batdatainfo为索引
GET batdatainfo/_mapping
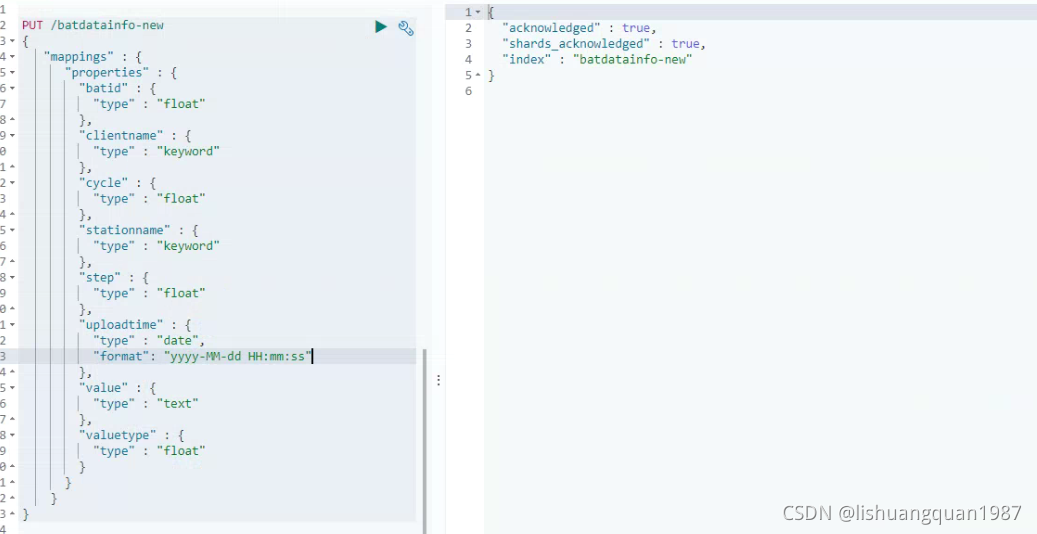
新建索引,并设置Mapping
PUT /batdatainfo-new
{
   "mappings" : {
      "properties" : {
        "batid" : {
          "type" : "float"
        },
        "clientname" : {
          "type" : "keyword"
        },
        "cycle" : {
          "type" : "float"
        },
        "stationname" : {
          "type" : "keyword"
        },
        "step" : {
          "type" : "float"
        },
        "uploadtime" : {
          "type" : "date",
          "format": "yyyy-MM-dd HH:mm:ss"
        },
        "value" : {
          "type" : "text"
        },
        "valuetype" : {
          "type" : "float"
        }
      }
    }
}
将数据从旧的索引迁移到新的索引
把数据从batdatainfo索引迁移到batdatainfo-new
POST _reindex
{
  "source": {"index": "batdatainfo"},
  "dest": {"index": "batdatainfo-new"}
}


 908
908


 被折叠的 条评论
为什么被折叠?
被折叠的 条评论
为什么被折叠?
 到【灌水乐园】发言


