


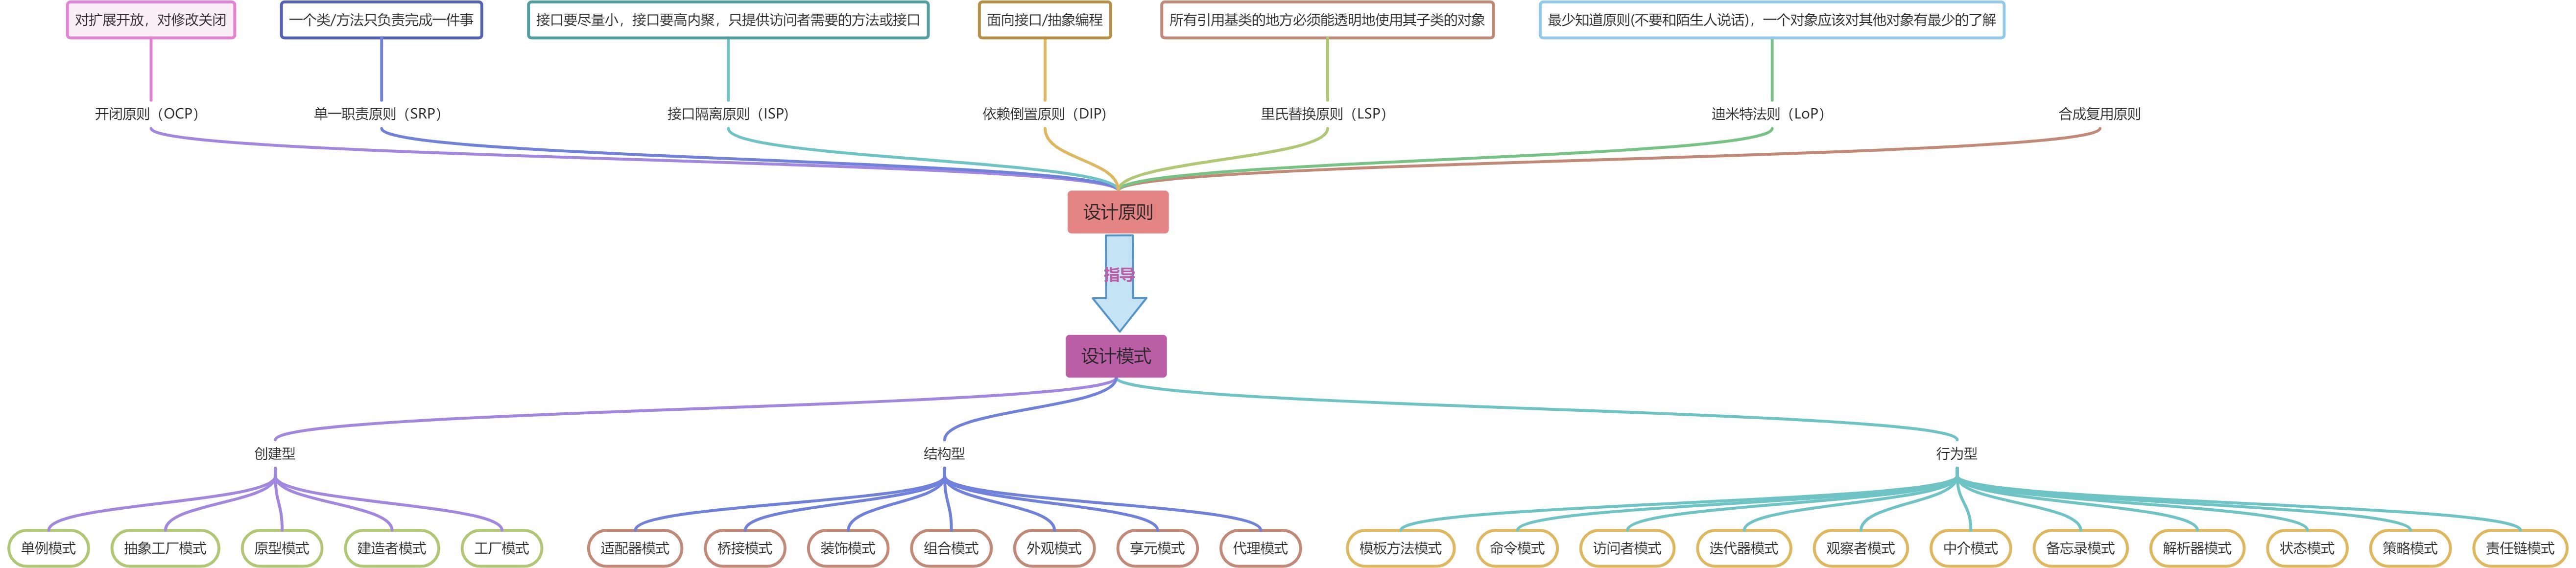
一、一张图总览
二、23种设计模式
一、创建型(5种)
1、单例模式(8种)
1.1 饿汉式(2种)
1.1.1 静态常量
/**
 * @author zero
 * @description HungrySingleton 饿汉模式
 * @date 2022/4/25 15:09
 */
public class HungrySingleton {

    public static void main(String[] args) {
        Singleton instance1 = Singleton.getInstance();
        Singleton instance2 = Singleton.getInstance();
        System.out.println(instance1.hashCode());
        System.out.println(instance2.hashCode());
    }

}

class Singleton{
    // 1、构造器私有化
    private Singleton() { }

    // 2、提前创建好对象
    private final static Singleton singleton = new Singleton();

    // 3、提供访问对象的方法
    public static Singleton getInstance() {
        return singleton;
    }
}
优缺点说明:
优点:写法简单,就是在类加载的时候完成对象实例化,避免了线程同步问题
缺点:在类加载的时候完成对象实例化,没有达到懒加载的效果,如果此对象一直未使用,则可能会造成内存浪费
1.1.2 静态代码块
public class HungrySingleton2 {

    public static void main(String[] args) {
        Singleton2 instance1 = Singleton2.getInstance();
        Singleton2 instance2 = Singleton2.getInstance();
        System.out.println(instance1.hashCode());
        System.out.println(instance2.hashCode());
    }

}

class Singleton2{
    private static Singleton2 instance;
    // 1、构造器私有化
    private Singleton2() {}
    static {
        // 2、提前创建好对象
        instance = new Singleton2();
    }
    // 3、提供访问对象的方法
    public static Singleton2 getInstance() {
        return instance;
    }
}
1.2 懒汉式(3种)
1.2.1 线程不安全
public class LazySingletonUnSafe {
    public static void main(String[] args) {
        Singleton instance1 =Singleton.getInstance();
        Singleton instance2 = Singleton.getInstance();
        System.out.println(instance1 == instance2);
        System.out.println(instance1.hashCode());
        System.out.println(instance2.hashCode());
    }
}

class Singleton{
    private static Singleton instance;

    private Singleton() {}

    public static Singleton getInstance() {
        // 在使用的时候才进行实例化
        if (instance == null) {
            instance = new Singleton();
        }
        return instance;
    }
}
优缺点说明:
优点:起到了懒加载的效果
缺点:多线程环境下是不安全的,实际开发种,不推荐这种写法
1.2.2 线程安全
public class LazySingletonSafe {
    public static void main(String[] args) {
        Singleton1 instance1 =Singleton1.getInstance();
        Singleton1 instance2 = Singleton1.getInstance();
        System.out.println(instance1 == instance2);
        System.out.println(instance1.hashCode());
        System.out.println(instance2.hashCode());
    }
}

class Singleton1{
    private static Singleton1 instance;

    private Singleton1() {}

    public static synchronized Singleton1 getInstance() {
        // 加synchronized使得实例化的过程线程安全
        if (instance == null) {
            instance = new Singleton1();
        }
        return instance;
    }
}
优缺点说明:
优点:解决了线程不安全问题
缺点:每次在获取对象实例的时候多要加锁,效率比较低,实际开发种也不推荐这种用法
1.2.3 同步代码块
public class LazySingletonBlock {

    private static LazySingletonBlock instance;

    private LazySingletonBlock() {}

    public static LazySingletonBlock getInstance() {
        if (instance == null) {
            // 此处加锁是不能保证线程安全的
            synchronized (LazySingletonBlock.class) {
                instance = new LazySingletonBlock();
            }
        }
        return instance;
    }
}
说明:
这种同步方式不能起到线程安全的作用
1.3 双重检查
public class DCSingleton {
    public static void main(String[] args) {
        Singleton instance1 =Singleton.getInstance();
        Singleton instance2 = Singleton.getInstance();
        System.out.println(instance1 == instance2);
        System.out.println(instance1.hashCode());
        System.out.println(instance2.hashCode());
    }
}

class Singleton {
    private static volatile Singleton instance;

    private Singleton() {
    }

    public static Singleton getInstance() {
        if (instance == null) {
            synchronized (Singleton.class) {
                if (instance == null) {
                    instance = new Singleton();
                }
            }
        }
        return instance;
    }
}
说明:
Double-Check进行了两次if检查,保证了线程安全,即对象只实例化一次,同时也保证了对象的延迟加载,提升效率,在开发种推荐这种方式。
1.4 静态内部类
public class StaticInnerClassSingleton {

    public static void main(String[] args) {
        Singleton instance1 =Singleton.getInstance();
        Singleton instance2 = Singleton.getInstance();
        System.out.println(instance1.hashCode());
        System.out.println(instance2.hashCode());
    }


}
class Singleton{
    private Singleton() {}
    private static class SingletonInstance{
        private static final Singleton INSTANCE = new Singleton();
    }

    public static Singleton getInstance() {
        return SingletonInstance.INSTANCE;
    }
}
说明:
这种方式采用了类加载的机制来保证初始化实例时只有一个线程
利用静态内部类的特点实现延迟加载,且是线程安全的,推荐使用
1.5 枚举类
public class EnumSingleton {
    public static void main(String[] args) {
        Singleton instance = Singleton.INSTANCE;
        Singleton instance2 = Singleton.INSTANCE;
        System.out.println(instance.hashCode());
        System.out.println(instance2.hashCode());
        instance.say();
    }
}

enum Singleton{
    /**
     * 单例对象
     */
    INSTANCE;
    public void say() {
        System.out.println("this is a enum class");
    }
}
说明:
借助枚举来实现单例模式,不仅能避免线程同步问题,而且还能防止反序列化重新创建新的对象。推荐使用。
2、工厂模式
2.1简单工厂模式
简单工厂包含三种角色:
- 抽象产品:定义产品的规范,描述了产品的主要特性和功能
- 具体产品:实现或继承抽象产品的子类
- 具体工厂:提供了创建产品的方法,调用者通过该方法来创建产品
以造汽车为例,分别建立这三种角色所代表的类。
public abstract class Car {

    public abstract void setCarName();

    public void run() {
        setCarName();
        System.out.println("汽车跑起来!!");
    }
}
public class AudiCar extends Car{
    @Override
    public void setCarName() {
        System.out.println("奥迪汽车");
    }
}
public class BenzCar extends Car {
    @Override
    public void setCarName() {
        System.out.println("奔驰汽车");
    }
}
public class AutoCar extends Car {
    @Override
    public void setCarName() {
        System.out.println("奥拓汽车");
    }
}
public class CarSimpleFactory {

    Car car = null;
    public Car createCar(String brand) {
        if ("Audi".equals(brand)) {
            car = new AudiCar();
        } else if ("Benz".equals(brand)) {
            car = new BenzCar();
        } else {
            car = new AutoCar();
        }
        return car;
    }
}
public class CarStore {
    public static void main(String[] args) {
        CarSimpleFactory factory = new CarSimpleFactory();
        Car audi = factory.createCar("Audi");
        audi.run();
    }
}
优缺点说明:
优点:封装了创建对象的过程,可以通过参数直接获取对象,这样就把对象的创建和业务逻辑分开,降低了代码耦合度,更容易实现扩展
缺点:增加新产品时还需要修改工厂类的代码,如上面代码中if-else,违背了开闭原则
2.2工厂方法模式
工厂方法相比于简单工厂而言,多了一个工厂的抽象,即将创建对象的工厂进行抽象,由不同的实现类型来创建不同的对象。类图如下:

抽象产品类与上边的简单工厂一样,下面展示不同的代码之处:
public abstract class CarFactory {
    public abstract Car createCar(String type);
}
public class AudiCarFactory extends CarFactory{
    @Override
    public Car createCar(String type) {
        Car car = null;
        if ("SUV".equals(type)) {
            car = new AudiSuvCar();
        } else {
            car = new AudiSportCar();
        }
        return car;
    }
}
public class AudiSportCar extends Car {
    @Override
    public void setCarName() {
        System.out.println("奥迪跑车");
    }
}
public class AudiSuvCar extends Car {
    @Override
    public void setCarName() {
        System.out.println("奥迪SUV");
    }
}
public class CarStore {
    public static void main(String[] args) {
        // 创建对象使用具体的工厂
        CarFactory audiCarFactory = new AudiCarFactory();
        Car suv = audiCarFactory.createCar("SUV");
        suv.run();
    }
}
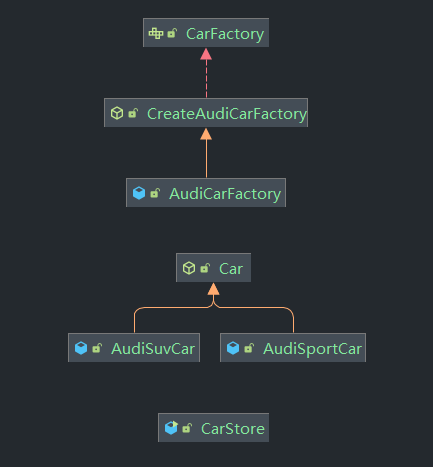
2.3抽象工厂模式
抽象工厂模式是将创建具体类型对象的工厂的共性进行了抽象,形成了更上层的类,同时根据不同类型的工厂提供不同能力的对象创建,与工厂方法模式相比,多了一层抽象,使得不同的业务下沉到抽象工厂,上层提供一个统一的工厂接口,类图如下:
public interface CarFactory {
    Car createCar(String type);
    void modifyCar(Car car);
}
public abstract class CreateAudiCarFactory implements CarFactory {

    @Override
    public Car createCar(String type) {
        Car car = null;
        if ("SUV".equals(type)) {
            car = new AudiSuvCar();
        } else {
            car = new AudiSportCar();
        }
        return car;
    }
}
public class AudiCarFactory extends CreateAudiCarFactory{
    @Override
    public void modifyCar(Car car) {
        System.out.println("修理奥迪汽车!!!");
    }
}
public class CarStore {
    public static void main(String[] args) {
        // 创建对象使用具体的工厂
        CarFactory audiCarFactory = new AudiCarFactory();
        Car suv = audiCarFactory.createCar("SUV");
        suv.run();
        audiCarFactory.modifyCar(suv);
    }
}
抽象工厂模式是工厂方法模式的升级版本,在有多个业务品种、业务分类时,通过抽象工厂模式产生需要的对象是一种非常好的解决方式。
4、原型模式
原型模式是一个比较简单的模式,在JDK中Object类提供了一个clone()方法,其子类只需要实现Clonealbe接口并重写clone()方法就能实现对象的复制问题,原型模式通过clone方法创建对象是通过复制内存中的流实现的,故在使用时不会调用类的构造函数。这种方式默认提供的复制对象的能力为浅拷贝,如果需要深拷贝对象,则需要定制实现。
public class Person  implements Cloneable{
    private String name;
    private int age;

    public Person(String name, int age) {
        this.name = name;
        this.age = age;
    }
   // 省略get/set/toString方法
    @Override
    protected Person clone() {
        Person person = null;
        try {
            person = (Person) super.clone();
        } catch (CloneNotSupportedException e) {
            e.printStackTrace();
        }
        return person;
    }
}
public class Client {
    public static void main(String[] args) {
        Person person = new Person("Zero", 18);
        Person clone = person.clone();
        System.out.println(person);
        System.out.println(clone);
    }
}
优缺点说明:
优点:性能优良,原型模式是在内存二进制流的拷贝,要比直接new一个对象性能好很多,特别是要在一个循环体内产生大量的对象时,原型模式可以更好地体现其优点。
缺点:逃避构造函数的约束,这个也不能说是缺点,看实际的使用场景吧
5、建造者模式
建造者模式也叫生成器模式,表示将一个复杂对象的创建与它的表示分开,如创建一个跑车对象,只需要将轮子,方向盘,发动机进行组装即可,无需关心各个组件是如何创建的。建造者模式有四种角色:
- Product(产品角色):一个具体的产品对象
- Builder(抽象建造者):创建一个Product对象的各个组件指定的接口/抽象类
- ConcreBuilder(具体建造者):实现接口,构建和装配各个组件
- Director(指挥者):构建一个使用Builder接口的对象,它主要是用于创建一个复杂的对象。主要有两个作用:一是隔离了客户与对象的生产过程;二是负责控制产品对象的生产过程
public class House {
    private String basic;
    private String wall;
    private String roofed;
    // 省略get/set方法
}
public abstract class HouseBuilder {
    protected House house = new House();

    public abstract void buildBasic();
    public abstract void buildWalls();
    public abstract void roofed();

    public House buildHouse() {
        return house;
    }
}
public class CommonHouse extends HouseBuilder{
    @Override
    public void buildBasic() {
        System.out.println("普通房子打地基3米");
    }

    @Override
    public void buildWalls() {
        System.out.println("普通房子砌墙10cm");
    }

    @Override
    public void roofed() {
        System.out.println("普通房子封顶");
    }
}
public class HouseDirector {
    HouseBuilder builder = null;

    public HouseDirector(HouseBuilder builder) {
        this.builder = builder;
    }

    // 具体产品的创建过程,过程是不对外暴露的
    public House constructHouse() {
        builder.buildBasic();
        builder.buildWalls();
        builder.roofed();
        return builder.buildHouse();
    }
}
public class Client {
    public static void main(String[] args) {
        CommonHouse commonHouse = new CommonHouse();
        HouseDirector director = new HouseDirector(commonHouse);
        House house = director.constructHouse();
        System.out.println(house);
    }
}
优缺点说明:
优点:封装性,使用该模式使客户端可以不用知道产品内部组成细节;建造者独立,容易扩展;便于控制细节风险,由于具体的建造者是独立的,因此可以对建造过程逐步细化,而不对其他模块产生影响
缺点:产生多个建造类,有可能造成类爆炸的问题
二、结构型(7种)
1、适配器模式
适配器模式将某个类的接口转换成客户端期望给的另一个接口表示,主要的目的是兼容性,让原本因接口不匹配不能一起工作的两个类可以协同工作。主要分为三类:类适配器模式、对象适配器模式,接口适配器模式。
1.1类适配器模式
public class Voltage220V {
    public int output220v() {
        int src = 220;
        System.out.println("输出220V电压");
        return src;
    }
}
public interface IVoltage5V {
    int output5V();
}
public class VoltageAdapter extends Voltage220V implements IVoltage5V {

    @Override
    public int output5V() {
        int srcV = output220v();
        int dstV = srcV / 44;
        return dstV;
    }
}
public class Phone {
    public void charge(IVoltage5V voltage5V) {
        if (voltage5V.output5V() == 5) {
            System.out.println("电压正常,可以充电。。。。");
        } else {
            System.out.println("电压不正常,无法充电");
        }
    }
}
public class Client {
    public static void main(String[] args) {
        // 类适配器模式
        Phone phone = new Phone();
        phone.charge(new VoltageAdapter());
    }
}
1.2对象适配器模式
根据合成复用原则,在系统中尽量使用关联来替代继承关系,故上边的类适配器模式中的继承不太友好,为了解决此问题,将适配器类中的继承改为持有源接口的实例,以此来符合合成复用原则。
public class VoltageAdapter implements IVoltage5V {
    private Voltage220V voltage220V;

    @Override
    public int output5V() {
        int dstv = 0;
        if (voltage220V != null) {
            int srcV = voltage220V.output220v();
            int dstV = srcV / 44;
        }
        return dstv;
    }

    public void setVoltage220V(Voltage220V voltage220V) {
        this.voltage220V = voltage220V;
    }
}
public class Client {
    public static void main(String[] args) {
        // 对象适配器模式
        Phone phone = new Phone();
        VoltageAdapter voltageAdapter = new VoltageAdapter();
        voltageAdapter.setVoltage220V(new Voltage220V());
        phone.charge(voltageAdapter);
    }
}
1.3接口适配器模式
使用抽象类实现接口的所有方法,同时将抽象类作为适配器类提供给客户端使用,保证了客户端无需实现接口的所有实现,只需实现自己关心的方法即可。
public interface Interface {
    void operation();
    void operation1();
    void operation2();
}
public abstract class AbstractAdapter implements Interface{
    @Override
    public void operation() {

    }

    @Override
    public void operation1() {

    }

    @Override
    public void operation2() {

    }
}
public class Client {
    public static void main(String[] args) {
        // 接口适配器模式
        AbstractAdapter adapter = new AbstractAdapter(){
            @Override
            public void operation() {
                System.out.println("覆盖默认方法实现");
            }
        };
        adapter.operation();
    }
}
优缺点说明:
适配器模式可以让两个没有任何关系的类在一起运行,只要适配器这个角色能够搞定他们就成;增加了类的透明性,提高了类的复用度,灵活性好
2、桥接模式
桥接模式是指将实现与抽象放在两个不同类层次中,使两个类可以独立改变。以不同品牌不同样式手机为例。
public interface Brand {
    void open();
    void call();
    void close();
}
public class Vivo implements Brand{
    @Override
    public void open() {
        System.out.println("Vivo手机开机");
    }

    @Override
    public void call() {
        System.out.println("Vivo手机打电话");
    }

    @Override
    public void close() {
        System.out.println("Vivo手机关机");
    }
}
public class Xiaomi implements Brand{
    @Override
    public void open() {
        System.out.println("小米手机开机");
    }

    @Override
    public void call() {
        System.out.println("小米手机打电话");
    }

    @Override
    public void close() {
        System.out.println("小米手机关机");
    }
}
public abstract class Phone {
    // 聚合了接口业务
    private Brand brand;

    public Phone(Brand brand) {
        this.brand = brand;
    }

    protected void open() {
        this.brand.open();
    }

    protected void call() {
        this.brand.call();
    }

    protected void close() {
        this.brand.close();
    }
}
public class FoldedPhone extends Phone{

    public FoldedPhone(Brand brand) {
        super(brand);
    }

    public void open() {
        super.open();
    }

    public void call() {
        super.call();
    }

    public void close() {
        super.close();
    }
}
public class Client {
    public static void main(String[] args) {
        Phone phone = new FoldedPhone(new Vivo());
        phone.open();
        phone.call();
        phone.close();
        System.out.println("=================");
        Phone phone1 = new FoldedPhone(new Xiaomi());
        phone1.open();
        phone1.call();
        phone1.close();
    }
}
如上代码所示,如果想增加一种样式的手机,只需要继承抽象类Phone后就能实现手机对应的全部功能。同时在JDBC的实现模式中就应用了桥接模式,不同类型数据库实现了相同的JDBC接口业务。
优缺点说明:
抽象和实现分离,优秀的扩展能力,实现细节对客户透明。
3、装饰者模式
装饰者模式是指动态的将新功能添加到对象上,在对象功能扩展方面,它比继承更有弹性,装饰者模式也体现了开闭原则(OCP)。通俗的理解装饰者模式就是“套娃”。以咖啡店点咖啡为例,每种咖啡在单点的基础上还可以添加各种辅料,如牛奶,巧克力等,这样如果点一杯加一份牛奶两份巧克力的美式咖啡就可以很容易实现。
public abstract class Drink {
    private String desc;
    private float price;
    public abstract float cost();
    // 省略get/set方法
}
public class LongBlack extends Coffee{
    public LongBlack() {
        setDesc("美式咖啡");
        setPrice(5.0f);
    }
}
public class Decorator extends Drink{
    // 装饰者类聚合了业务单品类,这样在添加辅料时就能很好的进行组合
    private Drink drink;
    public Decorator(Drink drink) {
        this.drink = drink;
    }

    @Override
    public String getDesc() {
        return super.getDesc() + super.getPrice();
    }

    @Override
    public float cost() {
        return super.getPrice() + drink.cost();
    }
}
public class Coffee extends Drink{
    @Override
    public float cost() {
        return super.getPrice();
    }
}
public class Chocolate extends Decorator{
    public Chocolate(Drink drink) {
        super(drink);
        setDesc("巧克力");
        setPrice(2.0f);
    }
}
public class Milk extends Decorator {

    public Milk(Drink drink) {
        super(drink);
        setDesc("牛奶");
        setPrice(1.0f);
    }
}
public class Client {
    public static void main(String[] args) {
        // 获取加了一份牛奶两份巧克力的美式咖啡
        Drink longBlack = new LongBlack();
        System.out.println(longBlack.getDesc() + "--" + longBlack.getPrice());
        Drink milk = new Milk(longBlack);
        System.out.println("加了牛奶的美式:"+ milk.cost() + milk.getDesc());
        Drink chocolate = new Chocolate(milk);
        System.out.println("加了一份巧克力的美式:" + chocolate.cost() + chocolate.getDesc());
        Drink chocolate2 = new Chocolate(chocolate);
        System.out.println("加了两份巧克力的美式:" + chocolate2.cost() + chocolate2.getDesc());
    }
}
根据上面的实现,如果还想添加其他辅料或单品的组合商品,只需要让辅料继承装饰者类,具体单品继承单品抽象类即可实现多种类型的组合。在JDK中流相关的类就是很好的装饰者模式的体现。
优缺点说明:
装饰类和呗装饰类可以独立发展,而不会相互耦合;装饰模式是继承关系的一个代替方案;装饰模式可以动态的扩展一个实现类的功能。
4、组合模式
组合模式又叫部分整体模式,它创建了对象组的树形结构,将对象组合成树状结构以表示”整体-部分“的层次关系。组合模式使得用户对单个对象和组合对象的方位具有一致性。故在实现树形菜单、文件和文件夹管理等功能时是一个很好的方式。如以实现一个大学有多个学院,每个学院又有多个系,类似于树状的组织结构。
public abstract class OrganizationComponent {
    private String name;
    private String desc;

    public OrganizationComponent(String name, String desc) {
        this.name = name;
        this.desc = desc;
    }

    protected void add(OrganizationComponent component) {
        // 默认实现
        throw new UnsupportedOperationException();
    }
    protected void remove(OrganizationComponent component) {
        // 默认实现
        throw new UnsupportedOperationException();
    }

    // 需要子类实现的方法
    protected abstract void print();
    // 省略get/set方法
}
public class College extends OrganizationComponent {

    List<OrganizationComponent> components = new ArrayList<>();

    public College(String name, String desc) {
        super(name, desc);
    }

    @Override
    protected void add(OrganizationComponent component) {
        components.add(component);
    }

    @Override
    protected void remove(OrganizationComponent component) {
        components.remove(component);
    }

    @Override
    protected void print() {
        System.out.println("------------" + getName() + "-----------");
        components.forEach(OrganizationComponent::print);
    }
}
public class University extends OrganizationComponent {
    private List<OrganizationComponent> components = new ArrayList<>();

    public University(String name, String desc) {
        super(name, desc);
    }

    @Override
    protected void add(OrganizationComponent component) {
        components.add(component);
    }

    @Override
    protected void remove(OrganizationComponent component) {
        components.remove(component);
    }

    @Override
    protected void print() {
        System.out.println("-------------" + getName() + "-------------");
        components.forEach(OrganizationComponent::print);
    }
}
public class Department extends OrganizationComponent {

    public Department(String name, String desc) {
        super(name, desc);
    }

    @Override
    protected void print() {
        System.out.println(getName());
    }
}
public class Client {
    public static void main(String[] args) {
        // 实现一个大学有多个学院,每个学院有多个系,类似于一个树状结构
        University university = new University("北京大学", "中国最牛逼的大学");
        College college = new College("计算机学院", "");
        College college1 = new College("通讯学院", "");
        college.add(new Department("软件工程",""));
        college.add(new Department("网络工程",""));
        college.add(new Department("计算机科学与技术",""));
        college1.add(new Department("信息工程",""));
        college1.add(new Department("通讯工程",""));
        university.add(college);
        university.add(college1);
        university.print();
    }
}
优缺点说明:
优点:高层模块调用简单,节点自由添加
**缺点:**在测试代码中直接使用到了实现类,在面向接口编程上不是很恰当,与依赖倒置原则冲突
5、外观模式
外观模式就是解决多个复杂接口带来的使用困难,起到简化用户操作的作用。以一个家庭影院项目为例,如果不使用外观模式的话,那用户在使用的时候就会有一堆的遥控器来控制投影仪、音响等设备;如果使用外观模式,那就只需要有一个遥控器就能操作所有设备开关操作。
public class Projector {
    private static Projector instance = new Projector();

    public static Projector getInstance() {
        return instance;
    }

    public void on() {
        System.out.println("投影仪打开");
    }

    public void off() {
        System.out.println("投影仪关闭");
    }
    public void focus() {
        System.out.println("投影仪在聚焦");
    }
}
public class DVDPlayer {
    private static DVDPlayer instance = new DVDPlayer();

    public static DVDPlayer getInstance() {
        return instance;
    }

    public void on() {
        System.out.println("dvd打开");
    }

    public void off() {
        System.out.println("dvd关闭");
    }
    public void play() {
        System.out.println("dvd is playing");
    }
}
public class HomeTheaterFacade {

    private DVDPlayer dvdPlayer;
    private Projector projector;

    public HomeTheaterFacade() {
        this.dvdPlayer = DVDPlayer.getInstance();
        this.projector = Projector.getInstance();
    }

    public void open() {
        projector.on();
        dvdPlayer.on();
        projector.focus();
        dvdPlayer.play();
    }

    public void close() {
        projector.off();
        dvdPlayer.off();
    }
}
public class Client {
    public static void main(String[] args) {
        // 外观模式只需提供统一的接口供客户端调用即可实现复杂功能的实现
        HomeTheaterFacade theaterFacade = new HomeTheaterFacade();
        theaterFacade.open();
        System.out.println("漫威的电影真好看....");
        theaterFacade.close();
    }
}
优缺点说明:
优点:减少系统的相互依赖,提高了灵活性,提高安全性
缺点:不符合开闭原则,后续如果需要扩展,则需要修改外观类的核心逻辑
6、享元模式
享元模式能够解决重复对象的内存浪费问题,当系统中共有大量相似对象,需要缓冲池时,不需要总是创建新对象,可以从缓存池中取,这样可以降低系统内存,提高效率。享元模式经典得应用场景就是池技术了。总的来说就是使用共享对象可有效地支持大量的细粒度的对象。享元模式中对象的信息分为两个部分:内部状态和外部状态。
- 内部状态:内部状态是对象可共享出来的信息,存储在享元对象内部并且不会随环境改变而改变
- 外部状态:外部状态是对象得以依赖的一个标记,是随环境改变而改变的、不可以共享的状态
public abstract class WebSite {
    public abstract void use();
}
public class ConcreteWebSite extends WebSite {
    private String type = "";

    public ConcreteWebSite(String type) {
        this.type = type;
    }

    @Override
    public void use() {
        System.out.println("网站的发布形式为:" + type);
    }
}
public class WebSiteFactory {
    private Map<String, ConcreteWebSite> websites = new HashMap<>();

    public WebSite getWebSite(String type) {
        if (!websites.containsKey(type)) {
            websites.put(type, new ConcreteWebSite(type));
        }

        return websites.get(type);
    }

    public int getWebSiteCount() {
        return websites.size();
    }
}
public class Client {
    public static void main(String[] args) {
        WebSiteFactory factory = new WebSiteFactory();
        WebSite webSite = factory.getWebSite("新闻");
        webSite.use();

        WebSite webSite1 = factory.getWebSite("博客");
        webSite1.use();
    }
}
优缺点说明
享元模式是一个非常简单的模式,它可以大大减少应用程序创建的对象,降低程序内存的占用,增强程序的性能,但它同时也提高了系统复杂性,需要分离出外部状态和内部状态,而且外部状态具有固化特性,不应该随内部状态改变而改变,否则导致系统的逻辑混乱。
7、代理模式
代理模式就是为其他对象提供一种代理以控制对这个对象的访问,代理模式分为三种类型:静态代理、动态代理、CGLIB代理。
7.1静态代理
public interface ITeacherDao {
    void tech();
}
public class TeacherDao implements ITeacherDao{
    @Override
    public void tech() {
        System.out.println("开始教书。。。。");
    }
}
public class TeacherDaoProxy implements ITeacherDao {
    private ITeacherDao target;

    public TeacherDaoProxy(ITeacherDao target) {
        this.target = target;
    }

    @Override
    public void tech() {
        System.out.println("代理之前。。。。");
        target.tech();
        System.out.println("代理之后。。。。");
    }
}
public class Client {
    public static void main(String[] args) {
        TeacherDaoProxy proxy = new TeacherDaoProxy(new TeacherDao());
        proxy.tech();
    }
}
7.2动态代理(JDK代理)
public interface Calculator {
	void add(int i, int j);
	void sub(int i, int j);
	void multi(int i, int j);
	void div(int i, int j);
}
public class MyCalculator implements Calculator{
	@Override
	public void add(int i, int j) {
		System.out.println("执行加法操作:" + (i + j));
	}

	@Override
	public void sub(int i, int j) {
		System.out.println("执行减法操作:" + (i - j));
	}

	@Override
	public void multi(int i, int j) {
		System.out.println("执行乘法操作:" + (i * j));
	}

	@Override
	public void div(int i, int j) {
		System.out.println("执行除法操作:" + (i / j));
	}
}
public class MyInvocationHandler implements InvocationHandler {
	private Calculator target;

	public MyInvocationHandler(Calculator calculator) {
		this.target = calculator;
	}

	@Override
	public Object invoke(Object proxy, Method method, Object[] args) throws Throwable {
		System.out.println("方法执行前。。。。");
		method.invoke(target, args);
		System.out.println("方法执行后。。。。");
		return proxy;
	}
}
public class JDKProxyTest {
	public static void main(String[] args) {
		Calculator calculator = (Calculator) Proxy.newProxyInstance(
				MyCalculator.class.getClassLoader(),
				new Class[]{Calculator.class},
				new MyInvocationHandler(new MyCalculator()));
		calculator.add(1,1);

	}
}
7.3CGLIB代理
CGLIB代理需要导入相关的依赖包。asm-commos.jar、asm-tree.jar、asm.jar、cglib-2.2.jar
public class MyCalculator {
	public void add(int i, int j) {
		System.out.println("执行加法操作:" + (i + j));
	}

	public void sub(int i, int j) {
		System.out.println("执行减法操作:" + (i - j));
	}

	public void multi(int i, int j) {
		System.out.println("执行乘法操作:" + (i * j));
	}

	public void div(int i, int j) {
		System.out.println("执行除法操作:" + (i / j));
	}
}
public class MyInterceptor implements MethodInterceptor {
	@Override
	public Object intercept(Object o, Method method, Object[] objects, MethodProxy methodProxy) throws Throwable {
		Object result = null;
		System.out.println("cglib代理方法执行之前。。。。");
		String name = methodProxy.getSignature().getName();
		if ("add".equals(name)) {
			result = methodProxy.invokeSuper(o, objects);
		}
		System.out.println("cglib代理方法执行之后。。。。");
		return result;
	}
}
public class CGLIBProxyTest {
	public static void main(String[] args) {
		Enhancer enhancer = new Enhancer();
		enhancer.setClassLoader(com.zero.proxy.cglib.MyCalculator.class.getClassLoader());
		enhancer.setSuperclass(com.zero.proxy.cglib.MyCalculator.class);
		enhancer.setCallback(new com.zero.proxy.cglib.MyInterceptor());
		com.zero.proxy.cglib.MyCalculator calculator = (com.zero.proxy.cglib.MyCalculator) enhancer.create();
		calculator.add(1,1);
		System.out.println(calculator);
	}
}
优缺点说明:
- 职责清晰:真实的角色就是实现实际的业务逻辑,不用关心其他非本职责的事务,通过后期的代理完成一件事务,附带的结果就是编程简洁清晰
- 高扩展性:具体主题角色是随时都会发生变化的,只要它实现了接口,甭管它如何变化,都逃不脱接的规范,那代理类完全就可以在不做任何修改的情况下使用
三、行为型(11种)
1、模板方法模式
模板方法模式又叫模板模式,在一个抽象类公开定义了执行它的方法的模板。它的子类可以按需要重写方法实现,但调用将以抽象类中定义的方式进行。以制作豆浆为例,制作豆浆的过程:浸泡、打浆、过滤、加料等等步骤都是一样的,故可以抽象成一系列模板。
public abstract class SoyaMilk {
    // 模板方法(固定流程/算法)可以声明成final,不让子类重写
    final void make() {
        select();
        addCondiments();
        soak();
        beat();
    }
   private void select() {
        System.out.println("选择新鲜黄豆");
    }

    // 添加不同的配料,抽象方法,让子类去实现
    abstract void addCondiments();

    private void soak() {
        System.out.println("黄豆和配料开始浸泡");
    }

    private void beat() {
        System.out.println("将黄豆和配料放到豆浆机中打碎");
    }
}
public class RedBeanSoyaMilk extends SoyaMilk{
    @Override
    void addCondiments() {
        System.out.println("添加红豆");
    }
}
public class PeanutSoyaMilk extends SoyaMilk{
    @Override
    void addCondiments() {
        System.out.println("加入花生");
    }
}
public class Client {
    public static void main(String[] args) {
        // 制作红豆豆浆
        RedBeanSoyaMilk redBeanSoyaMilk = new RedBeanSoyaMilk();
        redBeanSoyaMilk.make();
    }
}
优缺点说明:
优点:封装不变部分,扩展可变部分;提取公共部分代码,便于维护;行为由父类控制,子类实现
缺点:模板方法颠倒了抽象的定义,即子类的执行结果对父类产生了影响,这在复杂的项目中,会带来代码阅读的难度。
2、命令模式
命令模式是一个高内聚的模式,指的是将一个请求封装成对象,从而在使用不同的请求把客户端参数化,对请求排队或者记录请求日志,可以提供该命令的撤销和恢复功能。以智能家居的遥控器为例,每个智能家居都能有开关命令,使用一个遥控器如何实现所有智能家居的控制。
public interface Command {
    void execute();
    void undo();
}
public class LightOnCommand implements Command{
    LightReceiver lightReceiver;

    public LightOnCommand(LightReceiver lightReceiver) {
        this.lightReceiver = lightReceiver;
    }

    @Override
    public void execute() {
        // 执行具体的命令
        lightReceiver.on();
    }

    @Override
    public void undo() {
        // 执行具体的命令
        lightReceiver.off();
    }
}
public class LightOffCommand implements Command{
    LightReceiver lightReceiver;

    public LightOffCommand(LightReceiver lightReceiver) {
        this.lightReceiver = lightReceiver;
    }
    @Override
    public void execute() {
        lightReceiver.off();
    }

    @Override
    public void undo() {
        lightReceiver.on();
    }
}
public class LightReceiver {

    public void on() {
        System.out.println("打开电灯");
    }

    public void off() {
        System.out.println("关闭电灯");
    }
}
public class NoCommand implements Command{
    @Override
    public void execute() {

    }

    @Override
    public void undo() {

    }
}
public class RemoteController {
    // 打开命令集合
    Command[] onCommands;
    Command[] offCommands;

    // 撤销命令
    Command undoCommand;

    public RemoteController() {
        onCommands = new Command[5];
        offCommands = new Command[5];
        for (int i = 0; i <5; i++) {
            onCommands[i] = new NoCommand();
            offCommands[i] = new NoCommand();
        }
    }

    // 设置需要的命令
    public void setCommand(int no, Command onCommand, Command offCommand) {
        onCommands[no] = onCommand;
        offCommands[no] = offCommand;
    }

    // 按下开命令
    public void onButtonWasPushed(int no) {
        onCommands[no].execute();
        undoCommand = onCommands[no];
    }

    // 按下关命令
    public void offButtonWasPushed(int no) {
        offCommands[no].execute();
        undoCommand = offCommands[no];
    }

    public void undoButtonWasPushed() {
        undoCommand.undo();
    }
}
public class Client {
    public static void main(String[] args) {
        // 完成通过遥控器,对电灯的操作
        // 创建电灯对象
        LightReceiver lightReceiver = new LightReceiver();
        // 创建命令对象
        LightOnCommand lightOnCommand = new LightOnCommand(lightReceiver);
        LightOffCommand lightOffCommand = new LightOffCommand(lightReceiver);
        // 创建控制器
        RemoteController remoteController = new RemoteController();
        // 设置命令
        remoteController.setCommand(0,lightOnCommand,lightOffCommand);
        // 执行命令
        remoteController.onButtonWasPushed(0);
        remoteController.offButtonWasPushed(0);
        remoteController.undoButtonWasPushed();
    }
}
在以上代码的基础上如果要实现电视机的开关,只需要实现Command接口和要执行命令的类即可。
优缺点说明
优点:类间解耦,调用者和接收者之间没有任何依赖,调用者只需调用Command类的方法就可以;可扩展性
缺点:如果有N个命令,那Command的子类就有N个,很容易会造成类爆炸
3、访问者模式
访问者模式主要是将数据结构和数据操作分离,解决数据结构和操作耦合性问题,在被访问的类里边加一个对外提供接待访问者的接口。以给歌手唱歌打分为例,由于歌手的分类有男人、女人之分,可能还有老年组、中年组的年龄之分,同时针对结果也有成功和失败之分,这样的组合下来会有多种结果。如果要对这种结果进行描述,可以使用访问者模式。
public abstract class Action {
    public abstract void getManResult(Man man);

    public abstract void getWomanResult(Woman woman);
}
public class Success extends Action{
    @Override
    public void getManResult(Man man) {
        System.out.println("给男人的评价是成功的");
    }

    @Override
    public void getWomanResult(Woman woman) {
        System.out.println("给女人的评价是成功的");
    }
}
public class Fail extends Action{
    @Override
    public void getManResult(Man man) {
        System.out.println("给男人的评价是失败的");
    }

    @Override
    public void getWomanResult(Woman woman) {
        System.out.println("给女人的评价是失败的");
    }
}
public abstract class Person {
    public abstract void accept(Action action);
}
public class Man extends Person{
    @Override
    public void accept(Action action) {
        // 这里是重点
        action.getManResult(this);
    }
}
public class Woman extends Person{
    @Override
    public void accept(Action action) {
        // 这里是重点
        action.getWomanResult(this);
    }
}
public class ObjectStructure {
    // 数据管理
    private List<Person> persons = new LinkedList<>();

    public void attach(Person p) {
        persons.add(p);
    }
    public void detach(Person p) {
        persons.remove(p);
    }
    public void display(Action action) {
        for (Person p : persons) {
            p.accept(action);
        }
    }
}
public class Client {
    public static void main(String[] args) {
        ObjectStructure objectStructure = new ObjectStructure();
        objectStructure.attach(new Man());
        objectStructure.attach(new Woman());

        Success success = new Success();
        objectStructure.display(success);

        Fail fail = new Fail();
        objectStructure.display(fail);
    }
}
以上述代码为例,如果要对年龄段的人进行结果描述,只需实现Person接口即可。
优缺点说明
优点:
- 符合单一职责原则,优秀的扩展性,灵活性非常高
- 可以对功能进行统一,可以做报表,UI、拦截器或过滤器,适用于数据结构相对稳定的系统
缺点:
- 具体元素对访问者公布细节,具体元素变更比较困难
- 违背了依赖倒置原则,访问者依赖的是具体元素,而不是抽象
4、迭代器模式
迭代器模式提供了一种遍历集合元素的统一接口,用一致的方法遍历集合元素,不需要知道集合对象的底层表示,即:不暴露其内部的结构。以之前的输出各个学院及下的专业为例。
public interface College {
    String getName();
    void addDepartment(String name, String desc);
    Iterator createIterator();
}
public class ComputerCollegeIterator implements Iterator {

    Department[] departments;
    int position = 0;

    public ComputerCollegeIterator(Department[] departments) {
        this.departments = departments;
    }

    @Override
    public boolean hasNext() {
        if(position >= departments.length || departments[position] == null) {
            return false;
        }
        return true;
    }

    @Override
    public Object next() {
        Department department = departments[position++];
        return department;
    }
}
public class InfoCollegeIterator implements Iterator {
    List<Department> departmentList;
    int index = -1;

    public InfoCollegeIterator(List<Department> departmentList) {
        this.departmentList = departmentList;
    }

    @Override
    public boolean hasNext() {
        if (index >= departmentList.size() -1) {
            return false;
        } else {
            index++;
            return true;
        }
    }

    @Override
    public Object next() {
        return departmentList.get(index);
    }
}
public class Department {
    private String name;
    private String desc;

    public Department(String name, String desc) {
        this.name = name;
        this.desc = desc;
    }
    // get/set方法
}
public class ComputerCollege implements College{
    Department[] departments;
    int numOfDepartment = 0;

    public ComputerCollege() {
        // 初始化数据
        this.departments = new Department[5];
        addDepartment("Java专业","Java专业");
        addDepartment("PHP专业","PHP专业");
        addDepartment("大数据专业","大数据专业");
    }

    @Override
    public String getName() {
        return "计算机学院";
    }

    @Override
    public void addDepartment(String name, String desc) {
        Department department = new Department(name, desc);
        departments[numOfDepartment++] = department;
    }

    @Override
    public Iterator createIterator() {
        return new ComputerCollegeIterator(departments);
    }
}
public class InfoCollegeIterator implements Iterator {
    List<Department> departmentList;
    int index = -1;

    public InfoCollegeIterator(List<Department> departmentList) {
        this.departmentList = departmentList;
    }

    @Override
    public boolean hasNext() {
        if (index >= departmentList.size() -1) {
            return false;
        } else {
            index++;
            return true;
        }
    }

    @Override
    public Object next() {
        return departmentList.get(index);
    }
}
public class Client {
    public static void main(String[] args) {
        // 输出所有学院下的所有系
        List<College> collegeList = new ArrayList<>();
        ComputerCollege computerCollege = new ComputerCollege();
        InfoCollege infoCollege = new InfoCollege();
        collegeList.add(computerCollege);
        collegeList.add(infoCollege);
        for (College college: collegeList) {
            System.out.println("======" + college.getName() + "===========");
            Iterator iterator = college.createIterator();
            while (iterator.hasNext()) {
                Department department = (Department) iterator.next();
                System.out.println(department.getName() + "==" + department.getDesc());
            }
        }
    }
}
优缺点说明:
迭代器模式已经深入到开发工作的各个角落了,由于使用的太普遍,所以有人建议将这个模式从23种设计模式中移除。
5、观察者模式
观察者模式定义了对象间一种一对多的依赖关系,使得每当一个对象改变状态,则所有依赖于它的对对象都会得到通知并被自动更新,也就是常说的发布订阅模式。以发布天气预报为例。
public interface Subject {
    void registerObserver(Observer observer);
    void removeObserver(Observer observer);
    void notifyObservers();
}
public interface Observer {
    void update(float temperature, float pressure, float humidity);
}
public class WeatherData implements Subject{
    private float temperature;
    private float pressure;
    private float humidity;

    List<Observer> observers = new ArrayList<>();

    public WeatherData() {
        this.observers = new ArrayList<>();
    }

    public void setData(float temperature, float pressure, float humidity) {
        this.temperature = temperature;
        this.pressure = pressure;
        this.humidity = humidity;
    }

    @Override
    public void registerObserver(Observer observer) {
        observers.add(observer);
    }

    @Override
    public void removeObserver(Observer observer) {
        observers.remove(observer);
    }

    @Override
    public void notifyObservers() {
        for (Observer observer : observers) {
            observer.update(this.temperature, this.pressure, this.humidity);
        }
    }
}
public class CurrentConditions implements Observer{
    private float temperature;
    private float pressure;
    private float humidity;

    protected void display() {
        System.out.println("今天的温度是:" + temperature);
        System.out.println("今天的气压是:" + pressure);
        System.out.println("今天的湿度是:" + humidity);
    }

    @Override
    public void update(float temperature, float pressure, float humidity) {
        this.temperature = temperature;
        this.pressure = pressure;
        this.humidity = humidity;
        display();
    }
}
public class Client {
    public static void main(String[] args) {
        CurrentConditions currentConditions = new CurrentConditions();
        WeatherData subject = new WeatherData();
        subject.registerObserver(currentConditions);
        subject.setData(30, 110, 20);
        subject.notifyObservers();
    }
}
以上述代码为例,如果要增加其他三方订阅天气预报信息的功能,只需要实现Observer接口即可。
优缺点说明:
优点:观察者和被观察者之间是抽象耦合,建立了一套出发机制
缺点:观察者模式需要考虑一下开发效率和运行效率问题,一个被观察者,多个观察者,开发和调试就会比较复杂,而且在Java中消息的通知默认是顺序执行,一个观察者卡壳,会影响整体的执行效率。在这种情况下,一般考虑采用异步的方式
6、中介者模式
中介者模式就是用一个中介对象封装一系列的对象交互,中介者使各对象不需要显示的相互作用,从而使其耦合松散,而且可以独立的改变它们之间的交互。以进销存管理系统中采购、销售、库存三个模块为例,这三个模块之间都有业务关联,故在一般的实现中每个模块的对象都对其他模块产生了依赖,这样就使得系统很复杂。使用中介者模式进行实现如下:
public abstract class AbstractMediator {
    protected Purchase purchase;
    protected Sale sale;
    protected Stock stock;

    //构造函数
    public AbstractMediator() {
        purchase = new Purchase(this);
        sale = new Sale(this);
        stock = new Stock(this);
    }

    //中介者最重要的方法叫做事件方法,处理多个对象之间的关系
    public abstract void execute(String str, Object... objects);
}
public class Mediator extends AbstractMediator {
    //中介者最重要的方法
    public void execute(String str, Object... objects) {
        if (str.equals("purchase.buy")) { //采购电脑
            this.buyComputer((Integer) objects[0]);
        } else if (str.equals("sale.sell")) { //销售电脑
            this.sellComputer((Integer) objects[0]);
        } else if (str.equals("sale.offsell")) { //折价销售
            this.offSell();
        } else if (str.equals("stock.clear")) { //清仓处理
            this.clearStock();
        }
    }

    //采购电脑
    private void buyComputer(int number) {
        int saleStatus = super.sale.getSaleStatus();
        if (saleStatus > 80) { //销售情况良好
            System.out.println("采购IBM电脑:" + number + "台");
            super.stock.increase(number);
        } else { //销售情况不好
            int buyNumber = number / 2; //折半采购
            System.out.println("采购IBM电脑:" + buyNumber + "台");
        }
    }

    //销售电脑
    private void sellComputer(int number) {
        if (super.stock.getStockNumber() < number) { //库存数量不够销售
            super.purchase.buyIBMComputer(number);
        }
        super.stock.decrease(number);
    }

    //折价销售电脑
    private void offSell() {
        System.out.println("折价销售IBM电脑" + stock.getStockNumber() + "台");
    }

    //清仓处理
    private void clearStock() {
        //要求清仓销售
        super.sale.offSale();
        //要求采购人员不要采购
        super.purchase.refuseBuyIBM();
    }
}
public abstract class AbstractColleague {
    protected AbstractMediator mediator;

    public AbstractColleague(AbstractMediator mediator){
        this.mediator = mediator;
    }
}
public class Purchase extends AbstractColleague {
    public Purchase(AbstractMediator mediator) {
        super(mediator);
    }

    //采购IBM电脑
    public void buyIBMComputer(int number) {
        super.mediator.execute("purchase.buy", number);
    }

    //不再采购IBM电脑
    public void refuseBuyIBM() {
        System.out.println("不再采购IBM电脑");
    }
}
public class Sale extends AbstractColleague {
    public Sale(AbstractMediator mediator) {
        super(mediator);
    }

    //销售IBM电脑
    public void sellIBMComputer(int number) {
        super.mediator.execute("sale.sell", number);
        System.out.println("销售IBM电脑" + number + "台");
    }

    //反馈销售情况,0~100变化,0代表根本就没人买,100代表非常畅销,出一个卖一个
    public int getSaleStatus() {
        Random rand = new Random(System.currentTimeMillis());
        int saleStatus = rand.nextInt(100);
        System.out.println("IBM电脑的销售情况为:" + saleStatus);
        return saleStatus;
    }

    //折价处理
    public void offSale() {
        super.mediator.execute("sale.offsell");
    }
}
public class Stock extends AbstractColleague {
    public Stock(AbstractMediator mediator) {
        super(mediator);
    }

    //刚开始有100台电脑
    private static int COMPUTER_NUMBER = 100;

    //库存增加
    public void increase(int number) {
        COMPUTER_NUMBER = COMPUTER_NUMBER + number;
        System.out.println("库存数量为:" + COMPUTER_NUMBER);
    }

    //库存降低
    public void decrease(int number) {
        COMPUTER_NUMBER = COMPUTER_NUMBER - number;
        System.out.println("库存数量为:" + COMPUTER_NUMBER);
    }

    //获得库存数量
    public int getStockNumber() {
        return COMPUTER_NUMBER;
    }

    //存货压力大了,就要通知采购人员不要采购,销售人员要尽快销售
    public void clearStock() {
        System.out.println("清理存货数量为:" + COMPUTER_NUMBER);
        super.mediator.execute("stock.clear");
    }
}
public class Client {
    public static void main(String[] args) {
        AbstractMediator mediator = new Mediator();
        //采购人员采购电脑
        System.out.println("------采购人员采购电脑--------");
        Purchase purchase = new Purchase(mediator);
        purchase.buyIBMComputer(100);
        //销售人员销售电脑
        System.out.println("\n------销售人员销售电脑--------");
        Sale sale = new Sale(mediator);
        sale.sellIBMComputer(1);
        //库房管理人员管理库存
        System.out.println("\n------库房管理人员清库处理--------");
        Stock stock = new Stock(mediator);
        stock.clearStock();
    }
}
优缺点说明:
优点:减少类间的依赖,把原有的一对多的依赖变成了一对一的依赖,同事只依赖中介者,减少了依赖,当然同时也降低了类间的耦合
缺点:中介类会膨胀的很大,而且逻辑复杂,原本N个对象直接的依赖关系变成中介者和同事之间依赖,同事类越多,中介类的逻辑就越复杂
7、备忘录模式
备忘录模式指在不破坏封装性的前提下,捕获一个对象的内部状态,并在该对象之外保存这个状态。这样以后就可将该对象恢复到原先保存的状态。以恢复游戏角色状态为例
public class Memento {
    // 攻击力
    private int vit;
    // 防御力
    private int def;

    public Memento(int vit, int def) {
        this.vit = vit;
        this.def = def;
    }

    // set/get方法
}
public class CareTaker {
    // 如果有多个状态需要保存,则可以使用集合的方式进行保存
    private Memento memento;

    public Memento getMemento() {
        return memento;
    }

    public void setMemento(Memento memento) {
        this.memento = memento;
    }
}
public class GameRole {
    private int vit;
    private int def;

    // 创建备忘录对象
    public Memento createMemento() {
        return new Memento(vit, def);
    }

    // 从备忘录对象中恢复对象状态
    public void recoverGameRole(Memento memento) {
        this.vit = memento.getVit();
        this.def = memento.getDef();
    }

    public void display() {
        System.out.println("游戏角色当前的攻击力:" + this.vit + ", 防御力:" + this.def);
    }

    // set/get方法
}
public class Client {
    public static void main(String[] args) {
        // 创建游戏角色
        GameRole gameRole = new GameRole();
        gameRole.setVit(100);
        gameRole.setDef(100);
        System.out.println("原始战斗力");
        gameRole.display();
        // 保存当前状态
        CareTaker careTaker = new CareTaker();
        careTaker.setMemento(gameRole.createMemento());
        System.out.println("经过一段时间大战");
        gameRole.setVit(40);
        gameRole.setDef(50);
        gameRole.display();
        // 使用备忘录恢复状态a
        System.out.println("经过修养后的战斗力");
        gameRole.recoverGameRole(careTaker.getMemento());
        gameRole.display();
    }
}
8、解释器模式
解释器模式指按照规定语法进行解析得方案,给定一门语言,定义它的文法的一种表示,并定义一个解释器,该解释器使用该表示来解释语言中的句子。解释器模式在实际的系统开发中使用得非常少,因为它会引起效率、性能以及维护等问题。以四则运算为例,输入一个表达式(如a+b),并且输入个变量的值后,输出表达式的结果。
public abstract class Expression {
    //解析公式和数值,其中var中的key值是公式中的参数,value值是具体的数字
    public abstract int interpreter(HashMap<String, Integer> var);
}
public class VarExpression extends Expression {
    private String key;

    public VarExpression(String key) {
        this.key = key;
    }

    //从map中取之
    public int interpreter(HashMap<String, Integer> var) {
        return var.get(this.key);
    }
}
public abstract class SymbolExpression extends Expression {
    protected Expression left;
    protected Expression right;

    //所有的解析公式都应只关心自己左右两个表达式的结果
    public SymbolExpression(Expression left, Expression right) {
        this.left = left;
        this.right = right;
    }
}
public class AddExpression extends SymbolExpression {
    public AddExpression(Expression left, Expression right) {
        super(left, right);
    }

    //把左右两个表达式运算的结果加起来
    public int interpreter(HashMap<String, Integer> var) {
        return super.left.interpreter(var) + super.right.interpreter(var);
    }
}
public class SubExpression extends SymbolExpression {
    public SubExpression(Expression left, Expression right) {
        super(left, right);
    }

    //把左右两个表达式运算的结果加起来
    public int interpreter(HashMap<String, Integer> var) {
        return super.left.interpreter(var) - super.right.interpreter(var);
    }
}
public class Calculator {
    //定义表达式
    private Expression expression;

    //构造函数传参,并解析
    public Calculator(String expStr) {
        //定义一个栈,安排运算的先后顺序
        Stack<Expression> stack = new Stack<Expression>();
        //表达式拆分为字符数组
        char[] charArray = expStr.toCharArray();
        //运算
        Expression left = null;
        Expression right = null;
        for (int i = 0; i < charArray.length; i++) {
            switch (charArray[i]) {
                case '+': //加法
                    //加法结果放到栈中
                    left = stack.pop();
                    right=new VarExpression(String.valueOf(charArray[++i]));
                    stack.push(new AddExpression(left,right));
                    break;
                case '-':
                    left = stack.pop();
                    right=new VarExpression(String.valueOf(charArray[++i]));
                    stack.push(new SubExpression(left,right));
                    break;
                default: //公式中的变量
                    stack.push(new VarExpression(String.valueOf(charArray[i])));
            }
        }
        //把运算结果抛出来
        this.expression = stack.pop();
    }

    //开始运算
    public int run(HashMap<String, Integer> var) {
        return this.expression.interpreter(var);
    }
}
public class Client {
    //运行四则运算
    public static void main(String[] args) throws IOException {
        String expStr = getExpStr();
        //赋值
        HashMap<String, Integer> var = getValue(expStr);
        Calculator cal = new Calculator(expStr);
        System.out.println("运算结果为:" + expStr + "=" + cal.run(var));
    }

    //获得表达式
    public static String getExpStr() throws IOException {
        System.out.print("请输入表达式:");
        return (new BufferedReader(new InputStreamReader(System.in))).readLine();
    }

    //获得值映射
    public static HashMap<String, Integer> getValue(String exprStr) throws IOException {
        HashMap<String, Integer> map = new HashMap<String, Integer>();
        //解析有几个参数要传递
        for (char ch : exprStr.toCharArray()) {
            if (ch != '+' && ch != '-') {
                //解决重复参数的问题
                if (!map.containsKey(String.valueOf(ch))) {
                    String in = (new BufferedReader(new InputStreamReader (System.in))).readLine();
                    map.put(String.valueOf(ch),Integer.valueOf(in));
                }
            }
        }
        return map;
    }
}
优缺点说明:
优点:解释器是一个简单语法分析工具,它最显著的优点就是扩展性,修改语法规则只要修改相应的非终结符表达式就可以了,若扩展语法,则只要增加非终结符类就可以了
缺点:
- 引起类膨胀:每个语法都要产生一个非终结符表达式,语法规则比较复杂时,就可能产生大量的类文件,为维护带来了非常多的麻烦
- 采用递归调用方法
- 效率问题:由于使用了大量的循环和递归,效率是一个不容忽视的问题,特别是一用于解析复杂、冗长的语法时,效率是难以忍受的
9、状态模式
状态模式主要用来解决对象在多种状态转换时,需要对外输出不同的行为的问题。状态和行为时一一对应的,状态之间可以相互转换。以电梯运行为例,电梯有开门、关门、运行、停止等状态。
public abstract class LiftState {
    //定义一个环境角色,也就是封装状态的变化引起的功能变化
    protected Context context;

    public void setContext(Context context) {
        this.context = context;
    }

    //首先电梯门开启动作
    public abstract void open();

    //电梯门有开启,那当然也就有关闭了
    public abstract void close();

    //电梯要能上能下,运行起来
    public abstract void run();

    //电梯还要能停下来
    public abstract void stop();
}
public class OpenningState extends LiftState {
    //开启当然可以关闭了,我就想测试一下电梯门开关功能
    @Override
    public void close() {
        //状态修改
        super.context.setLiftState(Context.closeingState);
        //动作委托为CloseState来执行
        super.context.getLiftState().close();
    }

    //打开电梯门
    @Override
    public void open() {
        System.out.println("电梯门开启...");
    }

    //门开着时电梯就运行跑,这电梯,吓死你!
    @Override
    public void run() {
        //do nothing;
    }

    //开门还不停止?
    public void stop() {
        //do nothing;
    }
}
public class RunningState extends LiftState {
    //电梯门关闭?这是肯定的
    @Override
    public void close() {
        //do nothing
    }

    //运行的时候开电梯门?你疯了!电梯不会给你开的
    @Override
    public void open() {
        //do nothing
    }

    //这是在运行状态下要实现的方法
    @Override
    public void run() {
        System.out.println("电梯上下运行...");
    }

    //这绝对是合理的,只运行不停止还有谁敢坐这个电梯?!估计只有上帝了
    @Override
    public void stop() {
        super.context.setLiftState(Context.stoppingState);//环境设置为停止状态
        super.context.getLiftState().stop();
    }
}
public class StoppingState extends LiftState {
    //停止状态关门?电梯门本来就是关着的!
    @Override
    public void close() {
        //do nothing;
    }

    //停止状态,开门,那是要的!
    @Override
    public void open() {
        super.context.setLiftState(Context.openningState);
        super.context.getLiftState().open();
    }

    //停止状态再运行起来,正常得很
    @Override
    public void run() {
        super.context.setLiftState(Context.runningState);
        super.context.getLiftState().run();
    }

    //停止状态是怎么发生的呢?当然是停止方法执行了
    @Override
    public void stop() {
        System.out.println("电梯停止了...");
    }
}
public class ClosingState extends LiftState {
    //电梯门关闭,这是关闭状态要实现的动作
    @Override
    public void close() {
        System.out.println("电梯门关闭...");
    }

    //电梯门关了再打开
    @Override
    public void open() {
        super.context.setLiftState(Context.openningState); //置为敞门状态
        super.context.getLiftState().open();
    }

    //电梯门关了就运行,这是再正常不过了
    @Override
    public void run() {
        super.context.setLiftState(Context.runningState); //设置为运行状态
        super.context.getLiftState().run();
    }

    //电梯门关着,我就不按楼层
    @Override
    public void stop() {
        super.context.setLiftState(Context.stoppingState); //设置为停止状态
        super.context.getLiftState().stop();
    }
}
public class Context {
    //定义出所有的电梯状态
    public final static OpenningState openningState = new OpenningState();
    public final static ClosingState closeingState = new ClosingState();
    public final static RunningState runningState = new RunningState();
    public final static StoppingState stoppingState = new StoppingState();
    //定义一个当前电梯状态
    private LiftState liftState;

    public LiftState getLiftState() {
        return liftState;
    }

    public void setLiftState(LiftState liftState) {
        this.liftState = liftState;
        //把当前的环境通知到各个实现类中
        this.liftState.setContext(this);
    }

    public void open() {
        this.liftState.open();
    }

    public void close() {
        this.liftState.close();
    }

    public void run() {
        this.liftState.run();
    }

    public void stop() {
        this.liftState.stop();
    }
}
public class Client {
    public static void main(String[] args) {
        Context context = new Context();
        context.setLiftState(new ClosingState());
        context.open();
        context.close();
        context.run();
        context.stop();
    }
}
优缺点说明:
优点:
- 结构清晰
- 遵循设计原则:开闭原则和单一职责原则
- 封装性好
缺点:当状态多了之后,状态类的子类也会多,会造成类爆炸
10、策略模式
策略模式指定义一组算法,将每个算法都封装起来,并且使它们之间可以互换,也叫政策模式。策略模式使用的就是面向对象的继承和多态机制。
public class Context {
    // 构造函数
    private IStrategy straegy;

    public Context(IStrategy strategy) {
        this.straegy = strategy;
    }

    // 执行策略的操作
    public void operate() {
        this.straegy.operate();
    }
}
public interface IStrategy {
    void operate();
}
public class ConcreteStrategy1 implements Strategy {
    public void doSomething() {
        System.out.println("具体策略1的运算法则");
    }
}
public class ConcreteStrategy2 implements Strategy {
    public void doSomething() {
        System.out.println("具体策略2的运算法则");
    }
}
public class Client {
    public static void main(String[] args) {
        // 声明一个具体的策略
        IStrategy strategy = new ConcreteStrategy1();
        // 声明上下文对象
        Context context = new Context(strategy);
        // 执行封装后的方法
        context.operate();
    }
}
优缺点说明:
优点:算法可以自由切换、避免使用多重判断条件、扩展性好
缺点:策略类数量增多、所有的策略类都要对外暴露,违背了迪米特法则
11、责任链模式
责任链模式指使多个对象都有机会处理请求,从而避免了请求的发送者和接收者之间的耦合关系。将这些对象连成一条链,并沿着这条链传递该请求,直到有对象处理它位置。以审批流程为例。
public abstract class Approver {
    // 下一个处理者
    Approver approver;
    String name;

    public Approver(String name) {
        this.name = name;
    }

    // 传递到下一个处理者
    public void setApprover(Approver approver) {
        this.approver = approver;
    }
    // 处理审批请求
    public abstract void processRequest(PurchaseRequest request);
}
public class PurchaseRequest {
    private int type;
    private float price = 0.0f;
    private int id = 0;

    public PurchaseRequest(int type, float price, int id) {
        this.type = type;
        this.price = price;
        this.id = id;
    }

    public int getType() {
        return type;
    }

    public float getPrice() {
        return price;
    }

    public int getId() {
        return id;
    }
}
public class DepartmentApprover extends Approver {

    public DepartmentApprover(String name) {
        super(name);
    }

    @Override
    public void processRequest(PurchaseRequest request) {
        if (request.getPrice() <= 5000) {
            System.out.println("请求编号id=" + request.getId() + " 被 " + this.name + " 处理。");
        } else {
            approver.processRequest(request);
        }
    }
}
public class CollegeApprover extends Approver {

    public CollegeApprover(String name) {
        super(name);
    }

    @Override
    public void processRequest(PurchaseRequest request) {
        if (request.getPrice() > 5000 && request.getPrice() <= 10000) {
            System.out.println("请求编号id=" + request.getId() + " 被 " + this.name + " 处理。");
        } else {
            approver.processRequest(request);
        }
    }
}
public class Client {
    public static void main(String[] args) {
        // 创建请求
        PurchaseRequest purchaseRequest = new PurchaseRequest(1, 7000, 1);
        // 创建审批人
        DepartmentApprover departmentApprover = new DepartmentApprover("李主任");
        CollegeApprover collegeApprover = new CollegeApprover("孙院长");

        // 设置审批流程
        departmentApprover.setApprover(collegeApprover);
        departmentApprover.processRequest(purchaseRequest);
    }
}
优缺点说明:
优点:将请求和处理分开,请求者可以不用知道是谁处理的,处理者可以不用知道请求的全貌,两者解耦,提高系统的灵活性
缺点:性能问题,如果链条比较长,调试也不方便


 1169
1169


 被折叠的 条评论
为什么被折叠?
被折叠的 条评论
为什么被折叠?
 到【灌水乐园】发言


