


一、背景
笔者在讨论组中看到网友提到的 Session 共享问题,因此私下查阅文档,最终锁定使用 Spring Session 解决问题并在此记录。
二、介绍
Spring Session 提供了一套 API 来管理用户的会话信息。
使用 Spring Session 可以替换项目容器中 HttpSession 的实现。此外, Spring Session 还提供如下功能:
1) Session 集群:Spring Session 使得支持集群会话变得非常简单。使用 Spring Session 我们不必为 session 的集群而将项目绑定在指定的应用程序中。
2) 多浏览器会话:Spring Session 提供了在单个浏览器中管理多个 session 的方案。
3) RESTful APIs:Spring Session 允许在请求头中添加 Session ID 以实现 RESTful 风格的 API。
本篇内容之针对第一点的功能进行介绍。
原理图如下:
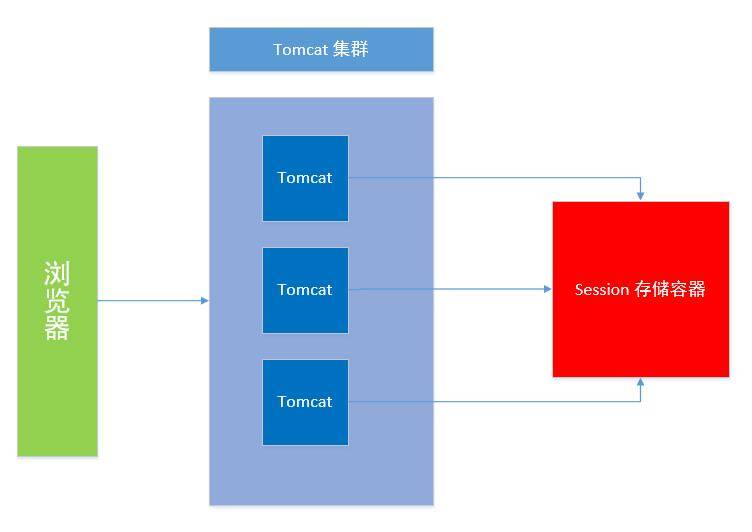
浏览器发起请求后,tomcat (由负载均衡分配指向具体的 tomcat)获取请求中的 session id 在 session 存储容器中找到相应的 Session 对象。
针对 Session 存储的容器, Spring Session 提供了很多方案:
1) HttpSession with Redis
2) HttpSession with Pivotal GemFire
3) HttpSession with JDBC
4) HttpSession with Mongo
5) HttpSession with Hazelcast
三、实现
JDK:1.8
容器:Tomcat 8
Session 存储容器:Redis 3.2.0
本次测试使用 HttpSession with Redis 方案, 为了测试方便,笔者将项目部署到同一台虚拟机上的 2 个 tomcat 中,使用 8080 和 8081 端口启动。
3.1 添加依赖
|
1
2
3
4
5
6
7
8
9
10
11
12
13
14
15
16
17
|
<dependency>
<groupId>org.springframework.data
</groupId>
<artifactId>spring-data-redis
</artifactId>
<version>1.8.9.RELEASE
</version>
</dependency>
<dependency>
<groupId>redis.clients
</groupId>
<artifactId>jedis
</artifactId>
<version>2.9.0
</version>
</dependency>
<dependency>
<groupId>org.springframework.session
</groupId>
<artifactId>spring-session
</artifactId>
<version>1.3.1.RELEASE
</version>
</dependency>
|
此处省略 Spring 等相关 jar 。
3.2 applicationContext-session.xml 文件
|
1
2
3
4
5
6
7
8
9
10
11
12
13
14
15
16
17
18
19
20
21
22
23
|
<context:annotation-config/>
<!-- redis 连接池 -->
<bean id="jedisPoolConfig" class="redis.clients.jedis.JedisPoolConfig">
<property name="maxTotal" value="20">
</property>
<property name="maxIdle" value="1">
</property>
</bean>
<!-- redis 连接工厂 -->
<bean id="jedisConnectionFactory" class="org.springframework.data.redis.connection.jedis.JedisConnectionFactory"
destroy-method="destroy">
<property name="hostName" value="192.168.2.11"/>
<property name="port" value="6379"/>
<property name="timeout" value="5000"/>
<property name="password" value=""/>
<property name="usePool" value="true"/>
<property name="poolConfig" ref="jedisPoolConfig"/>
</bean>
<!-- spring session 配置 -->
<bean id="redisHttpSessionConfiguration" class="org.springframework.session.data.redis.config.annotation.web.http.RedisHttpSessionConfiguration">
<property name="maxInactiveIntervalInSeconds" value="600"/>
</bean>
|
当项目启动时,Spring 会创建一个名为 springSessionRepositoryFilter 的 Bean(过滤器),而 Bean 负责将 HttpSession 的实现替换成 Spring Session 。Spring Session 依赖 Redis 存储客户端的 Session 信息。
3.3 web.xml 文件
|
1
2
3
4
5
6
7
8
|
<filter>
<filter-name>springSessionRepositoryFilter
</filter-name>
<filter-class>org.springframework.web.filter.DelegatingFilterProxy
</filter-class>
</filter>
<filter-mapping>
<filter-name>springSessionRepositoryFilter
</filter-name>
<url-pattern>/*
</url-pattern>
</filter-mapping>
|
每个客户端请求经过 DelegatingFilterProxy 后,DelegatingFilterProxy 会在 Spring 容器中查找名为 springSessionRepositoryFilter 的 Bean,将其转化成 Filter 对请求数据进行过滤。
注意:如果项目中还配置了其他过滤器,该过滤器必须配置在所有过滤器的首位。
3.4 后端代码
|
1
2
3
4
5
6
7
8
9
10
11
12
13
14
15
16
17
18
19
20
21
22
23
24
25
26
27
28
29
30
31
32
|
public
class LoginController {
(
"login")
public String login(String userName, String password,HttpServletRequest request) {
// 首次登录
if (
"admin".equals(userName) &&
"admin".equals(password)) {
HttpSession session = request.getSession();
session.setAttribute(
"userName", userName);
return
"manageUI";
}
// 如果已经登录过,从另一个 tomcat 访问该方法,跳转到 manageUI 页面可以查看 session 信息
if (
"".equals(userName) &&
"".equals(password)) {
return
"manageUI";
}
return
"redirect:/index.jsp";
}
(
"logout")
public String logout(HttpSession session) {
session.removeAttribute(
"userName");
session.removeAttribute(
"url");
return
"redirect:/index.jsp";
}
}
|
3.5 前端代码
index.jsp 页面
|
1
2
3
4
5
6
7
8
9
10
11
12
13
14
15
16
17
18
19
20
21
22
23
24
25
26
27
28
29
30
31
32
33
34
35
36
37
38
39
40
41
42
43
44
45
46
47
48
49
50
51
52
53
54
55
56
57
58
|
<%@ page language="java" contentType="text/html; charset=UTF-8" pageEncoding="UTF-8"%>
<html lang="zh">
<head>
<meta charset="utf-8">
<meta http-equiv="X-UA-Compatible" content="IE=edge">
<meta name="viewport" content="width=device-width, initial-scale=1">
<meta name="description" content="">
<meta name="author" content="">
<title>登陆界面
</title>
<link href="/resources/css/bootstrap.min.css" rel="stylesheet">
<style>
html {
background: url("/resources/images/bg.png") no-repeat center center;
}
label {
color: #fff;
}
.container {
position:absolute;
top:50%;
left:50%;
margin-top: -115px;
margin-left: -250px;
width: 500px;
height:230px;
padding:50px;
border: 2px solid #eee;
border-radius: 5px;
box-shadow:5px 5px 16px #000;
}
</style>
</head>
<body>
<div class="container">
<form class="form-horizontal" role="form" action="/login" method="post">
<div class="form-group">
<label for="inputEmail3" class="col-sm-2 control-label">用户名
</label>
<div class="col-sm-10">
<input type="text" class="form-control" name="userName" placeholder="用户名">
</div>
</div>
<div class="form-group">
<label for="inputPassword3" class="col-sm-2 control-label">密码
</label>
<div class="col-sm-10">
<input type="password" class="form-control" name="password" placeholder="密码">
</div>
</div>
<div class="form-group">
<div class="col-sm-offset-2 col-sm-10">
<button type="submit" class="btn btn-primary" style="width: 100%">登陆
</button>
</div>
</div>
</form>
</div>
</body>
</html>
|
manageUI.jsp 页面
|
1
2
3
4
5
6
7
8
9
10
11
12
13
14
15
16
17
18
19
20
21
22
23
|
<%@ page language="java" contentType="text/html; charset=UTF-8" pageEncoding="UTF-8"%>
<html lang="zh">
<head>
<meta charset="utf-8">
<meta http-equiv="X-UA-Compatible" content="IE=edge">
<meta name="viewport" content="width=device-width, initial-scale=1">
<meta name="description" content="">
<meta name="author" content="">
<title>管理界面
</title>
<link href="/resources/css/bootstrap.min.css" rel="stylesheet">
</head>
<body>
<div class="container">
<div class="jumbotron">
<h3>端口为 8080 的页面
</h3>
<h3>用户名:${sessionScope.userName}(session 域数据)
</h3>
<p>
<a class="btn btn-lg btn-success" href="/logout" role="button">注销
</a>
</p>
</div>
</div>
</body>
</html>
|
注意:8081 项目的页面需要改成 “端口为 8081 的页面”。
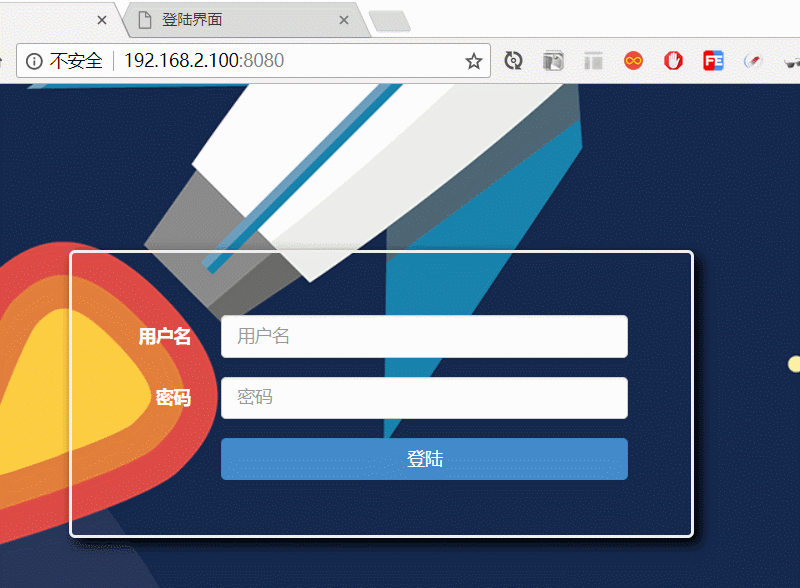
四、演示
预期效果:
1) 首先访问 8080 端口的项目并进行登陆操作,跳转到管理界面并显示保存的信息。
2) 在同个浏览器中访问 8081 端口项目的页面,不需要输入账号密码直接点击登陆按钮,会直接跳转到管理界面。如果 session 实现了共享,那么在管理界面就可以查看由 8080 端口项目保存在 session 的信息。否则反之。
演示图如下:
使用 Spring Session 确实很方便和简单,我们不需要额外的学习 API,只需配置就能实现功能。


 555
555

 被折叠的 条评论
为什么被折叠?
被折叠的 条评论
为什么被折叠?
 到【灌水乐园】发言


