


项目环境:
vue3 项目 element-plus 组件库
直接看组件代码
表单的单元form
<template>
	<el-select :model-value="modelValue + ''" :placeholder="placeholder" :clearable="clearable" @change="$emit('update:modelValue', $event)">
		<el-option v-for="data in dataList" :key="data.dictValue" :label="data.dictLabel" :value="data.dictValue">{{ data.dictLabel }}</el-option>
	</el-select>
</template>

<script setup lang="ts" name="FastSelect">
import store from '@/store'
import { getDictDataList } from '@/utils/tool'

const props = defineProps({
	modelValue: {
		type: [Number, String],
		required: true
	},
	dictType: {
		type: String,
		required: true
	},
	clearable: {
		type: Boolean,
		required: false,
		default: () => false
	},
	placeholder: {
		type: String,
		required: false,
		default: () => ''
	}
})

const dataList = getDictDataList(store.appStore.dictList, props.dictType)
</script>
表格的列table
<template>
	<el-table-column
		:prop="prop"
		:label="label"
		:header-align="headerAlign"
		:align="align"
		:width="width"
		:min-width="minWidth"
		:class-name="className"
	>
		<template #default="scope">
			<el-tag
				v-if="getDictLabelClass(store.appStore.dictList, props.dictType, scope.row[props.prop])"
				:type="
					getDictLabelClass(store.appStore.dictList, props.dictType, scope.row[props.prop]) === 'primary'
						? ''
						: getDictLabelClass(store.appStore.dictList, props.dictType, scope.row[props.prop])
				"
			>
				{{ getDictLabel(store.appStore.dictList, props.dictType, scope.row[props.prop]) }}
			</el-tag>
			<span v-else>
				{{ getDictLabel(store.appStore.dictList, props.dictType, scope.row[props.prop]) }}
			</span>
		</template>
	</el-table-column>
</template>

<script setup lang="ts" name="FastTableColumn">
import store from '@/store'
import { getDictLabel, getDictLabelClass } from '@/utils/tool'

const props = defineProps({
	prop: {
		type: String,
		required: true
	},
	label: {
		type: String,
		required: true
	},
	dictType: {
		type: String,
		required: true
	},
	headerAlign: {
		type: String,
		required: false,
		default: () => 'center'
	},
	align: {
		type: String,
		required: false,
		default: () => 'center'
	},
	width: {
		type: String,
		required: false,
		default: () => ''
	},
	minWidth: {
		type: String,
		required: false,
		default: () => ''
	},
	className: {
		type: String,
		required: false,
		default: () => ''
	}
})
</script>
然后分别看下依赖的模块代码
import store from '@/store'
import { getDictLabel, getDictLabelClass } from '@/utils/tool'
store就是vue3 默认的pinia状态管理,我们在登录的时候就获取到当前账号的所有字典数据
getDictLabel函数
export const getDictLabel = (dictList: any[], dictType: string, dictValue: string) => {
	const type = dictList.find((element: any) => element.dictType === dictType)
	if (type) {
		const val = type.dataList.find((element: any) => element.dictValue === dictValue + '')
		if (val) {
			return val.dictLabel
		} else {
			return dictValue
		}
	} else {
		return dictValue
	}
}
这个函数就是从pinia中查询对应的字典样式,说白了就是tag标签的位子,最终决定显示的标签内容是什么。
getDictLabelClass函数
export const getDictLabelClass = (dictList: any[], dictType: string, dictValue: string): string => {
	const type = dictList.find((element: any) => element.dictType === dictType)
	if (type) {
		const val = type.dataList.find((element: any) => element.dictValue === dictValue + '')
		if (val) {
			return val.labelClass
		} else {
			return ''
		}
	} else {
		return ''
	}
}
这个函数就是从pinia中查询对应的字典样式,说白了就是tag标签的type属性,最终决定显示的标签是什么颜色。
组件使用
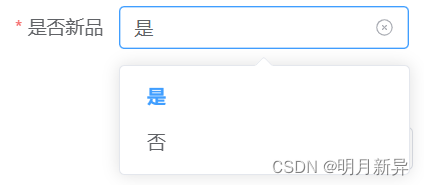
form表单中
<el-form 属性省略 >
	<el-form-item label="是否新品" prop="isNew">
			<fast-select v-model="dataForm.isNew" dict-type="is_new" placeholder="是否在售必选" clearable></fast-select>
	</el-form-item>
</el-form>
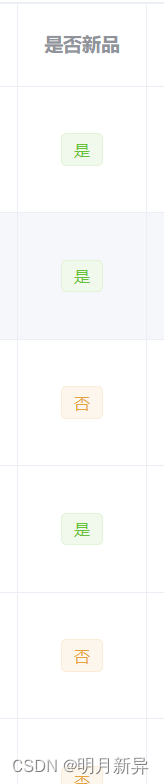
table中
<el-table 属性省略 >
	<fast-table-column prop="isNew" dict-type="is_new" label="是否新品"></fast-table-column>
</el-table>
最终展示效果
form表单效果
table列效果


 5480
5480


 被折叠的 条评论
为什么被折叠?
被折叠的 条评论
为什么被折叠?
 到【灌水乐园】发言


