


一 背景
在运维场景中 存在需要唯一ID的情况,很多时候不知道什么时候采取唯一ID比较合适
场景1 不需要唯一ID的情况
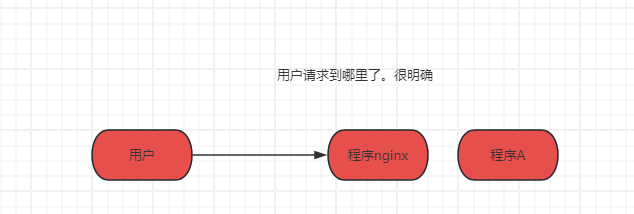
1.1 说明:
这种情况下不需要NGINX唯一ID接入,域名和程序都比较明确,链路较短。很容易定位到链路在哪里中断和链路的目的地
场景2 有必要介入唯一ID
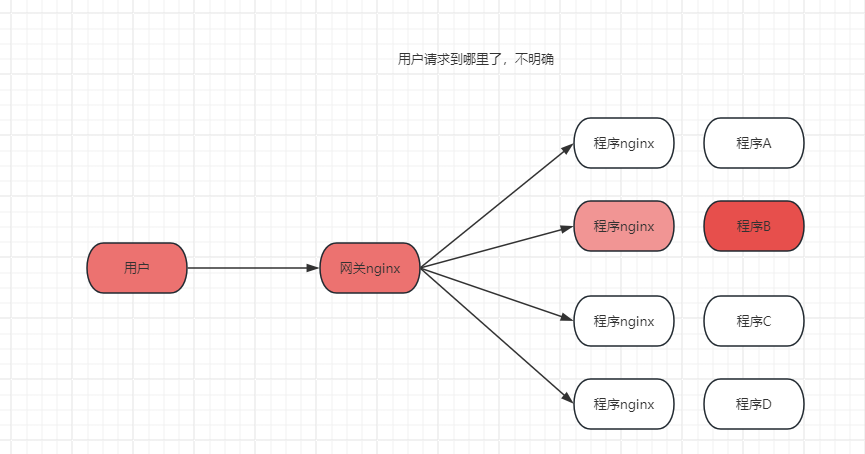
2.1 说明:
这种情况下建议引入唯一ID。 中间涉及多个网关和多个NGINX 用户请求不明确。 当客户URL访问异常,
当用户访问异常:为了确定URL流向
1 必须先登录网关,确定是否为网关问题
2 通过网关流向判断 再次登录后端服务器判断 服务器状态
至少2次服务器登录 和排查 增加了问题排查周期
场景3 非常需要唯一ID
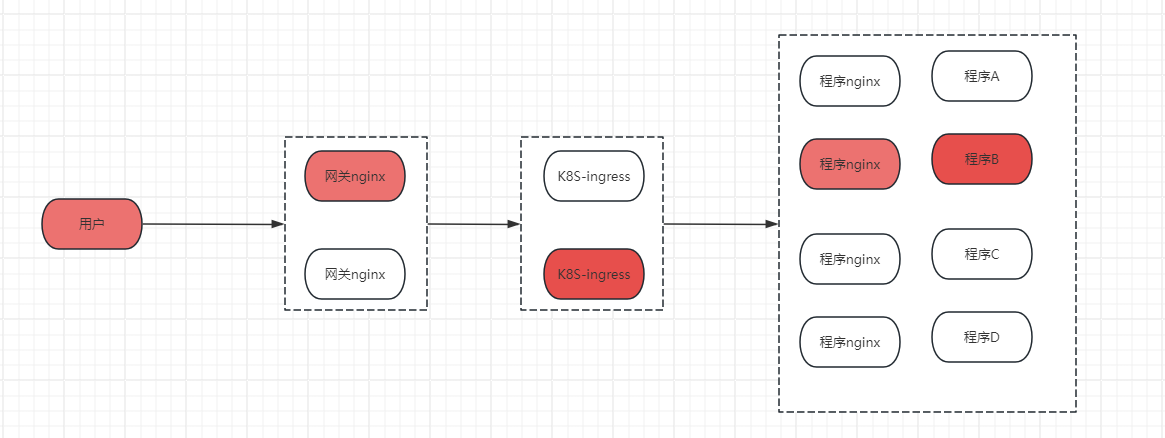
3.1 说明:
这种情况下有必要介入唯一ID。 中间涉及多个网关和K8S-INGRESS(也是一个NGINX)多个NGINX 用户请求不明确。 当客户URL访问异常,
当用户访问异常:为了确定URL流向
1 必须先登录网关,确定是否为网关问题
2 登录 INGRESS POD 查看日志
2 登录具体了业务POD查看日志
至少3次服务器登录
3.2 复杂情况
在更加复杂的情况下 是存在多个网关 , 网关 和K8S前是存在SLB的。
当用户访问异常:为了确定URL流向
1 先解析域名 确定网关的SLB地址
2 分别登录2个网关
3 分别登录2个SLB
4 登录具体的POD
这里还没引入 服务网关的等场景,引入之后排查流程将会更长
场景4 NGINX唯一ID无法解决

说明: 这种情况下无法通过NGINX唯一ID 解决,需要引入APM 程序 的AGENT
后面我们再介绍 简单引入一个知乎的 关于APM的介绍
APM分为前端和后端 这里主要介绍的是后端。
目前很多企业是前端APM和后端APM 一起来做的2端的唯一ID进行打通。其实是更好的。
前端APM:
开源的:WebMonitoring WebTracing
前端的开源APM较少
付费阿里云的:应用实时监控服务_全栈性能监控_用户体验监控_迁移与运维管理-阿里云
阿里的是前后端进行打通的。
后端的APM:
https://zhuanlan.zhihu.com/p/660338176
这里是很多开源的。推荐:SkyWalking
二 如何引入NGINX唯一ID
2.1 基本流程是这样的
1 在网关 配置增加 唯一ID 请求头,并且日志打印
2 在后端业务NGINX 或者请求头 并且日志打印
3 业务程序也可以接受这个请求头 在业务日志进行打印 (可选)
1.项目接受的请求头定义为traceId。
2.nginx.conf主文件配置增加proxy_set_header traceId $request_id;
3.nignx.conf主文件日志增加打印日志$request_id
最后项目接受到nginx传送的以$request_id 作为traceId的字符串,实现nginx和tomcat的链路串联。
2.2 入口网关的配置
这里网关入口的日志配置 :核心配置 p-request-id=[$request_id]
2.2.1 NGINX 日志配置
www escape=json 'remote_addr=[$remote_addr] http_x_forward=[$http_x_forwarded_for] time=[$time_local] '
        'request=[$request] status=[$status] byte=[$bytes_sent] elapsed=[$request_time] refer=[$http_referer] '
        'body=[$request_body] ua=[$http_user_agent] cookie=[$http_cookie] gzip=[$gzip_ratio] '
        'log_id=[$hostname] msec=[$msec] '
        'host=[$host] http_host=[$http_host] http_accept=[$http_accept|$http_accept_encoding|$http_accept_language] '
        'upstream_response_time=[$upstream_response_time] sent_http_set_cookie=[$sent_http_set_cookie] '
         'upstreamip=[$upstream_addr] session_id=[$upstream_cookie_rrc_rrc_signed] rrc_tg=[$upstream_cookie_rrc_tg] upsteam_status=[$upstream_status] p-request-id=[$request_id] x-request-id=[$http_x_request_id]   pod_name=[$http_x_downstream_host]'
2.2.2 SERVER 日志配置
这里是SERVER 的配置 核心配置
add_header x-request-id $request_id; (添加请求头 方便调用的时候返回给调用方唯一ID )
proxy_set_header x-request-id $request_id; (自己生成的唯一ID 向后传递)
server {
  server_name a.com;
  listen 8180;
  location / {
    proxy_pass http://octo-gateway;
    proxy_set_header Host $host;
    proxy_set_header X-Real-IP $remote_addr;
    proxy_set_header X-Forwarded-For $proxy_add_x_forwarded_for;
    proxy_set_header X-Forwarded-Host $http_host;
    proxy_set_header X-Forwarded-Port $server_port;
    proxy_set_header X-Forwarded-Proto $scheme;
    proxy_set_header REMOTE-HOST $remote_addr;
    proxy_redirect off;
    proxy_cache rrc;
    proxy_cache_key $http_x_forwarded_proto$host$proxy_host$uri$is_args$args;
    proxy_next_upstream http_500 http_502  http_504 error timeout invalid_header;
    proxy_connect_timeout 600;
    proxy_send_timeout 600;
    proxy_read_timeout 600;
    proxy_buffering on;
    proxy_buffer_size 402400k;
    proxy_buffers 8 402400k;
    proxy_busy_buffers_size 402400k;
    proxy_max_temp_file_size 2048m;
    proxy_temp_file_write_size 402400k;
    add_header x-request-id $request_id;
    proxy_set_header x-request-id $request_id;
    add_header X-CACHE-RRC '$upstream_cache_status from $proxy_host-$hostname-$upstream_status';
  }
}
2.3 业务nginx
核心: x-request-id 为上游传递过来的唯一ID
非核心:p-request-id 为本地生成的。根据业务需求引用
www escape=json 'remote_addr=[$remote_addr] http_x_forward=[$http_x_forwarded_for] time=[$time_local] '
        'request=[$request] status=[$status] byte=[$bytes_sent] elapsed=[$request_time] refer=[$http_referer] '
        'body=[$request_body] ua=[$http_user_agent] cookie=[$http_cookie] gzip=[$gzip_ratio] '
        'log_id=[$hostname] msec=[$msec] '
        'host=[$host] http_host=[$http_host] http_accept=[$http_accept|$http_accept_encoding|$http_accept_language] '
        'upstream_response_time=[$upstream_response_time] sent_http_set_cookie=[$sent_http_set_cookie] '
         'upstreamip=[$upstream_addr] session_id=[$upstream_cookie_rrc_rrc_signed] rrc_tg=[$upstream_cookie_rrc_tg] upsteam_status=[$upstream_status] p-request-id=[$request_id] x-request-id=[$http_x_request_id]   pod_name=[$http_x_downstream_host]'
2.3.1 SERVER配置
这里的 唯一ID proxy_set_header x-request-id $http_x_request_id; 继续向后传递
server {
  server_name a.com;
  listen 8180;
  location / {
    proxy_pass http://octo-gatewa;
    proxy_set_header Host $host;
    proxy_set_header X-Real-IP $remote_addr;
    proxy_set_header X-Forwarded-For $proxy_add_x_forwarded_for;
    proxy_set_header X-Forwarded-Host $http_host;
    proxy_set_header X-Forwarded-Port $server_port;
    proxy_set_header X-Forwarded-Proto $scheme;
    proxy_set_header REMOTE-HOST $remote_addr;
    proxy_redirect off;
    proxy_cache rrc;
    proxy_cache_key $http_x_forwarded_proto$host$proxy_host$uri$is_args$args;
    proxy_next_upstream http_500 http_502  http_504 error timeout invalid_header;
    proxy_connect_timeout 600;
    proxy_send_timeout 600;
    proxy_read_timeout 600;
    proxy_buffering on;
    proxy_buffer_size 402400k;
    proxy_buffers 8 402400k;
    proxy_busy_buffers_size 402400k;
    proxy_max_temp_file_size 2048m;
    proxy_temp_file_write_size 402400k;
    proxy_set_header x-request-id $http_x_request_id;
    add_header X-CACHE-RRC '$upstream_cache_status from $proxy_host-$hostname-$upstream_status';
  }
}
2.3.2 业务代码
获取唯一ID 打印
import org.springframework.web.bind.annotation.GetMapping;
import org.springframework.web.bind.annotation.RestController;
import javax.servlet.http.HttpServletRequest;

@RestController
public class RequestIdController {
    @GetMapping("/getRequestId")
    public String getRequestId(HttpServletRequest request) {
        // 从请求头中获取 X-Request-Id
        String requestId = request.getHeader("X-Request-Id");
        if (requestId != null) {
            return "X-Request-Id: " + requestId;
        } else {
            return "X-Request-Id not found in the request headers.";
        }
    }
}
三 如何查找问题
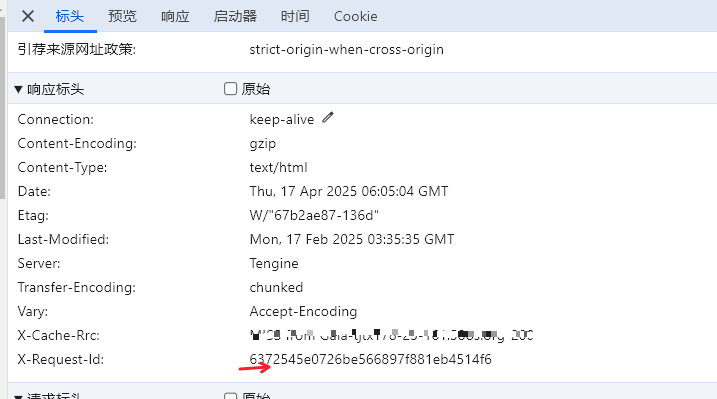
我们网页打开 访问URL F12,或curl -I 网址 就可以看到这个唯一ID
我们就可以根据这个唯一ID 追述问题。
这里我们还是需要登录服务器来查询指定唯一ID的问题更方便的方案 是需要对NGINX 日志收集集中查看
常用的方案 ELK
如果不会收集这里我引用一个ELK其他博文:
当然K8S日志收集也有专门的收集器。 都是一样的 日志读取--最终写入到ES里。 我们通过各种界面工具去查看ES的结果。方便争端问题
后续:
1 可以通过Kibana argus 等去查询ES
2 python运维开发去调用ES的数据进行故障分析 故障复盘 结合其他的运维定位工具 统一定位问题
最近我们通过dify工具流和大模型 来调用ES 来追踪链路,使链路结果更佳清洗。后面我专门搞一个文章来写一下 基于dify工具流和大模型的 链路追踪定位


 1923
1923

 被折叠的 条评论
为什么被折叠?
被折叠的 条评论
为什么被折叠?
 到【灌水乐园】发言


