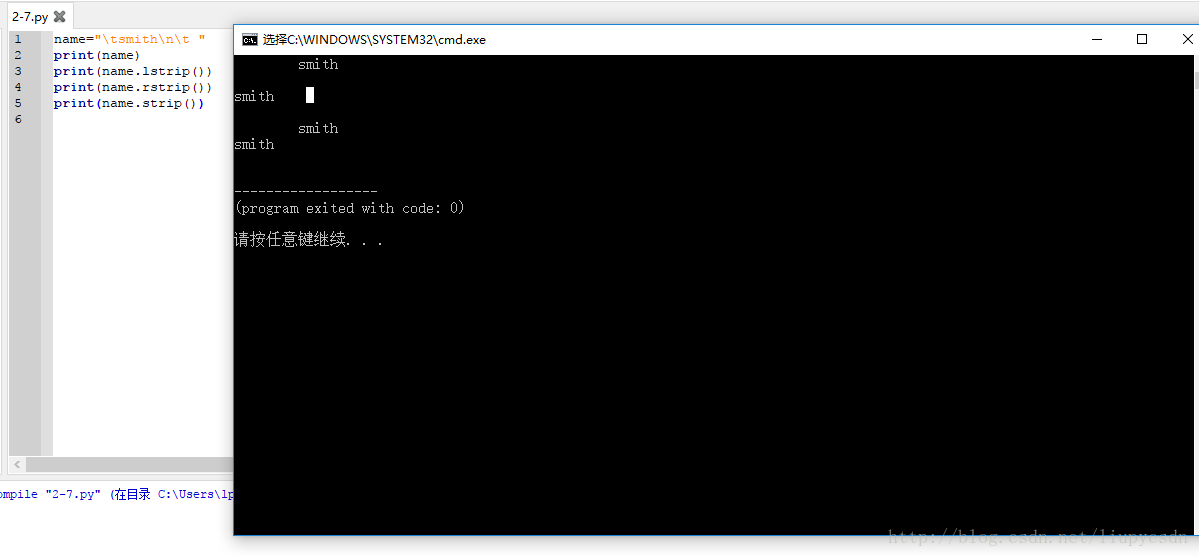
第二次作业

2-2


2-4


2-7


2-8


  • 0
    点赞
  • 0
    收藏
    觉得还不错? 一键收藏
  • 0
    评论
好的,我来为您解答。 首先,我们需要在布局文件中添加一个 RelativeLayout 控件: ```xml <RelativeLayout android:layout_width="match_parent" android:layout_height="match_parent"> <!-- 这里添加九宫格子的布局 --> </RelativeLayout> ``` 然后,我们需要在 RelativeLayout 中添加九宫格子的布局。这里我们采用 ImageView 控件作为九宫格子,每个格子的大小相同,可以采用权重的方式实现。 ```xml <RelativeLayout android:layout_width="match_parent" android:layout_height="match_parent"> <ImageView android:id="@+id/image1" android:layout_width="0dp" android:layout_height="0dp" android:layout_margin="5dp" android:layout_centerInParent="true" android:layout_alignParentTop="true" android:layout_alignParentLeft="true" android:layout_alignParentStart="true" android:layout_weight="1" android:src="@drawable/image1" /> <ImageView android:id="@+id/image2" android:layout_width="0dp" android:layout_height="0dp" android:layout_margin="5dp" android:layout_centerInParent="true" android:layout_alignParentTop="true" android:layout_toRightOf="@id/image1" android:layout_toEndOf="@id/image1" android:layout_weight="1" android:src="@drawable/image2" /> <ImageView android:id="@+id/image3" android:layout_width="0dp" android:layout_height="0dp" android:layout_margin="5dp" android:layout_centerInParent="true" android:layout_alignParentTop="true" android:layout_toRightOf="@id/image2" android:layout_toEndOf="@id/image2" android:layout_weight="1" android:src="@drawable/image3" /> <ImageView android:id="@+id/image4" android:layout_width="0dp" android:layout_height="0dp" android:layout_margin="5dp" android:layout_centerInParent="true" android:layout_below="@id/image1" android:layout_alignParentLeft="true" android:layout_alignParentStart="true" android:layout_weight="1" android:src="@drawable/image4" /> <ImageView android:id="@+id/image5" android:layout_width="0dp" android:layout_height="0dp" android:layout_margin="5dp" android:layout_centerInParent="true" android:layout_below="@id/image2" android:layout_toRightOf="@id/image4" android:layout_toEndOf="@id/image4" android:layout_weight="1" android:src="@drawable/image5" /> <ImageView android:id="@+id/image6" android:layout_width="0dp" android:layout_height="0dp" android:layout_margin="5dp" android:layout_centerInParent="true" android:layout_below="@id/image3" android:layout_toRightOf="@id/image5" android:layout_toEndOf="@id/image5" android:layout_weight="1" android:src="@drawable/image6" /> <ImageView android:id="@+id/image7" android:layout_width="0dp" android:layout_height="0dp" android:layout_margin="5dp" android:layout_centerInParent="true" android:layout_below="@id/image4" android:layout_alignParentLeft="true" android:layout_alignParentStart="true" android:layout_weight="1" android:src="@drawable/image7" /> <ImageView android:id="@+id/image8" android:layout_width="0dp" android:layout_height="0dp" android:layout_margin="5dp" android:layout_centerInParent="true" android:layout_below="@id/image5" android:layout_toRightOf="@id/image7" android:layout_toEndOf="@id/image7" android:layout_weight="1" android:src="@drawable/image8" /> <ImageView android:id="@+id/image9" android:layout_width="0dp" android:layout_height="0dp" android:layout_margin="5dp" android:layout_centerInParent="true" android:layout_below="@id/image6" android:layout_toRightOf="@id/image8" android:layout_toEndOf="@id/image8" android:layout_weight="1" android:src="@drawable/image9" /> </RelativeLayout> ``` 在上述布局中,我们使用了 `android:layout_weight` 属性来实现九宫格子的等分布局,每个 ImageView 控件的权重都设置为 1,这样每个格子的大小就相等了。同时,我们使用了 `android:layout_centerInParent` 属性来使每个格子都居中显示,使用了 `android:layout_alignParentTop` 和 `android:layout_alignParentLeft`(或 `android:layout_alignParentStart`)属性来使第一个格子位于 RelativeLayout 控件的左上角,使用了 `android:layout_below`、`android:layout_toRightOf` 和 `android:layout_toEndOf` 属性来设置每个格子的位置。 最后,我们可以在 Java 代码中获取每个 ImageView 控件,并为它们设置点击事件,以实现九宫格的功能。 ```java ImageView image1 = findViewById(R.id.image1); ImageView image2 = findViewById(R.id.image2); ImageView image3 = findViewById(R.id.image3); ImageView image4 = findViewById(R.id.image4); ImageView image5 = findViewById(R.id.image5); ImageView image6 = findViewById(R.id.image6); ImageView image7 = findViewById(R.id.image7); ImageView image8 = findViewById(R.id.image8); ImageView image9 = findViewById(R.id.image9); image1.setOnClickListener(new View.OnClickListener() { @Override public void onClick(View v) { // 处理第一个格子的点击事件 } }); image2.setOnClickListener(new View.OnClickListener() { @Override public void onClick(View v) { // 处理第二个格子的点击事件 } }); // 其他格子的点击事件同理 ``` 好了,以上就是使用相对布局实现九宫格的方法。希望对您有帮助!

“相关推荐”对你有帮助么?

  • 非常没帮助
  • 没帮助
  • 一般
  • 有帮助
  • 非常有帮助
提交
评论
添加红包

请填写红包祝福语或标题

红包个数最小为10个

红包金额最低5元

当前余额3.43前往充值 >
需支付:10.00
成就一亿技术人!
领取后你会自动成为博主和红包主的粉丝 规则
hope_wisdom
发出的红包
实付
使用余额支付
点击重新获取
扫码支付
钱包余额 0

抵扣说明:

1.余额是钱包充值的虚拟货币,按照1:1的比例进行支付金额的抵扣。
2.余额无法直接购买下载,可以购买VIP、付费专栏及课程。

余额充值