


一、目前异步返回多个值方案
如果存在异步返回多个值的需求,我们探索以下解决方案
1.1、集合
集合返回了多个值,但是一个一个返回的,不是异步
fun simpleList(): List<Int> = listOf<Int>(1, 2, 3)

@Test
fun `test multiple values`() {
    simpleList().forEach { value -> println(value) }
}
//一次性返回:
//1
//2
//3
1.2、序列
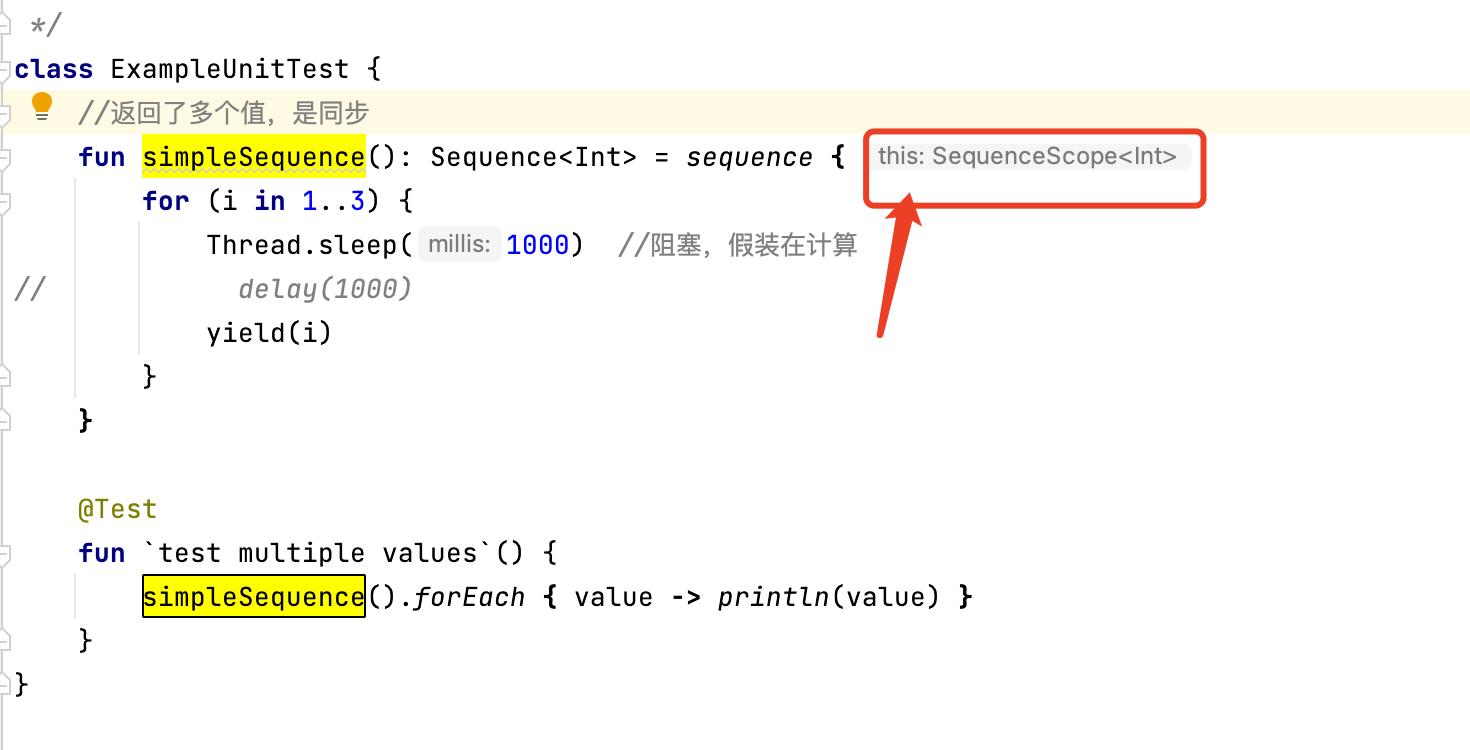
下面示例中:Sequence返回了多个值,是同步,为什么Sequence返回值会是同步?
由于是阻塞了协程,一段时间只能卡在这儿,因此Sequence序列也是同步。
fun simpleSequence(): Sequence<Int> = sequence {
    for (i in 1..3) {
        Thread.sleep(1000)  //阻塞,假装在计算
//            delay(1000)
      	//yield:这里的yield是Sequence允许的挂起函数,作用是将数据加入到Sequence序列中
        yield(i)
    }
}

@Test
fun `test multiple values`() {
    simpleSequence().forEach { value -> println(value) }
}
//一个个返回:
//1
//2
//3
sleep会阻塞协程,肯定delay挂起会好点,但是实际上这里delay编译会报错,那这是为什么?
下面我们从sequence源码进行分析:

sequence源码中,入参block是SequenceScope类型的扩展函数。
然后接着看SequenceScope源码:
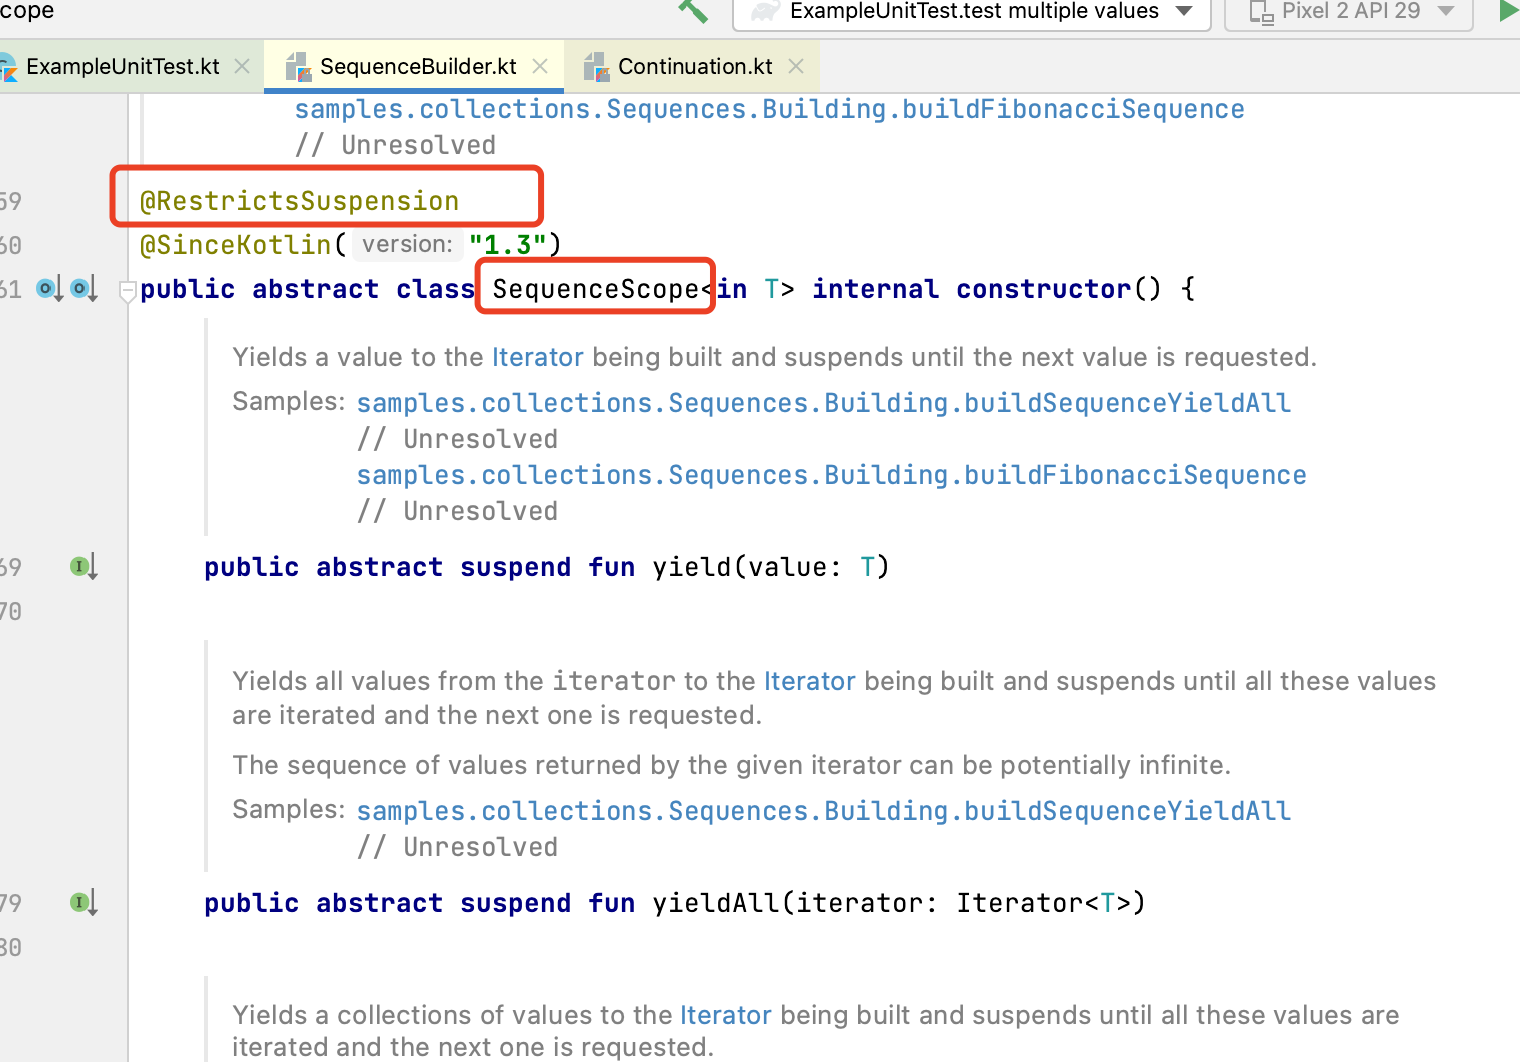
SequenceScope注解是@RestrictsSuspension,意思是限制挂起,只能调用已经提供的挂起函数(如源码下面的yidld、yieldAll等)
然后代码里面的this,指的就是SequenceScope类型,也就在编译器层面起到了限制delay挂起函数的作用
1.3、挂起函数
返回了多个值,是异步,一次性返回了多个值。
实际我们需要的是异步一个个的返回多个值
suspend fun simpleList2(): List<Int> {
    delay(1000)
    return listOf<Int>(1, 2, 3)
}

@Test
fun `test multiple values`() = {
    //报错:挂起函数调用者只能是挂起函数、协程
//    simpleList2().forEach { value -> println(value) }
}

//这里使用runBlocking将调用者包成主协程
@Test
fun `test multiple values2`() = runBlocking<Unit> {
    simpleList2().forEach { value -> println(value) }
}
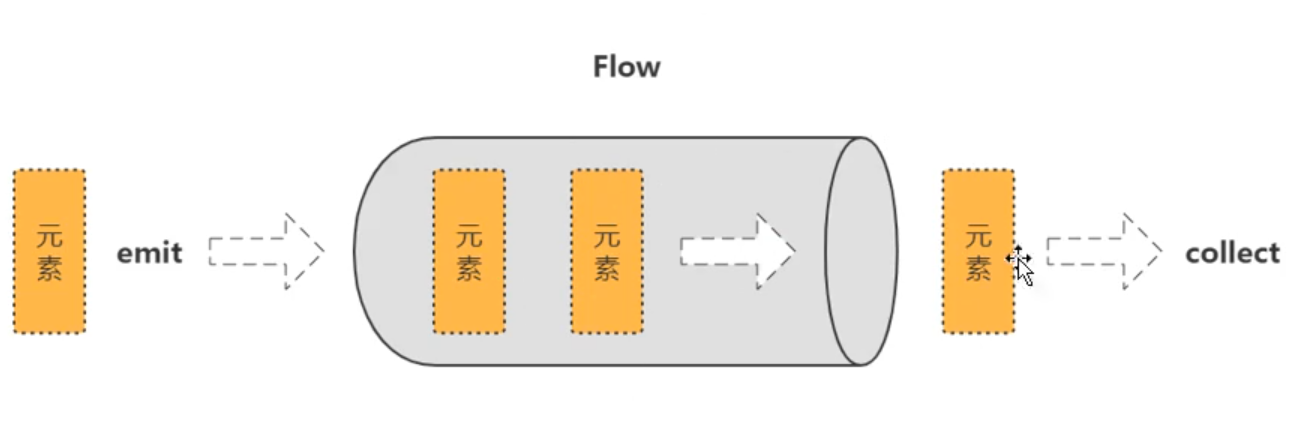
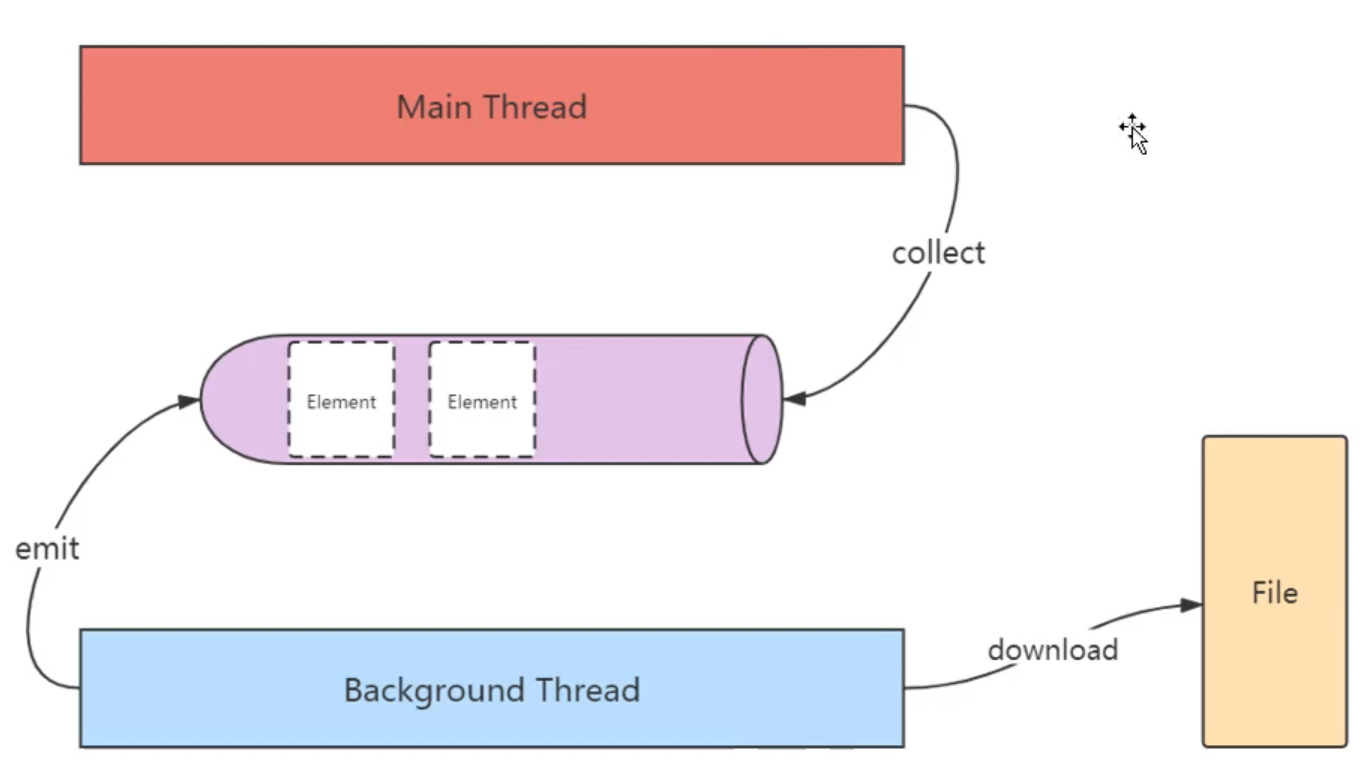
1.4、flow
做到了挨个儿返回多个值,并且是异步的
collect:是末端操作符,作用把emit发射的数据收集起来
//通过flow构建器构建flow。flow的suspend可以去掉
suspend fun simpleFlow() = flow<Int> {
    for (i in 1..3) {
        delay(1000) //假装在一些重要的事情
        emit(i) //发射,产生一个元素
    }
}

@Test
fun `test multiple values3`() = runBlocking<Unit> {
    //证明flow没有阻塞线程
    launch {
        for (k in 1..3) {
            println("I'm not blocked $k")
            delay(1500)
        }
    }

    simpleFlow().collect { value -> println(value) }
}
fow与其他方式的区别
名为flow的FIow类型构建器函数。
fow{…}构建块中的代码可以挂起。
函数simpleFlow.不再标有suspend修饰符
流使用emit函数发射值。
流使用collect函数收集值。
应用场景:在Android当中,文件下载是Flow的一个非常典型的应用。
二、冷流
Flow是一种类似于序列的冷流,flow构建器中的代码直到流被收集的时候才运行。
fun simpleFlow2() = flow<Int> {
    println("Flow started")
    for (i in 1..3) {
        delay(1000)
        emit(i)
    }
}

@Test
fun `test flow is cold`() = runBlocking<Unit> {
    val flow = simpleFlow2()
    println("Calling collect...")
    flow.collect { value -> println(value) }
    println("Calling collect again...")
    flow.collect { value -> println(value) }
}
//Calling collect...
//Flow started
//1
//2
//3
//Calling collect again...
//Flow started
//1
//2
//3
冷流是在collect收集的时候才开始执行业务代码,再次收集会再次执行
三、流的连续性
流的每次单独收集都是按顺序执行的,除非使用特殊操作符。
从上游到下游每个过渡操作符都会处理每个发射出的值,然后再交给末端操作符。下面示例中:asFlow是IntRange提供的流的快速构建器
@Test
fun `test flow continuation`() = runBlocking<Unit> {
    (1..5).asFlow().filter {
        it % 2 == 0
    }.map {
        "string $it"
    }.collect {
        println("Collect $it")
    }
}
//Collect string 2
//Collect string 4
四、流构建器
流的构建器有3种:flow、flowOf、asFlow()
1、flow构建器
fun simpleFlow2() = flow<Int> {
    println("Flow started")
    for (i in 1..3) {
        delay(1000)
        emit(i)
    }
}

@Test
fun `test flow is cold`() = runBlocking<Unit> {
    val flow = simpleFlow2()
    println("Calling collect...")
    flow.collect { value -> println(value) }
}
//Calling collect...
//Flow started
//1
//2
//3
2、flowOf构建器
flowOf构建器定义了一个发射固定值集的流。
@Test
fun `test flow builder`() = runBlocking<Unit> {
    flowOf("one", "two", "three")
        .onEach { delay(1000) }
        .collect { value ->
            println(value)
        }
}
//one
//two
//three
3、asFlow()构建器
使用.asFlow()扩展函数,可以将各种集合与序列转换为流。
@Test
fun `test flow builder`() = runBlocking<Unit> {
    (1..3).asFlow().collect { value ->
        println(value)
    }
}
//1
//2
//3
五、流上下文切换
-
流的收集总是在调用协程的上下文中发生,流的该属性称为上下文保存。
-
fow{…}构建器中的代码必须遵循上下文保存属性,并且不允许从其他上下文中发射(emit)。
-
flowOn操作符,该函数用于更改流发射的上下文。
下面示例:构建流、收集流都在主线程,这叫做上下文保存。但是不符合实际情况,比如在下载文件就需要开辟非主线程
fun simpleFlow3() = flow<Int> {
    println("Flow started ${Thread.currentThread().name}")
    for (i in 1..3) {
        delay(1000)
        emit(i)
    }
}
@Test
fun `test flow context`() = runBlocking<Unit> {
    simpleFlow3()
        .collect { value -> println("Collected $value ${Thread.currentThread().name}") }
}
//Flow started Test worker @coroutine#1
//Collected 1 Test worker @coroutine#1
//Collected 2 Test worker @coroutine#1
//Collected 3 Test worker @coroutine#1
如果想耗时操作放到IO线程,使用withContext切换线程,结果会报错
fun simpleFlow4() = flow<Int> {
    withContext(Dispatchers.IO) {
        println("Flow started ${Thread.currentThread().name}")
        for (i in 1..3) {
            delay(1000)
            emit(i)
        }
    }
}


@Test
fun `test flow context`() = runBlocking<Unit> {
    simpleFlow4()
        .collect { value -> println("Collected $value ${Thread.currentThread().name}") }
}
//报错java.lang.IllegalStateException: Flow invariant is violated:
这里我们使用flowOn来切换线程
fun simpleFlow5() = flow<Int> {
    println("Flow started ${Thread.currentThread().name}")
    for (i in 1..3) {
        delay(1000)
        emit(i)
    }
}.flowOn(Dispatchers.Default)

@Test
fun `test flow on`() = runBlocking<Unit> {
    simpleFlow5()
        .collect { value -> println("Collected $value ${Thread.currentThread().name}") }
}
//Flow started DefaultDispatcher-worker-1 @coroutine#2
//Collected 1 Test worker @coroutine#1
//Collected 2 Test worker @coroutine#1
//Collected 3 Test worker @coroutine#1
六、在指定协程中收集流
使用launchIn替换collect我们可以在单独的协程中启动流的收集。
下面示例中:指定在IO线程收集流信息,因此要加上join让主线程等待
fun events() = (1..3)
    .asFlow()
    .onEach { delay(100) }
    .flowOn(Dispatchers.Default)

@Test
fun `test flow launch`() = runBlocking<Unit> {
    val job = events()
        .onEach { event -> println("Event: $event ${Thread.currentThread().name}") }
        .launchIn(CoroutineScope(Dispatchers.IO))
        .join()
}
// Event: 1 DefaultDispatcher-worker-3 @coroutine#2
// Event: 2 DefaultDispatcher-worker-3 @coroutine#2
// Event: 3 DefaultDispatcher-worker-2 @coroutine#2
如果想要在主线程收集流信息
- 这里launchIn改为this,为runBlocking所在的主线程,因此join可以去掉
- launchIn返回的是一个Job,因此我们可以取消该任务
fun events() = (1..3)
    .asFlow()
    .onEach { delay(100) }
    .flowOn(Dispatchers.Default)


@Test
fun `test flow launch`() = runBlocking<Unit> {
    val job = events()
        .onEach { event -> println("Event: $event ${Thread.currentThread().name}") }
        .launchIn(this)

//    delay(200)
//    job.cancelAndJoin()
}
七、流的取消
流采用与协程同样的协作取消。像往常一样,流的收集可以是当流在一个可取消的挂起函数(例如delay)中挂起的时候取消。
下面示例中:withTimeoutOrNull超时取消了子协程,也就取消了流
fun simpleFlow6() = flow<Int> {
    for (i in 1..3) {
        delay(1000)
        emit(i)
        println("Emitting $i")
    }
}

@Test
fun `test cancel flow`() = runBlocking<Unit> {
    withTimeoutOrNull(2500) {
        simpleFlow6().collect { value -> println(value) }
    }
    println("Done")
}
八、流的取消检测
- 为方便起见,流构建器对每个发射值执行附加的ensureActive检测以进行取消,
这意味着从flow{…}发出的繁忙循环是可以取消的。
协程可取消示例
fun simpleFlow7() = flow<Int> {
    for (i in 1..5) {
        emit(i)
        println("Emitting $i")
    }
}

@Test
fun `test cancel flow check`() = runBlocking<Unit> {
    simpleFlow7().collect { value ->
        println(value)
        if (value == 3) cancel()
    }
}
// 1
// Emitting 1
// 2
// Emitting 2
// 3
// Emitting 3
- 出于性能原因,大多数其他流操作不会自行执行其他取消检测,在协程处于繁忙循环的情况下,必须明确检测是否取消。
这里繁忙情况下(1…5).asFlow()取消失败了,本来应该只打印到3
fun simpleFlow7() = flow<Int> {
    for (i in 1..5) {
        emit(i)
        println("Emitting $i")
    }
}

@Test
fun `test cancel flow check`() = runBlocking<Unit> {
    (1..5).asFlow().collect { value ->
        println(value)
        if (value == 3) cancel()
    }
}
// 1
// 2
// 3
// 4
// 5
- 通过cancellable操作符来执行此操作。
上面示例中加个.cancellable()即可取消
(1..5).asFlow().cancellable().collect { value ->
    println(value)
    if (value == 3) cancel()
}
// 1
// 2
// 3
九、背压
9.1、名词解释
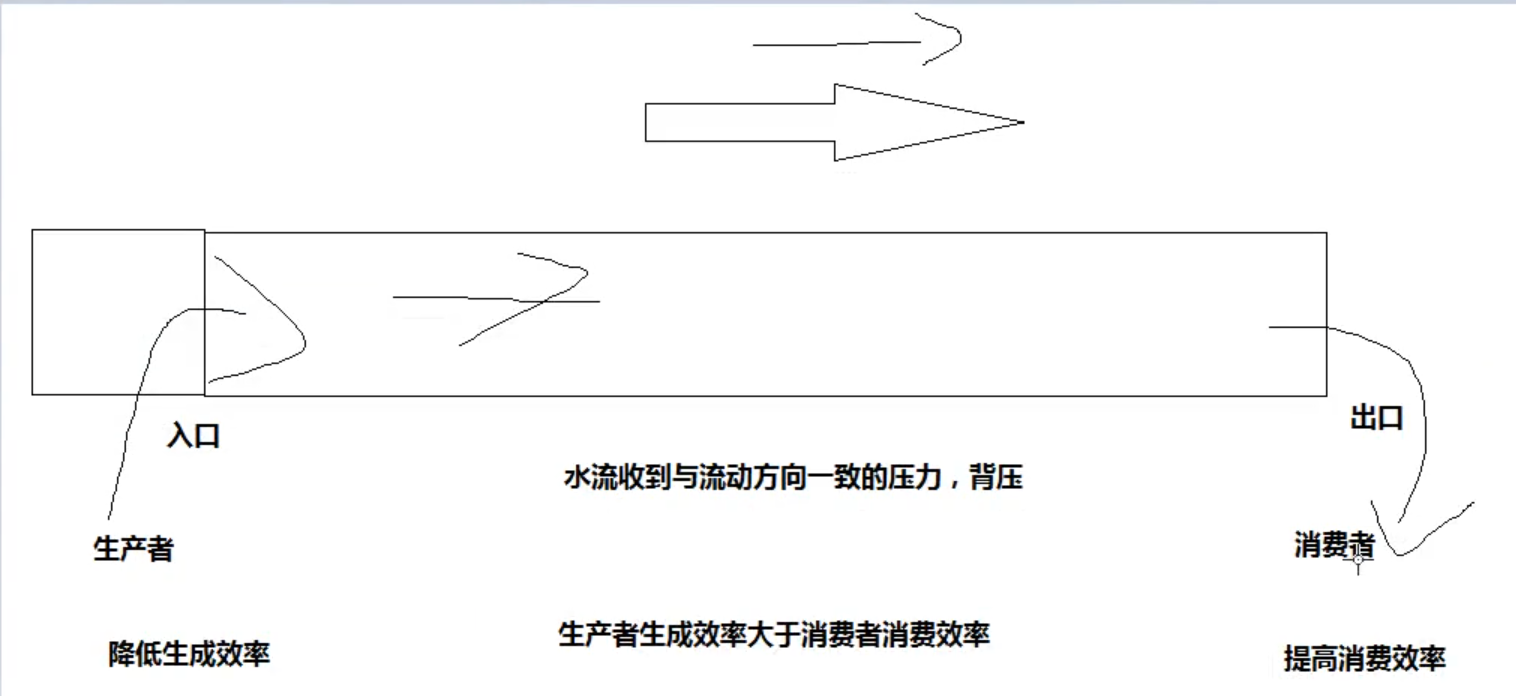
背压:水流受到与流动方向一直的压力。
在这里,只要生产者生产的效率大于消费者消费效率,就产生背压。
9.2、背压产生的问题
下面示例中:生产者100ms后并发生产,消费者每300毫秒消费一个measureTimeMillis:统计协程总时长
结果1234 ms:约等于(100+300)*3。时间相当于所有的生产者消费者加起来,效率最低,那么如何优化?
fun simpleFlow8() = flow<Int> {
    for (i in 1..3) {
        delay(100)
        emit(i)
        println("Emitting $i ${Thread.currentThread().name}")
    }
}

@Test
fun `test flow back pressure`() = runBlocking<Unit> {
    val time = measureTimeMillis {
        simpleFlow8()
            .collect { value ->
                delay(300)   //处理这个元素消耗300ms
                println("Collected $value ${Thread.currentThread().name}")
            }
    }
    println("Collected in $time ms")
}
// Collected 1 Test worker @coroutine#1
// Emitting 1 Test worker @coroutine#1
// Collected 2 Test worker @coroutine#1
// Emitting 2 Test worker @coroutine#1
// Collected 3 Test worker @coroutine#1
// Emitting 3 Test worker @coroutine#1
// Collected in 1234 ms
9.3、measureTimeMillis测量时长
可以measureTimeMillis用测量程序执行时长
val time1 = measureTimeMillis {
}
println("Collected in $time1 ms")
9.4、解决方案
通常解决办法:
- 做大管子,增加容积 (buffer、flowOn方式)
- 降低生产者生产效率
- 提高消费者消费效率 (conflate、collectLatest方式)
1、buffer缓冲方式处理背压
我们加上一个buffer,结果1061 ms:约等于100+300*3
fun simpleFlow8() = flow<Int> {
    for (i in 1..3) {
        delay(100)
        emit(i)
        println("Emitting $i ${Thread.currentThread().name}")
    }
}

@Test
fun `test flow back pressure`() = runBlocking<Unit> {
    val time = measureTimeMillis {
        simpleFlow8()
            .buffer(50)
            .collect { value ->
                delay(300)   //处理这个元素消耗300ms
                println("Collected $value ${Thread.currentThread().name}")
            }
    }
    println("Collected in $time ms")
}
// Emitting 1 Test worker @coroutine#2
// Emitting 2 Test worker @coroutine#2
// Emitting 3 Test worker @coroutine#2
// Collected 1 Test worker @coroutine#1
// Collected 2 Test worker @coroutine#1
// Collected 3 Test worker @coroutine#1
// Collected in 1061 ms
2、flowOn处理背压
当必须更改CoroutineDispatcher时,flowOn:操作符使用了相同的缓冲机制,但
是buffer函数显式地请求缓冲而不改变执行上下文。下面示例:将生产者使用flowOn放到后台协程,这种更改了协程上下文,结果同样是1061 ms,原理是协程对不同线程默认实现了缓冲
fun simpleFlow8() = flow<Int> {
    for (i in 1..3) {
        delay(100)
        emit(i)
        println("Emitting $i ${Thread.currentThread().name}")
    }
}

@Test
fun `test flow back pressure`() = runBlocking<Unit> {
    val time = measureTimeMillis {
        simpleFlow8()
            .flowOn(Dispatchers.Default)
            .collect { value ->
                delay(300)   //处理这个元素消耗300ms
                println("Collected $value ${Thread.currentThread().name}")
            }
    }
    println("Collected in $time ms")
}
// Emitting 1 DefaultDispatcher-worker-1 @coroutine#2
// Emitting 2 DefaultDispatcher-worker-1 @coroutine#2
// Emitting 3 DefaultDispatcher-worker-1 @coroutine#2
// Collected 1 Test worker @coroutine#1
// Collected 2 Test worker @coroutine#1
// Collected 3 Test worker @coroutine#1
// Collected in 1061 ms
3、conflate()
合并发射项,不对每个值进行处理。
缺点:每次取最新值,可能跳过中间的值
@Test
fun `test flow back pressure`() = runBlocking<Unit> {
    val time = measureTimeMillis {
        simpleFlow8()
            .conflate()
            .collect { value ->
                delay(300)   //处理这个元素消耗300ms
                println("Collected $value ${Thread.currentThread().name}")
            }
    }
    println("Collected in $time ms")
}
// Emitting 1 Test worker @coroutine#2
// Emitting 2 Test worker @coroutine#2
// Emitting 3 Test worker @coroutine#2
// Collected 1 Test worker @coroutine#1
// Collected 3 Test worker @coroutine#1
// Collected in 756 ms
4、collectLatest
取消并重新发射最后一个值。
这里只收集了最后一个值
@Test
fun `test flow back pressure`() = runBlocking<Unit> {
    val time = measureTimeMillis {
        simpleFlow8()
            .collectLatest { value ->
                delay(300)   //处理这个元素消耗300ms
                println("Collected $value ${Thread.currentThread().name}")
            }
    }
    println("Collected in $time ms")
}
// Emitting 1 Test worker @coroutine#2
// Emitting 2 Test worker @coroutine#2
// Emitting 3 Test worker @coroutine#2
// Collected 3 Test worker @coroutine#5
// Collected in 710 ms
十、转换操作符transform
-
可以使用操作符转换流,就像使用集合与序列一样。
-
过渡操作符应用于上游流,并返回下游流。
-
这些操作符也是冷操作符,就像流一样。这类操作符本身不是挂起函数。
-
它运行的速度很快,返回新的转换流的定义。
如果不使用转换操作符,我们对流字符串处理可以使用map遍历
suspend fun performRequest(request: Int): String {
    delay(1000)
    return "response $request"
}

@Test
fun `test transform flow operator`() = runBlocking<Unit> {
    (1..3).asFlow()
        .map { request -> performRequest(request) }
        .map { request1 -> "Making request $request1" }
        .collect { value -> println(value) }
}
// Making request response 1
// Making request response 2
// Making request response 3
使用了transform,我们对流的处理可以更灵活。
这里接受到的数据与emit互不影响
@Test
fun `test transform flow operator`() = runBlocking<Unit> {
    (1..3).asFlow()
        .transform { request ->
            emit("Making request $request")
            emit(performRequest(request))
        }.collect { value -> println(value) }
}
// Making request 1
// response 1
// Making request 2
// response 2
// Making request 3
// response 3
10.1、限长操作符take
这里take限制取2,则从第二个emit就不再执行,也就是这里的println
fun numbers() = flow<Int> {
    try {
        emit(1)
        emit(2)
        println("This line will not execute")
        emit(3)
    } finally {
        println("Finally in numbers")
    }
}

@Test
fun `test limit length operator`() = runBlocking<Unit> {
    numbers().take(2).collect { value -> println(value) }
}
// 1
// 2
// Finally in numbers
10.2、末端操作符
末端操作符是在流上用于启动流收集的挂起函数。collect是最基础的末端操作符,但是还有另外一些更方便使用的末端操作符:
-
转化为各种集合,例如toList与toSet。
-
获取第一个(first)值与确保流发射单个(single)值的操作符。
-
使用reduce与fold将流规约到单个值。
reduce示例,取1到5的平方累加,reduce为末端操作符产生结果
@Test
fun `test terminal operator`() = runBlocking<Unit> {
    val sum = (1..5).asFlow()
        .map { it * it }
        .reduce { a, b -> a + b }
    println(sum)
}
// 55
10.3、组合操作符
就像Kotlin标准库中的Sequence.zip扩展函数一样,流拥有一个zip操作符用于组合两个流中的相关值。
类似于拉链
@Test
fun `test zip`() = runBlocking<Unit> {
    val numbs = (1..3).asFlow()
    val strs = flowOf("One", "Two", "Three")
    numbs.zip(strs) { a, b -> "$a -> $b" }.collect { println(it) }
}
// 1 -> One
// 2 -> Two
// 3 -> Three
如果两个是异步的且时间间隔不一致,可以看到是以较长时间为间隔,也就是一遍取300ms的一遍等400ms的
@Test
fun `test zip2`() = runBlocking<Unit> {
    val numbs = (1..3).asFlow().onEach { delay(300) }
    val strs = flowOf("One", "Two", "Three").onEach { delay(400) }
    val startTime = System.currentTimeMillis()
    numbs.zip(strs) { a, b -> "$a -> $b" }.collect {
        println("$it at ${System.currentTimeMillis() - startTime} ms from start")
    }
}
// 1 -> One at 429 ms from start
// 2 -> Two at 832 ms from start
// 3 -> Three at 1241 ms from start
10.4、展平操作符
流表示异步接收的值序列,所以很容易遇到这样的情况:每个值都会触发对另一个值序列的请求,然而,由于流具有异步的性质,因此需要不同的展平模式,为此,存在一系列的流展平操作符:
-
flatMapConcat连接模式,
-
flatMapMerge合并模式
-
flatMapLatest最新展平模式
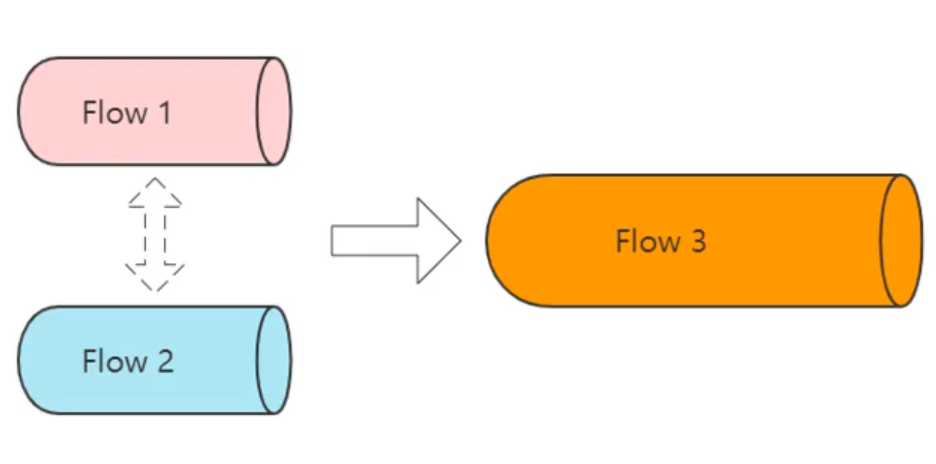
1、flatMapConcat连接模式
示例:将两个异步流合并
如果使用Map,则就是双层流Flow<Flow>,这里使用flatMapConcat展平连接
fun requestFlow(i: Int) = flow<String> {
    emit("$i: First")
    delay(500)
    emit("$i: Second")
}

@Test
fun `test flatMapConcat`() = runBlocking<Unit> {
    val startTime = System.currentTimeMillis()
    (1..3).asFlow()
        .onEach { delay(100) }
        //.map { requestFlow(it) }        //Flow<Flow<String>>
        .flatMapConcat { requestFlow(it) }
        .collect { println("$it at ${System.currentTimeMillis() - startTime} ms from start") }
}
// 1: First at 127 ms from start
// 1: Second at 631 ms from start
// 2: First at 735 ms from start
// 2: Second at 1239 ms from start
// 3: First at 1342 ms from start
// 3: Second at 1846 ms from start
2、flatMapMerge合并模式
fun requestFlow(i: Int) = flow<String> {
    emit("$i: First")
    delay(500)
    emit("$i: Second")
}

@Test
fun `test flatMapMerge`() = runBlocking<Unit> {
    val startTime = System.currentTimeMillis()
    (1..3).asFlow()
        .onEach { delay(100) }
        .flatMapMerge { requestFlow(it) }
        .collect { println("$it at ${System.currentTimeMillis() - startTime} ms from start") }
}
// 1: First at 153 ms from start
// 2: First at 251 ms from start
// 3: First at 355 ms from start
// 1: Second at 654 ms from start
// 2: Second at 752 ms from start
// 3: Second at 858 ms from start
3、flatMapLatest最新展平模式
fun requestFlow(i: Int) = flow<String> {
    emit("$i: First")
    delay(500)
    emit("$i: Second")
}

@Test
fun `test flatMapLatest`() = runBlocking<Unit> {
    val startTime = System.currentTimeMillis()
    (1..3).asFlow()
        .onEach { delay(100) }
        .flatMapLatest { requestFlow(it) }
        .collect { println("$it at ${System.currentTimeMillis() - startTime} ms from start") }
}
// 1: First at 142 ms from start
// 2: First at 285 ms from start
// 3: First at 388 ms from start
// 3: Second at 889 ms from start
10.5、流的异常处理
当运算符中的发射器或代码抛出异常时,有几种处理异常的方法:
try/catch块
catch函数
1、接收流
对于流的接收方来说,可以try/catch硬编码来捕获异常
fun simpleFlow() = flow<Int> {
    for (i in 1..3) {
        println("Emitting $i")
        emit(i)
    }
}

@Test
fun `test flow exception`() = runBlocking<Unit> {
    try {
        simpleFlow().collect { value ->
            println(value)
            // Throws an IllegalStateExceptio
            check(value <= 1) { "Collected $value" }
        }
    } catch (e: Throwable) {
        println("Caught $e")
    }
}
// Emitting 1
// 1
// Emitting 2
// 2
// Caught java.lang.IllegalStateException: Collected 2
2、发送流
但是对于流的发送方来说,try/catch块会打破flow的设计原则,因此不建议使用。
建议使用flow提供的catch函数:
@Test
fun `test flow exception2`() = runBlocking<Unit> {
    flow {
        emit(1)
        throw ArithmeticException("Div 0")
    }.catch { e: Throwable -> println("Caught $e") }
            .flowOn(Dispatchers.IO)
            .collect { println(it) }
}
// Caught java.lang.ArithmeticException: Div 0
// 1
3、异常恢复
可以通过在catch中再次emit来达到恢复异常的效果
@Test
fun `test flow exception2`() = runBlocking<Unit> {
    flow {
        throw ArithmeticException("Div 0")
        emit(1)
    }.catch { e: Throwable ->
        println("Caught $e")
        emit(10)
    }.flowOn(Dispatchers.IO).collect { println(it) }
}
10.6、流的完成
当流收集完成时(普通情况或异常情况),它可能需要执行一个动作。
命令式finally块
onCompletion声明式处理
fun simpleFlow2() = (1..3).asFlow()

@Test
fun `test flow complete in finally`() = runBlocking<Unit> {
  	// 命令式finally块【示例】
    try {
        simpleFlow2().collect { println(it) }
    } finally {
        println("Done")
    }
}

@Test
fun `test flow complete in onCompletion`() = runBlocking<Unit> {
  	// onCompletion声明式处理【示例】
    simpleFlow2()
            .onCompletion { println("Done") }
            .collect { println(it) }
}
onCompletion只能获取异常信息,不能捕获异常,如果需要程序不崩溃,需要catch异常
fun simpleFlow3() = flow<Int> {
    emit(1)
    throw RuntimeException()
}

@Test
fun `test flow complete in onCompletion`() = runBlocking<Unit> {
    simpleFlow3()
        .onCompletion { exception ->
            if (exception != null) println("Flow completed exceptionally")
        }
        .catch { exception -> println("Caught $exception") }
        .collect { println(it) }
}
// 1
// Flow completed exceptionally
// Caught java.lang.RuntimeException
onCompletion不仅可以捕获发送流的异常,亦可以捕获collect阶段的异常
fun simpleFlow2() = (1..3).asFlow()

@Test
fun `test flow complete in onCompletion`() = runBlocking<Unit> {
    simpleFlow2()
        .onCompletion { exception ->
            if (exception != null) println("Flow completed exceptionally")
        }
        .collect { value ->
            println(value)
            check(value <= 1) { "Collected $value" }
        }
}
// 1
// 2
// Flow completed exceptionally


 2774
2774


 被折叠的 条评论
为什么被折叠?
被折叠的 条评论
为什么被折叠?
 到【灌水乐园】发言


