


Django-10:django前后端交互Ajax
Django - Ajax
一、回顾往期知识点
本章节需要使用到往期文章中前端的知识点,所以本小结用来回顾一些比较关键的。
1.1、绑定事件
原生JS两种绑定事件的方式:
-
<!--HTML--> <button onclick="func1()">点我</button> <script> function func1() { alert(111) } </script> -
<!--HTML-->
<button id="d1">点我</button>

<script>
    let btnEle = document.getElementById('d1');
    btnEle.onclick = function () {
        alert(222)
    }
</script>
前面了解过了jQuery,所以后续代码都以jQuery为准。
-
jQuery绑定事件
<script>
	// 第一种
    $('#d1').click(function () {
            alert('111')
    });

	// 第二种(功能更加强大,支持事件委托)
    $('#d2').on('click',function () {
            alert('111')
    })
</script>
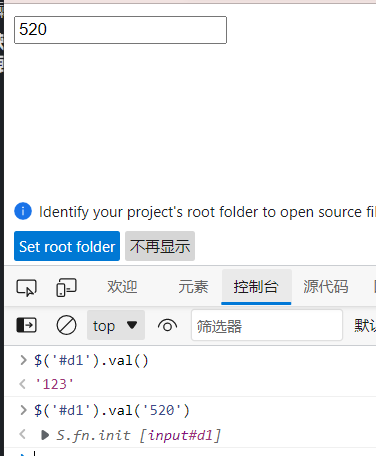
1.1 获取标签内的数据
/*通过不同选择器,获取表单内当前的数据*/
$('#d1').val()
$('input').val()
$('.c1').val()


/*将数据发送给标签(设置表单内数据)*/
$('#d1').val('520')

1.2 获取发送的文件数据
let fileEle = document.getElementById('ipt1')
fileEle.value
'''
	.value  无法获取到文件数据,只能获取到文件路径。
'''
可以利用files方法,来获取到提交的文件数据。
let fileEle = document.getElementById('ipt1')
fileEle.files[0]

'''
File {name: '测试.png', lastModified: 1638241647821, lastModifiedDate: Tue Nov 30 2021 11:07:27 GMT+0800 (中国标准时间), webkitRelativePath: '', size: 144161, …}
'''
注意:
-
files是DOM对象的方法,如果是使用的jQuery语法,获取的jQuery对象,是无法使用该方法的,需要先进行转换。
jQuery对象 – > DOM对象:
$('#input')[0]

'''
加上索引0即可
'''
二、Ajax
Ajax简介:
AJAX(Asynchronous Javascript And XML)翻译成中文就是“异步的Javascript和XML”。即使用Javascript语言与服务器进行异步交互,传输的数据为XML(当然,传输的数据不只是XML)。
AJAX 不是新的编程语言,而是一种使用现有标准的新方法。
AJAX 最大的优点是在不重新加载整个页面的情况下,可以与服务器交换数据并更新部分网页内容。(这一特点给用户的感受是在不知不觉中完成请求和响应过程)
AJAX 不需要任何浏览器插件,但需要用户允许JavaScript在浏览器上执行。
- 同步交互:客户端发出一个请求后,需要等待服务器响应结束后,才能发出第二个请求;
- 异步交互:客户端发出一个请求后,无需等待服务器响应结束,就可以发出第二个请求
优点:
- AJAX使用JavaScript技术向服务器发送异步请求;
- AJAX请求无须刷新整个页面;
- 因为服务器响应内容不再是整个页面,而是页面中的部分内容,所以AJAX性能高;
- 两个关键点:1.局部刷新,2.异步请求
常见应用场景:
一、基本语法:(使用jQuery为主)
-
$.ajax({})所需参数:
$.ajax({
    url:''   #指定朝哪个后端发送ajax请求,不写就是朝当前地址提交
    type:'post'   #不指定默认就是get,都是小写
    data:{}   #发给后端的数据
    success:function(形参接收后端返回的结果){处理代码}  #回调函数
})
二、小案例
页面上有三个input框:
- 在前两个框中输入数字,点击按钮后,朝后端发送ajax请求
- 后端计算出结果,再返回给前端,动态展示的到第三个input框中,整个过程页面不准有刷新,也不能在前端计算。
HTML代码如下:
<input type="text" id="num1"> +
<input type="text" id="num2"> =
<input type="text" id="num3">
<p>
    <button id="btn">计算</button>
</p>
2.1 JS代码与python代码的推导
第一步:
-
JS
$('#btn').on('click',function () { $.ajax({ url:'', type:'post', data:{'num1':$('#num1').val(),'num2':$('#num2').val()}, success:function (args) { } }) }) -
Python
def ajax_test(request):
    if request.method == 'POST':
        print(request.POST)
        #输出结果 <QueryDict: {'num1': ['xxx'], 'num2': ['xxx']}>
    return render(request,'ajax_test.html')
代码分析:
JS:先给计算按钮添加绑定事件,当点击触发之后,执行函数体内的代码。
代码内发送Ajax请求,类型为POST,发送的数据为num1表单内的数据,与num表单内的数据,随后将这些获取到的数据组成字典返回给后端(在js中,这种数据类型叫对象,而在python中叫做字典)
Python:打印request.POST,查看是否可以正常的获取到Ajax发来的数据,答案是可以的。
第二步:
-
后端Python代码中,可以获取到数据后,就可以着手书写计算上传数值的合了。
# Python
def ajax_test(request):
    if request.method == 'POST':
        print(request.POST)
        # <QueryDict: {'num1': ['3'], 'num2': ['4']}>
        num1 = request.POST.get('num1')
        num2 = request.POST.get('num2')
        res = int(num1)+int(num2)
        return HttpResponse(res)

    return render(request,'ajax_test.html')
这里需要注意,返回计算后的结果时,不可以直接return返回,而是要使用HttpResponse。
第三步:
-
将后端计算好的结果,渲染到页面上
$('#btn').on('click',function () {
    $.ajax({
        url:'',
        type:'post',
        data:{'num1':$('#num1').val(),'num2':$('#num2').val()},
        /*回调函数*/
        success:function (args) {
            $('#num3').val(args)
        }
    })
})
后端返回的函数,会被回调函数的形参所接收,所以后续只需要让表单内的值,与返回的计算结果相等即可。
补充:
-
判断当前请求是否是ajax请求
request.is_ajax()

'''
返回值为布尔类型
'''
三、前后端交互的编码格式
本章节主要研究,前后端在传输数据的编码格式(contentType)
由于GET请求数据就是直接放在url后面的,如:url?name=liuyu&pwd=123,是可以直接看到的,所以本章节主要研究POST请求数据的编码格式。
可以朝后端发送post请求的方式:
- form表单
- ajax请求
前后端传输数据的编码格式:
- urlencoded
- formdata
- json
下面将针对form表单以及ajax请求,在使用不同编码格式时如何交互。
3.1 研究form表单
3.1.1 urlencoded编码格式
urlencoded默认的编码格式。
-
全称:Content-Type: application/x-www-form-urlencoded
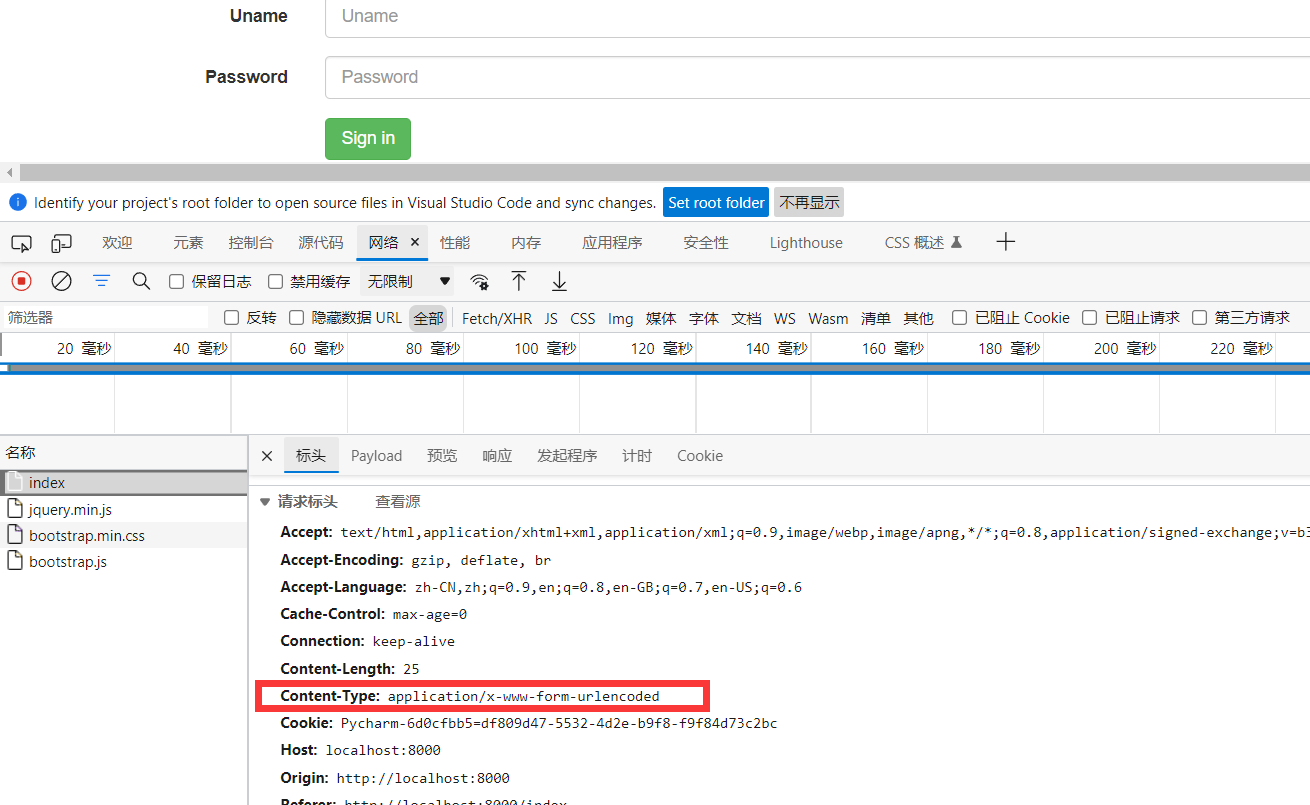
结论:
-
Django后端针对符合urlencoded编码格式的数据都会自动帮你解析封装到request.POST中
username=liuyu&password=123 >>> request.POST
3.2.2 formdata编码格式
formdata编码的应用场景:
-
上传文件
"""
当需要上传文件时,就需要form表单必须满足两个条件:
	1.method必须指定成post
	2.enctype必须换成formdata,否则只能接收到文件名。
		其中,这个enctype就是设置编码为formdata格式。
"""
<form action="" method="post" enctype="multipart/form-data">
    <p>上传图片:<input type="file" name="photo"></p>
    <p><input type="submit"></p>
</form>
request.POST只能拿到普通的键值对数据,对于文件数据,则不行,需要专门利用request.FILES来获取文件数据
file_obj = request.FILES.get('file') #获取文件对象,file为前端标签的name属性值。
结论:
-
Django后端针对符合formdata编码格式的数据都会自动帮你解析封装到request.FILES中
<MultiValueDict: {'file': [<InMemoryUploadedFile: 笑哭.jpg (image/jpeg)>]}>
3.2.3 无法发送json格式数据
'''form表单是没有办法发送json格式数据的'''
3.2 研究Ajax请求
2.2.1 urlencoded
form表单一样,默认都是urlencoded编码格式
代码示例:
<div class="col-sm-offset-2 col-sm-10">
  <button type="submit" class="btn btn-danger " id="button1">Ajax提交</button>
</div>


<script>
    $('#button1').click(function () {
        $.ajax({
            url:'',
            type:'post',
            data:{'name':'liuyu','age':19},
            success:function () {}
        })
    })
</script>
通过给标签绑定事件的方式,来向后端提交数据,如图所示,默认为urlencoded
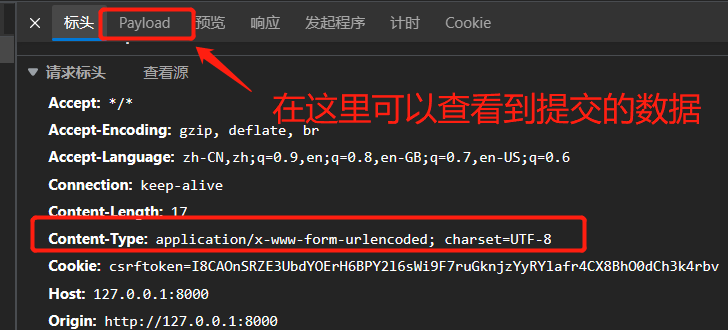
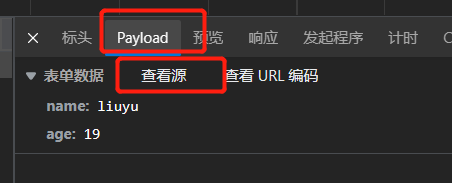
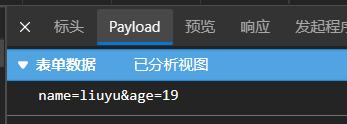
结论:
- django后端针对符合urlencoded编码格式的数据都会自动解析封装到request.POST中
3.2.2 ajax发送文件(formdata)
ajax发送文件需要借助于js内置对象FormData
<script>
    // 点击按钮朝后端发送普通键值对和文件数据
    $('#d4').on('click',function () {
        // 1 需要先利用FormData内置对象
        let formDateObj = new FormData();
        // 2 添加普通的键值对
        formDateObj.append('username',$('#d1').val());
        formDateObj.append('password',$('#d2').val());
        // 3 添加文件对象
        formDateObj.append('myfile',$('#d3')[0].files[0])
        // 4 将对象基于ajax发送给后端
        $.ajax({
            url:'',
            type:'post',
            data:formDateObj,  // 直接将对象放在data后面即可

            // ajax发送文件必须要指定的两个参数
            contentType:false,  // 不需使用任何编码 django后端能够自动识别formdata对象
            processData:false,  // 告诉你的浏览器不要对你的数据进行任何处理

            success:function (args) {
            }
        })

    })
</script>
-
contentType:false和processData:false,这两句话一定要附带上。
-
借助formDate对象,将文件数据与键值对数据都利用append方法添加,随后直接返回给python后端。
-
$(‘#d3’)[0].files[0],这里的filter[0],表示取DOM对象的文件数据对象,又因为这是DOM对象的方法而不是jQuery对象,所以还需要进行转换。
总结:
- django后端能够直接识别到formdata对象,并且能够将内部的普通键值,自动解析并封装到request.POST中,文件数据自动解析并封装到request.FILES中。
3.2.3 ajax发送json格式数据
代码示例:
-
HTML
<div> <button class="btn btn-warning" id="ipt_json">点我发送JSON数据</button> </div> -
JS
$('#ipt_json').on('click',function () { $.ajax({ url:'', type:'post', contentType:'application/json', // 指定编码格式 data:JSON.stringify({'username':'liuyu','age':20}), success:function () { } }) }) -
Python(Django)
def ajax_test(request):
    if request.method == 'POST':
        print(request.POST)
        print(request.body)

    return render(request,'ajax_test.html')
打印结果如下:
<QueryDict: {}>b’{“username”:“liuyu”,“age”:20}'
可以看到,request.POST为空,而前端发送的JSON数据,被封装进了request.body里面,因为django后端不会帮我们处理json格式数据。
所以当前端返回给后端JSON格式的数据时,后端Python首先需要解码,然后再反序列化
def ajax_test(request):
    if request.method == 'POST':

        '''
        ajax发送json数据
        '''
        print(request.body)
        json_bytes = request.body
        json_str = json_bytes.decode('utf-8')
        json_dict = json.loads(json_str)
        print(json_dict['username'],json_dict['age'])

    return render(request,'ajax_test.html')

'''
打印结果:
	b'{"username":"liuyu","age":20}'
	liuyu 20
'''
python后端如何给前端发送json数据
-
第一种,使用JsonResponse。
return JsonResponse({'code':200})$.ajax({ /*其他参数略*/ success:function (args) { console.log(args,typeof args) } })-
打印输出:{code: 200} ‘object’
直接就是JS中的对象,无需再进行反序列化。
-
-
第二种,使用HttpResponse,但是前端收到数据后进行反序列化。
return HttpResponse({'code':200})$.ajax({ /*其他参数略*/ success:function (args) { console.log(args,typeof args) } }) /* 打印输出:code string */后端直接返回字典格式的数据时,前端收到的是自动进行过序列化的字符串数据,所以需要再进行反序列化。
success:function (args) {
    resObj = JSON.parse(args)
    console.log(resObj)
}
四、django自带的序列化组件
引子:
-
后端返回数据,前端将数据以列表的形式展示在页面上。
def ab_ser(request): user_queryset = models.User.objects.all() return render(request,'datalist.html',locals())<table> <thead> <tr> <th>ID</th> <th>Username</th> <th>Age</th> <th>Gender</th> </tr> </thead> <tbody> {% for user_obj in data_queryset %} <tr> <td>{{ user_obj.pk }}</td> <td>{{ user_obj.username }}</td> <td>{{ user_obj.age }}</td> <td>{{ user_obj.gender }}</td> </tr> {% endfor %} </tbody> </table>
上述代码,是利用了模板语法来实现将后端的数据“层层剥出”,最终实现把数据渲染在页面上。
-
实际项目中,往往都是前后端分离的,没有模板语法…
解决方案:在返回给前端数据的时候,不丢过去Queryset对象,而是我们封装好的一个字典
user_queryset = models.User.objects.all()
# [{obj1},{obj2},{obj3},{obj4},.....]
user_list = []
for user_obj in user_queryset:
	tmp = {
		'pk':user_obj.pk,
		'username':user_obj.username,
		'age':user_obj.age,
		'gender':user_obj.get_gender_display()
         }
	user_list.append(tmp)

return JsonResponse(user_list,safe=False)
	# 由于这里返回的是列表,所以需要添加safe参数,值为False
- 此时前端反序列化得到对象(python中叫字典),有了数据之后,前端可通过jsDOM操作将数据渲染到页面上,不需要模板语法。
python后端处理好的数据:
[
 {"pk": 1, "username": "张三", "age": 25, "gender": "male"},
 {"pk": 2, "username": "李四", "age": 31, "gender": "female"},
 {"pk": 3, "username": "王五", "age": 32, "gender": "others"},
 {"pk": 4, "username": "马六", "age": 40, "gender": 4}
 ]
在前后端分离的项目中,作为后端开发只需要写代码,将数据处理好,能够序列化返回给前端即可,随后再写一个接口文档 告诉前端每个字段代表的意思即可。
Django中提供了很多序列化组件,可以帮助我们省略创建列表封装数据的步骤。
4.1 serializers组件
序列化组件之一,还有drf等,后续章节再介绍。
作用:
- 直接丢入一个对象,指定编码格式,即可转换成对应编码格式。
from django.core import serializers
res = serializers.serialize('编码格式',obj)
代码示例:
import json
from django.http import JsonResponse
from django.core import serializers


def ab_ser(request):
    user_queryset = models.User.objects.all()

    """会自动将数据变成json格式的字符串 并且内部非常的全面"""
    res = serializers.serialize('json',user_queryset)

    return HttpResponse(res)  # 直接返回到页面上,查看效果。

"""返回在页面上的值

[
    {   "model": "app01.user",
        "pk": 1,
        "fields": {"username": "jason", "age": 25, "gender": 1}},

    {   "model": "app01.user",
        "pk": 2,
        "fields": {"username": "egon", "age": 31, "gender": 2}},

    {   "model": "app01.user",
        "pk": 3,
        "fields": {"username": "kevin", "age": 32, "gender": 3}},

    {   "model": "app01.user",
        "pk": 4,
        "fields": {"username": "tank", "age": 40, "gender": 4}}
]
"""
-
可以看到,serializers还会标注上数据是来自那张表的,主键值是多少,字段值是什么。
gender字段的值由于使用了choise参数,所以实际存入数据库的值为1、2、3、4,所以就需要我们后端程序员,书写文档,来告诉前端程序员每个key对应的value都是什么意思,随后至于说怎么渲染,这就是前端的工作了。
五、ajax小项目
5.1 代码
1、模型层:
-
from django.db import models

class Usermsg(models.Model):
    name = models.CharField(max_length=10,verbose_name='名字')
    age = models.IntegerField()
    hobby = models.TextField()
2、在测试文件,给数据库添加数据:
-
import os

if __name__ == "__main__":
    os.environ.setdefault("DJANGO_SETTINGS_MODULE", "djangoProject.settings")
    import django
    django.setup()

    from app01 import models
    for i in range(0,10):
        models.Usermsg.objects.create(name='test',age=18,hobby='被测....试')
3、路由层:
-
urlpatterns = [
    url(r'^admin/', admin.site.urls),

    url(r'^userlist/',views.user_msg,name='userlist'),
]
4、模板层:
-
<!DOCTYPE html>
<html lang="en">
<head>
    <meta charset="UTF-8">
    <title>Title</title>
    <!--静态文件配置,的动态解析(令牌可随意更换)-->
    {% load static %}
    <script src="{% static 'jquery-3.6.0.min.js' %}"></script>
    <script src="{% static 'bootstrap.min.js' %}"></script>
    <link rel="stylesheet" href="{% static 'bootstrap.css' %}">
</head>
<body>

<div class="container">
    <div class="row">
        <div class="col-md-10">
            <!--面板-->
            <div class="panel panel-info">
                <div class="panel-heading">数据列表</div>
                <div class="panel-body">
                    <!--图书表格-->
                    <table class="table table table-striped table-bordered table-hover table-condensed">
                        <thead>
                             <tr class="success">
                                    <th>姓名</th>
                                    <th>年龄</th>
                                    <th>擅长领域</th>
                                    <th>操作</th>
                            </tr>
                        </thead>
                        <tbody></tbody>
                    </table>
                    <!--图书表格-->
                </div>
            </div>
            <!--面板-->
        </div>
    </div>
</div>


<script>
    //定义函数。获取图书列表
    function getList() {
        //发送get请求
        $.ajax({
            type:'GET',
            url:'userlist',
            //回调函数
            success:function (res) {
                //因为每次刷新、添加、删除都需要调用该函数渲染
                //所以在每次渲染之前,先把之前的数据删除掉。
                 $('tbody').empty()

                //反序列化,将后端传递过来的JSON格式数据转成对象
                res = JSON.parse(res)

                //创建一个空数组,随后把每一个用户数据对象提取出数据,最后利用字符串拼接的方式,将数据拼接为html格式的字符串,从而达到数据渲染到页面的效果。
                let rows = []
                $.each(res,function (i,item) {
                    // 形参i为对象在列表中的索引,形参item为用户数据对象。
                    rows.push('<tr><td>'+ item.fields.name +'</td><td>'+ item.fields.age +'</td><td>'+ item.fields.hobby +'</td><td><button class="btn btn-success btn-xs"   data-id='+item.pk+'>编辑</button><button class="btn btn-danger btn-xs"    data-id='+item.pk+'>删除</button></td></tr>')
                    //这里的编辑和删除标签,添加了自定义属性data-id,值为用户数据的ID
                })

                //渲染到页面上
                $('tbody').html(rows.join(''))
            }
        })
    }

    //调用刚刚定义的函数,将数据渲染到页面上
    getList()


    //删除数据
    $('tbody').on('click','.btn-danger',function () {
        //获取对应需要删除的id值
        let delId = $(this).attr('data-id')
        //发起post请求,并将需要删除的数据id返回给后端。
        $.ajax({
            url:'userlist',
            type:'post',
            contentType:'json',
            data:JSON.stringify({'type':'del','id':delId,}),
            success:function (args) {
                //如果后端返回的状态码为200,那么就重新刷新列表数据。
                if (args.status === 200){
                    getList()
                }
            }
        })
    })
</script>

</body>
</html>
5、视图层
-
from app01 import  models
import json
from django.core import serializers
from django.http import  JsonResponse
def user_msg(request):
    '''
    如果是ajax请求,那么就判断是那种类型的请求,是get还是post
    随后针对不同的请求方式,来进行响应。
    '''
    if request.is_ajax():
        # 当前端ajax发起GET请求时,将数据库中的数据返回
        if request.method == 'GET':
            data_queryset = models.Usermsg.objects.all()
            # 利用django自带的序列化模块,可以直接将queryset对象进行处理,无需人为手动的封装数据。
            res = serializers.serialize('json', data_queryset)
            return  JsonResponse(res,safe=False)

        # 当前端ajax发起POST请求时,后端获取json数据,并进行处理。
        if request.method == 'POST':
            res_bytes = request.body
            res = json.loads(res_bytes)
            if res['type'] == 'del':
                # 执行删除操作。
                res = models.Usermsg.objects.filter(pk=res['id']).delete()
                # res : (1, {'app01.Usermsg': 1})
                if res:
                    # 将处理的结果返回给前端回调函数
                    return JsonResponse({'status':200,'msg':'删除数据成功'})
            else:
                pass
                # 执行编辑操作,此处代码略。

    return  render(request,'ajax_sweetalert.html')
最终实现的效果展示:
5.2 结合sweetalert实现二次确认
在很多需要删除的场景中,往往会有弹框,提示是否确定要删除,那么我们如何利用现有的知识点,完成这个效果呢?
项目:djangoAjaxProject
路由:http://127.0.0.1:8000/userlist/
所有功能都以写好,等待与sweetalert的结合。
<script>
    $('.del').on('click',function () {
        // 先将当前标签对象存储起来
        let currentBtn = $(this);
        // 二次确认弹框
        swal({
          title: "确定要删吗?",
          text: "此操作不可逆,请谨慎操作!",
          type: "warning",
          showCancelButton: true,
          confirmButtonClass: "btn-danger",
          confirmButtonText: "我就要删!",
          cancelButtonText: "算了,冷静冷静!",
          closeOnConfirm: false,
          closeOnCancel: false,
          showLoaderOnConfirm: true
        },
        function(isConfirm) {
          if (isConfirm) {
                // 朝后端发送ajax请求删除数据之后 再弹下面的提示框
                $.ajax({
                    {#url:'/delete/user/' + currentBtn.attr('delete_id'),  // 1 传递主键值方式1#}
                    url:'/delete/user/',  // 2 放在请求体里面
                    type:'post',
                    data:{'delete_id':currentBtn.attr('delete_id')},
                    success:function (args) {  // args = {'code':'','msg':''}
                        // 判断响应状态码 然后做不同的处理
                        if(args.code === 1000){
                            swal("删了!", args.msg, "success");
                            // 1.lowb版本 直接刷新当前页面
                            {#window.location.reload()#}
                            // 2.利用DOM操作 动态刷新
                            currentBtn.parent().parent().remove()
                        }else{
                            swal('完了','出现了未知的错误','info')
                        }
                    }

                })

          } else {
            swal("已取消", "当前数据已取消删除", "error");
          }
        });
    })

</script>
六、批量插入
def ab_pl(request):
    # 先给Book插入一万条数据
    # for i in range(10000):
    #     models.Book.objects.create(title='第%s本书'%i)
    # # 再将所有的数据查询并展示到前端页面
    book_queryset = models.Book.objects.all()

    # 批量插入
    # book_list = []
    # for i in range(100000):
    #     book_obj = models.Book(title='第%s本书'%i)
    #     book_list.append(book_obj)
    # models.Book.objects.bulk_create(book_list)
    """
    当你想要批量插入数据的时候 使用orm给你提供的bulk_create能够大大的减少操作时间
    :param request:
    :return:
    """
    return render(request,'ab_pl.html',locals())
七、自定义分页器
为什么要用自定义分页器:
- 上述的批量插入,可能会造成数据渲染时的一个问题,那就是页面上不能一次性展示那么多,所以需要分页展示。
- django内置的有分页器,但是效果不太好,而且使用起来也没那么好用,所以官网又提供了模块,供我们来拷贝使用。
当我们需要使用到非django内置的第三方功能或者组件代码的时候,我们一般情况下会在项目的根目录下,创建一个名为utils文件夹,在该文件夹内对模块进行功能性,创建不同的目录进行划分。
所以自定义分页器做好在新建的utils文件夹下。
模块源码:
class Pagination(object):
    def __init__(self, current_page, all_count, per_page_num=2, pager_count=11):
        """
        封装分页相关数据
        :param current_page: 当前页
        :param all_count:    数据库中的数据总条数
        :param per_page_num: 每页显示的数据条数
        :param pager_count:  最多显示的页码个数
        """
        try:
            current_page = int(current_page)
        except Exception as e:
            current_page = 1

        if current_page < 1:
            current_page = 1

        self.current_page = current_page

        self.all_count = all_count
        self.per_page_num = per_page_num

        # 总页码
        all_pager, tmp = divmod(all_count, per_page_num)
        if tmp:
            all_pager += 1
        self.all_pager = all_pager

        self.pager_count = pager_count
        self.pager_count_half = int((pager_count - 1) / 2)

    @property
    def start(self):
        return (self.current_page - 1) * self.per_page_num

    @property
    def end(self):
        return self.current_page * self.per_page_num

    def page_html(self):
        # 如果总页码 < 11个:
        if self.all_pager <= self.pager_count:
            pager_start = 1
            pager_end = self.all_pager + 1
        # 总页码  > 11
        else:
            # 当前页如果<=页面上最多显示11/2个页码
            if self.current_page <= self.pager_count_half:
                pager_start = 1
                pager_end = self.pager_count + 1

            # 当前页大于5
            else:
                # 页码翻到最后
                if (self.current_page + self.pager_count_half) > self.all_pager:
                    pager_end = self.all_pager + 1
                    pager_start = self.all_pager - self.pager_count + 1
                else:
                    pager_start = self.current_page - self.pager_count_half
                    pager_end = self.current_page + self.pager_count_half + 1

        page_html_list = []
        # 添加前面的nav和ul标签
        page_html_list.append('''
                    <nav aria-label='Page navigation>'
                    <ul class='pagination'>
                ''')
        first_page = '<li><a href="?page=%s">首页</a></li>' % (1)
        page_html_list.append(first_page)

        if self.current_page <= 1:
            prev_page = '<li class="disabled"><a href="#">上一页</a></li>'
        else:
            prev_page = '<li><a href="?page=%s">上一页</a></li>' % (self.current_page - 1,)

        page_html_list.append(prev_page)

        for i in range(pager_start, pager_end):
            if i == self.current_page:
                temp = '<li class="active"><a href="?page=%s">%s</a></li>' % (i, i,)
            else:
                temp = '<li><a href="?page=%s">%s</a></li>' % (i, i,)
            page_html_list.append(temp)

        if self.current_page >= self.all_pager:
            next_page = '<li class="disabled"><a href="#">下一页</a></li>'
        else:
            next_page = '<li><a href="?page=%s">下一页</a></li>' % (self.current_page + 1,)
        page_html_list.append(next_page)

        last_page = '<li><a href="?page=%s">尾页</a></li>' % (self.all_pager,)
        page_html_list.append(last_page)
        # 尾部添加标签
        page_html_list.append('''
                                           </nav>
                                           </ul>
                                       ''')
        return ''.join(page_html_list)
后端:
from utils.mypage import *
def mypage(request):
    msgdata_queryset = models.Usermsg.objects.all()

    '''自定义分页器'''
    current_page = request.GET.get("page", 1)
    all_count = msgdata_queryset.count()
    page_obj = Pagination(current_page=current_page, all_count=all_count, per_page_num=5)
    																	# per_page_num=5 表示每页展示5条数据
    page_queryset = msgdata_queryset[page_obj.start:page_obj.end]

    return render(request,'mypage.html',locals())
- 拷贝过来的第三方模块,放在utils目录下,名为mypage,所以在上面就直接from…import导入。
- 变量msgdata_queryset为查询出来的数据,正常情况下,直接通过locals()方法将该数据传给模板语法,但是这里使用自定义分页器,所以需要复制粘贴下列代码,注意变量间的替换即可,后续模板语法操作的数据为page_queryset,等同于msgdata_queryset,但是内部封装了很多方法。
前端:
<div class="container">
    <div class="row">
        <div class="col-md-10">
            <!--面板-->
            <div class="panel panel-info">
                <div class="panel-heading">数据列表</div>
                <div class="panel-body">
                    <!--图书表格-->
                    <table class="table table table-striped table-bordered table-hover table-condensed">
                        <thead>
                             <tr class="success">
                                    <th>姓名</th>
                                    <th>年龄</th>
                                    <th>擅长领域</th>
                                    <th>操作</th>
                            </tr>
                        </thead>
                        <tbody>
                            {% for data_obj in page_queryset %}
                                <tr>
                                    <td>{{ data_obj.name }}</td>
                                    <td>{{ data_obj.age }}</td>
                                    <td>{{ data_obj.hobby }}</td>
                                    <td>
                                        <button class="btn btn-success btn-xs"   data-id='+item.pk+'>编辑</button>
                                        <button class="btn btn-danger btn-xs"    data-id='+item.pk+'>删除</button>
                                    </td>
                            {% endfor %}
                        </tbody>
                    </table>
                    <!--图书表格-->

                    <!--自定义分页器-->
                 	{{ page_obj.page_html|safe }}
                    <!--自定义分页器-->

                </div>
            </div>
            <!--面板-->
        </div>
    </div>
</div>
-
上面说道,page_queryset等同于msgdata_queryset,并且内部还封装了很多属性和方法,如:控制每页展示行数等。
所以在渲染数据时,for…in的就是page_queryset。
-
最后直接在需要的地方书写{{ page_obj.page_html|safe }}即可,分页器就会转义之后成功渲染在页面上。


 3144
3144


 被折叠的 条评论
为什么被折叠?
被折叠的 条评论
为什么被折叠?
 到【灌水乐园】发言


