


ConstraintLayout介绍
Constraintlayout继承自ViewGroup,它是一个可以允许你以一种灵活的方式去 设置定位的控件,向下兼容到API 9。
ConstraintLayout的约束类型
Relative positioning
相对定位:通俗的讲就是约束一个组件的一边相对于其他控件的另外一边。
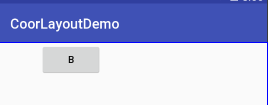
在谷歌的文档上描述控件的相对位置约束图示如下:
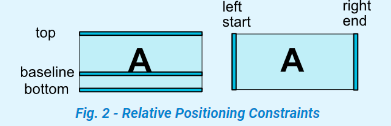
选择其中的两个在这里做下描述。
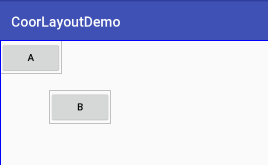
- layout_constraintLeft_toRightOf
<android.support.constraint.ConstraintLayout xmlns:android="http://schemas.android.com/apk/res/android"
xmlns:app="http://schemas.android.com/apk/res-auto"
xmlns:tools="http://schemas.android.com/tools"
android:layout_width="match_parent"
android:layout_height="match_parent"
tools:context="com.example.lijingya.coorlayoutdemo.MainActivity">

<Button
    android:id="@+id/btnA"
    android:layout_width="wrap_content"
    android:layout_height="wrap_content"
    android:text="A" />

<Button
    android:layout_width="wrap_content"
    android:layout_height="wrap_content"
    android:text="B"
    app:layout_constraintLeft_toRightOf="@id/btnA" />
    </android.support.constraint.ConstraintLayout>
在ButtonB中设置该属性,可以看到两个布局在屏幕中的显示位置如下:
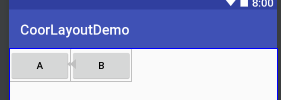
该属性的意思是约束B的左边位置相对于A的右边。对于layout_constraintLeft_toRightOf属性的值可以是一个组件的id或其他组件或者是parent(父布局)。
layout_constraintBaseline_toBaselineOf
该属性的意思是约束一个控件的基准线位置相对于另一个控件的基准线位置,结合相对位置约束的图示来看,在垂直方向上就是重合的意思。
<android.support.constraint.ConstraintLayout xmlns:android="http://schemas.android.com/apk/res/android"
xmlns:app="http://schemas.android.com/apk/res-auto"
xmlns:tools="http://schemas.android.com/tools"
android:layout_width="match_parent"
android:layout_height="match_parent"
tools:context="com.example.lijingya.coorlayoutdemo.MainActivity">

<Button
    android:id="@+id/btnA"
    android:layout_width="wrap_content"
    android:layout_height="wrap_content"
    android:text="A" />

<Button
    android:layout_width="wrap_content"
    android:layout_height="wrap_content"
    android:text="B"
    app:layout_constraintBaseline_toBaselineOf="@id/btnA" />
</android.support.constraint.ConstraintLayout>
效果如下:
- layout_constraintLeft_toRightOf
Margins
可以理解为为设置了Relative positioning属性的控件添加相对于另一个控件的边距。
- android:layout_marginStart
- android:layout_marginEnd
- android:layout_marginLeft
- android:layout_marginTop
- android:layout_marginRight
- android:layout_marginBottom
<android.support.constraint.ConstraintLayout xmlns:android="http://schemas.android.com   /apk/res/android"
xmlns:app="http://schemas.android.com/apk/res-auto"
xmlns:tools="http://schemas.android.com/tools"
android:layout_width="match_parent"
android:layout_height="match_parent"
tools:context="com.example.lijingya.coorlayoutdemo.MainActivity">

<Button
    android:id="@+id/btnA"
    android:layout_width="wrap_content"
    android:layout_height="wrap_content"
    android:text="A" />

<Button
    android:layout_width="wrap_content"
    android:layout_height="wrap_content"
    android:layout_marginLeft="92dp"
    android:layout_marginTop="48dp"
    android:text="B"
    app:layout_constraintLeft_toRightOf="@id/btnA"
    app:layout_constraintTop_toTopOf="parent" />
</android.support.constraint.ConstraintLayout>
若是连接的目标控件是一个visibility属性设置为gone的控件时,有时可以考虑属性用于设置margins
- layout_goneMarginStart
- layout_goneMarginEnd
- layout_goneMarginLeft
- layout_goneMarginTop
- layout_goneMarginRight
- layout_goneMarginBottom
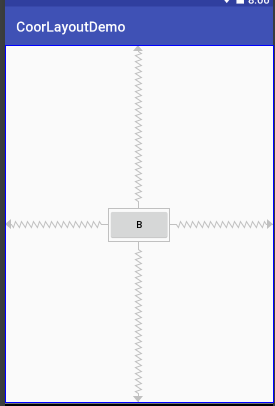
Centering positioning
中心定位:将一个控件放置在父布局的中心如何做?就用到中心定位了。如何做?如下:
<android.support.constraint.ConstraintLayout xmlns:android="http://schemas.android.com/apk/res/android"
xmlns:app="http://schemas.android.com/apk/res-auto"
xmlns:tools="http://schemas.android.com/tools"
android:layout_width="match_parent"
android:layout_height="match_parent"
tools:context="com.example.lijingya.coorlayoutdemo.MainActivity">


<Button
    android:layout_width="wrap_content"
    android:layout_height="wrap_content"
    android:text="B"
    app:layout_constraintBottom_toBottomOf="parent"
    app:layout_constraintLeft_toLeftOf="parent"
    app:layout_constraintRight_toRightOf="parent"
    app:layout_constraintTop_toTopOf="parent" />


</android.support.constraint.ConstraintLayout>
效果如下:
Bias
偏差:怎么理解呢,当我们设置中心定位之后,可以通过设置bias属性对偏差设置微调,中心定位在水平和竖直上默认是50%,
- layout_constraintHorizontal_bias
控制水平方向的偏差
- layout_constraintVertical_bias
控制竖直方向的偏差
<android.support.constraint.ConstraintLayout xmlns:android="http://schemas.android.com/apk/res/android"
xmlns:app="http://schemas.android.com/apk/res-auto"
xmlns:tools="http://schemas.android.com/tools"
android:layout_width="match_parent"
android:layout_height="match_parent"
tools:context="com.example.lijingya.coorlayoutdemo.MainActivity">


<Button
    android:layout_width="wrap_content"
    android:layout_height="wrap_content"
    android:text="B"
    app:layout_constraintHorizontal_bias="0.2"
    app:layout_constraintLeft_toLeftOf="parent"
    app:layout_constraintRight_toRightOf="parent" />


</android.support.constraint.ConstraintLayout>
效果如下图
我将按钮设置为水平居中,然后设置了左边偏移20%。
Circular positioning
圆形定位:可以以一个角度和距离,约束一个控件的中心相对于另一个控件的中心。
- layout_constraintCircle: 引用另一个控件的id
- layout_constraintCircleRadius:到另一个控件中心的距离
- layout_constraintCircleAngle :该控件被放置的角度(0-360)
<android.support.constraint.ConstraintLayout xmlns:android="http://schemas.android.com/apk/res/android"
xmlns:app="http://schemas.android.com/apk/res-auto"
xmlns:tools="http://schemas.android.com/tools"
android:layout_width="match_parent"
android:layout_height="match_parent"
tools:context="com.example.lijingya.coorlayoutdemo.MainActivity">

<Button
    android:id="@+id/btnA"
    android:layout_width="wrap_content"
    android:layout_height="wrap_content"
    android:text="A" />

<Button
    android:layout_width="wrap_content"
    android:layout_height="wrap_content"
    android:text="B"
    app:layout_constraintCircle="@id/btnA"
    app:layout_constraintCircleAngle="135"
    app:layout_constraintCircleRadius="100dp" />


</android.support.constraint.ConstraintLayout>
上述代码将约束B的中心相对于A的中心,并设置B被放置的角度是135度,到A的中心的距离为100dp。
Visibility behavior
可见性行为:约束布局对于一个控件被标记为Gone有特殊的处理。消失的控件是不会显示,而且也不是容器的一部分,但是对于容器的计算,消失的控件仍然会参与。对于容器,控件的尺寸会被当做0,如果对于其他控件有约束,那么设置margin会失效。
<android.support.constraint.ConstraintLayout xmlns:android="http://schemas.android.com/apk/res/android"
xmlns:app="http://schemas.android.com/apk/res-auto"
xmlns:tools="http://schemas.android.com/tools"
android:layout_width="match_parent"
android:layout_height="match_parent"
tools:context="com.example.lijingya.coorlayoutdemo.MainActivity">

<Button
    android:id="@+id/btnA"
    android:layout_width="wrap_content"
    android:layout_height="wrap_content"
    android:layout_marginLeft="50dp"
    android:text="A"
    android:visibility="visible"
    app:layout_constraintLeft_toLeftOf="parent" />

<Button
    android:layout_width="wrap_content"
    android:layout_height="wrap_content"
    android:layout_marginLeft="20dp"
    android:text="B"
    app:layout_constraintLeft_toRightOf="@id/btnA" />


</android.support.constraint.ConstraintLayout>
以这个例子,我设置A相对于父布局有50的边距,设置B的左边相对于A的右边有20的距离。当我指定A的visibility为visible时,A的边距是有效的,当设置A为gone时,A相对于父布局的边距失效。
A设置visible如图:
.jpg)
A设置gone如图:
.jpg)
Minimum dimensions on ConstraintLayout
尺寸约束:你可以为ConstraintLayout设置最大尺寸和最小尺寸
- android:minWidth :为约束布局设置最小宽度
- android:minHeight :为约束布局设置最小高度
- android:maxWidth :为约束布局设置最大宽度
- android:maxHeight :为约束布局设置最打高度
以上属性只在约束布局的宽高为wrap_content时有效
Percent dimension
百分比尺寸,当使用百分比时需要遵循下面的规则
- 控件的的宽或者高需要设置0dp。
你可以设置默认的百分比,设置之后的效果是控件的宽或者高等于父布局的宽高
app:layout_constraintWidth_default="percent"
app:layout_constraintHeight_default="percent"
然后通过 layout_constraintWidth_percent或者ayout_constraintHeight_percent属性设置比值,值是0-1。
Chains
链:就是将两个控件互相约束,这样形成的一个组合叫链,在第一个位置的控件叫做链头,可以为链头设置layout_constraintHorizontal_chainStyle 或者 layout_constraintVertical_chainStyle属性改变整个链的行为。
属性有是三种
- spread :是默认的一种链的风格
<android.support.constraint.ConstraintLayout
 xmlns:android="http://schemas.android.com/apk/res/android"
    xmlns:app="http://schemas.android.com/apk/res-auto"
    xmlns:tools="http://schemas.android.com/tools"
    android:layout_width="match_parent"
    android:layout_height="match_parent"
    tools:context="com.example.lijingya.coorlayoutdemo.MainActivity">
    <Button
    android:id="@+id/btnA"
    android:layout_width="wrap_content"
    android:layout_height="wrap_content"
    android:text="A"
    app:layout_constraintHorizontal_chainStyle="spread"
    app:layout_constraintLeft_toLeftOf="parent"
    app:layout_constraintRight_toLeftOf="@id/btnB" />
    <Button
    android:id="@+id/btnB"
    android:layout_width="wrap_content"
    android:layout_height="wrap_content"
    android:text="B"
    app:layout_constraintLeft_toRightOf="@id/btnA"
    app:layout_constraintRight_toRightOf="@id/btnC" />
    <Button
    android:id="@+id/btnC"
    android:layout_width="wrap_content"
    android:layout_height="wrap_content"
    android:text="C"
    app:layout_constraintLeft_toRightOf="@id/btnB"
    app:layout_constraintRight_toRightOf="parent" />
    </android.support.constraint.ConstraintLayout>
效果如下图
.jpg)
首先我三个按钮两两互相约束,并将收尾两个端点与父布局进行约束,这样就形成一条链,然后再链头也就是A的位置设置chainStyle为spread。spread的风格是属性默认的值。
packed
将链头的属性设置app:layout_constraintHorizontal_chainStyle=”packed”
效果如下:
.jpg)
spread_inside
将链头的该属性设置为app:layout_constraintHorizontal_chainStyle=”spread_inside”
效果如下
.jpg)
Optimizer
优化器:添加 app:layout_optimizationLevel 在约束布局和控件上。值有以下几种
- none : 不应有任何优化
- standard :只优化障碍约束和直接约束
- direct :优化直接约束
- barrier :优化障碍约束
- chain : 优化链约束
- dimensions : 优化尺寸度量


 3037
3037


 被折叠的 条评论
为什么被折叠?
被折叠的 条评论
为什么被折叠?
 到【灌水乐园】发言


