


掘金链接
脚手架的搭建作为公司的基建工作,有非常重要的作用。日常的脚手架像 vue-cli、angular-cli等都是通过简单的初始化命令完成了整体框架的快速构建。我们有必要系统性的了解并掌握脚手架的搭建相关知识。
- 文章涉及到脚手架源码链接:https://github.com/llz1990/llzscc_cli (请帮忙star一下)
- 文章最后提交的npm源:https://www.npmjs.com/package/llzscc_cli
基于vue-cli了解脚手架的简单应用
脚手架就是在启动的时候询问一些简单的问题,并且用户选择的结果去渲染对应的模板文件,基本工作流程如下:
- 通过命令行交互询问用户问题
- 根据用户回答的结果生成文件
我们在使用vue-cli时候,首先运行创建的命令,询问用户问题,用户可以自己选择。

我们看到,最后生成了我们需要的项目模板文件。
参考vue-cli的流程,我们自己也可以搭建一个脚手架。
搭建自己的脚手架
1. 项目创建
首先通过 npm init 简单的创建一个项目结构,这里我给自己的项目取名为 llzscc_cli(鉴于推到NPM中不能重名,这里就这么取名了)。添加一个启动文件 bin/cli.js,该文件主要写 commander 相关命令操作。
llzscc_cli
├─ bin
│  └─ cli.js  # 启动文件
├─ README.md
└─ package.json
再配置脚手架的 package.json 文件
{
  "name": "llzscc_cli",
  "version": "1.0.0",
  "description": "脚手架",
  "main": "index.js",
  "bin": {
    "run": "./bin/cli.js" // 配置启动文件路径,run 为别名
  },
  "scripts": {
    "test": "echo \"Error: no test specified\" && exit 1"
  },
  "author": {
    "name": "llz"
  },
  "license": "MIT"
}
简单编辑一下我们的 cli.js
#! /usr/bin/env node
console.log('~ working ~');
在终端执行命令 npm link 链接到全局方便调试。执行命令 run 可以输出打印结果:
~/Desktop/cli/llzscc_cli ->run
~ working ~ # 打印内容
2. 创建脚手架启动命令
这个过程我们需要先借助 commander 依赖来实现终端命令行的输出;参照vue-cli 中的命令有 create 、config 等,我们需要提供类似的指令完成逻辑实现。
首先安装commander 依赖包:
$ npm install commander --save
安装完成之后可以编辑 cli.js 内容:
#! /usr/bin/env node

const program = require('commander')

program
  // 定义命令和参数
  .command('create [name]')
  .description('create a new project')
  // -f or --force 为强制创建,如果创建的目录存在则直接覆盖
  .option('-f, --force', 'overwrite target directory if it exist')
  .action((name, options) => {
    // 打印结果,输出用户手动输入的项目名字
    console.log('name:',name)
  })

program
   // 配置版本号信息
  .version(`v${require('../package.json').version}`)
  .usage('<command> [option]')

// 解析用户执行命令传入参数
program.parse(process.argv);
如下图,在终端输入相关命令验证:
->run create
error: missing required argument 'name'

->run create my-project
执行结果 >>> name: my-project options: {}

->run create my-project -f
执行结果 >>> name: my-project options: { force: true }

->run create my-project --force
执行结果 >>> name: my-project options: { force: true }
创建 lib 文件夹, 该文件夹下的内容为主要逻辑实现,在该文件夹下创建 create.js
// lib/create.js

module.exports = async function (name, options) {
  // 验证是否正常取到值
  console.log('create success', name);
}
在 cli.js 中使用 create.js
// bin/cli.js
program
  .command('create [name]')
  .description('create a new project')
  .option('-f, --force', 'overwrite target directory if it exist')
  .action((name, options) => {
    require('../lib/create.js')(name, options)    // 引入 create.js 文件
  })
->run create my-project
>>> create success my-project
在创建项目文件目录时候,还需要考虑一个问题:如果目录已经存在,怎么处理已经存在的目录?有几个处理方案:如果不存则直接创建一个新的项目文件目录;如果存在是否要直接删除或者用一个新的项目文件目录替换掉(在这个逻辑判断过程中就涉及到脚手架核心功能的一个讯问过程,我们需要给用户提供命令选择,这个过程我们后面再实现)。当前的过程涉及到nodejs 对文件的处理,我们引入依赖包 fs-extra, 在完善create.js:
$ npm install fs-extra --save
// lib/create.js
const path = require('path')
const fs = require('fs-extra')

module.exports = async function (name, options) {
    const cwd = process.cwd(); // 选择目录
    const targetAir = path.join(cwd, name); // 需要创建的目录地址
  // 判断目录是否已经存在?
  if (fs.existsSync(targetAir)) {
    // 是否为强制创建?
    if (options.force) {
      await fs.remove(targetAir)
    } else {
      // TODO:询问用户是否确定要覆盖
    }
  }
}
我们已经创建了 create 的命令,作用是创建一个新的项目目录。那么我们是否可以再继续拓展新的命令呢?照葫芦画瓢,直接在 cli.js 文件里面编辑,例如我们配置一个 config 命令,直接可以添加代码:
// bin/cli.js
......
// 配置 config 命令
program
    .command('config [value]')
    .description('inspect and modify the config')
    .option('-g, --get <path>', 'get value from option')
    .option('-s, --set <path> <value>')
    .option('-d, --delete <path>', 'delete option from config')
    .action((value, options) => {
        console.log('自定义config 命令:', value);
    })
......
我们先看一下 llzscc-cli 执行 run --help 打印的信息:
> run --help
----------以下执行commander命令---------
Usage: cli <command> [option]

Options:
  -V, --version             output the version number
  -h, --help                output usage information

Commands:
  create [options] [name]   create a new project
  config [options] [value]  inspect and modify the config
对于输出的 --help 信息,我们可以做出一些好看的样式,引入依赖 chalk 、figlet, 我们打印一个有趣的图案:
// bin/cli.js
// 打印一个有趣的 help
program
    .on('--help', () => {
        // 使用 figlet 绘制 Logo
        console.log('\r\n' + figlet.textSync('zhurong', {
            font: 'Ghost',
            horizontalLayout: 'default',
            verticalLayout: 'default',
            width: 80,
            whitespaceBreak: true
        }));
        // 新增说明信息
        console.log(`\r\nRun ${chalk.cyan(`roc <command> --help`)} show details\r\n`)
    })

3. 询问用户功能实现
在上一步中我们遗留了一个问题:在对文件目录判断时,如何实现询问用户的操作?在此我们引入一个依赖 inquirer ,实现以下逻辑:
// 目录是否已经存在:
    if (fs.existsSync(targetAir)) {
        if (options.force) {
            await fs.remove(targetAir);
        } else {
            // 在终端输出询问用户是否覆盖:
            const inquirerParams = [{
                name: 'action',
                type: 'list',
                message: '目标文件目录已经存在,请选择如下操作:',
                choices: [
                    { name: '替换当前目录', value: 'replace'},
                    { name: '移除已有目录', value: 'remove' },
                    { name: '取消当前操作', value: 'cancel' }
                ]
            }];
            let inquirerData = await inquirer.prompt(inquirerParams);
            if (!inquirerData.action) {
                return;
            } else if (inquirerData.action === 'remove') {
                // 移除已存在的目录
                console.log(`\r\nRemoving...`)
                await fs.remove(targetAir)
            }
        }
    }
我们来测试一下效果,我们增加一个文件夹 src , 然后执行命令:run create src。我们可以看到一个询问的选择出现了,是我们想要的效果。

4. 通过git提供的api接口拉取模板信息
如下图所示,我们可以看到vuejs 有很多已有模板。我们以此为例,需要将vuejs的虽有模板拉取下来,然后询问用户选择哪种模板,同时还要提供模板的版本信息的询问选择,这个过程又该如何做呢?
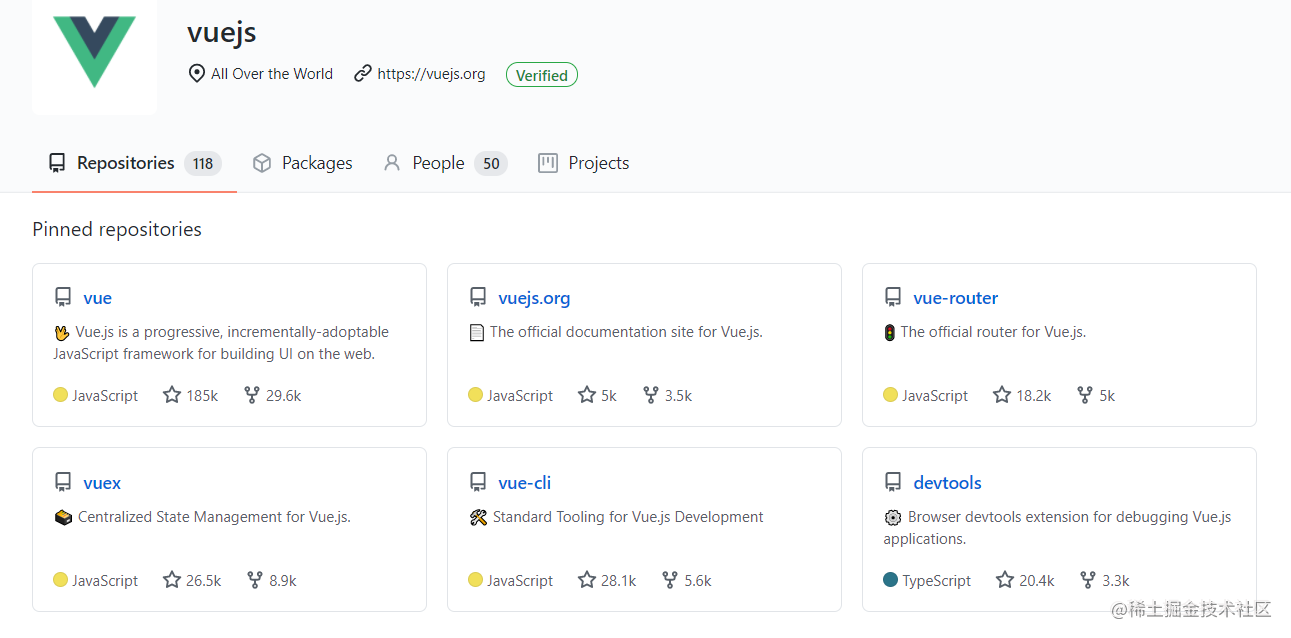
对于获取模板信息和获取模板的版本信息,我们可以用 git官方提供的api 接口取到:获取模板信息的接口:https://api.github.com/orgs/${projectName}/repos、获取模板的版本信息的接口:https://api.github.com/repos/${projectName}/${repo}/tags。我们在lib 文件夹创建一个 http.js 的文件处理接口。
const axios = require('axios');

axios.interceptors.response.use(res => {
    return res.data;
})

/**
 * 获取模板列表
 * @returns Promise
 */
async function getRepoList() {
    return axios.get('https://api.github.com/orgs/vuejs/repos')
}

/**
 * 获取版本信息
 * @param {string} repo 模板名称
 * @returns Promise
 */
async function getTagList(repo) {
    return axios.get(`https://api.github.com/repos/vuejs/${repo}/tags`)
}

module.exports = {
    getRepoList,
    getTagList
}
我们创建一个文件 generator.js 来处理拉取模板的这块逻辑,然后在 create.js 里面引用他。
// lib/Generator.js

class Generator {
  constructor (name, targetDir){
    // 目录名称
    this.name = name;
    // 创建位置
    this.targetDir = targetDir;
  }

  // 核心创建逻辑
  create(){

  }
}
module.exports = Generator;
// lib/create.js

...
const Generator = require('./Generator')

module.exports = async function (name, options) {
  // 执行创建命令

  // 当前命令行选择的目录
  const cwd  = process.cwd();
  // 需要创建的目录地址
  const targetAir  = path.join(cwd, name)

  // 目录是否已经存在?
  if (fs.existsSync(targetAir)) {
    ...
  }

  // 创建项目
  const generator = new Generator(name, targetAir);

  // 开始创建项目
  generator.create()
}
在generator.js 里实现具体逻辑:1. 拉取模板信息;2. 拉取模板的版本信息; 3.添加动画效果;然后可以看到终端的询问信息,是我们想要的效果。
const {
    getRepoList,
    getTagList
} = require('./http')
const ora = require('ora')
const inquirer = require('inquirer')
const chalk = require('chalk')

// 添加加载动画
async function wrapLoading(fn, message, ...args) {
    // 使用 ora 初始化,传入提示信息 message
    const spinner = ora(message);
    // 开始加载动画
    spinner.start();

    try {
        // 执行传入方法 fn
        const result = await fn(...args);
        // 状态为修改为成功Place choose a tag to create project
        spinner.succeed('Request succeed !!!');
        return result;
    } catch (error) {
        // 状态为修改为失败
        spinner.fail('Request failed, refetch ...', error)
    }
}

class Generator {
    constructor(name, targetDir) {
        // 目录名称
        this.name = name;
        // 创建位置
        this.targetDir = targetDir;
    }

    // 获取用户选择的模板
    // 1)从远程拉取模板数据
    // 2)用户选择自己新下载的模板名称
    // 3)return 用户选择的名称

    async getRepo() {
        // 1)从远程拉取模板数据
        const repoList = await wrapLoading(getRepoList, 'waiting fetch template');
        if (!repoList) return;

        // 过滤我们需要的模板名称
        const repos = repoList.map(item => item.name);

        // 2)用户选择自己新下载的模板名称
        const {
            repo
        } = await inquirer.prompt({
            name: 'repo',
            type: 'list',
            choices: repos,
            message: 'Please choose a template to create project'
        })

        // 3)return 用户选择的名称
        return repo;
    }

    // 获取用户选择的版本
    // 1)基于 repo 结果,远程拉取对应的 tag 列表
    // 2)用户选择自己需要下载的 tag
    // 3)return 用户选择的 tag

    async getTag(repo) {
        // 1)基于 repo 结果,远程拉取对应的 tag 列表
        const tags = await wrapLoading(getTagList, 'waiting fetch tag', repo);
        if (!tags) return;

        // 过滤我们需要的 tag 名称
        const tagsList = tags.map(item => item.name);

        // 2)用户选择自己需要下载的 tag
        const {
            tag
        } = await inquirer.prompt({
            name: 'tag',
            type: 'list',
            choices: tagsList,
            message: 'Place choose a tag to create project'
        })

        // 3)return 用户选择的 tag
        return tag
    }

    // 核心创建逻辑
    // 1)获取模板名称
    // 2)获取 tag 名称
    // 3)下载模板到模板目录
    async create() {

        // 1)获取模板名称
        const repo = await this.getRepo();

        // 2) 获取 tag 名称
        const tag = await this.getTag(repo);

        console.log(`\r\nSuccessfully created project ${chalk.cyan(this.name)}`)
    }
}
module.exports = Generator;


5. 下载远程模板
当上一步中拉取到模板信息之后还需要下载远程模版,引入依赖 download-git-repo,需要注意一个问题,就是它是不支持 promise的,所以我们这里需要使用使用util模块中的 promisify 方法对其进行 promise 化。我们实现核心功能模块下载功能:
// lib/Generator.js

...
const util = require('util')
const path = require('path')
const downloadGitRepo = require('download-git-repo') // 不支持 Promise

// 添加加载动画
async function wrapLoading(fn, message, ...args) {
  ...
}

class Generator {
  constructor (name, targetDir){
    ...

    // 对 download-git-repo 进行 promise 化改造
    this.downloadGitRepo = util.promisify(downloadGitRepo);
  }
  ...

  // 下载远程模板
  // 1)拼接下载地址
  // 2)调用下载方法
  async download(repo, tag) {

    // 1)拼接下载地址
    const requestUrl = `vuejs/${repo}${tag?'#'+tag:''}`;

    // 2)调用下载方法
    await wrapLoading(
        this.downloadGitRepo, // 远程下载方法
        'waiting download template', // 加载提示信息
        requestUrl, // 参数1: 下载地址
        path.resolve(process.cwd(), this.targetDir)) // 参数2: 创建位置
  }

  // 核心创建逻辑
  // 1)获取模板名称
  // 2)获取 tag 名称
  // 3)下载模板到模板目录
  // 4)模板使用提示
  async create() {

        // 1)获取模板名称
        const repo = await this.getRepo();

        // 2) 获取 tag 名称
        const tag = await this.getTag(repo);

        // 3)下载模板到模板目录
        await this.download(repo, tag);

        console.log(`\r\nSuccessfully created project ${chalk.cyan(this.name)}`)
    }
}
module.exports = Generator;
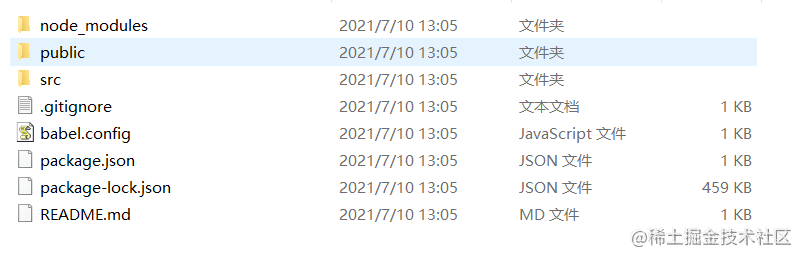
至此,一个简单的脚手架已经初步完成。我们试一下效果,执行:run create src。图中 src 文件时下载的vue模块,终端显示模块下载完成,脚手架的功能基本具备:

6. 发布项目
上面都是在本地测试,实际在使用的时候,需要发布到 npm 仓库,通过 npm 全局安装之后,直接到目标目录下面去创建项目,如何发布呢?
- 首先到 npm 官网去创建账号。注册完账号之后,我们就要在本地登录并发布我们的组件
- 通过终端命令 npm login. 然后输入你的账号、密码、邮箱当你在控制台看到
Logged in as <Username> on https://registry.npmjs.org说明登陆成功 - 通过 npm publish 发布包,发布之前需要在官网查找确认是否有重复名称。
- 发布成功之后,通过执行 npm install llzscc_cli 可以安装依赖。


 582
582


 被折叠的 条评论
为什么被折叠?
被折叠的 条评论
为什么被折叠?
 到【灌水乐园】发言


