


🌹欢迎来到《小5讲堂》🌹
🌹这是《前端》系列文章,每篇文章将以博主理解的角度展开讲解。🌹
🌹温馨提示:博主能力有限,理解水平有限,若有不对之处望指正!🌹

目录
前言
翻看了下上一篇写前端文章还是一年前,不知不觉又好久没写前端文章了。
最近太忙了,写文章都是忙里偷闲,挤点时间出来记录下开发过程中遇到得一些小细节问题。
本篇文章就是写开发前端时,博主习惯性打开console控制台,只要有黄色警告得都统统解决,
哈哈哈!

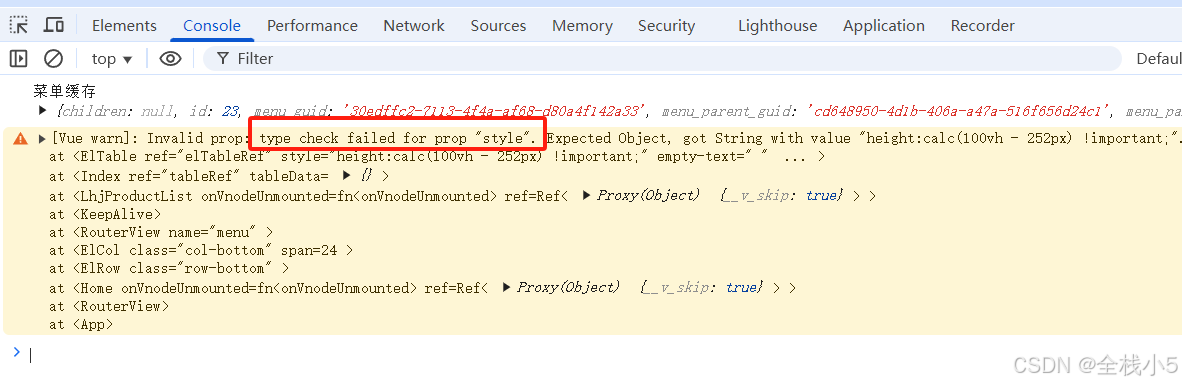
警告信息
index.vue?t=1747314464214:507 [Vue warn]: Invalid prop: type check failed for prop “style”. Expected Object, got String with value “height:calc(100vh - 252px) !important;”.
大概意思就是,赋值和接收参数值类型不对。
DeepSeek解答
不得不说,现在获取代码解决方法真真真真真得是太便捷了,再也不用到处找资料和解决方案。
只需要一点点信息输出就能醍醐灌顶,茅舍顿开。
从DeepSeek给出得答案可以判断,实际上把返回字符串参数值改为对象参数值即可。
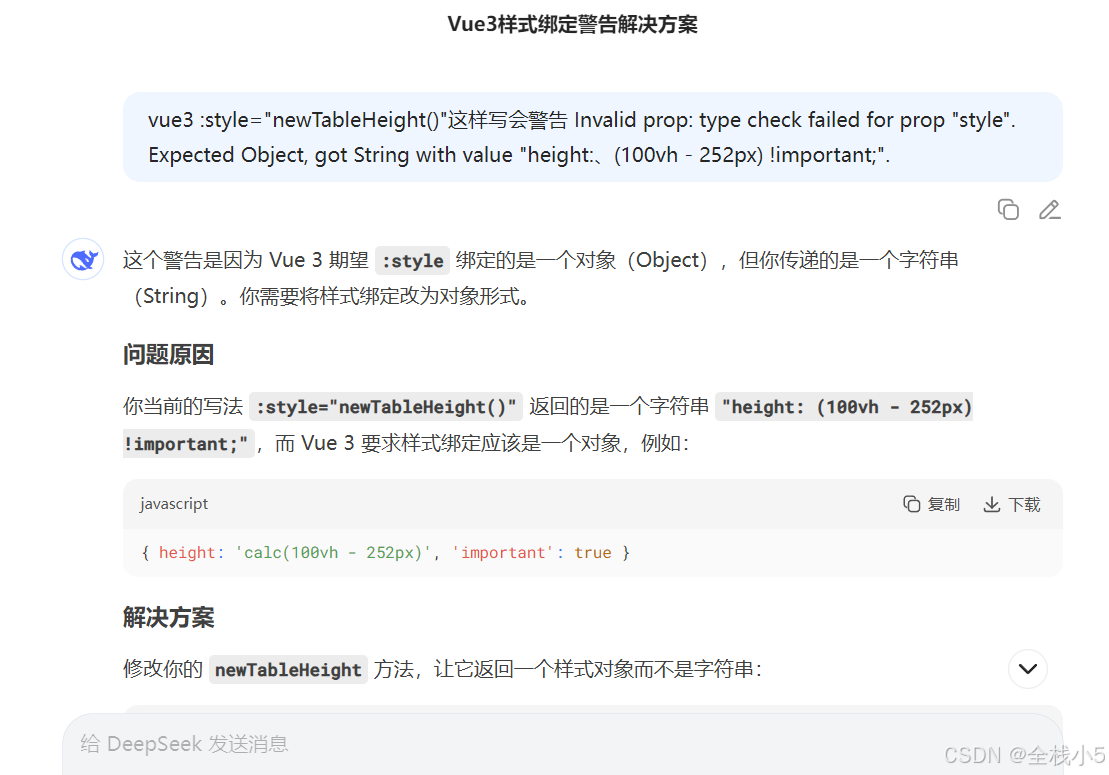
这个警告是因为 Vue 3 期望 :style 绑定的是一个对象(Object),但你传递的是一个字符串(String)。你需要将样式绑定改为对象形式。
问题原因
你当前的写法 :style="newTableHeight()" 返回的是一个字符串 "height: (100vh - 252px) !important;",而 Vue 3 要求样式绑定应该是一个对象,例如:
{ height: 'calc(100vh - 252px)', 'important': true }
解决方案
修改你的 newTableHeight 方法,让它返回一个样式对象而不是字符串:
methods: {
  newTableHeight() {
    return {
      height: 'calc(100vh - 252px)',
      'important': true // 或者直接写在值上:height: 'calc(100vh - 252px) !important'
    }
  }
}
或者在模板中直接使用对象语法:
<div :style="{ height: 'calc(100vh - 252px)', 'important': true }"></div>
关于 !important
Vue 的样式对象不支持直接写 !important,你有两种处理方式:
- 直接在值上添加
!important(虽然这不是官方推荐的做法):
return {
  height: 'calc(100vh - 252px) !important'
}
- 更好的方式是重构你的 CSS,避免使用
!important,可以通过提高 CSS 选择器特异性来实现。
最终建议写法
<template>
  <div :style="tableStyle"></div>
</template>

<script>
export default {
  data() {
    return {
      tableStyle: {
        height: 'calc(100vh - 252px)'
      }
    }
  }
}
</script>
或者如果必须使用计算属性:
computed: {
  tableStyle() {
    return {
      height: 'calc(100vh - 252px)'
    }
  }
}
这样可以避免警告,并且更符合 Vue 的样式绑定规范。
Vue小技巧
让DeepSeek给我们输出一些小技巧。小技巧可以帮助我们更高效地编写 Vue 3 代码,提高开发效率和代码质量!
Vue 3 实用代码小技巧
1. 组合式 API 技巧
// 使用 reactive 替代多个 ref
const state = reactive({
  count: 0,
  name: 'Vue 3',
  isActive: true
})

// 使用 toRefs 解构保持响应式
const { count, name } = toRefs(state)
2. 组件通信技巧
// 父子组件通信 - defineProps & defineEmits (script setup)
const props = defineProps({
  title: String,
  value: Number
})

const emit = defineEmits(['update:value'])
emit('update:value', newValue)

// 依赖注入 - provide/inject
const key = Symbol() // 推荐使用 Symbol 作为 key
provide(key, { data: '共享数据' })
const injectedData = inject(key)
3. 模板技巧
<!-- 动态组件 -->
<component :is="currentComponent" />

<!-- 条件渲染优化 -->
<template v-if="isLoading">加载中...</template>
<template v-else-if="isEmpty">暂无数据</template>
<template v-else>显示内容</template>

<!-- 样式绑定技巧 -->
<div :class="['base-class', { active: isActive }]" />
<div :style="{ '--custom-height': height + 'px' }" />
4. 性能优化技巧
// 计算属性缓存
const fullName = computed(() => `${firstName.value} ${lastName.value}`)

// 防抖处理
import { debounce } from 'lodash-es'
const handleInput = debounce(() => {
  // 处理逻辑
}, 300)

// 列表渲染优化
<ul>
  <li v-for="item in list" :key="item.id">{{ item.text }}</li>
</ul>
5. 组合式函数技巧
// useMouse.js
import { ref, onMounted, onUnmounted } from 'vue'

export function useMouse() {
  const x = ref(0)
  const y = ref(0)

  const update = (e) => {
    x.value = e.pageX
    y.value = e.pageY
  }

  onMounted(() => window.addEventListener('mousemove', update))
  onUnmounted(() => window.removeEventListener('mousemove', update))

  return { x, y }
}

// 在组件中使用
const { x, y } = useMouse()
6. 生命周期技巧
// 组合式 API 生命周期
onMounted(() => {
  console.log('组件挂载')
})

onUpdated(() => {
  console.log('组件更新')
})

onUnmounted(() => {
  console.log('组件卸载')
})

// 使用 watchEffect 自动清理副作用
watchEffect((onCleanup) => {
  const timer = setTimeout(() => {
    // 执行操作
  }, 1000)

  onCleanup(() => clearTimeout(timer))
})
7. 路由技巧 (Vue Router)
// 路由导航守卫
import { onBeforeRouteLeave } from 'vue-router'

onBeforeRouteLeave((to, from) => {
  if (hasUnsavedChanges.value) {
    return confirm('确定要离开吗?未保存的更改将会丢失')
  }
})

// 路由参数监听
watch(
  () => route.params.id,
  (newId) => {
    fetchData(newId)
  },
  { immediate: true }
)
8. 状态管理 (Pinia) 技巧
// store/user.js
export const useUserStore = defineStore('user', {
  state: () => ({ name: '', age: 0 }),
  getters: {
    isAdult: (state) => state.age >= 18
  },
  actions: {
    async fetchUser() {
      const user = await api.getUser()
      this.name = user.name
      this.age = user.age
    }
  }
})

// 在组件中使用
const userStore = useUserStore()
userStore.fetchUser()
9. 调试技巧
// 开发环境调试
import { ref } from 'vue'

const debugData = ref(null)

// 在模板中添加调试按钮
<button @click="console.log(debugData)">调试</button>

// 使用 Chrome 的 Vue Devtools 插件
文章推荐
【前端】Vue3+elementui+ts,给标签设置样式属性style时,提示type check failed for prop,再次请出DeepSeek来解答
【前端】Layui的表格常用功能,表单提交事件,表格下拉按钮点击事件,表格外的按钮点击事件
【Echarts】曲线图上方显示数字以及自定义值,标题和副标题居中,鼠标上显示信息以及自定义信息
【Echarts】柱状图上方显示数字以及自定义值,标题和副标题居中,鼠标上显示信息以及自定义信息


 2479
2479

 被折叠的 条评论
为什么被折叠?
被折叠的 条评论
为什么被折叠?
 到【灌水乐园】发言


