一、文件存储
1、将数据写到文件中
private fun save(inputText: String){

        try {
            //Context中的方法,用于将数据存储到指定的文件中,文件路径为/data/data/<package name>/files/目录下
            //写入方式有Context.MODE_PRIVATE和Context.MODE_APPEND两种,前者会覆盖原文件,后者是在原文件的基础上追加
            val output = openFileOutput("data", Context.MODE_PRIVATE)
            val writer = BufferedWriter(OutputStreamWriter(output))

            //扩展函数use可以在执行后自动将流关掉
            writer.use {
                it.write(inputText)
            }
        }catch (e: IOException){
            e.printStackTrace()
        }

    }
2、从文件中读取数据
//加载数据的函数
    private fun load(): String{
        val content = StringBuilder()
        try {
            val input = openFileInput("data")
            val reader = BufferedReader(InputStreamReader(input))
            reader.use {
                //一个内置扩展函数,读到的每一行都会返回到lambda中(it)
                reader.forEachLine {
                    content.append(it)
                }
            }
        }catch (e: IOException){
            e.printStackTrace()
        }
        return content.toString()
    }
二、SharedPreferences存储
1、获取SharedPreferences对象
获取SharedPreferences对象有两种方式
- 使用Context类中的方法获取,可以指定文件名
getSharedPreferences("data", Context.MODE_PRIVATE)
- 使用Activity类中的方法获取,不能指定文件名
getPreferences(Context.MODE_PRIVATE)
不过都需要指定操作模式,这里只能用Context.MODE_PRIVATE,其他几种都已被废弃
2、存储数据
- 先获取SharedPreferences.Editor对象
val editor: SharedPreferences.Editor = getSharedPreferences("data", Context.MODE_PRIVATE).edit()
- 使用putInt…等方法添加数据(名值对)
editor.putString("name", "Tom")
            editor.putInt("age", 28)
            editor.putBoolean("married", false)
- 最后提交,完成存储
editor.apply()
2、读取数据
一看就懂
val prefs = getSharedPreferences("data", Context.MODE_PRIVATE)
            val name = prefs.getString("name", "")
            val age = prefs.getInt("age", 0)
            val married = prefs.getBoolean("married", false)

            Log.d("MainActivity", "name is $name")
            Log.d("MainActivity", "age is $age")
            Log.d("MainActivity", "married is $married")
三、SQLite数据库存储
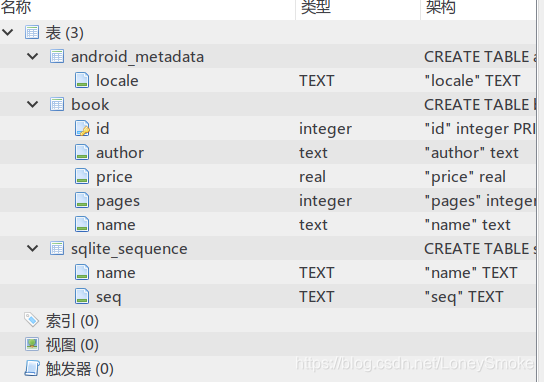
1、创建数据库
新建数据库类MyDatabaseHelper继承SQLiteOpenHelper
在onCreate中执行SQL语句完成建表
class MyDatabaseHelper(val context: Context, name: String, version: Int): SQLiteOpenHelper(context, name, null, version) {

    //建表语句
    private val createBook = "create table book (" +
            "id integer primary key autoincrement," +
            "author text," +
            "price real," +
            "pages integer," +
            "name text)"

	//创建表可以在这里面写
    override fun onCreate(db: SQLiteDatabase) {
        //执行SQL语句
        db.execSQL(createBook)
        Toast.makeText(context, "create succeeded", Toast.LENGTH_SHORT).show()
    }

	//数据库需要更新的时候使用
    override fun onUpgrade(db: SQLiteDatabase?, oldVersion: Int, newVersion: Int) {

    }

}
在主程序中建立MyDatabaseHelper对象
调用getWritableDatabase()方法:若程序中没有该数据库,就会进行创建
val dbHelper = MyDatabaseHelper(this, "BookStore.db", 1)
        createDatabase.setOnClickListener {
            dbHelper.writableDatabase
        }

2、升级数据库
如果我们要在数据库中添加一张新表或修改原有结构,如:
private val createCategory = "create table Category (" +
            "id integer primary key autoincrement," +
            "category_name text," +
            "category_code integer)"
此时必须在onUpgrade增加代码,使数据库重新创建
//数据库需要更新的时候使用
    override fun onUpgrade(db: SQLiteDatabase?, oldVersion: Int, newVersion: Int) {
        db?.execSQL("drop table if exists Book")
        db?.execSQL("drop table if exists Category")
        if (db != null) {
            onCreate(db)
        }
    }
并修改数据库版本号
val dbHelper = MyDatabaseHelper(this, "BookStore.db", 2)
3、添加数据
- 先获取writableDatabase对象
val db = dbHelper.writableDatabase
- 组装数据
val values1 = ContentValues().apply {
                //开始组装第一条数据
                put("name", "The Da Vinci Code")
                put("author", "Dan Brown")
                put("pages", 454)
                put("price", 16.96)
            }
- 插入数据
//插入数据,参数一:表面;参数二:null就行;参数三:ContentValues对象
            db.insert("Book", null, values1)
4、更新数据
val db = dbHelper.writableDatabase
//把要更新的数据放在ContentValues里面
val values = ContentValues()
values.put("price", 10.99)
//参数一:表名;参数二:要更新的ContentValues对象;参数三:where部分,使用?占位符;参数四:指定?的数组
db.update("Book", values, "name = ?", arrayOf("The Da Vinci Code"))
5、删除数据
val db = dbHelper.writableDatabase
//参数一:表名;参数二:where部分,使用?占位符;参数三:指定?的数组
db.delete("book", "pages > ?", arrayOf("500"))
6、查询数据
//查询所有数据
            val cursor = db.query("Book",null,null,null,null,null,null)
            if (cursor.moveToFirst()){//This method will return false if the cursor is empty.
                do {
                    //遍历cursor对象,取出所有值并打印
                    val name = cursor.getString(cursor.getColumnIndex("name"))//getColumnIndex获取某一列在表中对应的位置索引
                    val author = cursor.getString(cursor.getColumnIndex("author"))
                    val pages = cursor.getInt(cursor.getColumnIndex("pages"))
                    val price = cursor.getDouble(cursor.getColumnIndex("price"))
                    Log.d("MainActivity", "book name is $name")
                    Log.d("MainActivity", "book author is $author")
                    Log.d("MainActivity", "book pages is $pages")
                    Log.d("MainActivity", "book price is $price")
                }while (cursor.moveToNext())//向下一个位置移动
            }
            cursor.close()//最后别忘了关闭cursor
其中,query()的七个参数如下:

7、使用SQL语句进行增删改查
添加数据的方法如下:
db.execSQL("insert into Book (name, author, pages, price) values (?, ?, ?, ?)", arrayOf("The Da Vinci Code", "Dan Brown", "454", "16.96"))
更新数据的方法如下:
db.execSQL("update Book set price = ? where name = ?", new String[] { "10.99", "The Da Vinci Code" });
删除数据的方法如下:
db.execSQL("delete from Book where pages > ?", new String[] { "500" });
查询数据的方法如下:
db.rawQuery("select * from Book", null);
8、使用事务
val db = dbHelper.writableDatabase
            //事务的标准写法
            //先开启事务
            db.beginTransaction()
            try {
                //在try中执行逻辑代码,如果中途出现异常,则这个try中已执行的代码也不会起作用
                db.delete("Book", null, null)
                if (true){
                    //手动抛出异常使事务失败(测试使用)
                    throw NullPointerException()
                }
                val values = ContentValues().apply {
                    put("name", "Game of Thrones")
                    put("author", "George Martin")
                    put("pages", 720)
                    put("price", 20.85)
                }
                db.insert("Book", null, values)
                db.setTransactionSuccessful()//事务已经执行成功
            }catch (e: Exception){
                e.printStackTrace()
            } finally {
                db.endTransaction()//结束事务
            }
9、升级数据库
如果我们添加了新的字段或者表后,想要在升级数据库的同时保存原有数据,可以在onUpgrade()方法中进行数据库版本的判断,并做相应的特殊处理
if(oldVersion <= 2){
            db?.execSQL(createCategory)
        }

        if(oldVersion <= 3){
            db?.execSQL("alter table Book add column category_id integer")
        }
四、Kotlin课堂——高阶函数的应用
1、简化SharedPreferences的用法
由于扩展库KTX,我们可以直接这样
getSharedPreferences("data", Context.MODE_PRIVATE).edit {
            putString("name", "Tom")
            putBoolean("married", false)
        }
即可完成整个getSharedPreferences的数据添加
这个简便方法的原理可以自己实现一下
在SharedPreferences中添加open高阶函数,接受SharedPreferences.Editor的函数类型参数(也就是说,接受SharedPreferences.Editor类的成员方法,如putString())
import android.content.SharedPreferences

fun SharedPreferences.open(block: SharedPreferences.Editor.() -> Unit){
    val editor = edit()
    editor.block()
    editor.apply()
}
如此,便可以这样使用
//之后就可以这样存储数据
        getSharedPreferences("data", Context.MODE_PRIVATE).open {
            putString("name", "Tom")
            putBoolean("married", false)
        }
效仿这种做法,我们可以创建自己的高阶函数对已知类进行扩展,方便我们的开发使用


 1635
1635


 被折叠的 条评论
为什么被折叠?


