


本节简介:OpenCV中的阈值(threshold)函数: threshold 的运用。
threshold
Applies a fixed-level threshold to each array element.
-
C++: double threshold(InputArray src, OutputArray dst, double thresh, double maxval, int type)
-
Python: cv2.threshold(src, thresh, maxval, type[, dst]) → retval, dst
-
C: double cvThreshold(const CvArr* src, CvArr* dst, double threshold, double max_value, int threshold_type)
-
Parameters:- src – input array (single-channel, 8-bit or 32-bit floating point).
- dst – output array of the same size and type as src.
- thresh – threshold value.
- maxval–maximum value to use with the THRESH_BINARY and THRESH_BINARY_INV thresholding types.
- type – thresholding type (see the details below).
The function applies fixed-level thresholding to a single-channel array. The function is typically used to get a bi-level (binary) image out of a grayscale image ( compare() could be also used for this purpose) or for removing a noise, that is, filtering out pixels with too small or too large values. There are several types of thresholding supported by the function. They are determined by type :
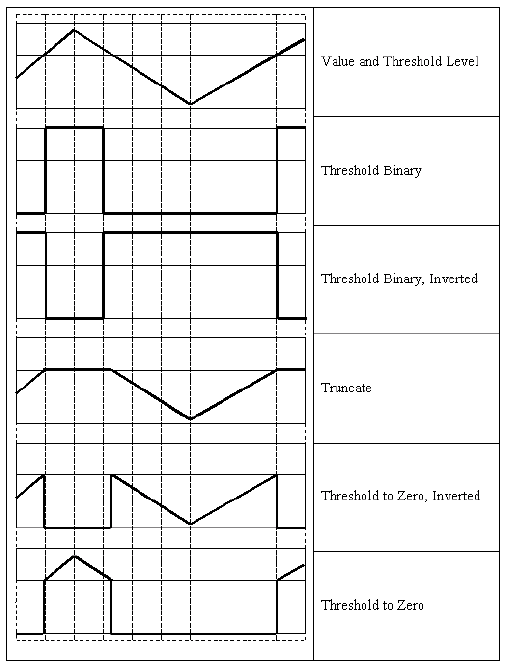
THRESH_BINARY
THRESH_BINARY_INV
THRESH_TRUNC
THRESH_TOZERO
THRESH_TOZERO_INV


Also, the special values THRESH_OTSU or THRESH_TRIANGLE may be combined with one of the above values. In these cases, the function determines the optimal threshold value using the Otsu’s or Triangle algorithm and uses it instead of the specified thresh . The function returns the computed threshold value. Currently, the Otsu’s and Triangle methods are implemented only for 8-bit images.
什么是阈值?
-
最简单的图像分割的方法。
-
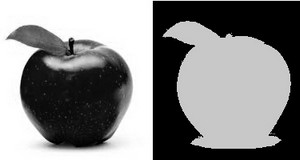
应用举例:从一副图像中利用阈值分割出我们需要的物体部分(当然这里的物体可以是一部分或者整体)。这样的图像分割方法是基于图像中物体与背景之间的灰度差异,而且此分割属于像素级的分割。
-
为了从一副图像中提取出我们需要的部分,应该用图像中的每一个像素点的灰度值与选取的阈值进行比较,并作出相应的判断。(注意:阈值的选取依赖于具体的问题。即:物体在不同的图像中有可能会有不同的灰度值。
-
一旦找到了需要分割的物体的像素点,我们可以对这些像素点设定一些特定的值来表示。(例如:可以将该物体的像素点的灰度值设定为:‘0’(黑色),其他的像素点的灰度值为:‘255’(白色);当然像素点的灰度值可以任意,但最好设定的两种颜色对比度较强,方便观察结果)。
阈值化的类型:
-
OpenCV中提供了阈值(threshold)函数: threshold 。
-
这个函数有5种阈值化类型,在接下来的章节中将会具体介绍。
-
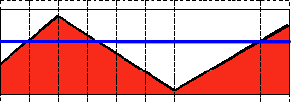
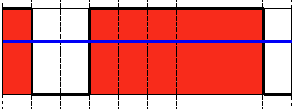
为了解释阈值分割的过程,我们来看一个简单有关像素灰度的图片,该图如下。该图中的蓝色水平线代表着具体的一个阈值。
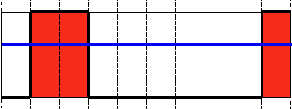
阈值类型1:二进制阈值化
-
该阈值化类型如下式所示:

-
解释:在运用该阈值类型的时候,先要选定一个特定的阈值量,比如:125,这样,新的阈值产生规则可以解释为大于125的像素点的灰度值设定为最大值(如8位灰度值最大为255),灰度值小于125的像素点的灰度值设定为0。
阈值类型2:反二进制阈值化
-
该阈值类型如下式所示:

-
解释:该阈值化与二进制阈值化相似,先选定一个特定的灰度值作为阈值,不过最后的设定值相反。(在8位灰度图中,例如大于阈值的设定为0,而小于该阈值的设定为255)。
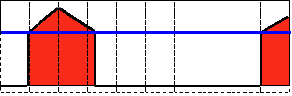
阈值类型3:截断阈值化
-
该阈值化类型如下式所示:

-
解释:同样首先需要选定一个阈值,图像中大于该阈值的像素点被设定为该阈值,小于该阈值的保持不变。(例如:阈值选取为125,那小于125的阈值不改变,大于125的灰度值(230)的像素点就设定为该阈值)。

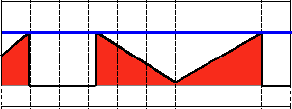
阈值类型4:阈值化为0
-
该阈值类型如下式所示:

-
解释:先选定一个阈值,然后对图像做如下处理:1 像素点的灰度值大于该阈值的不进行任何改变;2 像素点的灰度值小于该阈值的,其灰度值全部变为0。
阈值类型5:反阈值化为0
-
该阈值类型如下式所示:

-
解释:原理类似于0阈值,但是在对图像做处理的时候相反,即:像素点的灰度值小于该阈值的不进行任何改变,而大于该阈值的部分,其灰度值全部变为0。
cvtColor
Converts an image from one color space to another.
-
C++:
void
cvtColor
(InputArray
src, OutputArray
dst, int
code, int
dstCn=0
)
-
Python:
cv2.
cvtColor
(src, code
[, dst
[, dstCn
]
]
) → dst
-
C:
void
cvCvtColor
(const CvArr*
src, CvArr*
dst, int
code
)
-
Parameters: - src – input image: 8-bit unsigned, 16-bit unsigned ( CV_16UC... ), or single-precision floating-point.
- dst – output image of the same size and depth as src.
- code – color space conversion code (see the description below).
- dstCn – number of channels in the destination image; if the parameter is 0, the number of the channels is derived automatically from src and code .
The function converts an input image from one color space to another. In case of a transformation to-from RGB color space, the order of the channels should be specified explicitly (RGB or BGR). Note that the default color format in OpenCV is often referred to as RGB but it is actually BGR (the bytes are reversed). So the first byte in a standard (24-bit) color image will be an 8-bit Blue component, the second byte will be Green, and the third byte will be Red. The fourth, fifth, and sixth bytes would then be the second pixel (Blue, then Green, then Red), and so on.
The conventional ranges for R, G, and B channel values are:
- 0 to 255 for CV_8U images
- 0 to 65535 for CV_16U images
- 0 to 1 for CV_32F images
In case of linear transformations, the range does not matter. But in case of a non-linear transformation, an input RGB image should be normalized to the proper value range to get the correct results, for example, for RGB  L*u*v* transformation. For example, if you have a 32-bit floating-point image directly converted from an 8-bit image without any scaling, then it will have the 0..255 value range instead of 0..1 assumed by the function. So, before calling cvtColor , you need first to scale the image down:
If you use cvtColor with 8-bit images, the conversion will have some information lost. For many applications, this will not be noticeable but it is recommended to use 32-bit images in applications that need the full range of colors or that convert an image before an operation and then convert back.
If conversion adds the alpha channel, its value will set to the maximum of corresponding channel range: 255 for CV_8U, 65535 for CV_16U, 1 for CV_32F.
The function can do the following transformations:
-
RGB
 GRAY ( COLOR_BGR2GRAY, COLOR_RGB2GRAY, COLOR_GRAY2BGR, COLOR_GRAY2RGB ) Transformations within RGB space like adding/removing the alpha channel, reversing the channel order, conversion to/from 16-bit RGB color (R5:G6:B5 or R5:G5:B5), as well as conversion to/from grayscale using:
![\text{RGB[A] to Gray:} \quad Y \leftarrow 0.299 \cdot R + 0.587 \cdot G + 0.114 \cdot B](http://docs.opencv.org/3.0-beta/_images/math/36b21ba24ff32d923fd71e99849a0a903311e19b.png)
and
![\text{Gray to RGB[A]:} \quad R \leftarrow Y, G \leftarrow Y, B \leftarrow Y, A \leftarrow \max (ChannelRange)](http://docs.opencv.org/3.0-beta/_images/math/1970617ee21613b4418e836ba016e7e94cb065ce.png)
The conversion from a RGB image to gray is done with:
More advanced channel reordering can also be done with mixChannels() .
-
RGB
CIE XYZ.Rec 709 with D65 white point ( COLOR_BGR2XYZ, COLOR_RGB2XYZ, COLOR_XYZ2BGR, COLOR_XYZ2RGB):

 ,
,  and
and  cover the whole value range (in case of floating-point images, may exceed 1).
 -
RGB
YCrCb JPEG (or YCC) ( COLOR_BGR2YCrCb, COLOR_RGB2YCrCb, COLOR_YCrCb2BGR, COLOR_YCrCb2RGB )


where

Y, Cr, and Cb cover the whole value range.
-
-
RGB
-
In case of 8-bit and 16-bit images, R, G, and B are converted to the floating-point format and scaled to fit the 0 to 1 range.
HSV (
COLOR_BGR2HSV, COLOR_RGB2HSV, COLOR_HSV2BGR, COLOR_HSV2RGB )


If
 then
then  . On output
  ,
,  ,
,  .
.The values are then converted to the destination data type:
-
8-bit images

-
16-bit images (currently not supported)

-
-
32-bit images
-
H, S, and V are left as is
-
-
-
-
RGB
-
In case of 8-bit and 16-bit images, R, G, and B are converted to the floating-point format and scaled to fit the 0 to 1 range.
HLS (
COLOR_BGR2HLS, COLOR_RGB2HLS, COLOR_HLS2BGR, COLOR_HLS2RGB ).


If
then . On output  , , .
, , .The values are then converted to the destination data type:
-
8-bit images

-
16-bit images (currently not supported)

-
-
32-bit images
-
H, S, V are left as is
-
-
-
-
RGB
-
In case of 8-bit and 16-bit images, R, G, and B are converted to the floating-point format and scaled to fit the 0 to 1 range.
CIE L*a*b* (
COLOR_BGR2Lab, COLOR_RGB2Lab, COLOR_Lab2BGR, COLOR_Lab2RGB ).


where

and

This outputs
 ,
,  ,
,  . The values are then converted to the destination data type:
-
8-bit images

-
-
16-bit images
-
(currently not supported)
-
-
-
32-bit images
-
L, a, and b are left as is
-
-
-
-
RGB
-
In case of 8-bit and 16-bit images, R, G, and B are converted to the floating-point format and scaled to fit 0 to 1 range.
CIE L*u*v* (
COLOR_BGR2Luv, COLOR_RGB2Luv, COLOR_Luv2BGR, COLOR_Luv2RGB ).


This outputs
,  ,
,  .
.The values are then converted to the destination data type:
-
8-bit images

-
-
16-bit images
-
(currently not supported)
-
-
-
32-bit images
-
L, u, and v are left as is
-
The above formulae for converting RGB to/from various color spaces have been taken from multiple sources on the web, primarily from the Charles Poynton site http://www.poynton.com/ColorFAQ.html
-
-
Bayer
RGB ( COLOR_BayerBG2BGR, COLOR_BayerGB2BGR, COLOR_BayerRG2BGR, COLOR_BayerGR2BGR,COLOR_BayerBG2RGB, COLOR_BayerGB2RGB, COLOR_BayerRG2RGB, COLOR_BayerGR2RGB ). The Bayer pattern is widely used in CCD and CMOS cameras. It enables you to get color pictures from a single plane where R,G, and B pixels (sensors of a particular component) are interleaved as follows: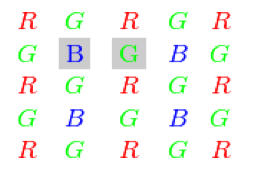
The output RGB components of a pixel are interpolated from 1, 2, or 4 neighbors of the pixel having the same color. There are several modifications of the above pattern that can be achieved by shifting the pattern one pixel left and/or one pixel up. The two letters
 and
and  in the conversion constants CV_Bayer
  2BGR and CV_Bayer 2RGB indicate the particular pattern type. These are components from the second row, second and third columns, respectively. For example, the above pattern has a very popular “BG” type.
代码示范:
解释:
-
先看一下整个程序的结构:
-
先读取一副图片,如果是图片颜色类型是RGB3色类型,则转换成灰度类型的图像。转换颜色类型可以运用OpenCV中的 cvtColor<> 函数。
-
然后创建一个窗口来显示该图片可以检验转换结果
-
接着该程序创建两个滚动条来等待用户的输入:
- 第一个滚动条作用:选择阈值类型:二进制,反二进制,截断,0,反0。
- 第二个滚动条作用:选择阈值的大小。
-
在这里等到用户拖动滚动条来输入阈值类型以及阈值的大小,或者是用户键入ESC健退出程序。
-
无论何时拖动滚动条,用户自定义的阈值函数都将会被调用。
就像你看到的那样,在这样的过程中,函数 threshold<> 会接受到5个参数:
- src_gray: 输入的灰度图像的地址。
- dst: 输出图像的地址。
- threshold_value: 进行阈值操作时阈值的大小。
- max_BINARY_value: 设定的最大灰度值(该参数运用在二进制与反二进制阈值操作中)。
- threshold_type: 阈值的类型。从上面提到的5种中选择出的结果。
-
结果:
-
程序编译过后,从正确的路径中读取一张图片。例如,该输入图片如下所示:

-
首先,阈值类型选择为反二进制阈值类型。我们希望灰度值大于阈值的变暗,即这一部分像素的灰度值设定为0。从下图中可以很清楚的看到这样的变化。(在原图中,狗的嘴和眼睛部分比图像中的其他部分要亮,在结果图中可以看到由于反二进制阈值分割,这两部分变的比其他图像的都要暗。原理具体参见本节中反二进制阈值部分解释)

-
现在,阈值的类型选择为0阈值。在这种情况下,我们希望那些在图像中最黑的像素点彻底的变成黑色,而其他大于阈值的像素保持原来的面貌。其结果如下图所示:


 1124
1124

 被折叠的 条评论
为什么被折叠?
被折叠的 条评论
为什么被折叠?
 到【灌水乐园】发言


