


http://blog.csdn.net/cnhua57inyu/article/details/40424773
- 说到Xposed,首先得了解Xposed是什么;
参考:http://blog.csdn.net/wxyyxc1992/article/details/17320911,我的Xposed之路就是这位大神引导的啊;
在读这篇文章之前请务必仔细阅读这篇博文才能更好的明白接下来的内容;
Xposed源码:https://github.com/rovo89,真是大神级别的啊;
下面这段概述从上面所说博文中摘录引用的:
Xposed是GitHUB上rovo89大大设计的一个针对Android平台的动态劫持项目,通过替换/system/bin/app_process程序控制zygote进程,使得app_process在启动过程中会加载XposedBridge.jar这个jar包,从而完成对Zygote进程及其创建的Dalvik虚拟机的劫持。与采取传统的Inhook方式(详见Dynamic Dalvik Instrumentation分析这篇本章 )相比,Xposed在开机的时候完成对所有的Hook Function的劫持,在原Function执行的前后加上自定义代码。
Xposed框架的基本运行环境如下:
| Configuration | RequireMent |
| Root Access | 因为Xposed工作原理是在/system/bin目录下替换文件,在install的时候需要root权限,但是运行时不需要root权限。 |
| 版本要求 | 需要在Android 4.0以上版本的机器中 |
如果你要先体验Xposed的强大,可以先安装Xprivacy,它是基于Xposed框架实现的权限管理App;你就可以感受到Xposed的强大了;
那么下面就来看看Xposed如何才能使用呢?
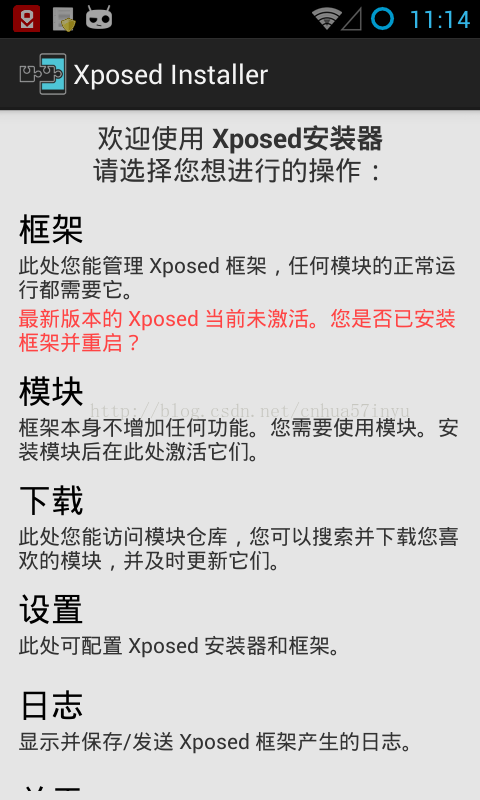
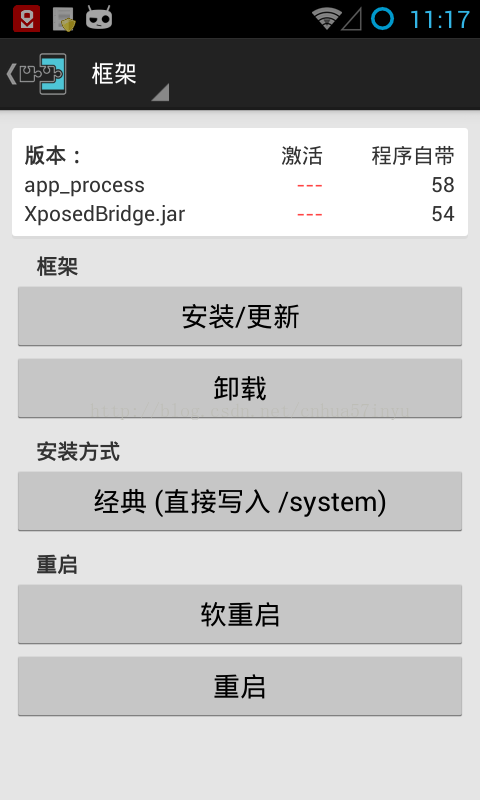

要安装Xposed框架,必须先安装一个Xposed Installer的application;就是一个Xposed安装管理器了;打开后会提示用户如上图左一的红色字提示部分;进去以后点击“安装/更新”按钮,成功后会如上图右一提示的那样,重启以后,Xposed框架就已经安装成功了;
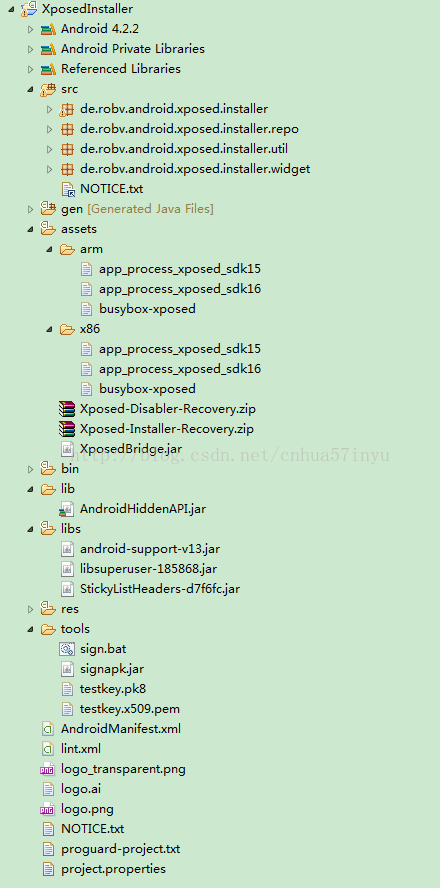
在分析安装过程之前先看一下Xposed Installer的包结构;
- app_process*文件:用来替换系统app_process的;
- Xposed-Disabler-Recovery.zip/Xposed-Installer-Recovery.zip:应该是和recovery相关,暂未了解;
- XposedBridge.jar:XposedBridge.jar:Xposed提供的jar文件,负责在Native层与FrameWork层进行交互。
- libsuperuser-185868.jar:how to SU,https://github.com/Chainfire/libsuperuser
- StickyListHeaders-d7f6fc.jar:listView效果,https://github.com/emilsjolander/StickyListHeaders
- tools:签名工具包
接下面我就来分析下这个安装过程;
首先肯定得找到 “安装/更新” 这个Button的onClick事件了;
- XposedInstaller/src/de/robv/android/xposed/installer/InstallerFragement.java
- btnInstall.setOnClickListener(new AsyncClickListener(btnInstall.getText()) {
- @Override
- public void onAsyncClick(View v) {
- final boolean success = install();
- getActivity().runOnUiThread(new Runnable() {
- @Override
- public void run() {
- Log.e("xposed", "Install/Update button clicked!!!");
- refreshVersions();
- if (success)
- ModuleUtil.getInstance().updateModulesList(false);//更新APP目录下的的modules.list,此文件用来记录使用了Xposed框架的module,比如XPrivacy就是一种
- // Start tracking the last seen version, irrespective of the installation method and the outcome.
- // 0 or a stale version might be registered, if a recovery installation was requested
- // It will get up to date when the last seen version is updated on a later panel startup
- XposedApp.getPreferences().edit().putInt(PREF_LAST_SEEN_BINARY, appProcessInstalledVersion).commit();
- // Dismiss any warning already being displayed
- getView().findViewById(R.id.install_reverted_warning).setVisibility(View.GONE);
- }
- });
- }
- });
自定义的AsyncClickListener就不看了,主要好像是加了一个进度条的处理过程;,直接看重要逻辑;
主要逻辑都在:
- final boolean success = install();
看看install方法,这个方法很长;
- de.robv.android.xposed.installer.InstallerFragement.java
- private boolean install() {
- final int installMode = getInstallMode(); //Step1
- if (!startShell())<span style="white-space:pre"> //Step2
- return false;
- <span style="white-space:pre"> </span>//Step3
- List<String> messages = new LinkedList<String>();
- boolean showAlert = true;
- try {
- messages.add(getString(R.string.sdcard_location, XposedApp.getInstance().getExternalFilesDir(null)));
- messages.add("");
- messages.add(getString(R.string.file_copying, "Xposed-Disabler-Recovery.zip"));
- if (AssetUtil.writeAssetToSdcardFile("Xposed-Disabler-Recovery.zip", 00644) == null) {
- messages.add("");
- messages.add(getString(R.string.file_extract_failed, "Xposed-Disabler-Recovery.zip"));
- return false;
- }
- File appProcessFile = AssetUtil.writeAssetToFile(APP_PROCESS_NAME, new File(XposedApp.BASE_DIR + "bin/app_process"), 00700);
- if (appProcessFile == null) {
- showAlert(getString(R.string.file_extract_failed, "app_process"));
- return false;
- }
- if (installMode == INSTALL_MODE_NORMAL) {
- // Normal installation
- messages.add(getString(R.string.file_mounting_writable, "/system"));
- if (mRootUtil.executeWithBusybox("mount -o remount,rw /system", messages) != 0) {
- messages.add(getString(R.string.file_mount_writable_failed, "/system"));
- messages.add(getString(R.string.file_trying_to_continue));
- }
- if (new File("/system/bin/app_process.orig").exists()) {
- messages.add(getString(R.string.file_backup_already_exists, "/system/bin/app_process.orig"));
- } else {
- if (mRootUtil.executeWithBusybox("cp -a /system/bin/app_process /system/bin/app_process.orig", messages) != 0) {
- messages.add("");
- messages.add(getString(R.string.file_backup_failed, "/system/bin/app_process"));
- return false;
- } else {
- messages.add(getString(R.string.file_backup_successful, "/system/bin/app_process.orig"));
- }
- mRootUtil.executeWithBusybox("sync", messages);
- }
- messages.add(getString(R.string.file_copying, "app_process"));
- if (mRootUtil.executeWithBusybox("cp -a " + appProcessFile.getAbsolutePath() + " /system/bin/app_process", messages) != 0) {
- messages.add("");
- messages.add(getString(R.string.file_copy_failed, "app_process", "/system/bin"));
- return false;
- }
- if (mRootUtil.executeWithBusybox("chmod 755 /system/bin/app_process", messages) != 0) {
- messages.add("");
- messages.add(getString(R.string.file_set_perms_failed, "/system/bin/app_process"));
- return false;
- }
- if (mRootUtil.executeWithBusybox("chown root:shell /system/bin/app_process", messages) != 0) {
- messages.add("");
- messages.add(getString(R.string.file_set_owner_failed, "/system/bin/app_process"));
- return false;
- }
- } else if (installMode == INSTALL_MODE_RECOVERY_AUTO) {
- if (!prepareAutoFlash(messages, "Xposed-Installer-Recovery.zip"))
- return false;
- } else if (installMode == INSTALL_MODE_RECOVERY_MANUAL) {
- if (!prepareManualFlash(messages, "Xposed-Installer-Recovery.zip"))
- return false;
- }
- File blocker = new File(XposedApp.BASE_DIR + "conf/disabled");
- if (blocker.exists()) {
- messages.add(getString(R.string.file_removing, blocker.getAbsolutePath()));
- if (mRootUtil.executeWithBusybox("rm " + blocker.getAbsolutePath(), messages) != 0) {
- messages.add("");
- messages.add(getString(R.string.file_remove_failed, blocker.getAbsolutePath()));
- return false;
- }
- }
- messages.add(getString(R.string.file_copying, "XposedBridge.jar"));
- File jarFile = AssetUtil.writeAssetToFile("XposedBridge.jar", new File(JAR_PATH_NEWVERSION), 00644);
- if (jarFile == null) {
- messages.add("");
- messages.add(getString(R.string.file_extract_failed, "XposedBridge.jar"));
- return false;
- }
- mRootUtil.executeWithBusybox("sync", messages);
- showAlert = false;
- messages.add("");
- if (installMode == INSTALL_MODE_NORMAL)
- offerReboot(messages);
- else
- offerRebootToRecovery(messages, "Xposed-Installer-Recovery.zip", installMode);
- return true;
- } finally {
- AssetUtil.removeBusybox();
- if (showAlert)
- showAlert(TextUtils.join("\n", messages).trim());
- }
- }
Step1:
- getInstallMode()正常安装情况返回的mode为:INSTALL_MODE_NORMAL
Step2:
startShell()方法主要是启动一个用来和root交互的shell进程;
- /**
- * Starts an interactive shell with root permissions.
- * Does nothing if already running.
- *
- * @return true if root access is available, false otherwise
- */
- public synchronized boolean startShell() {
- if (mShell != null) {
- if (mShell.isRunning())<span style="white-space:pre"> </span>//判断当前shell进程是否运行
- return true;
- else
- dispose();
- }
- mCallbackThread = new HandlerThread("su callback listener");
- mCallbackThread.start();
- mCommandRunning = true;
- mShell = new Shell.Builder()<span style="white-space:pre"> </span>//可以在root下执行命令的shell
- .useSU()<span style="white-space:pre"> </span>//Su
- .setHandler(new Handler(mCallbackThread.getLooper()))<span style="white-space:pre"> </span>//设置一个callback HandlerThread
- .setWantSTDERR(true)<span style="white-space:pre"> </span>//是否输出错误结果
- .setWatchdogTimeout(10)<span style="white-space:pre"> </span>//命令执行超时时间设置
- .open(commandResultListener);<span style="white-space:pre"> </span>//启动shell进程,并且设置result监听
- waitForCommandFinished();
- if (mLastExitCode != OnCommandResultListener.SHELL_RUNNING) {
- dispose();
- return false;
- }
- return true;
- }
Step3:
- 在接下来的Step3的整个执行过程是:
- 1、AssetUtil.writeAssetToSdcardFile("Xposed-Disabler-Recovery.zip", 00644)//将asserts中的Xposed-Disabler-Recovery.zip拷贝到/sdcard下;
- 2、AssetUtil.writeAssetToFile(APP_PROCESS_NAME, new File(XposedApp.BASE_DIR + "bin/app_process"), 00700)//将asserts下的arm/x86包中的app_process_*文件拷贝到APP目录下的bin中,并命名为app_process
- 3、mRootUtil.executeWithBusybox("mount -o remount,rw /system", messages)//利用busybox执行将/system目录重新挂载为可读写
- 4、mRootUtil.executeWithBusybox("cp -a /system/bin/app_process /system/bin/app_process.orig", messages)//将/system/bin/app_process重命名为system/bin/app_process.orig
- 5、mRootUtil.executeWithBusybox("sync", messages);执行sync
- 6、mRootUtil.executeWithBusybox("cp -a " + appProcessFile.getAbsolutePath() + " /system/bin/app_process", messages)//将APP目录下的app_process拷贝到/system/bin目录下;这样就替换了系统的app_process
- 7、mRootUtil.executeWithBusybox("chmod 755 /system/bin/app_process", messages)//更改app_process权限为755
- 8、mRootUtil.executeWithBusybox("chown root:shell /system/bin/app_process", messages)//更改app_process own为root和shell
- 9、mRootUtil.executeWithBusybox("rm " + blocker.getAbsolutePath(), messages)//删除APP目录下conf/disabled文件,如果此文件存在
- 10、AssetUtil.writeAssetToFile("XposedBridge.jar", new File(JAR_PATH_NEWVERSION), 00644)//将asserts目录下的XposedBridge.jar复制到APP目录下的bin目录,并重命名为XposedBridge.jar.newversion
- 11、mRootUtil.executeWithBusybox("sync", messages)//执行sync
- 12、mRootUtil.executeWithBusybox("reboot", messages)//弹出重启的提示框,点击重启手机
这样,整个框架的安装过程就完成了;


 699
699


 被折叠的 条评论
为什么被折叠?
被折叠的 条评论
为什么被折叠?
 到【灌水乐园】发言


