


WPF的渐变画刷,这些画刷改变不同DrawingBrush对象的几何图形,创建渐变为不同形状的平铺模式。
下面是来自一个国外的一些渐变画刷案例:
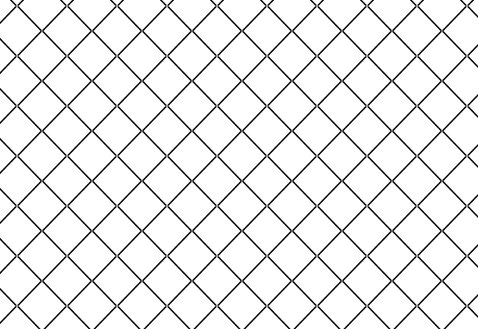
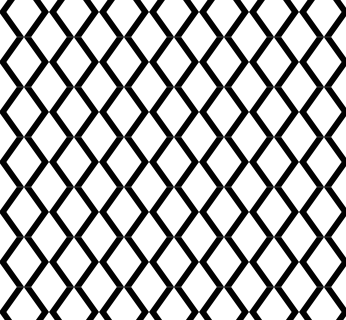
案例1:定义一个简单的直线,这个几何图形是基于DrawingBrush的扩展,当直线是垂直或水平时,这条线的宽度扩展25个单位。
案例源码:
<!-- ========================================================
      AnimatedDrawingBrush1.xaml (c) 2006 by Charles Petzold
     ======================================================== -->
<Page xmlns="http://schemas.microsoft.com/winfx/2006/xaml/presentation"
      xmlns:x="http://schemas.microsoft.com/winfx/2006/xaml">
    <Page.Background>
        <DrawingBrush TileMode="FlipXY"
                      ViewportUnits="Absolute"
                      Viewport="0 0 25 25">
            <DrawingBrush.Drawing>
                <GeometryDrawing>
                    <GeometryDrawing.Geometry>
                        <PathGeometry Figures="M 0 0 L 25 0">
                            <PathGeometry.Transform>
                                <RotateTransform x:Name="xform" />
                            </PathGeometry.Transform>
                        </PathGeometry>
                    </GeometryDrawing.Geometry>
                    <GeometryDrawing.Pen>
                        <Pen Brush="Black" Thickness="1" />
                    </GeometryDrawing.Pen>
                </GeometryDrawing>
            </DrawingBrush.Drawing>
        </DrawingBrush>
    </Page.Background>

    <Page.Triggers>
        <EventTrigger RoutedEvent="Page.Loaded">
            <BeginStoryboard>
                <Storyboard>
                    <DoubleAnimation Storyboard.TargetName="xform"
                                     Storyboard.TargetProperty="Angle"
                                     From="0" To="360"
                                     Duration="0:0:10"
                                     RepeatBehavior="Forever" />
                </Storyboard>
            </BeginStoryboard>
        </EventTrigger>
    </Page.Triggers>
</Page>
效果如下图:
渐变前效果:
渐变后效果:
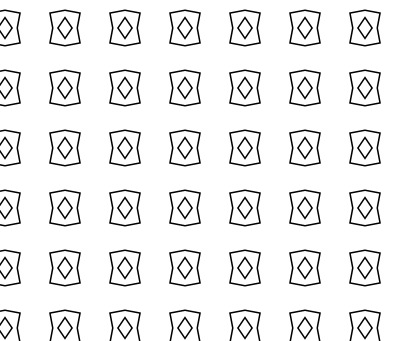
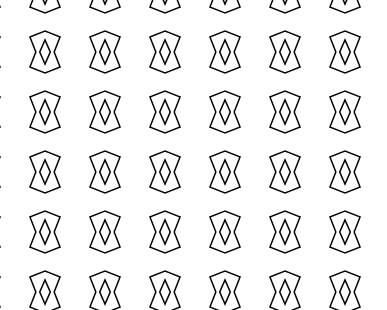
案例2:定义一个嵌套的视图盒子,这个盒子是使用Viewbox,当盒子的角度改变时,通过会裁剪盒子,这时每个盒子会相邻的盒子融合
案例源码:
<!-- ========================================================
      AnimatedDrawingBrush2.xaml (c) 2006 by Charles Petzold
     ======================================================== -->
<Page xmlns="http://schemas.microsoft.com/winfx/2006/xaml/presentation"
      xmlns:x="http://schemas.microsoft.com/winfx/2006/xaml">
    <Page.Background>
        <DrawingBrush TileMode="FlipXY"
                      ViewportUnits="Absolute" Viewport="0 0 30 30"
                      ViewboxUnits="Absolute" Viewbox="-10 -10 20 20" >
            <DrawingBrush.Drawing>
                <GeometryDrawing>
                    <GeometryDrawing.Geometry>
                        <PathGeometry Figures="M 0 0 L 10 10 L -10 10 Z">
                            <PathGeometry.Transform>
                                <RotateTransform x:Name="xform" />
                            </PathGeometry.Transform>
                        </PathGeometry>
                    </GeometryDrawing.Geometry>
                    <GeometryDrawing.Pen>
                        <Pen Brush="Black" Thickness="1" />
                    </GeometryDrawing.Pen>
                </GeometryDrawing>
            </DrawingBrush.Drawing>
        </DrawingBrush>
    </Page.Background>

    <Page.Triggers>
        <EventTrigger RoutedEvent="Page.Loaded">
            <BeginStoryboard>
                <Storyboard>
                    <DoubleAnimation Storyboard.TargetName="xform"
                                     Storyboard.TargetProperty="Angle"
                                     From="0" To="360" Duration="0:0:10"
                                     RepeatBehavior="Forever" />
                </Storyboard>
            </BeginStoryboard>
        </EventTrigger>
    </Page.Triggers>
</Page>
效果图如下:
渐变前的效果:
渐变后的效果:
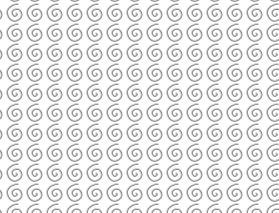
案例3:定义了一个旋转的螺旋,旋转方向是逆时针
案例源码:
<!-- ========================================================
      AnimatedDrawingBrush3.xaml (c) 2006 by Charles Petzold
     ======================================================== -->
<Page xmlns="http://schemas.microsoft.com/winfx/2006/xaml/presentation"
      xmlns:x="http://schemas.microsoft.com/winfx/2006/xaml">
    <Page.Background>
        <DrawingBrush x:Name="brush" TileMode="Tile"
                      ViewportUnits="Absolute" Viewport="0 0 20 20"
                      ViewboxUnits="Absolute" Viewbox="-80 -80 160 160" >
            <DrawingBrush.Drawing>
                <GeometryDrawing>
                    <GeometryDrawing.Geometry>
                        <PathGeometry Figures="M 0 0 C   5   5,   5   5,   0  10
                                                     C  -5  15, -15  10, -20   0
                                                     C -25 -10, -15 -25,   0 -30
                                                     C  15 -35,  35 -20,  40   0
                                                     C  45  20,  25  45,   0  50
                                                     C -25  55, -55  30, -60   0
                                                     C -65 -30, -35 -65,   0 -70
                                                     C  35 -75,  70 -40,  80   0">
                            <PathGeometry.Transform>
                                <RotateTransform x:Name="xform" />
                            </PathGeometry.Transform>
                        </PathGeometry>
                    </GeometryDrawing.Geometry>
                    <GeometryDrawing.Pen>
                        <Pen Brush="Black" Thickness="5" />
                    </GeometryDrawing.Pen>
                </GeometryDrawing>
            </DrawingBrush.Drawing>
        </DrawingBrush>
    </Page.Background>

    <Page.Triggers>
        <EventTrigger RoutedEvent="Page.Loaded">
            <BeginStoryboard>
                <Storyboard>
                    <RectAnimation Storyboard.TargetName="brush"
                                   Storyboard.TargetProperty="Viewport"
                                   From="0 0 20 20" To="20 20 20 20" Duration="0:0:01"
                                   RepeatBehavior="Forever" />
                    <DoubleAnimation Storyboard.TargetName="xform"
                                     Storyboard.TargetProperty="Angle"
                                     From="0" To="-360" Duration="0:0:4"
                                     RepeatBehavior="Forever" />
                </Storyboard>
            </BeginStoryboard>
        </EventTrigger>
    </Page.Triggers>
</Page>
效果图如下:


 437
437

 被折叠的 条评论
为什么被折叠?
被折叠的 条评论
为什么被折叠?
 到【灌水乐园】发言


