


RichFaces是一个开源框架,它不借助于JavaScript而增加Ajax能力到存在的JSF应用程序中
JDK1.7
TOMCAT7
IDE:intellij idea
1. 创建maven webapp项目,命名为RFDemo
参考博客分类idea下的创建
2. 修改maven的settings.xml文件,profiles元素中创建一个配置,如下:
<profile>
    <id>jsf-app-profile</id>
    <repositories>
        <repository>
            <releases>
                <enabled>true</enabled>
            </releases>
            <snapshots>
                <enabled>true</enabled>
                <updatePolicy>always</updatePolicy>
            </snapshots>
            <id>snapshots.jboss.org</id>
            <name>Snapshot Jboss Repository for Maven</name>
            <url>http://snapshots.jboss.org/maven2/</url>
            <layout>default</layout>
        </repository>
        <repository>
            <releases>
                <enabled>true</enabled>
            </releases>
            <snapshots>
                <enabled>true</enabled>
                <updatePolicy>always</updatePolicy>
            </snapshots>
            <id>repository.jboss.com</id>
            <name>Jboss Repository for Maven</name>
            <url>http://repository.jboss.com/maven2/</url>
            <layout>default</layout>
        </repository>
    </repositories>
</profile>
当配置被添加后,你需要在activeProfiles元素中激活它,如下所示:
<activeProfiles>
  <activeProfile>jsf-app-profile</activeProfile>
</activeProfiles>
增加该配置后,pom才能找到依赖的jar
3. 添加依赖文件
RichFaces自己包含有4个库文件:
richfaces-core-api.jar
richfaces-core-impl.jar
richfaces-components-api.jar
richfaces-components-impl.jar
此外,RichFaces还依赖于一些第三方文件,这里只列出那些必须的依赖文件:
JSF 2.x的具体实现
guava.jar
cssparser.jar
sac.jar
<properties>
<!-- RichFaces version -->
<richfaces.version>4.3.6.Final</richfaces.version>
<!-- JSF version -->
<jsf.version>2.2.6</jsf.version>
</properties>
<dependencies>
<dependency>
<groupId>junit</groupId>
<artifactId>junit</artifactId>
<version>3.8.1</version>
<scope>test</scope>
</dependency>
<!-- https://mvnrepository.com/artifact/javax.servlet/javax.servlet-api -->
<dependency>
<groupId>javax.servlet</groupId>
<artifactId>javax.servlet-api</artifactId>
<version>3.0.1</version>
</dependency>
<!--Servlet容器配置-->
<!--<dependency>-->
<!--<groupId>com.sun.faces</groupId>-->
<!--<artifactId>jsf-api</artifactId>-->
<!--<version>${jsf.version}</version>-->
<!--<scope>provided</scope>-->
<!--</dependency>-->
<!--<dependency>-->
<!--<groupId>com.sun.faces</groupId>-->
<!--<artifactId>jsf-impl</artifactId>-->
<!--<version>${jsf.version}</version>-->
<!--<scope>provided</scope>-->
<!--</dependency>-->
<!-- https://mvnrepository.com/artifact/javax.faces/javax.faces-api -->
<!--<dependency>-->
<!--<groupId>javax.faces</groupId>-->
<!--<artifactId>javax.faces-api</artifactId>-->
<!--<version>2.2</version>-->
<!--</dependency>-->
<!-- https://mvnrepository.com/artifact/org.apache.myfaces.core/myfaces-api -->
<dependency>
<groupId>org.apache.myfaces.core</groupId>
<artifactId>myfaces-api</artifactId>
<version>2.2.5</version>
</dependency>
<!-- https://mvnrepository.com/artifact/org.apache.myfaces.core/myfaces-impl -->
<dependency>
<groupId>org.apache.myfaces.core</groupId>
<artifactId>myfaces-impl</artifactId>
<version>2.2.5</version>
</dependency>
<dependency>
<groupId>org.richfaces.ui</groupId>
<artifactId>richfaces-components-ui</artifactId>
<version>${richfaces.version}</version>
</dependency>
<dependency>
<groupId>org.richfaces.core</groupId>
<artifactId>richfaces-core-impl</artifactId>
<version>${richfaces.version}</version>
</dependency>
<dependency>
<groupId>javax.servlet</groupId>
<artifactId>jstl</artifactId>
<version>1.2</version>
</dependency>
</dependencies>
<build>
<finalName>RFDemo</finalName>
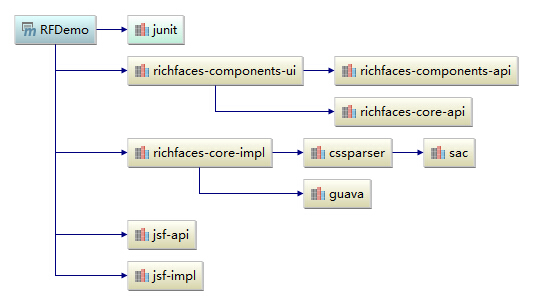
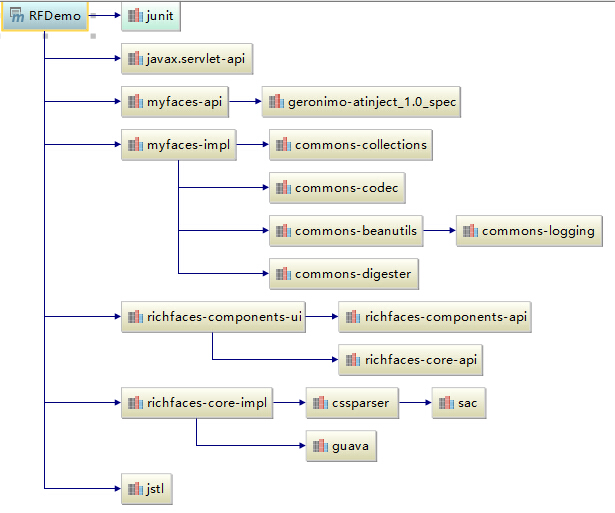
</build>用com.sun.faces各种报错,最后用org.apache.myfaces.core可以通过
使用com.sun.faces依赖关系如图:
使用org.apache.myfaces.core依赖关系图:
4.配置RichFaces
在 web.xml 文件中配置RichFaces
<?xml version="1.0" encoding="UTF-8"?>
<web-app version="3.0" xmlns="http://java.sun.com/xml/ns/javaee"
         xmlns:xsi="http://www.w3.org/2001/XMLSchema-instance"
         xsi:schemaLocation="http://java.sun.com/xml/ns/javaee
            http://java.sun.com/xml/ns/javaee/web-app_3_0.xsd">
    <display-name>Archetype Created Web Application</display-name>
    <welcome-file-list>
        <welcome-file>index.xhtml</welcome-file>
    </welcome-file-list>

    <context-param>
        <param-name>javax.faces.DEFAULT_SUFFIX</param-name>
        <param-value>.xhtml</param-value>
    </context-param>
    <context-param>
        <param-name>javax.faces.PROJECT_STAGE</param-name>
        <param-value>Development</param-value>
    </context-param>

    <servlet>
        <servlet-name>facesServlet</servlet-name>
        <servlet-class>javax.faces.webapp.FacesServlet</servlet-class>
        <load-on-startup>1</load-on-startup>
    </servlet>
    <servlet-mapping>
        <servlet-name>facesServlet</servlet-name>
        <url-pattern>*.xhtml</url-pattern>
    </servlet-mapping>
</web-app>
在 WEB-INF 文件夹下新建 faces-config.xml 文件
<?xml version="1.0" encoding="UTF-8"?>
<faces-config
        xmlns="http://xmlns.jcp.org/xml/ns/javaee"
        xmlns:xsi="http://www.w3.org/2001/XMLSchema-instance"
        xsi:schemaLocation="http://xmlns.jcp.org/xml/ns/javaee http://xmlns.jcp.org/xml/ns/javaee/web-facesconfig_2_2.xsd"
        version="2.2">
    <!--  Empty for now. There are many uses for faces-config.xml, but
          the most common are navigation rules (instead of having
          the return value of the "action" method be the base filename),
          bean declarations (instead of using @ManagedBean), and
          properties files (aka resource bundles).

          If you are not using faces-config.xml, it is perfectly legal
          to omit the file entirely. But, most people prefer to have
          a blank one already in their project for later use.

          From JSF 2 and PrimeFaces tutorial
          at http://www.coreservlets.com/JSF-Tutorial/jsf2/ -->
</faces-config>
5.创建显示页面
<ui:composition xmlns="http://www.w3.org/1999/xhtml"
xmlns:h="http://java.sun.com/jsf/html"
xmlns:f="http://java.sun.com/jsf/core"
xmlns:ui="http://java.sun.com/jsf/facelets"
xmlns:a4j="http://richfaces.org/a4j"
xmlns:rich="http://richfaces.org/rich">
<f:view>
<h:head></h:head>
<h:body>
<rich:panel header="Richfaces Demo">
<h:outputLabel value="Hello Richfaces"/>
</rich:panel>
</h:body>
</f:view>
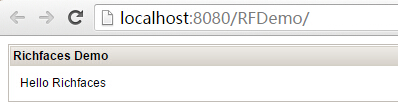
</ui:composition>6.无图无真相,启动服务,效果如下:


 8437
8437

 被折叠的 条评论
为什么被折叠?
被折叠的 条评论
为什么被折叠?
 到【灌水乐园】发言


